Handbook
Odysseus® is a simple but as complete as possible software in order to offer the most exhaustive practice of Uranian astrology possible. However, being available above all on phones and tablets, it was necessary to find ways to optimize space as efficiently as possible. Thus, some features are “concealed” at first glance, and requires knowing some tips in order to discover them. Here is a guide to help you in your use of the software.
CODEX ˚
HANDBOOK
Here is the guide for the CODEX ˚ section. You will find the guide for the CHART ˘ section below.
Click on the different sections below to read the content and thus discover the different features.
HOME
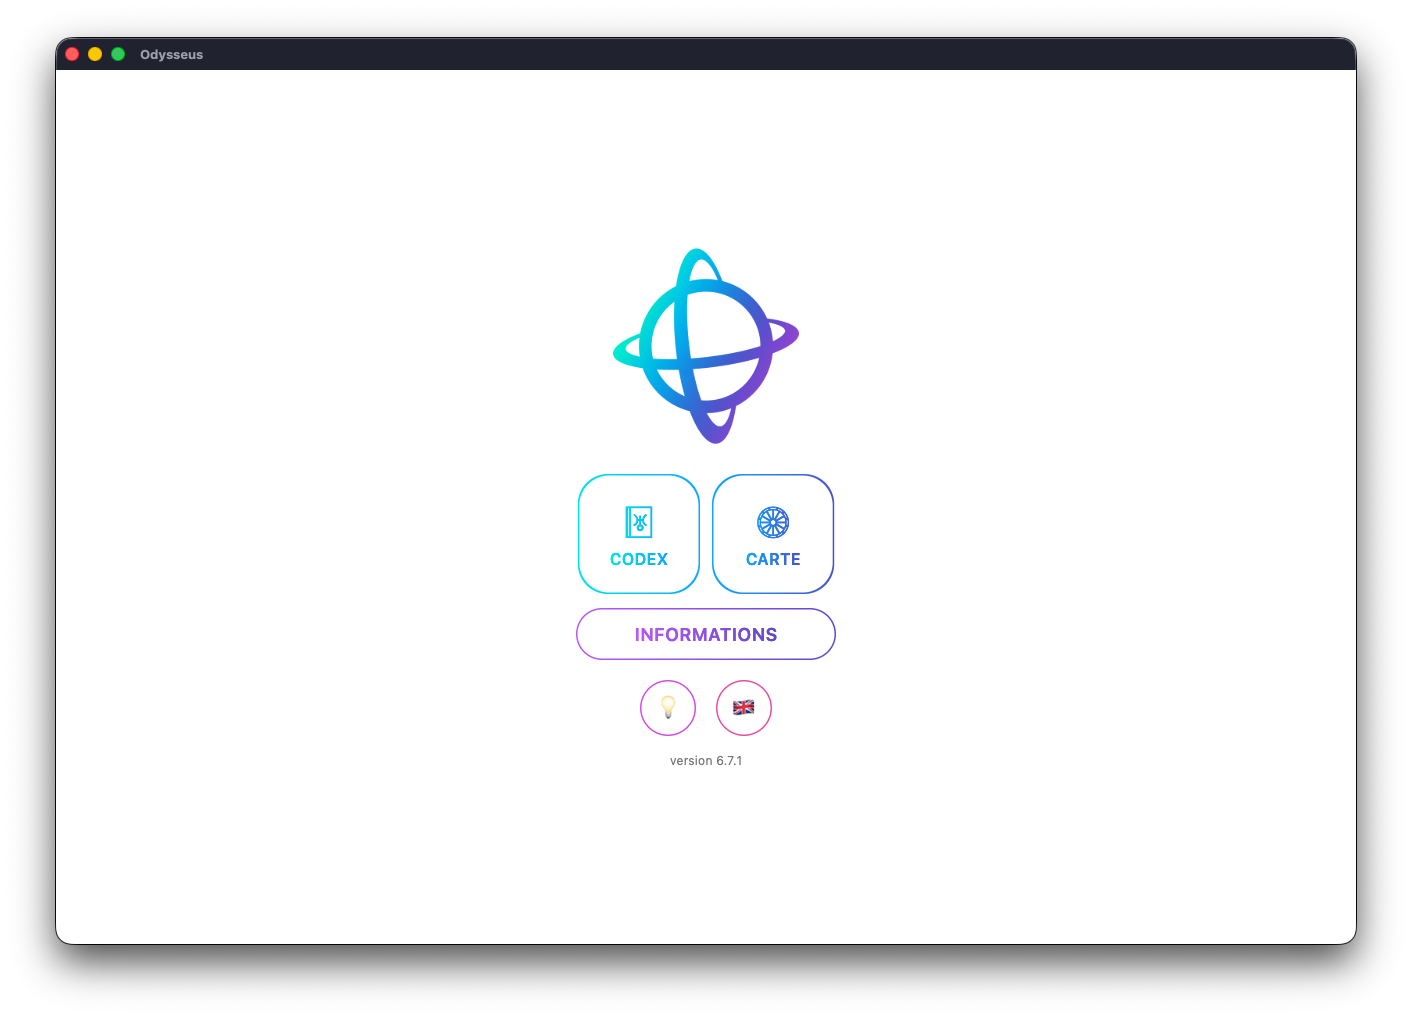
The Odysseus home page consists of 5 buttons and a link.
First, we find on the left the CODEX ˚ button, on the right the CHART ˘ button, below the INFORMATION button, then at the bottom of the screen, the mode button 💡, the language button 🇫🇷🇬🇧, and below the version number.
The CODEX ˚ button is used to go to the “textual” part of the application, to discover the meanings of planets, half-points, planetary figures and Houses, but also to search for a specific definition in the Codex, or to practice with quizzes.
The CHART ˘ button is used to generate sky maps, and thus practice Uranian astrology.
The INFORMATION button allows you to have some basic and copyright information about the application.
The mode button 💡 is used to switch from “light/day” mode to “dark/night” mode.
The language button 🇫🇷🇬🇧 is used to change the language of the application, from French to English and vice versa.
Finally, at the bottom is the version number, information that should be provided to me if you encounter a bug on the application, or simply to verify that you have the latest version. This link is also adorned with two emojis on the Windows version when an update is available. Simply click on the link to go to the updates page.
CODEX
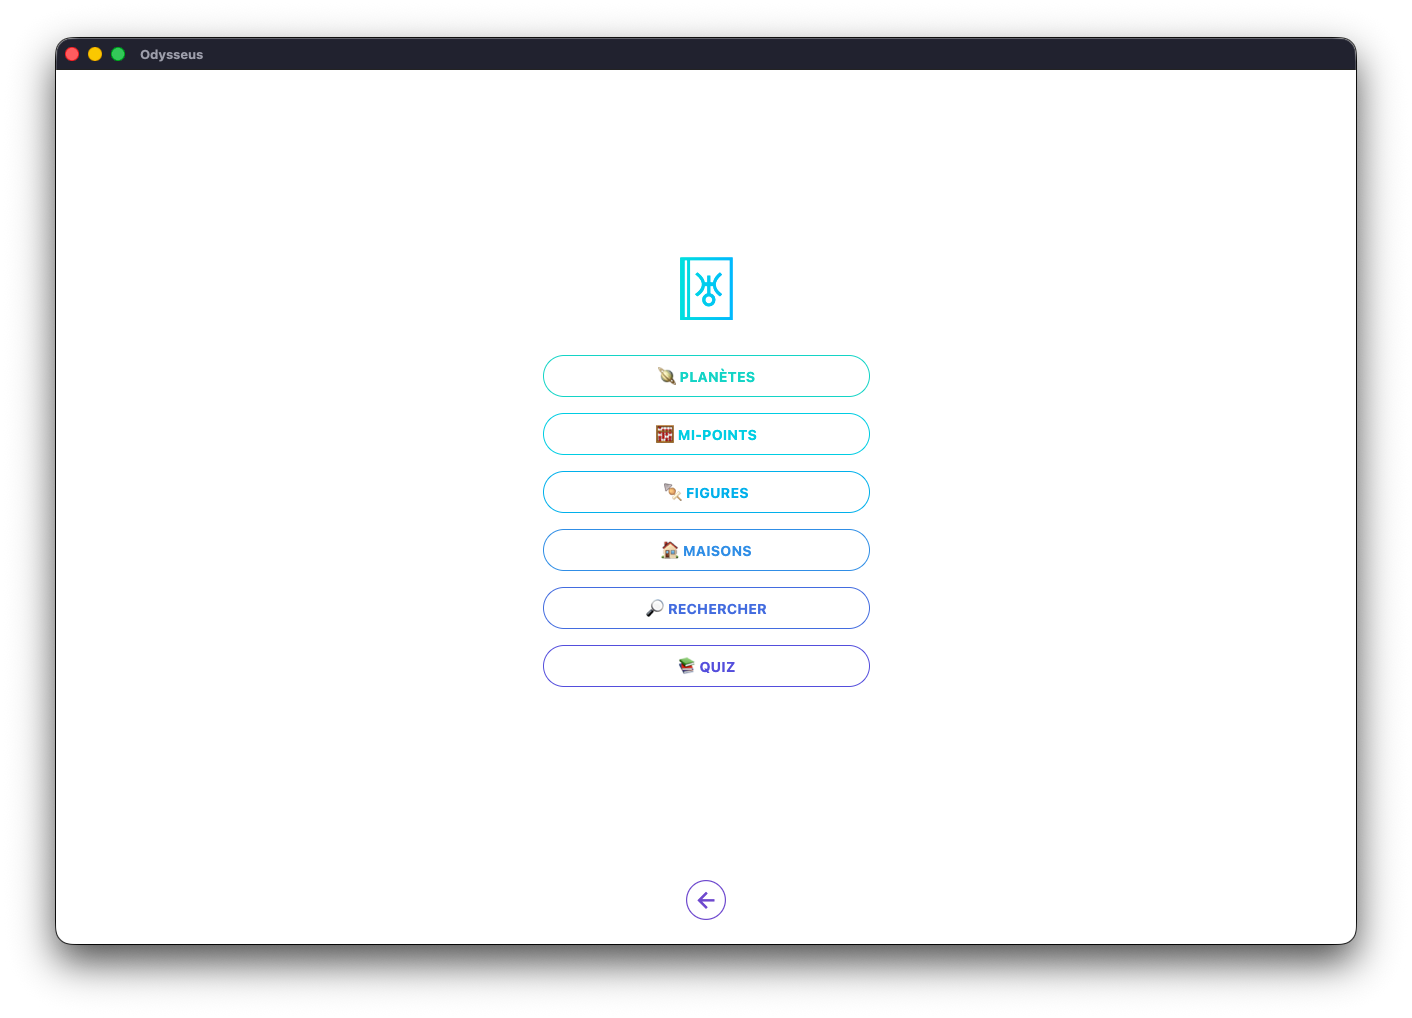
The CODEX ˚ is divided into 6 sections:
🪐 PLANETS
🧮 Mi-POINTS
🍢 FIGURES
🏠 HOUSES
🔎 SEARCH
📚 QUIZ
Their operation can be found in the sections below.
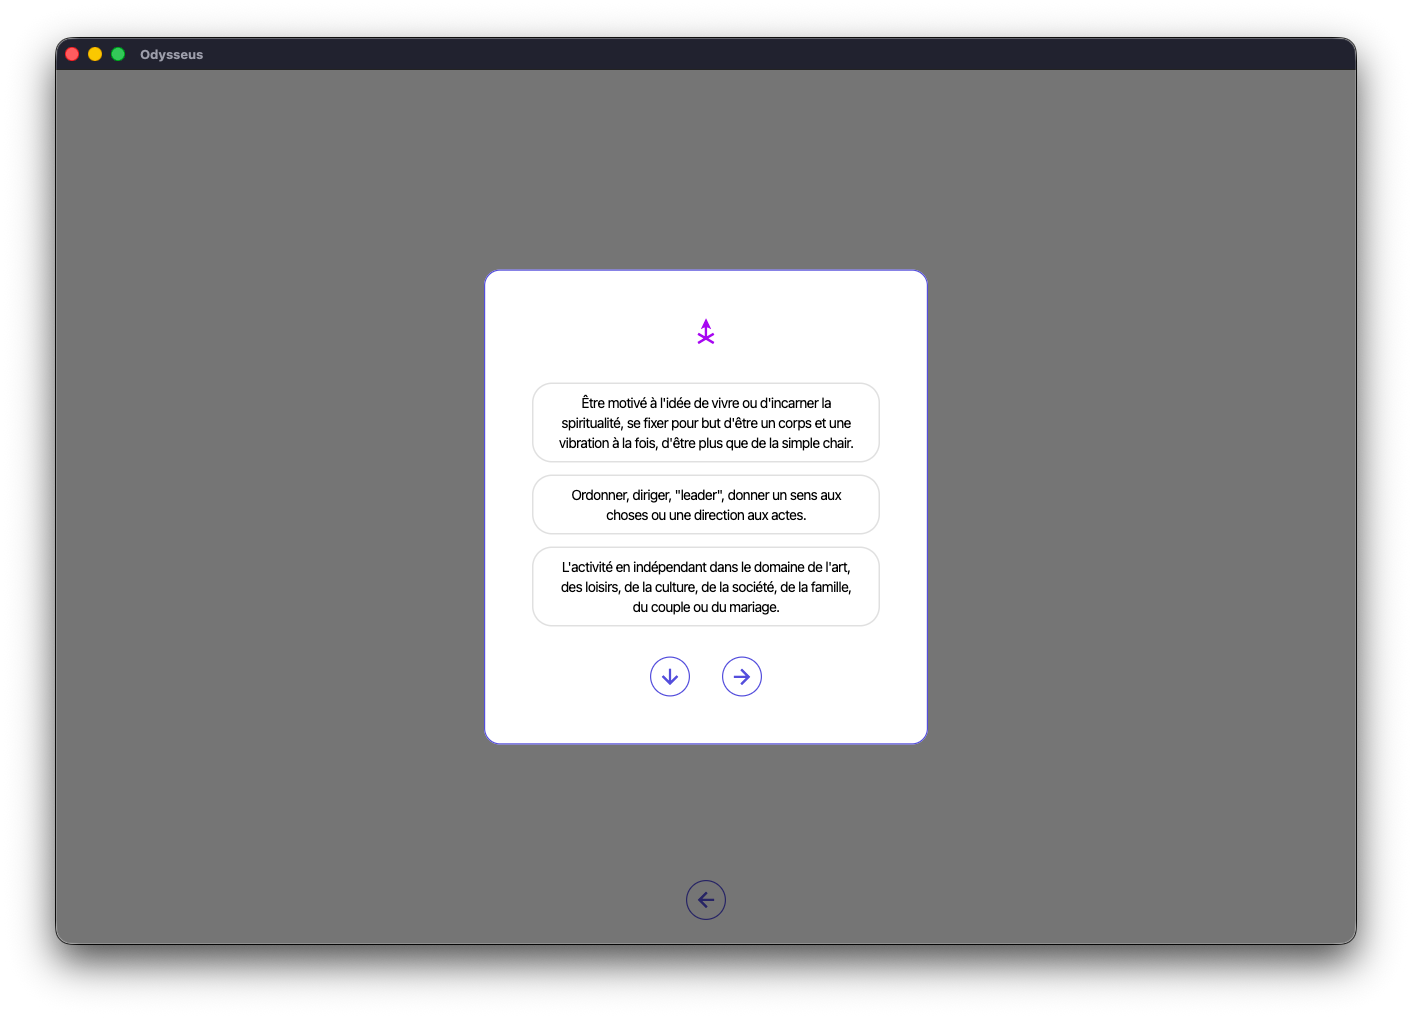
🪐 PLANETS
The 🪐 PLANETS section makes it possible to obtain the definitions of the planets used in the practice of Uranian astrology.
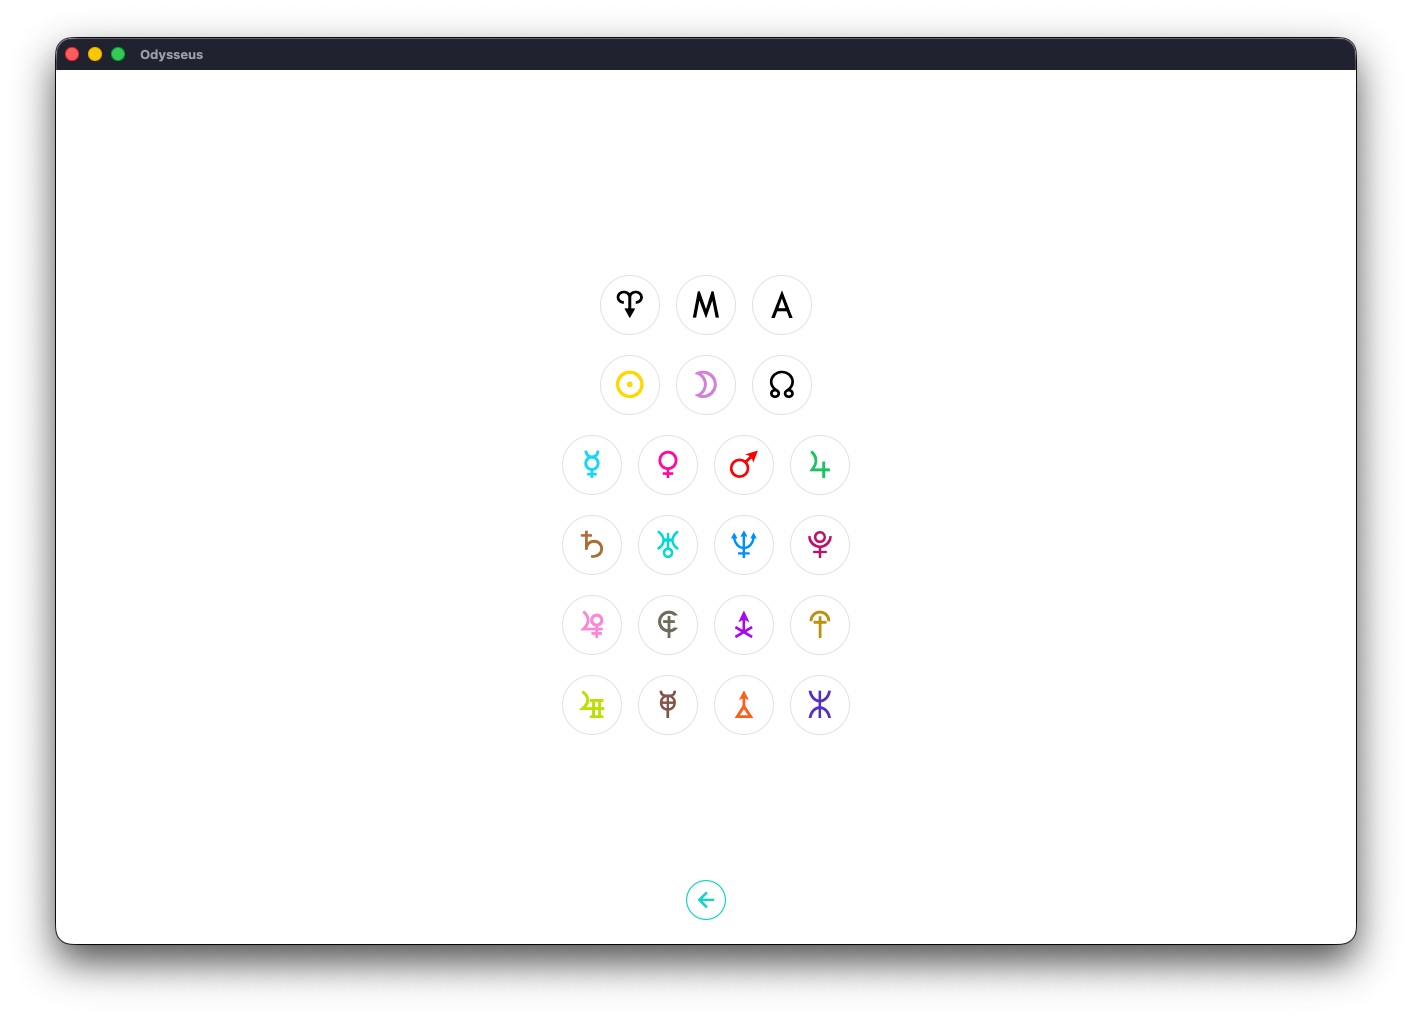
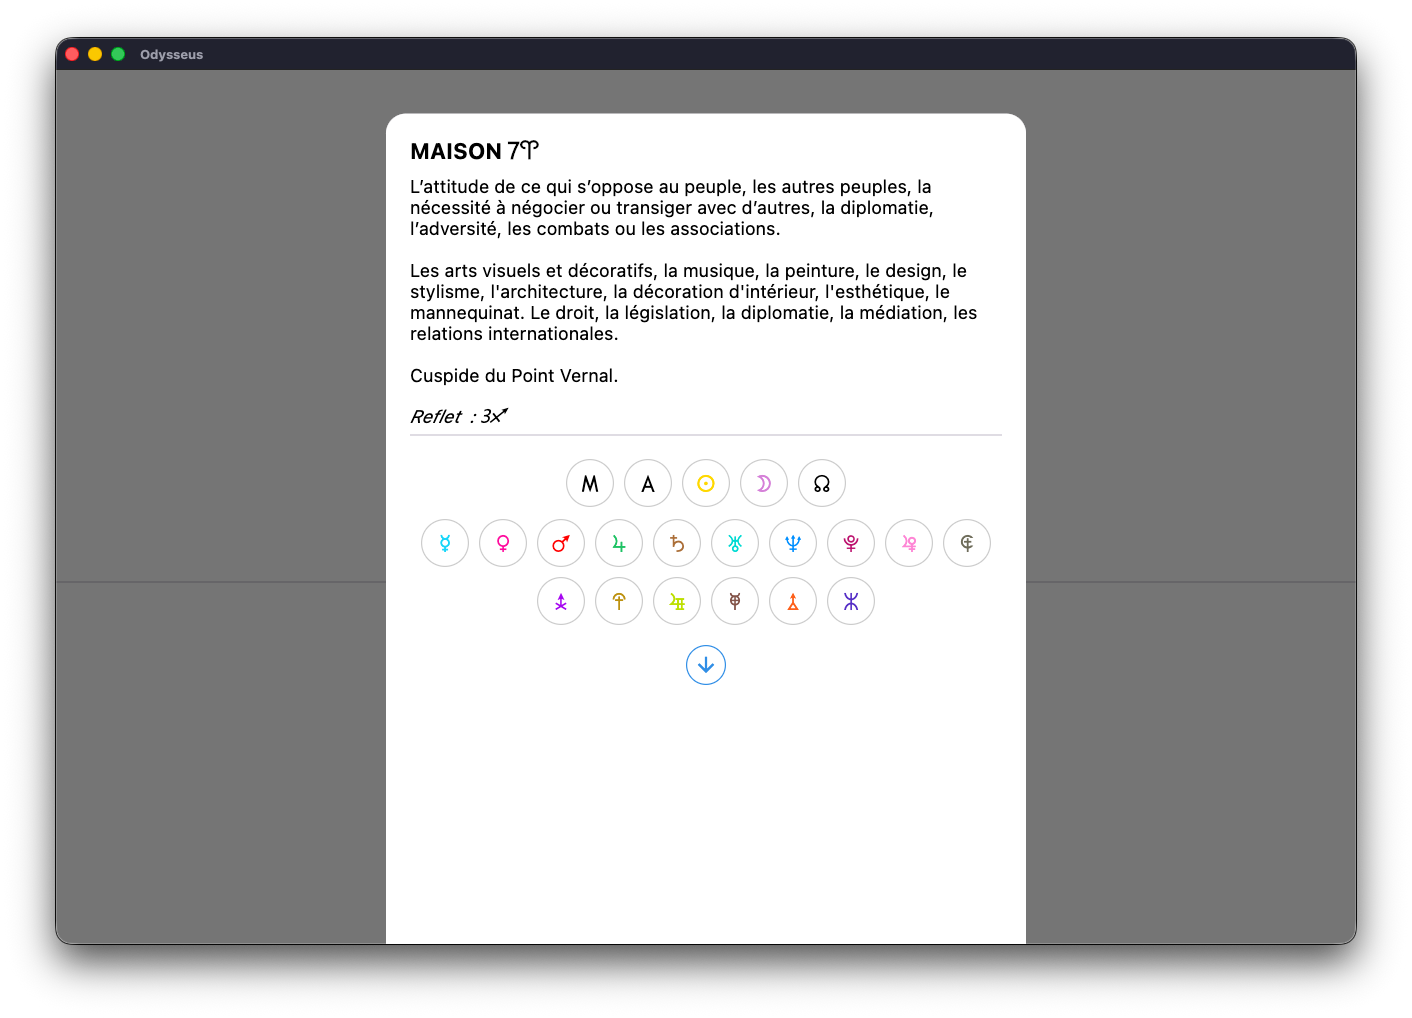
We then find the list of the 22 points traditionally used: the Vernal Point A, the Midheaven <, the Ascendant >, the Sun N, the Moon Y, the Lunar Node W, Mercury O, Venus P, Mars Q, Jupiter R, Saturn S, Uranus T, Neptune U, Pluto V, Cupid a, Hades b, Zeus c, Kronos d, Apollo e, Admète f, Vulcan g, Poseidon h.
Just click on a planet, as here with Vernal Point A, and the definition appears.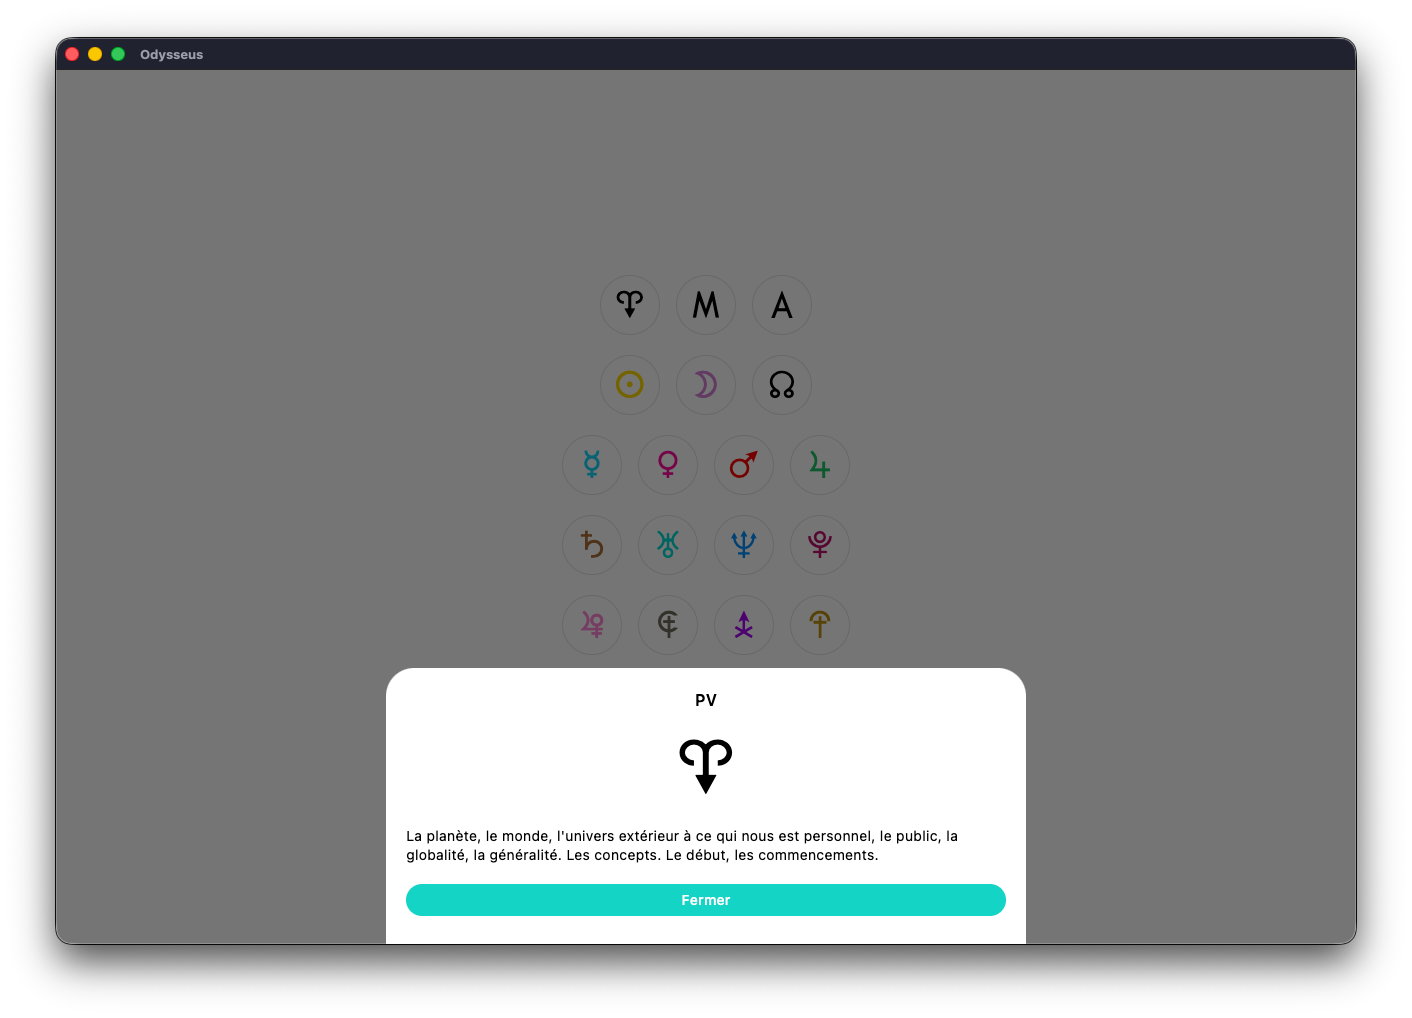
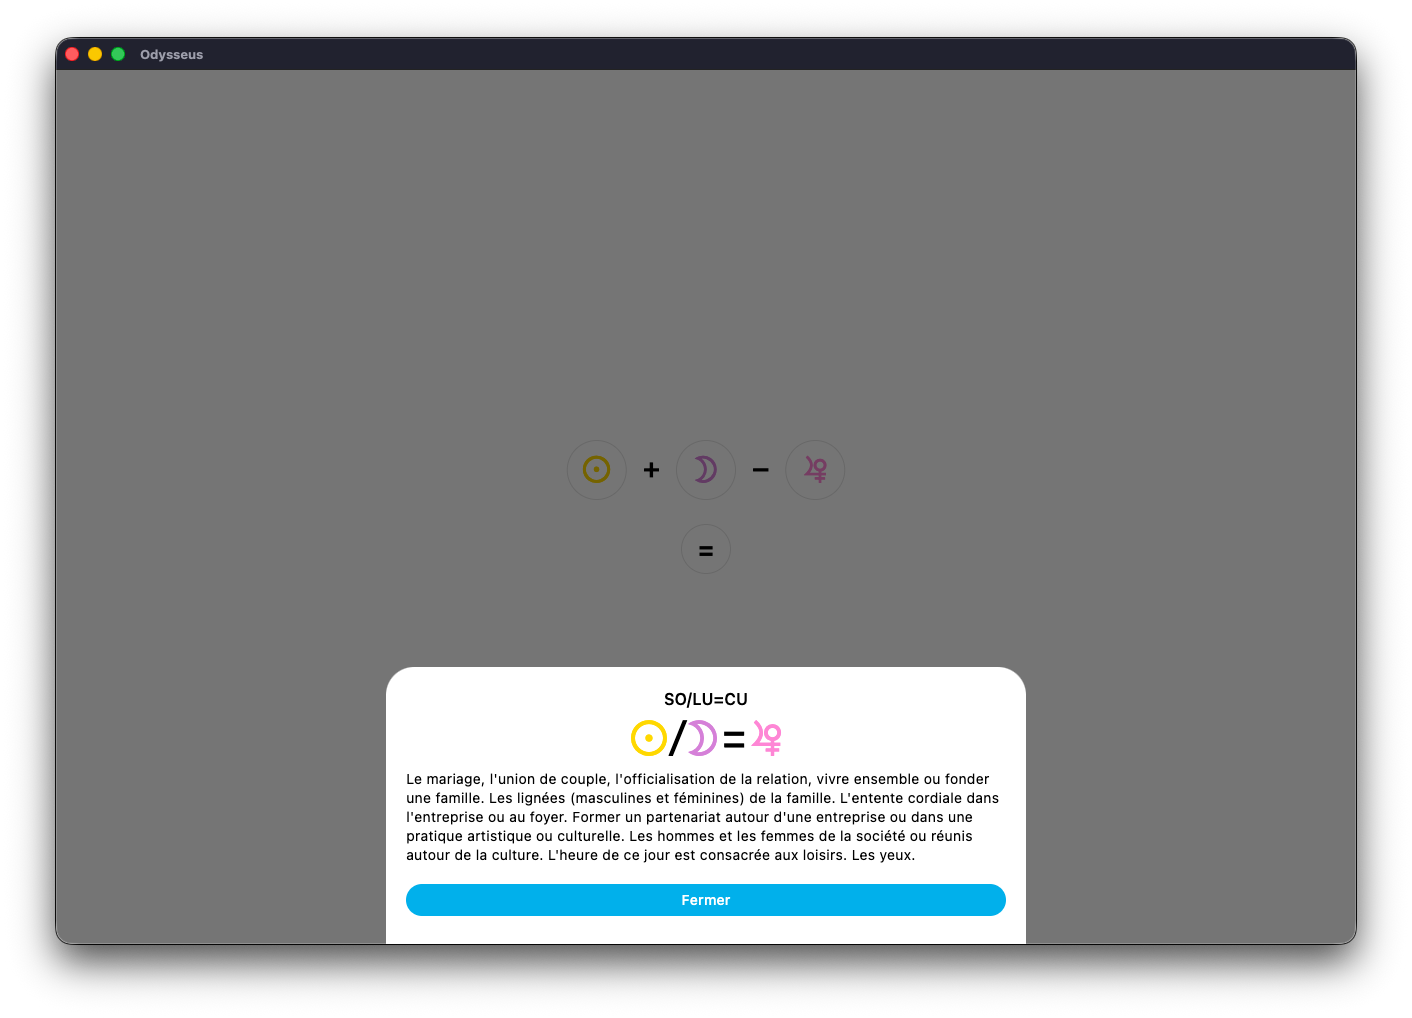
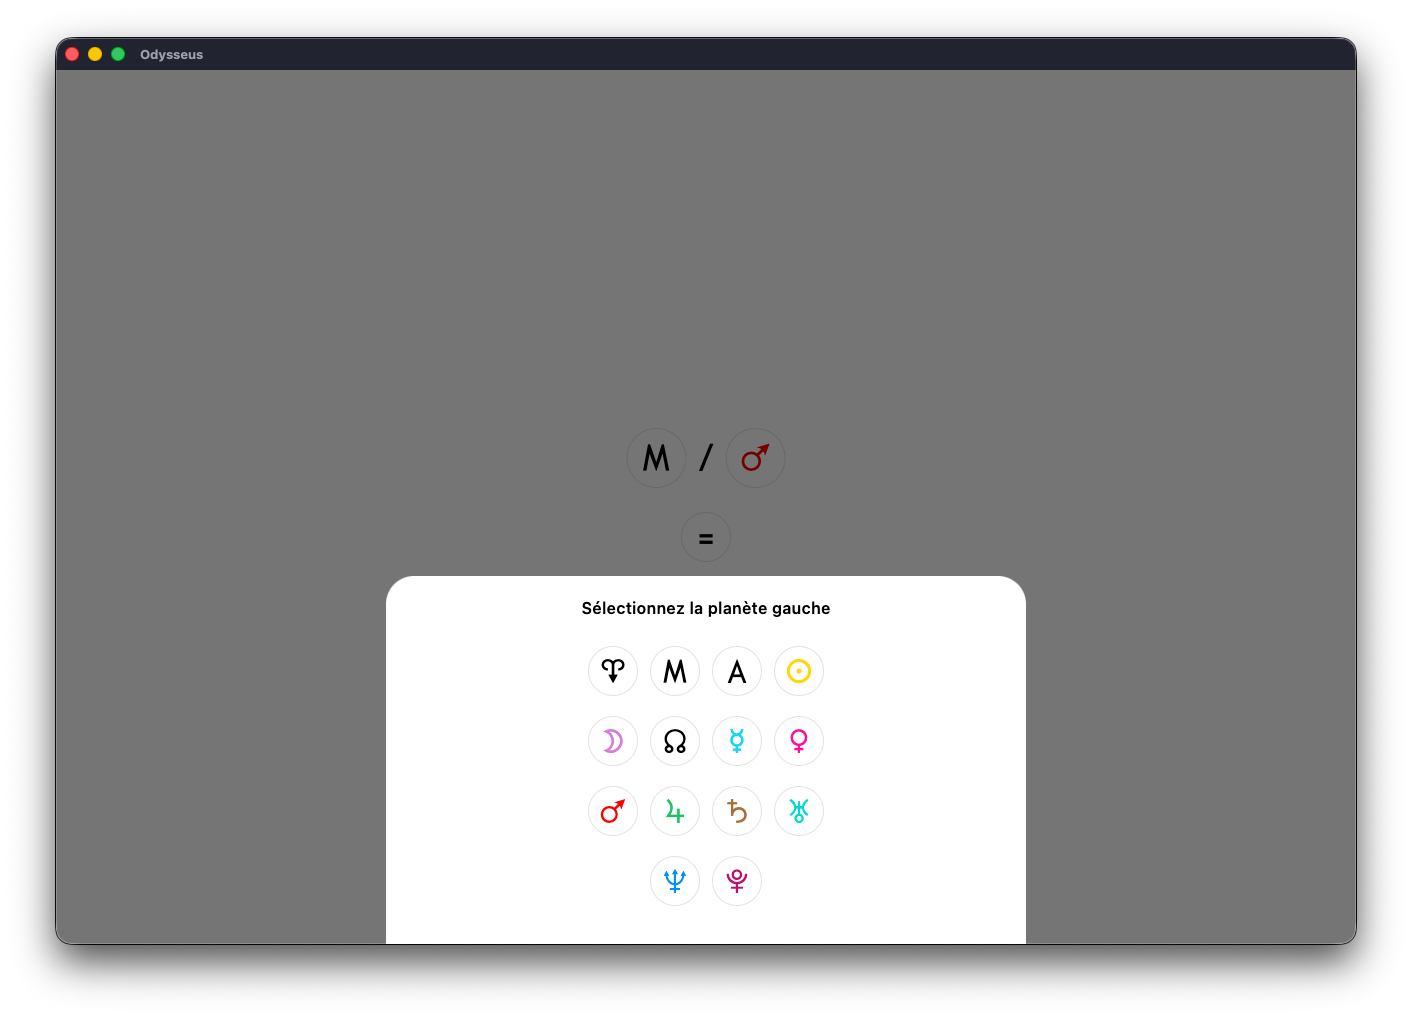
🧮 MIDPOINTS
The 🧮 MI-POINTS section allows you to obtain the definitions of half-points, the equidistance between two stars.
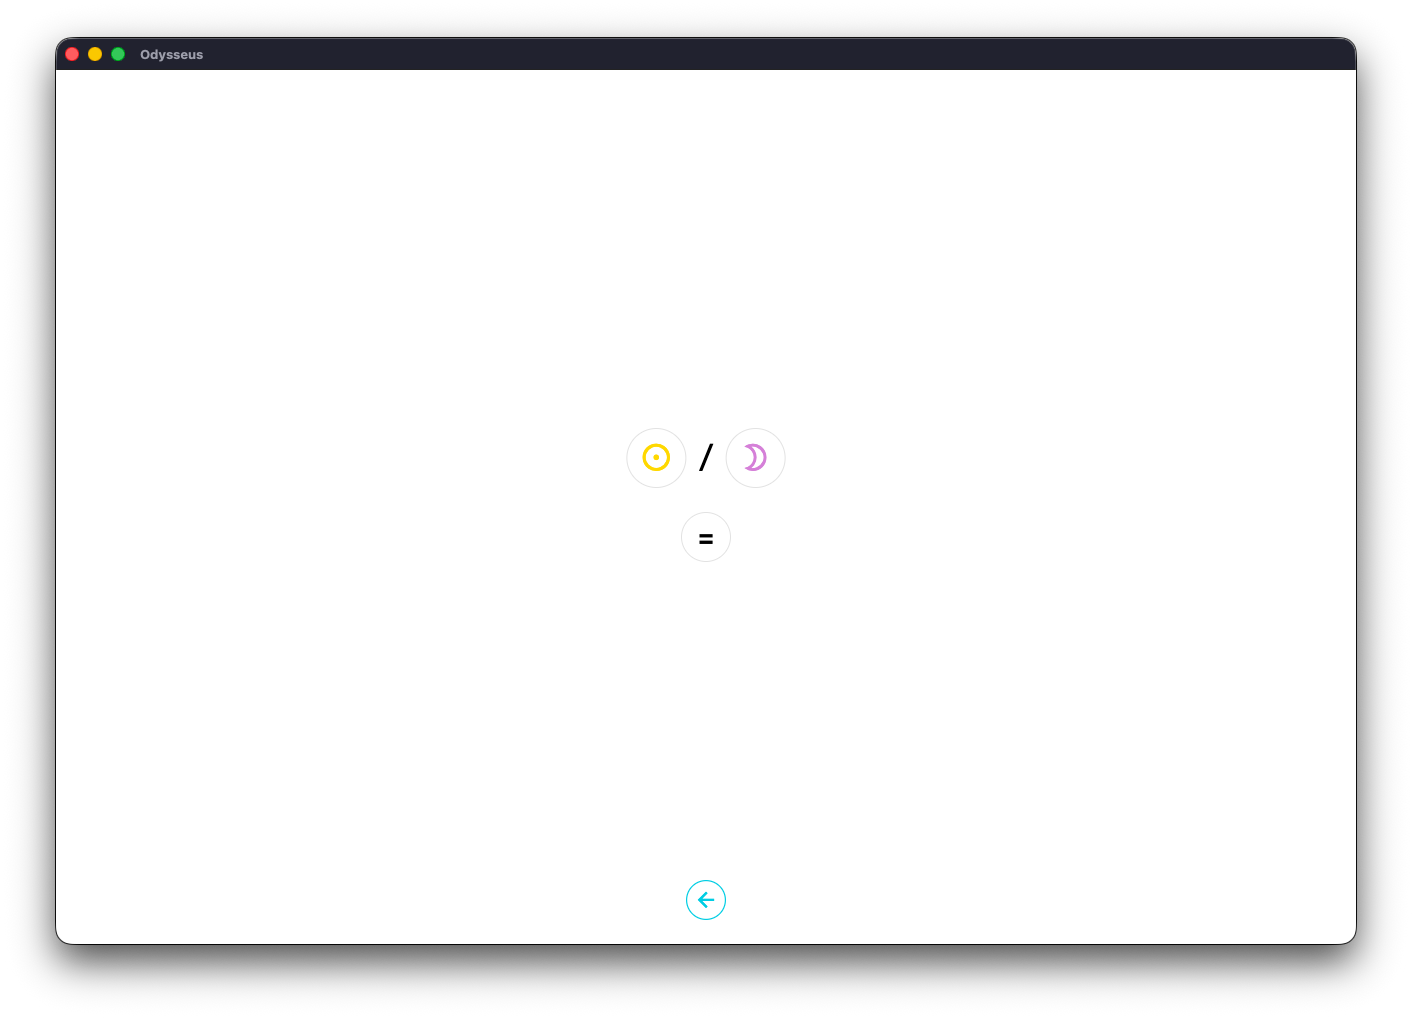
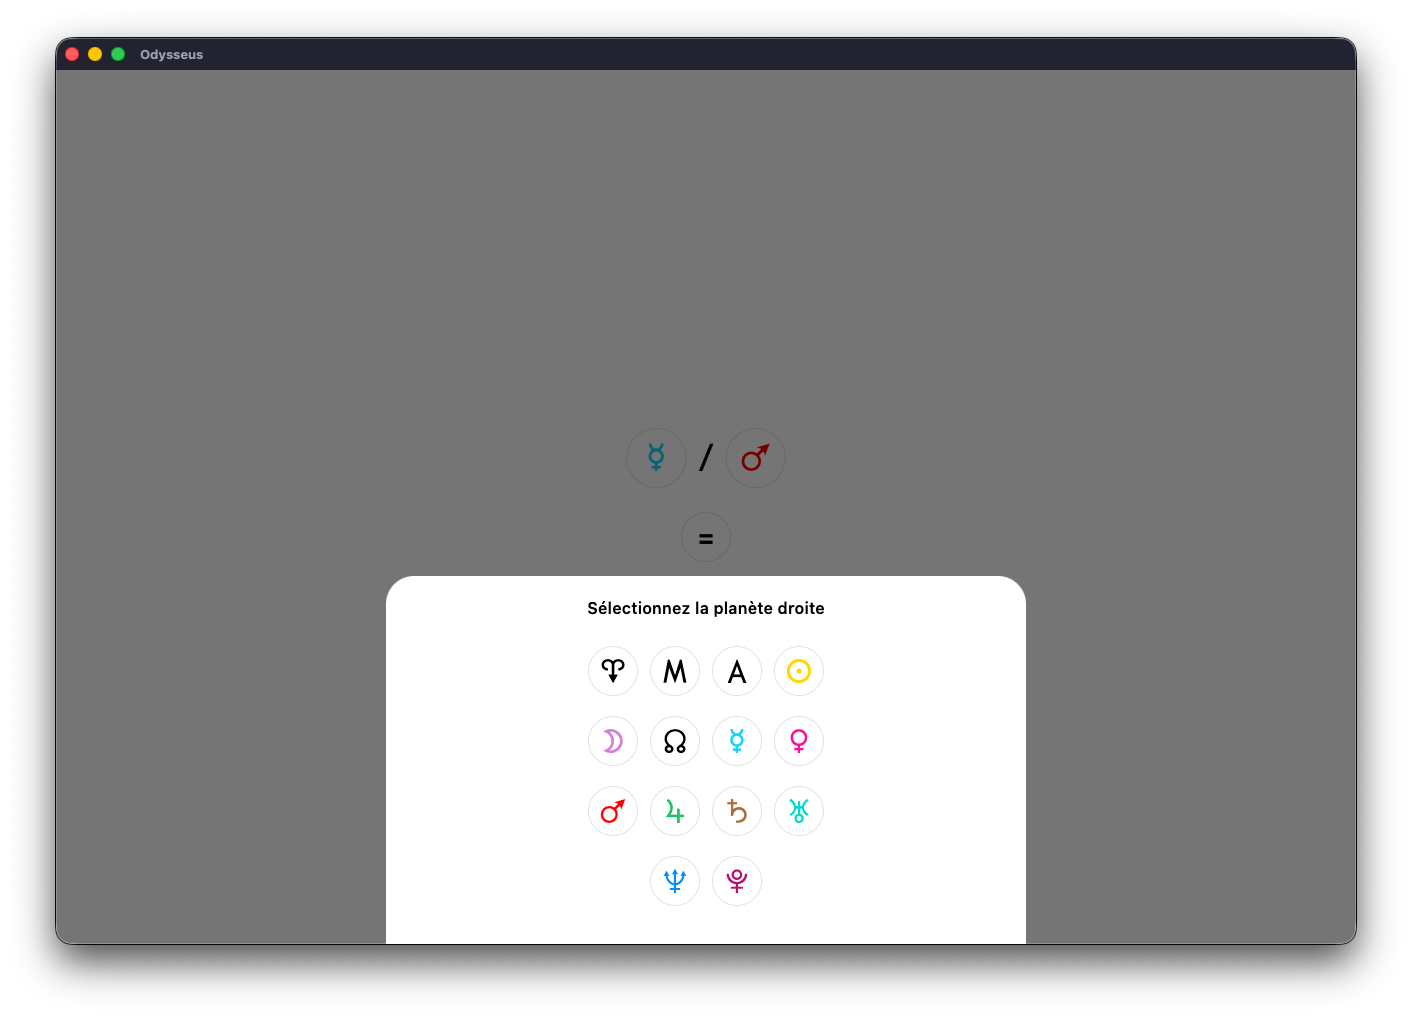
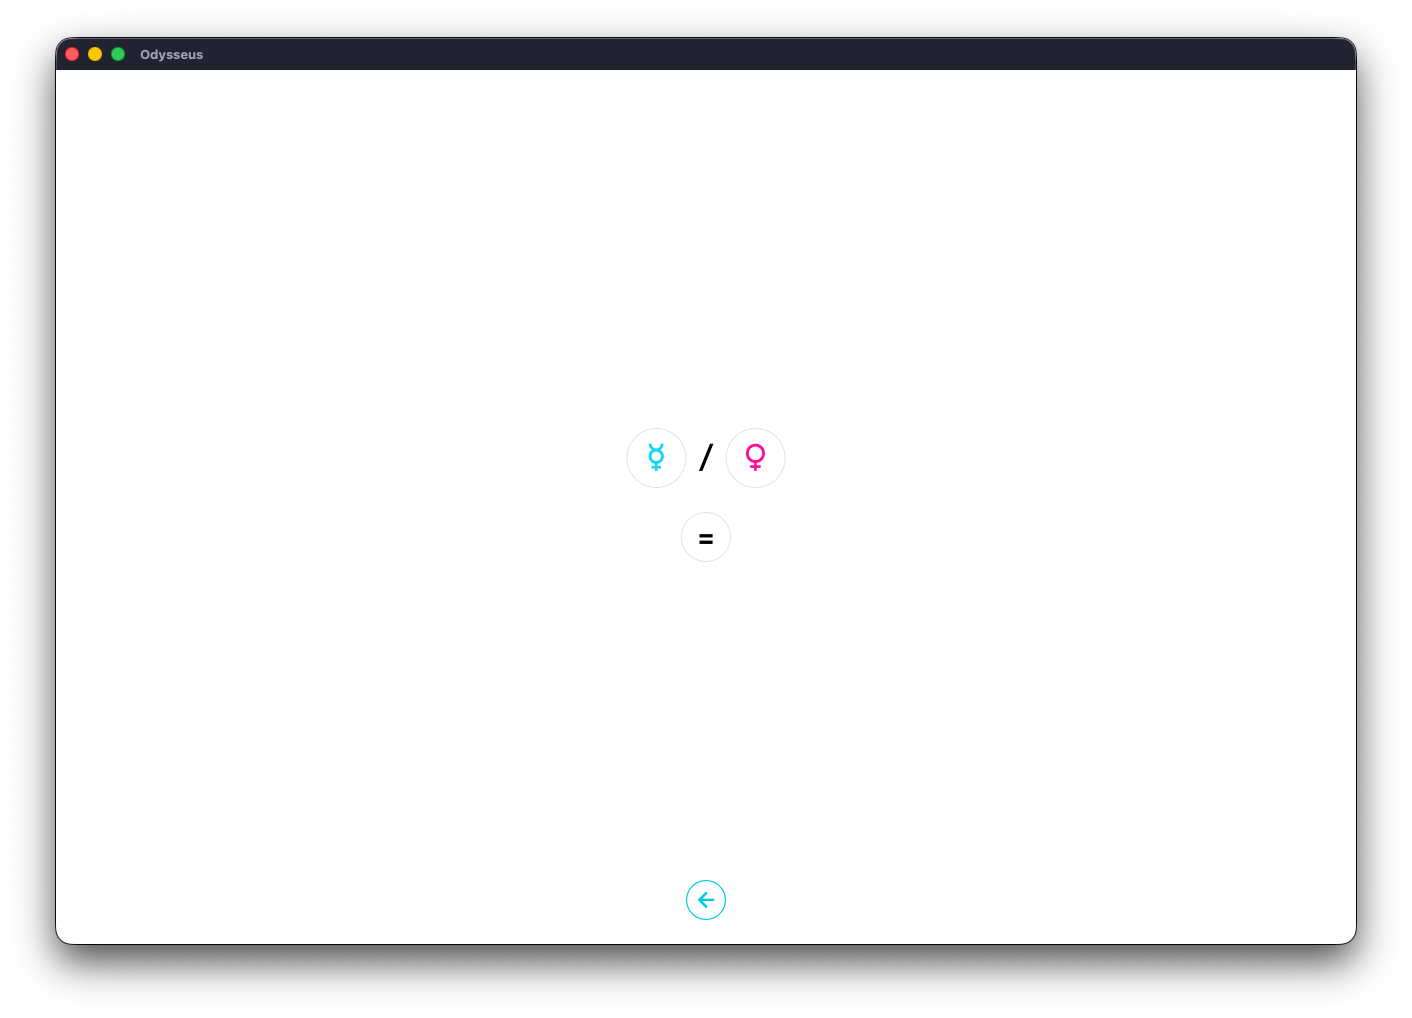
The screen has 3 buttons: a planet A (left), a planet B (right), and the = button to get the definition.

Click on the left button and choose the first planet.

Then the same with the right button.
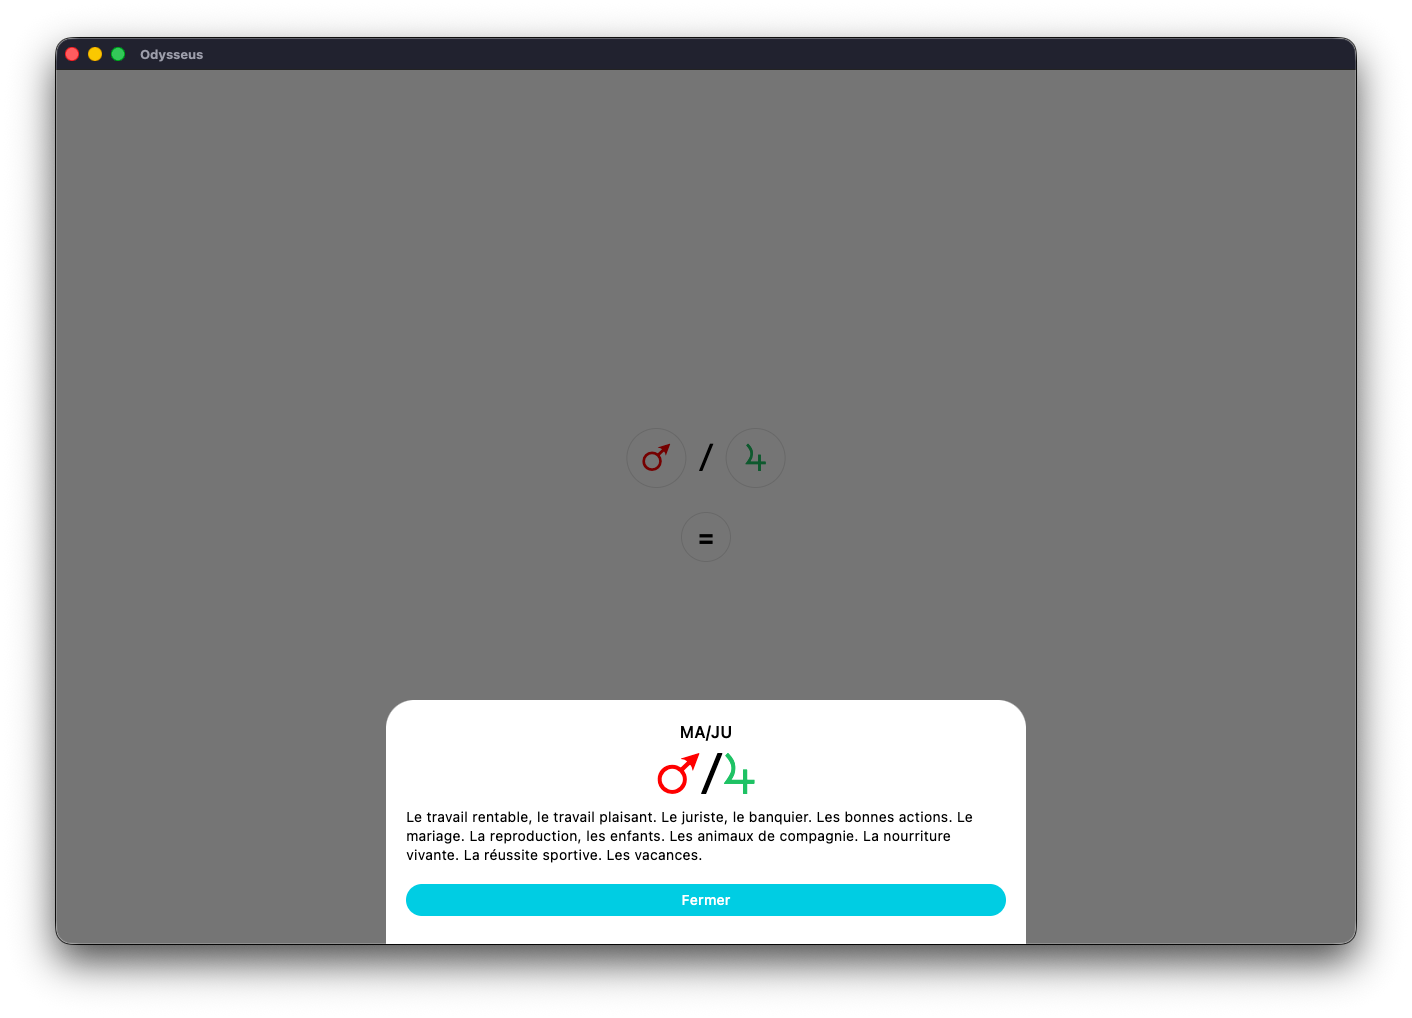
Then on the = button to get the definition.
🍢 FIGURES
The 🍢 FIGURES button makes it possible to obtain the definitions of planetary figures, which are also called “Arab parts” traditionally in astrology, but which here are used as sensitive points activated in the future when they are crossed by transit or direction planets.
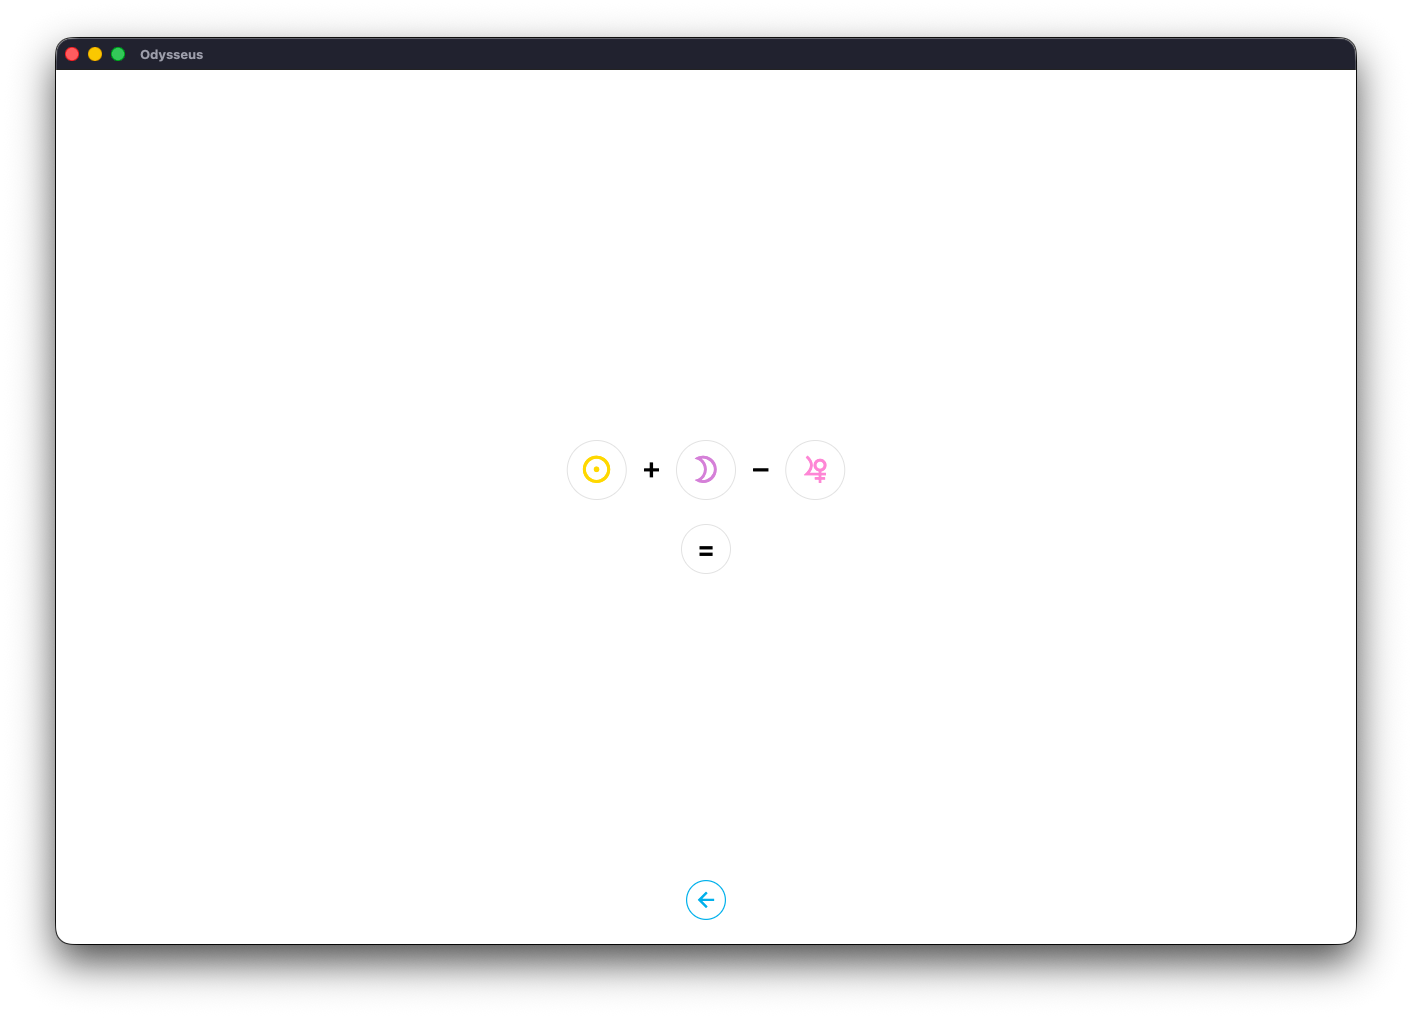
Just like with the 🧮 MI-POINTS tab, the screen has planetary buttons (here, 3 buttons, planet A, planet B and planet C) and the = button to show the definition. Just click on each of these buttons to choose the desired planet, then on =
🏠 HOUSES
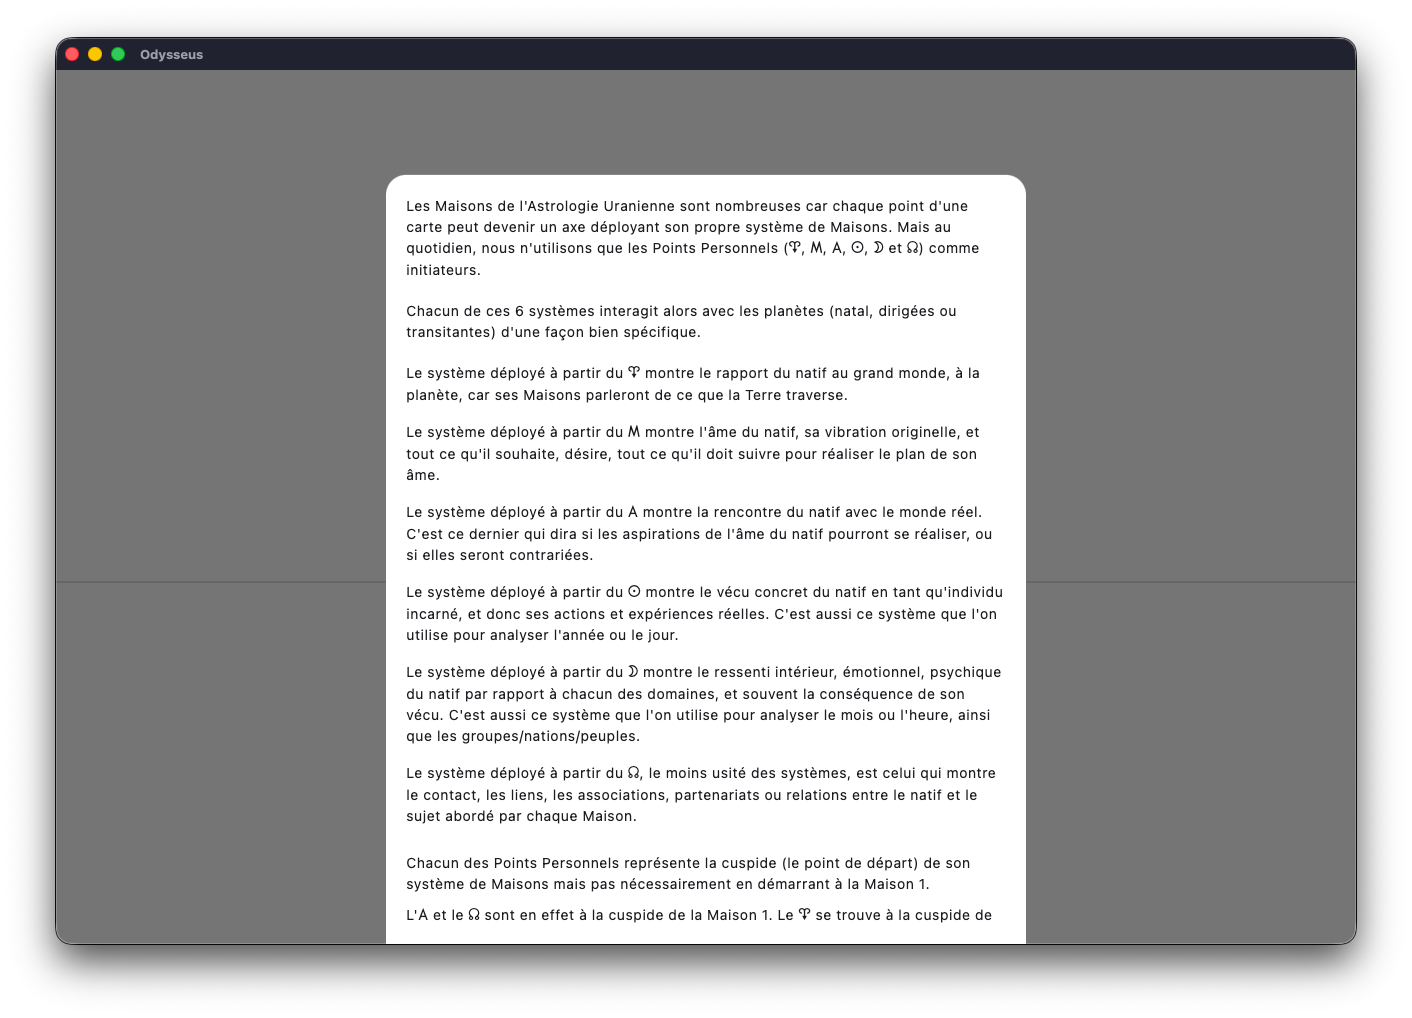
The 🏠 HOUSES section presents the 6 House systems used in Uranian astrology.
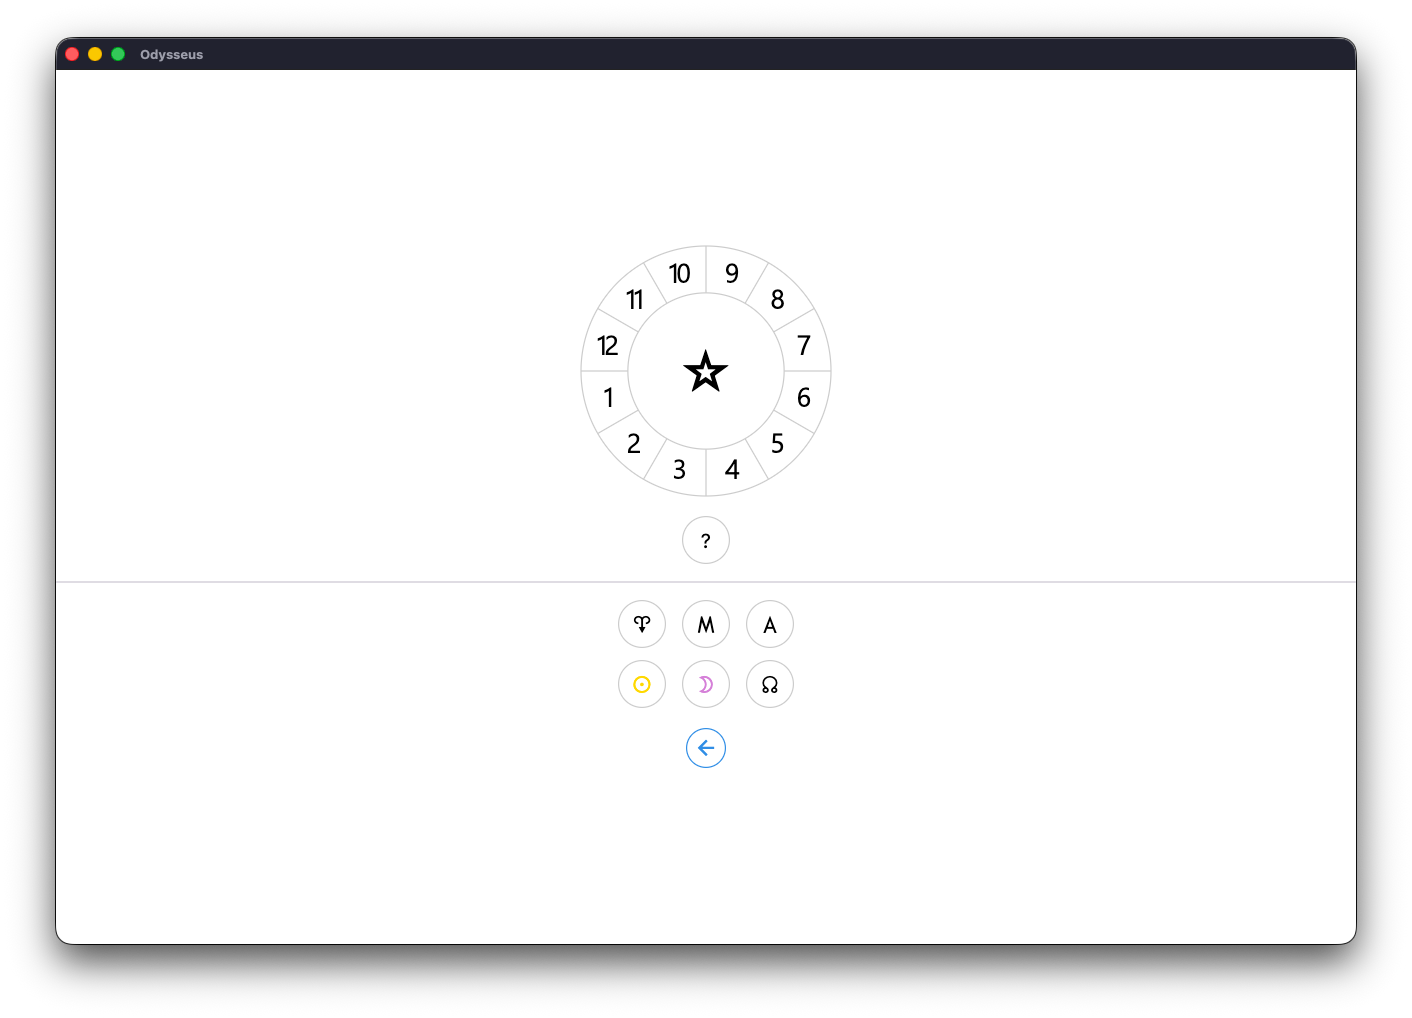
First of all, will you find the button ? presenting you the theory of the Uranian Houses:
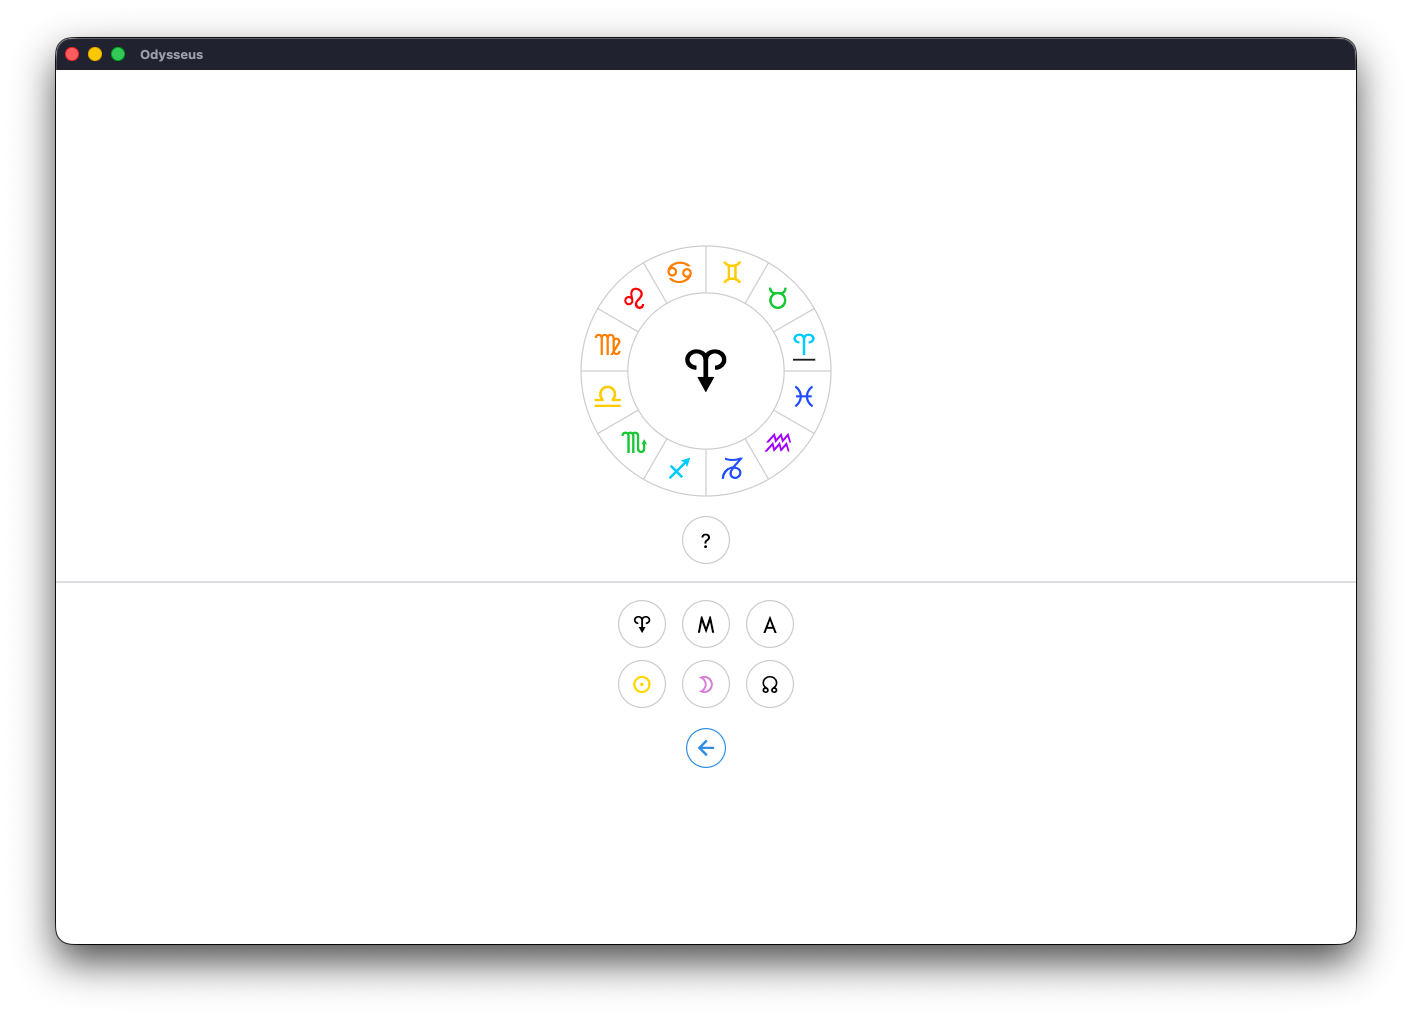
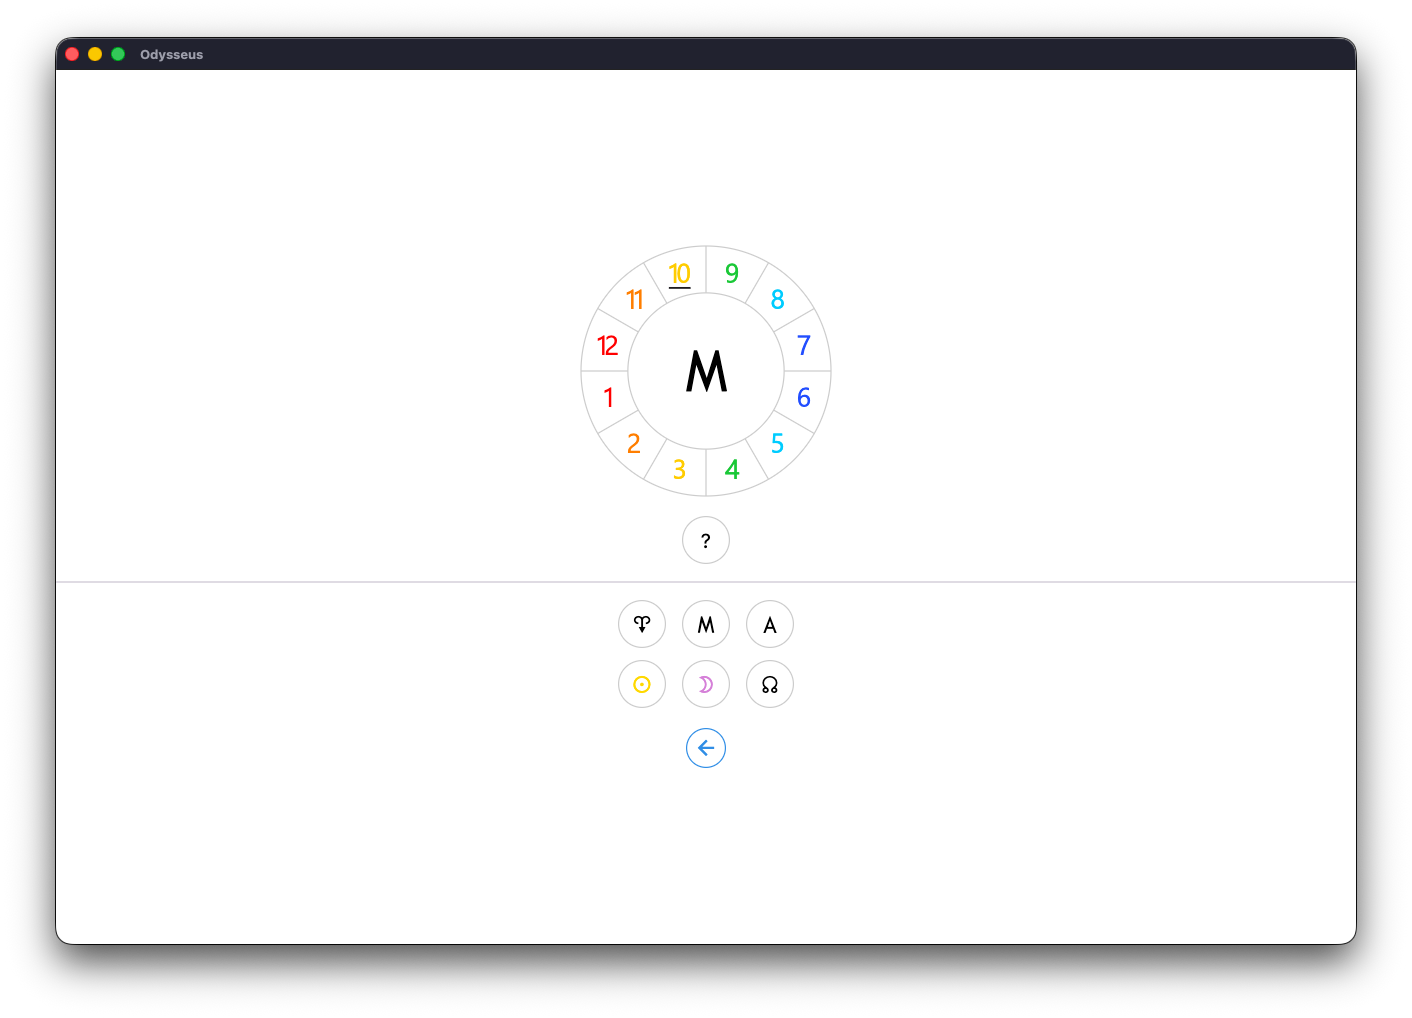
Then 6 buttons to see the different systems. The system of the “Houses of the Earth” by clicking on the Vernal Point A, which then displays the signs of the zodiac all around the wheel (and whose sign of Aries B is underlined, because on an astrological wheel, the Vernal Point A figures the cusp of the sign of Aries B) with distinctive colours allowing to see the “Reflected Houses” here distributed around the axis 5-Aquarius L / 11-Leo F :
The Houses of the Midheaven <, of which House 10 is underlined because the Midheaven < is the cusp of House 10, and with a vertical distribution of the Reflecting Houses:
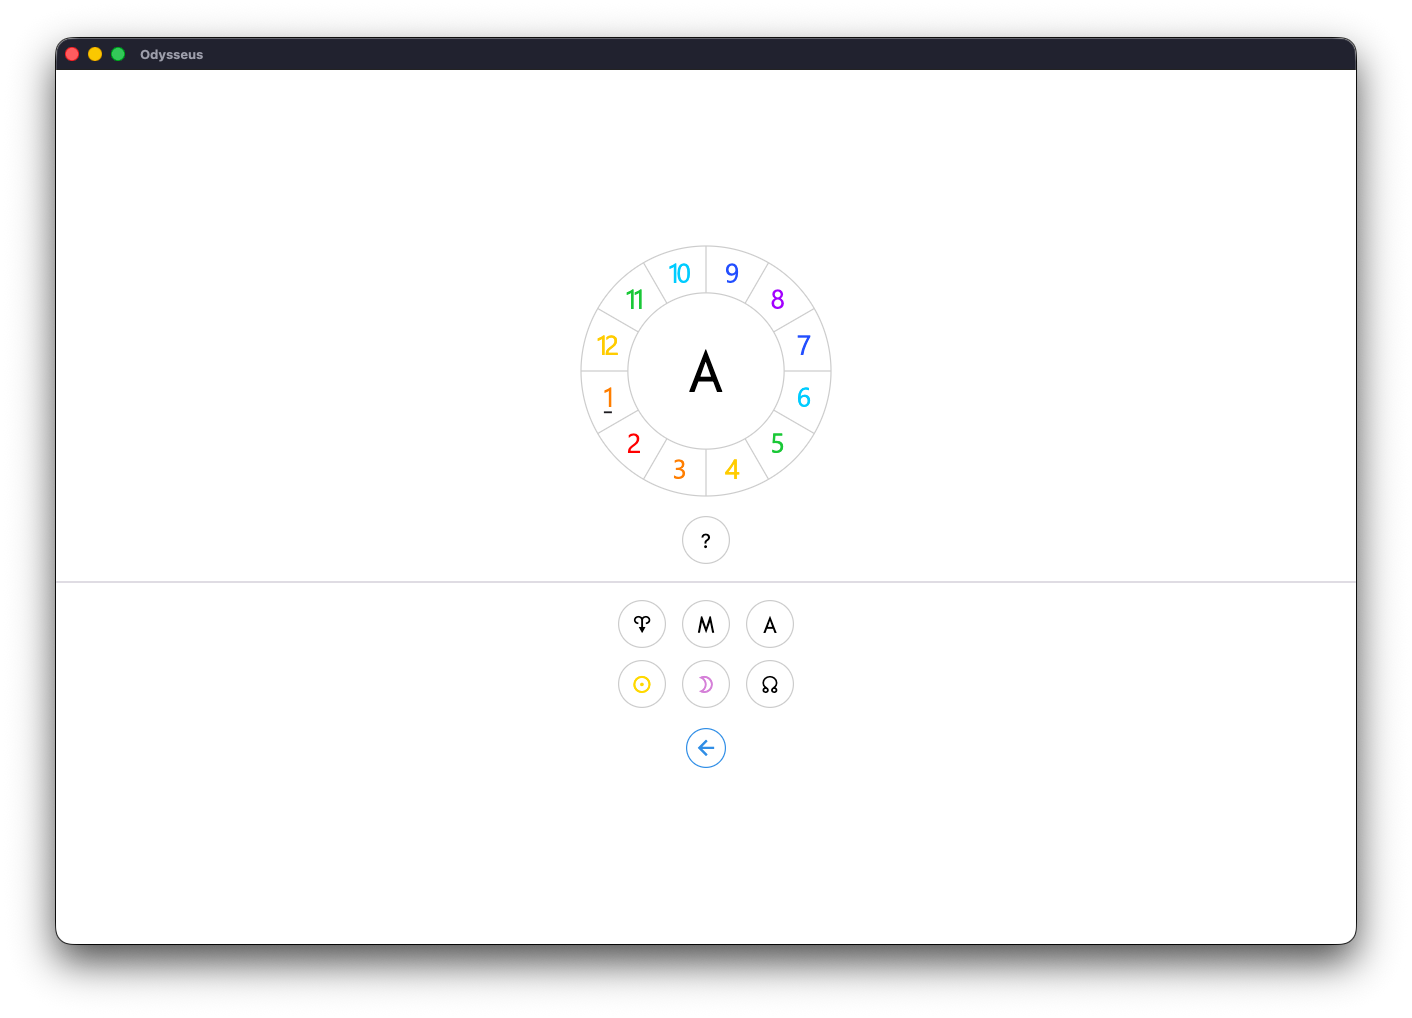
The Houses of the Ascendant > with House 1 underlined and with a distribution of the reflection houses around axis 2–8:
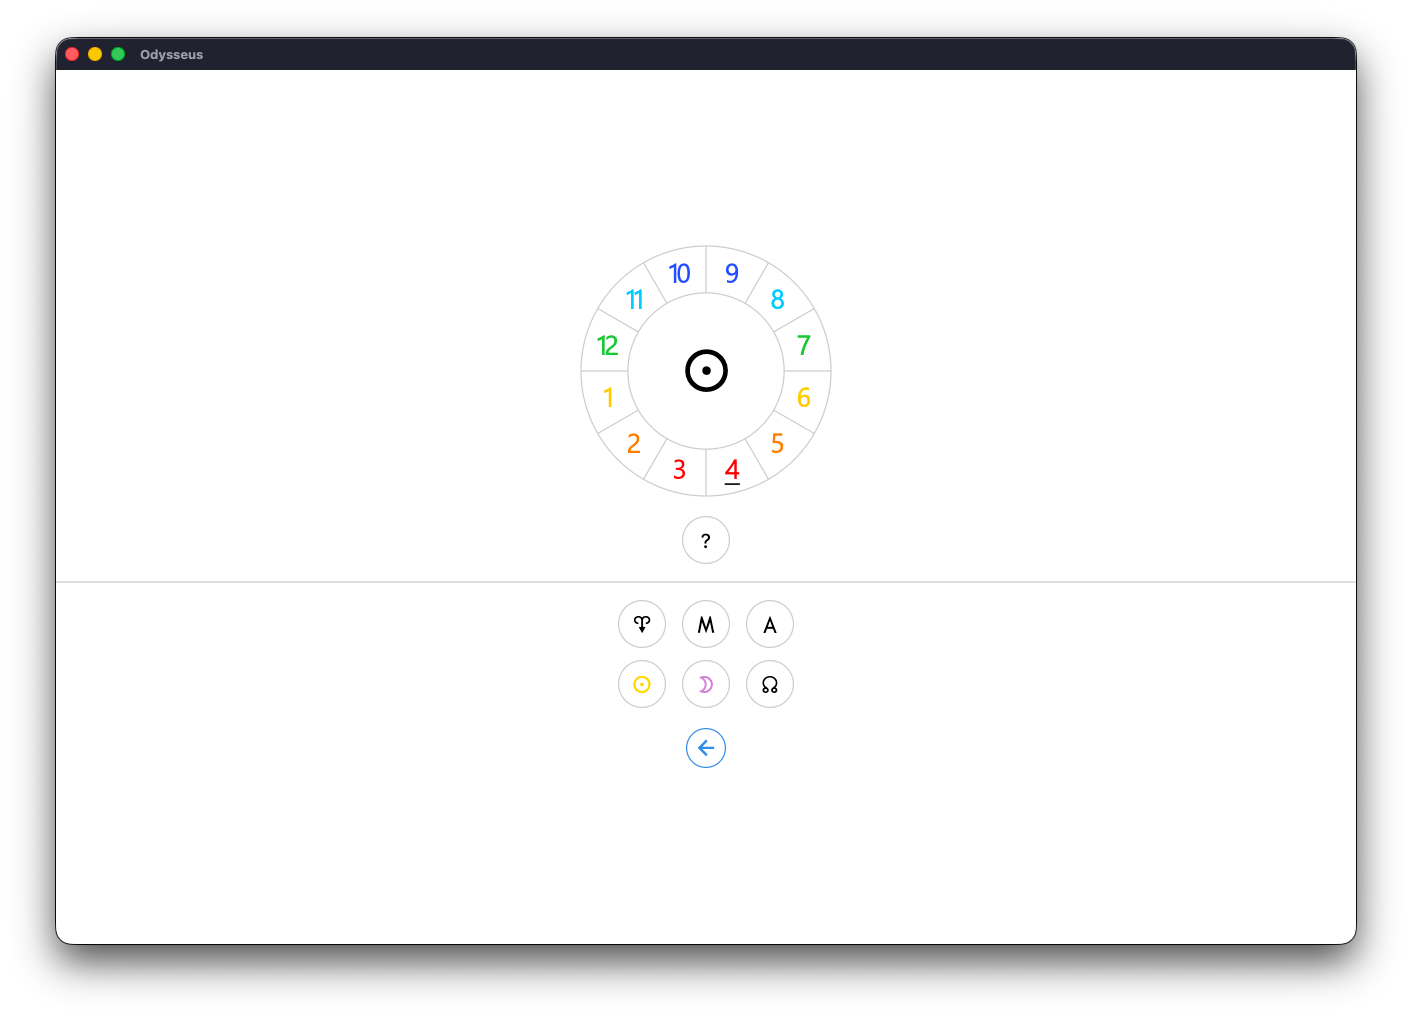
The Houses of the Sun N with the underlined House 4 and with a horizontal distribution of the reflected Houses:
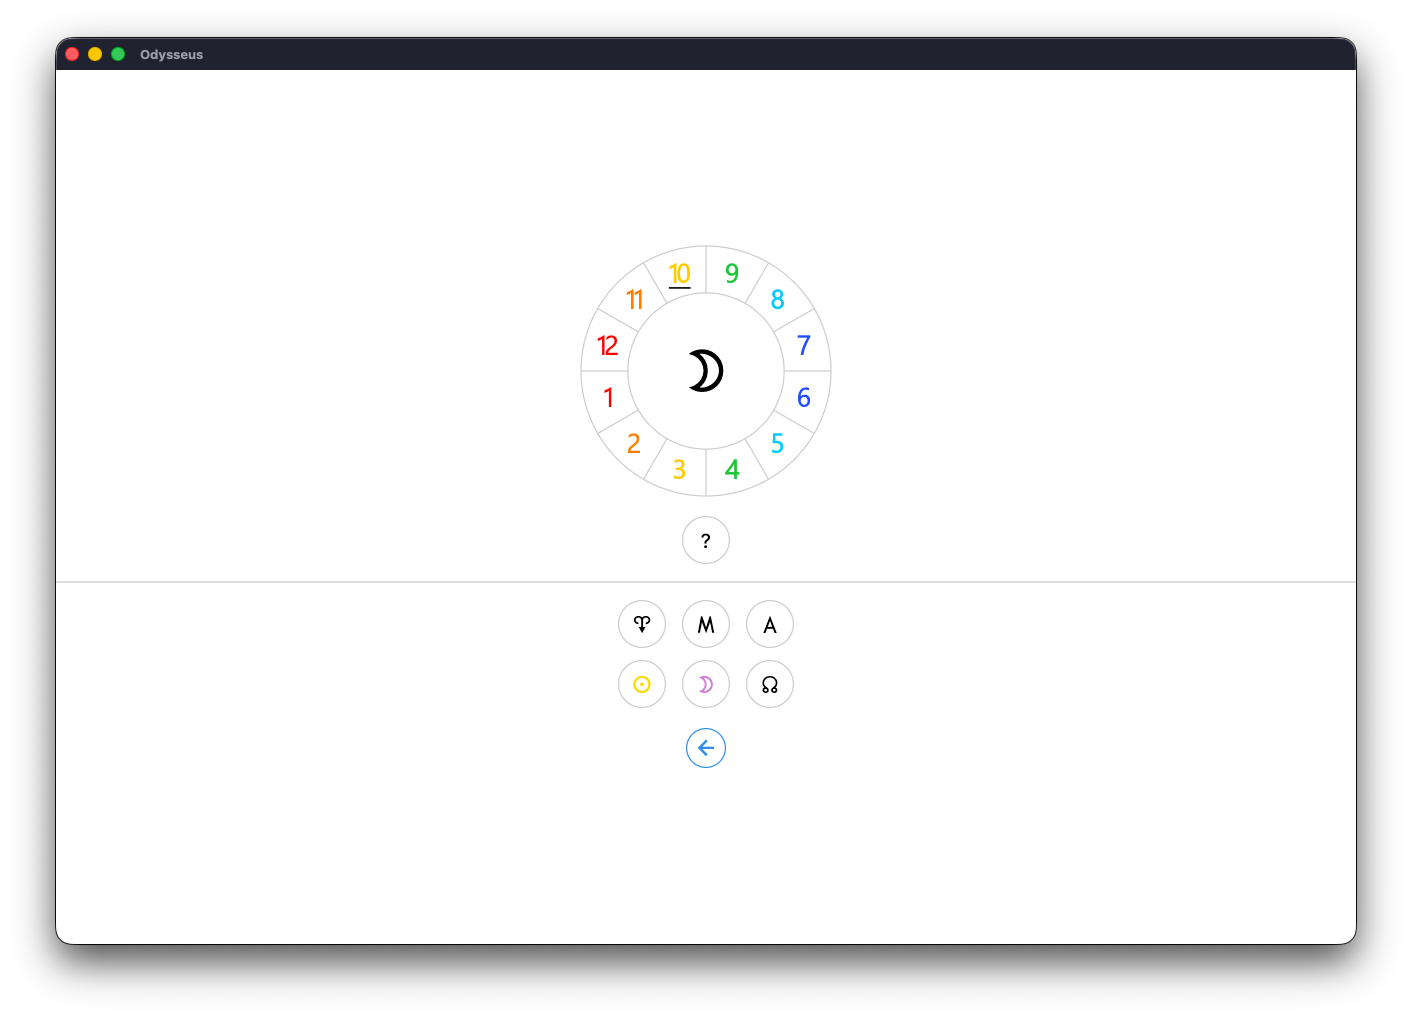
The Houses of the Moon Y with a cusp and distributions similar to those of the Midheaven < :
And finally the Houses of the Lunar Node W with a cusp and distribution similar to those of the Houses of the Ascendant > :

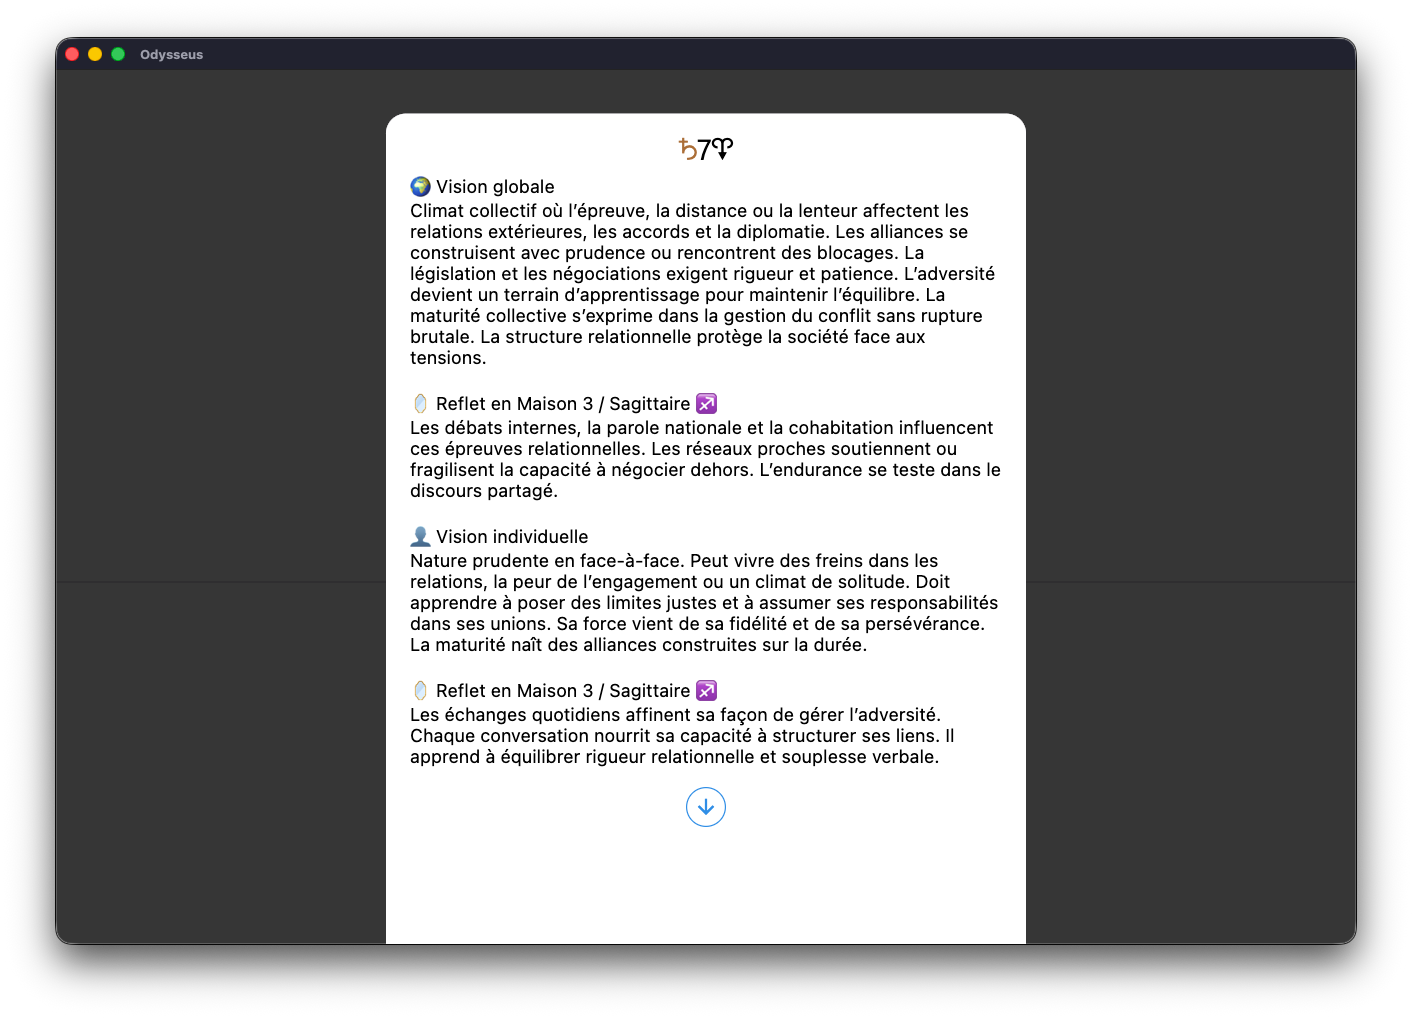
If you then click on one of these signs or one of these Houses, a new window opens with the definition of the aforesaid House:
And if you click on one of the planet buttons below, you will then have the definition of the planet in question in the aforesaid House, as here with Saturn S in Aries B.
🔎 SEARCH
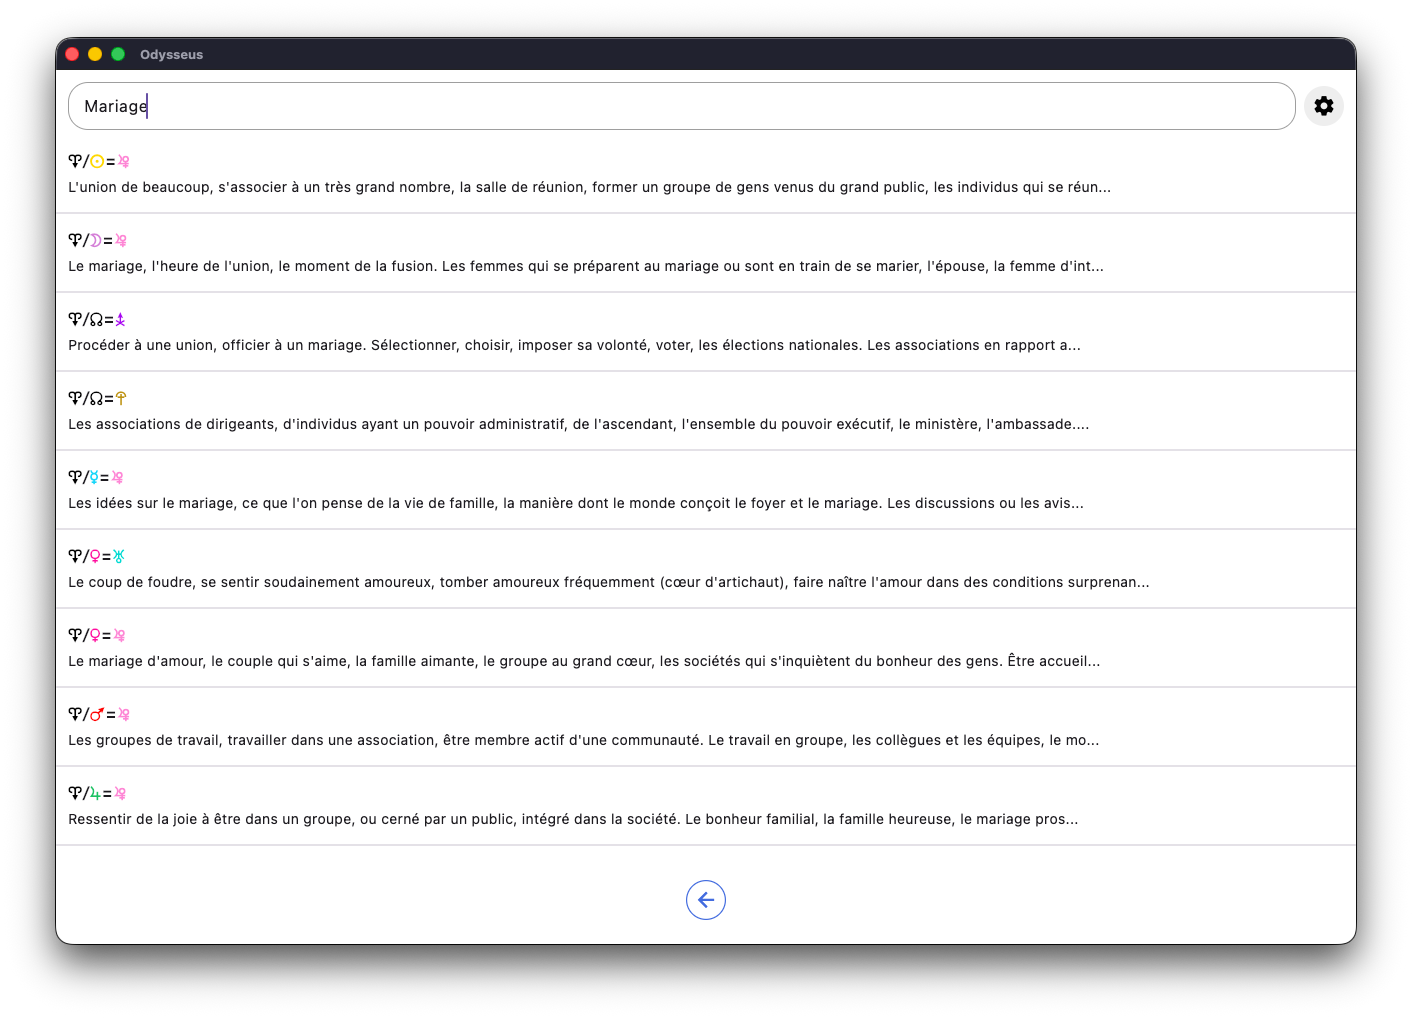
The 🔎 SEARCH section allows you to search the Codex for a definition containing a keyword that you will type in the search box:
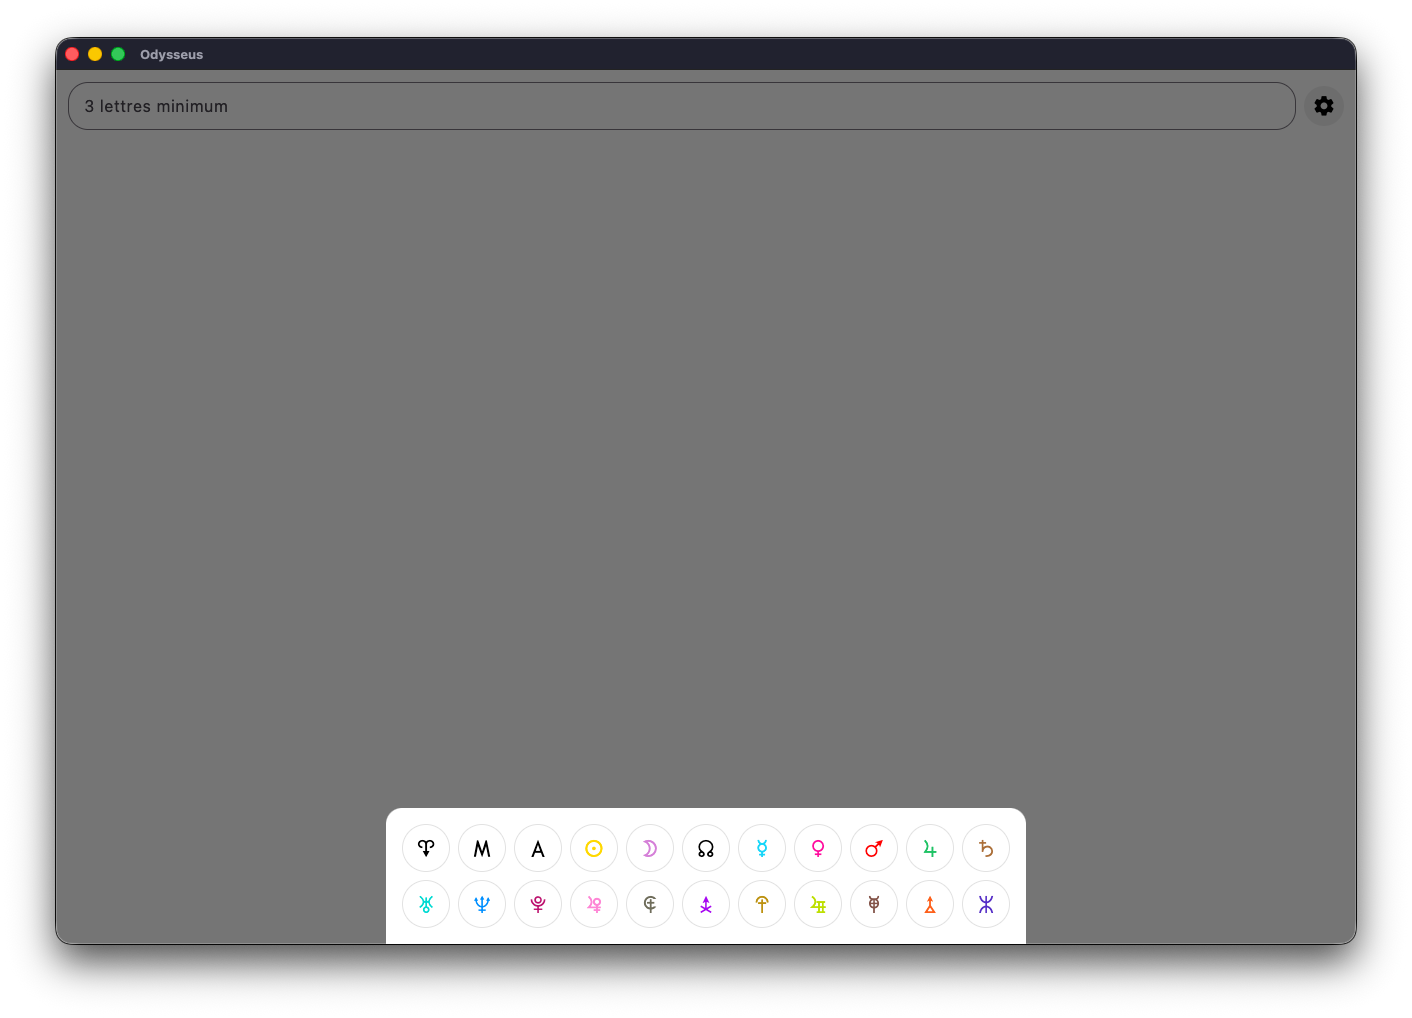
At the top right of the window is a gear-shaped button ⚙️. If you click on it, you can select the planets you want to include in the search:
Then simply type at least 3 letters in the search bar to find definitions containing them. Here with the word Marriage:
Then click on one of the lines to get the full definition:
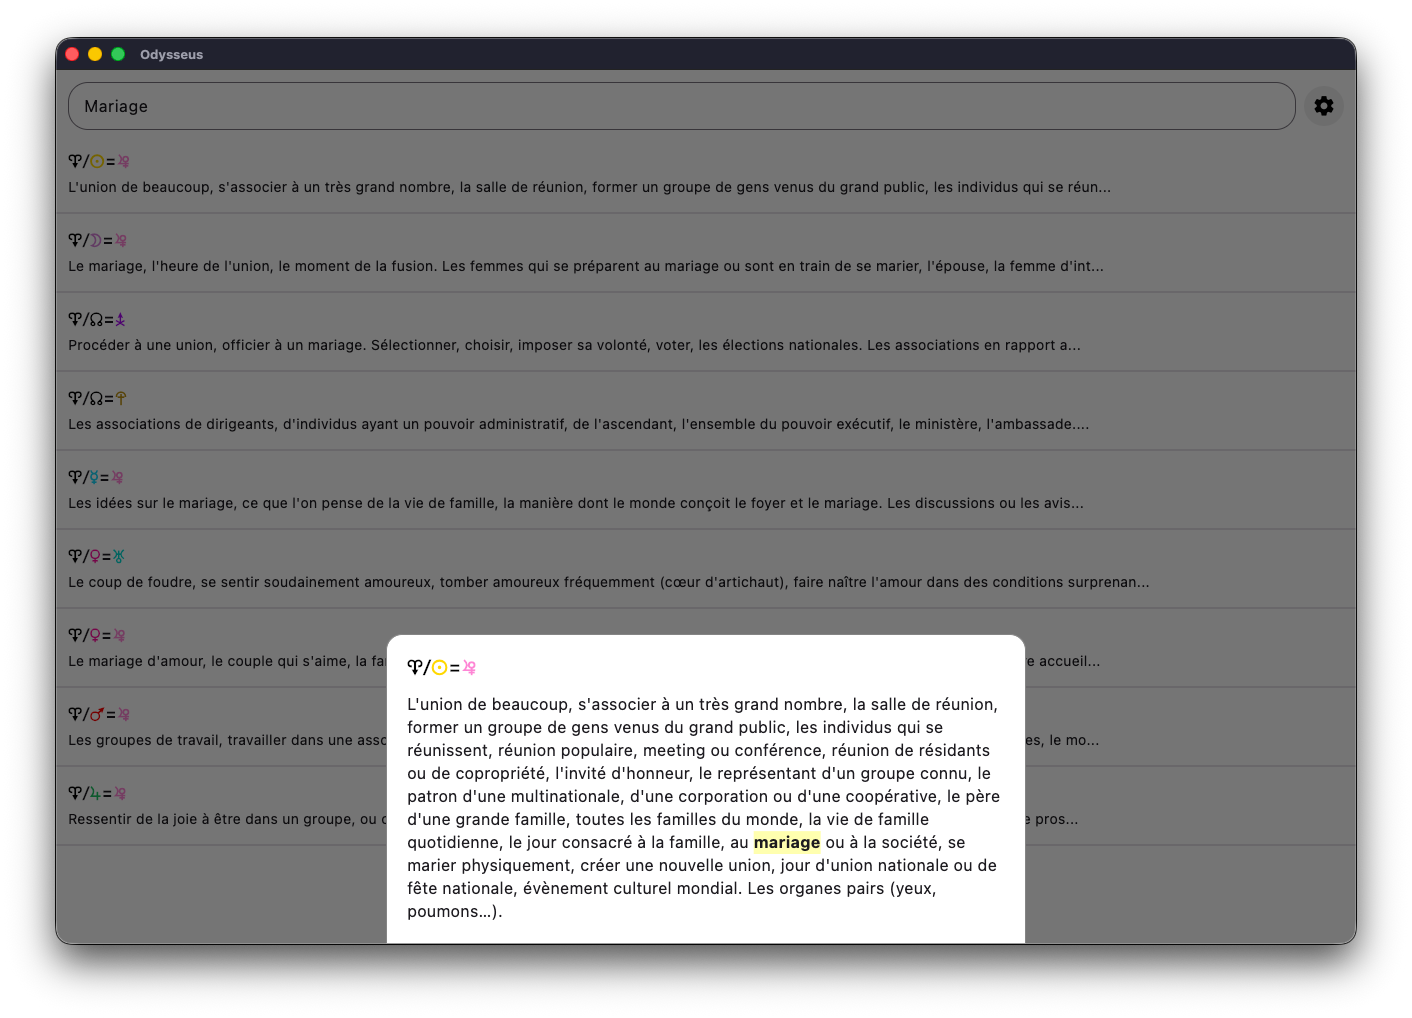
We also see the word concerned highlighted.
📚 QUIZ
The 📚 QUIZ section will allow you to practice your learning of planetary language:
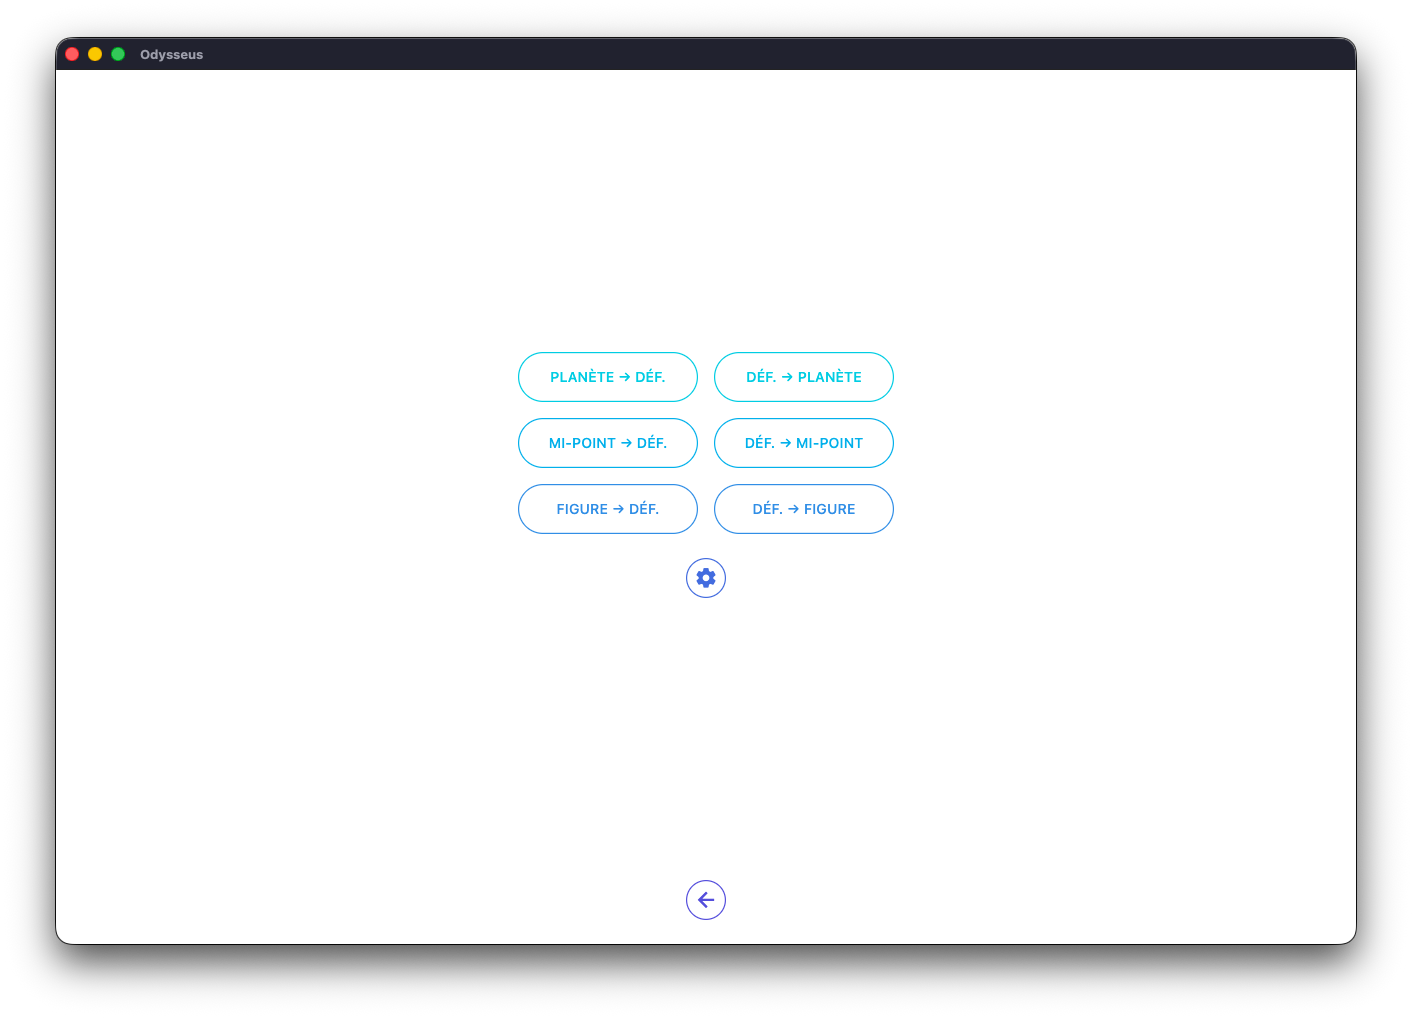
The screen is available in 2×3 buttons, plus a configuration button. By clicking on it:
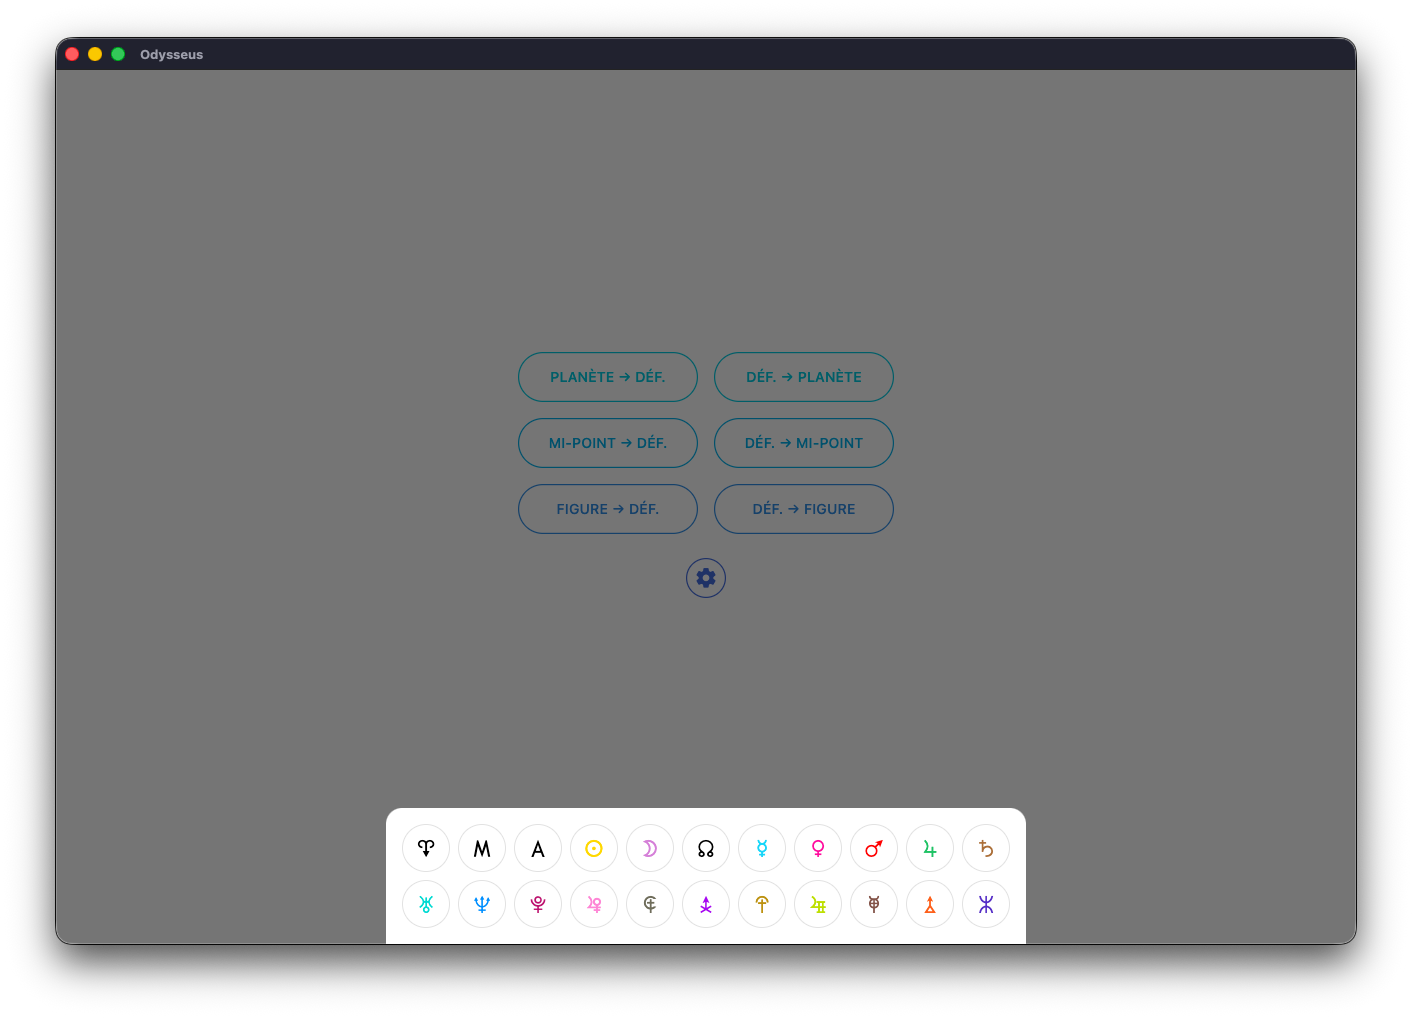
You can select the planets you want to see involved in the quizzes. Then, just choose the type of quiz you are interested in. For example, Planet to Definition:
You will then find the symbol at the top, and 3 definition possibilities. As well as 2 arrow buttons: one down to close the window, one to the right to go to the next quiz.
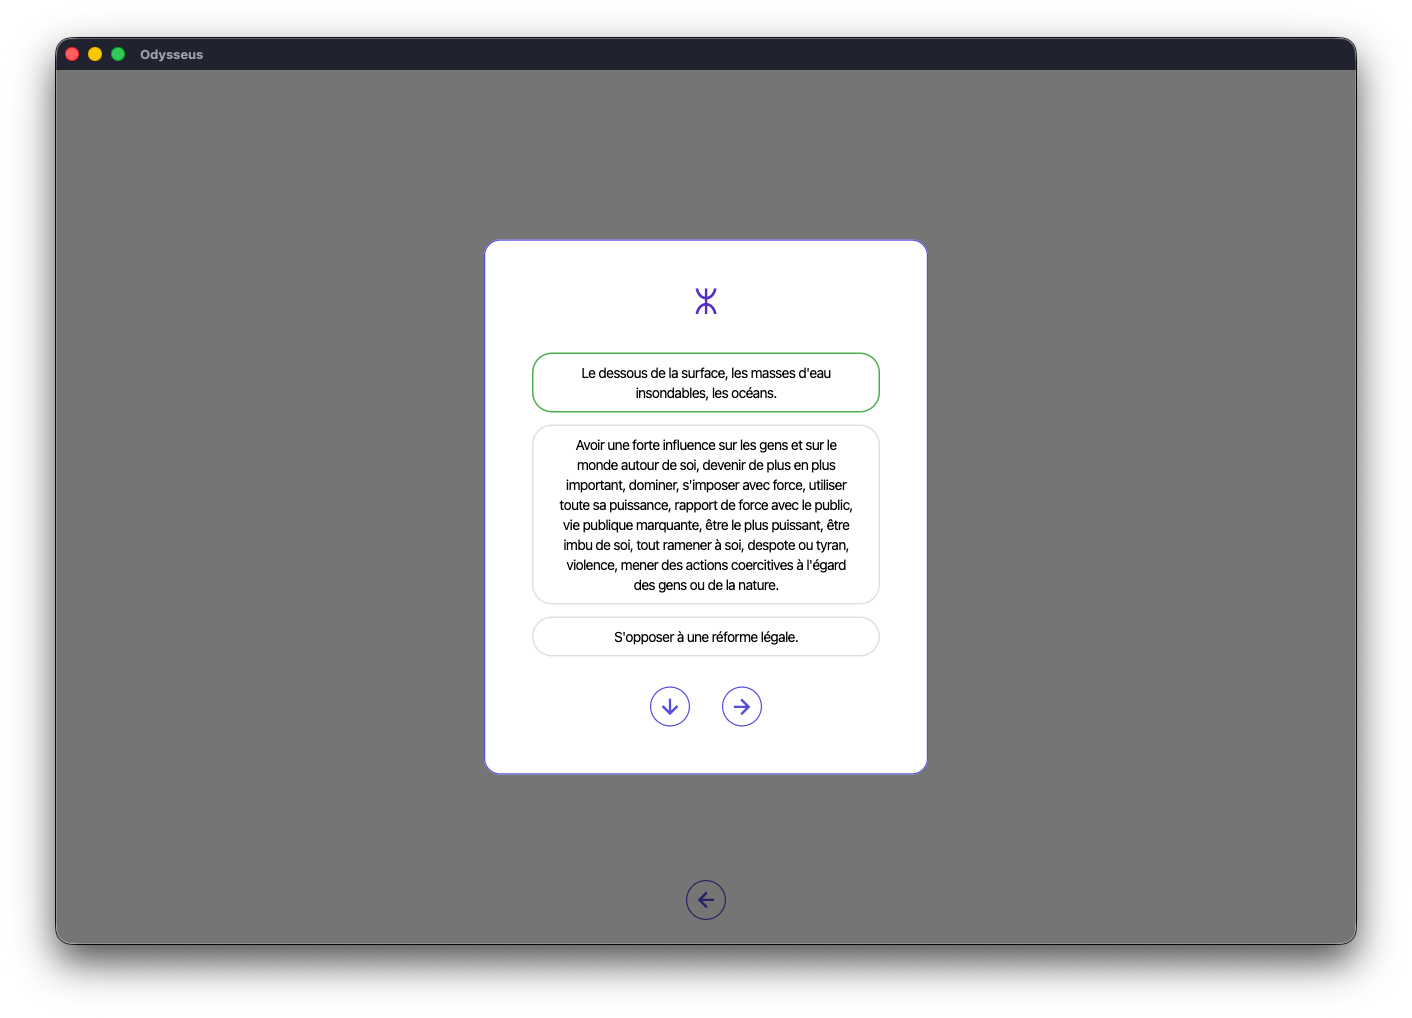
If you click on the correct definition, it is surrounded by green.
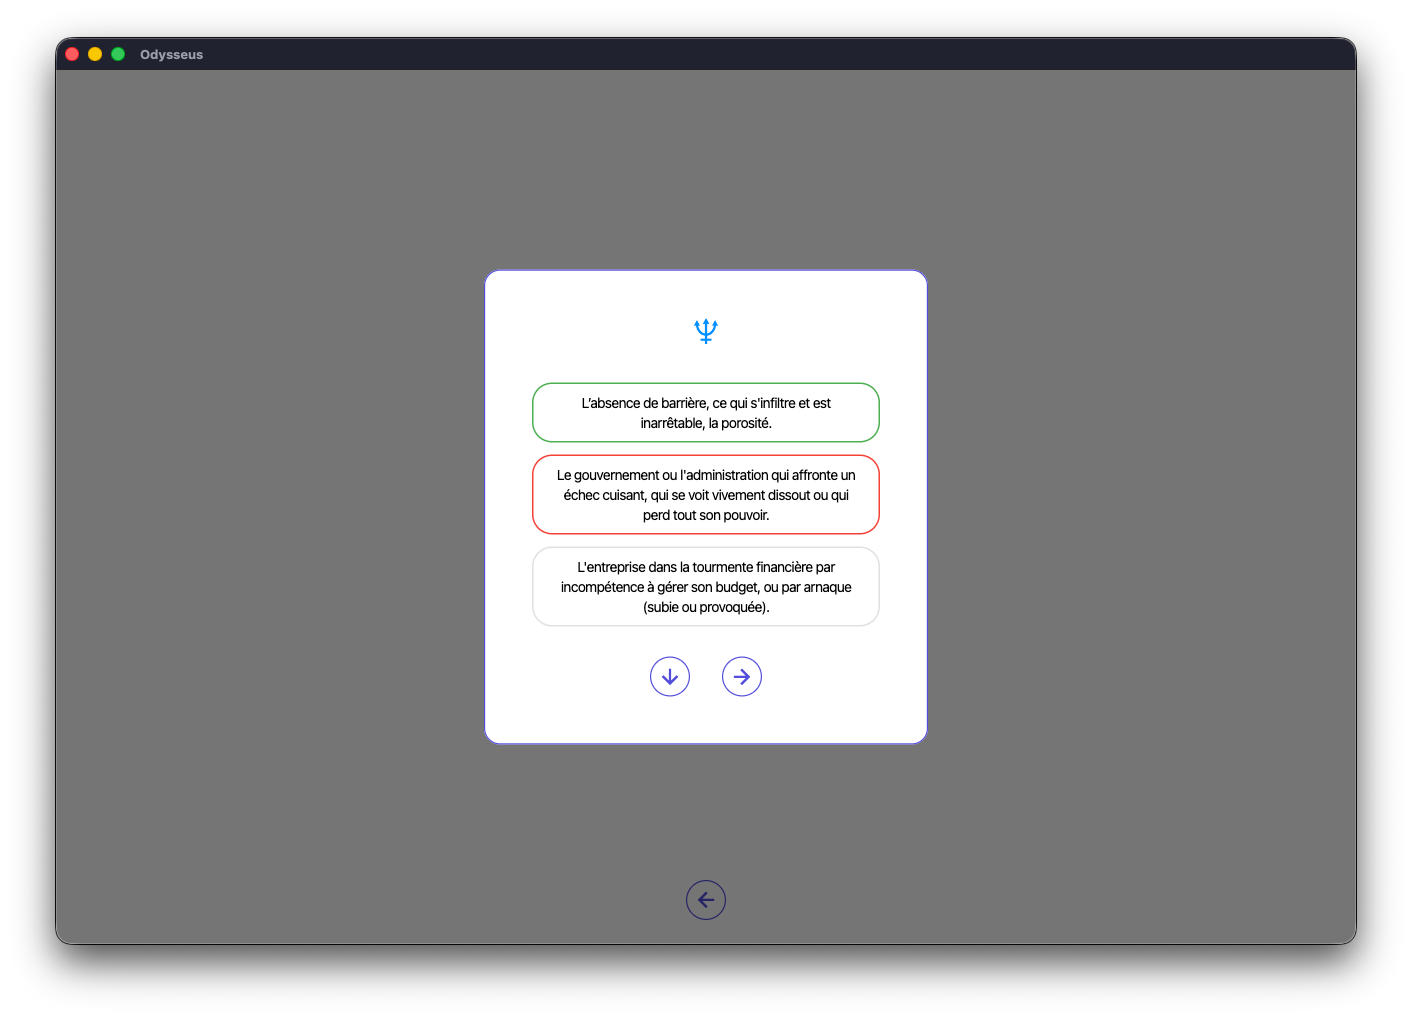
If you make a mistake, the chosen proposal will be bordered in red, and the good one in green.
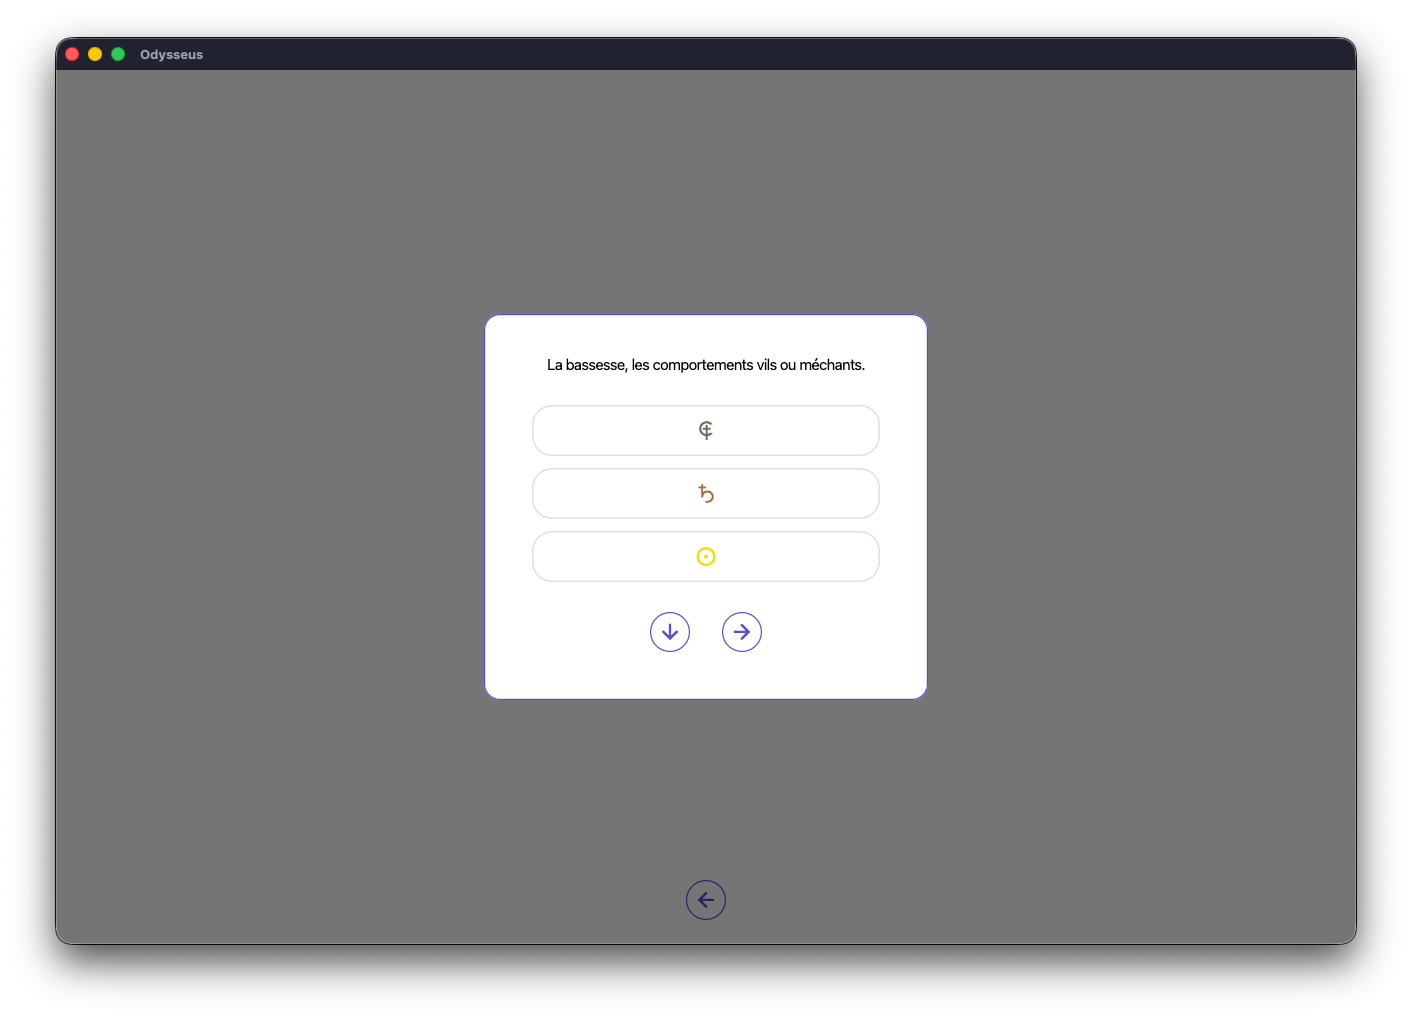
You will have a similar structure for Definition to Planet, with a definition of which you will have to guess the right planet among 3 proposals.
Also, you can practice with this time a Mi-point to Definition: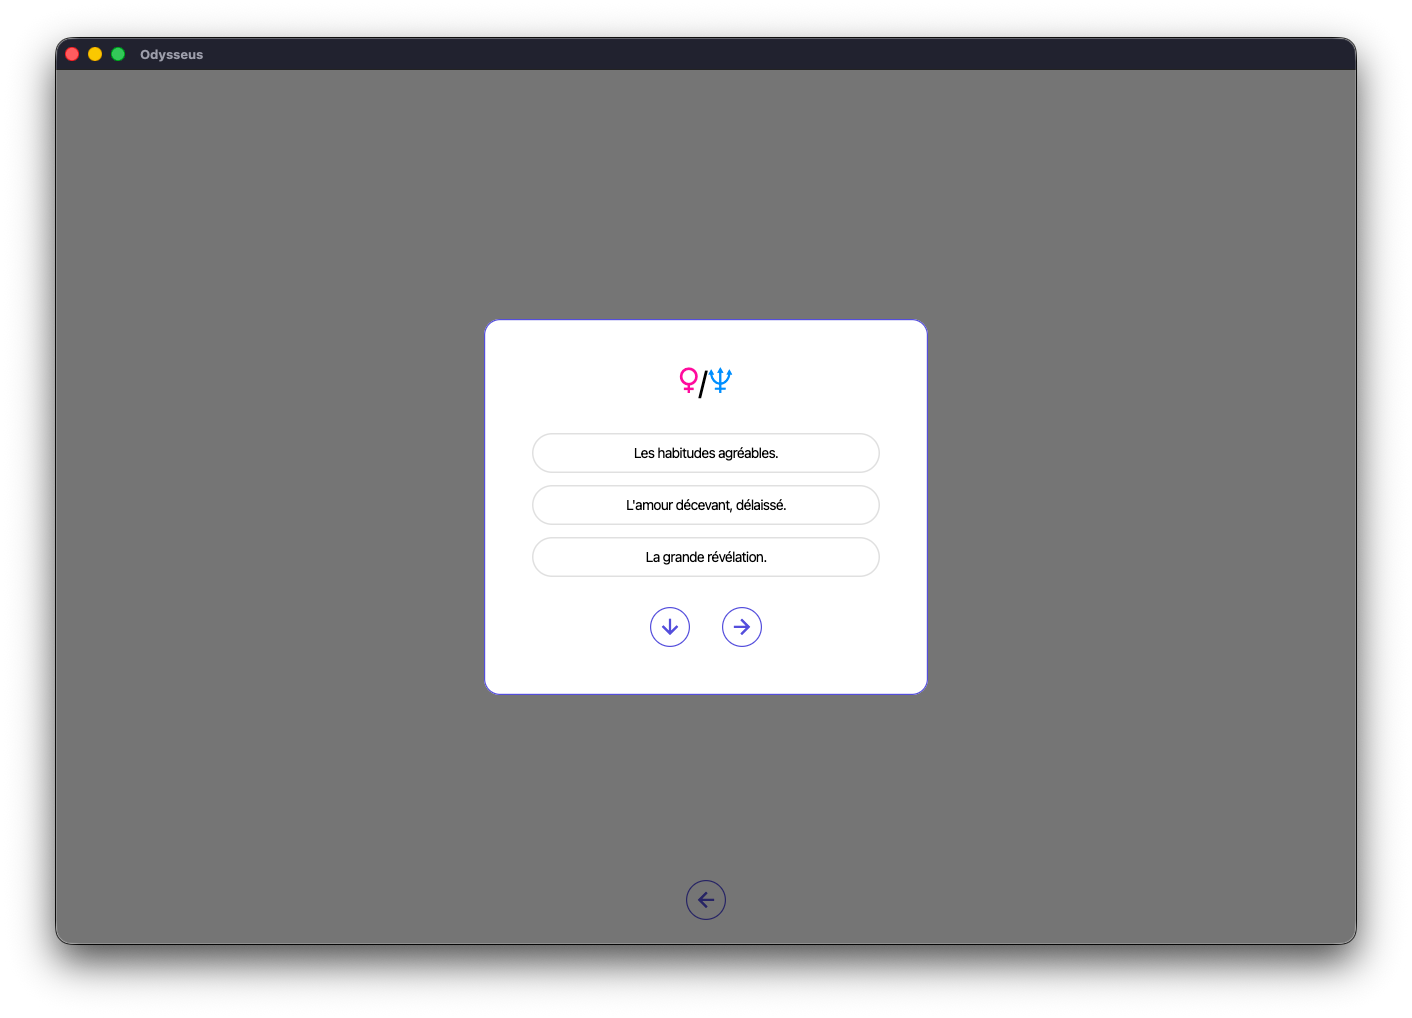
And Definition to Mi-point:
Finally, the same thing with a planetary figure towards Definition:
And a Definition to planetary figure:

CARTE ˘
HANDBOOK
Here is the guide for the CHART ˘ section.
Click on the different sections below to read the content and thus discover the different features.
HOME
The Odysseus home page consists of 5 buttons and a link.
First, we find on the left the CODEX ˚ button, on the right the CHART ˘ button, below the INFORMATION button, then at the bottom of the screen, the mode button 💡, the language button 🇫🇷🇬🇧, and below the version number.
The CODEX ˚ button is used to go to the “textual” part of the application, to discover the meanings of planets, half-points, planetary figures and Houses, but also to search for a specific definition in the Codex, or to practice with quizzes.
The CHART ˘ button is used to generate sky maps, and thus practice Uranian astrology.
The INFORMATION button allows you to have some basic and copyright information about the application.
The mode button 💡 is used to switch from “light/day” mode to “dark/night” mode.
The language button 🇫🇷🇬🇧 is used to change the language of the application, from French to English and vice versa.
Finally, at the bottom is the version number, information that should be provided to me if you encounter a bug on the application, or simply to verify that you have the latest version. This link is also adorned with two emojis on the Windows version when an update is available. Simply click on the link to go to the updates page.
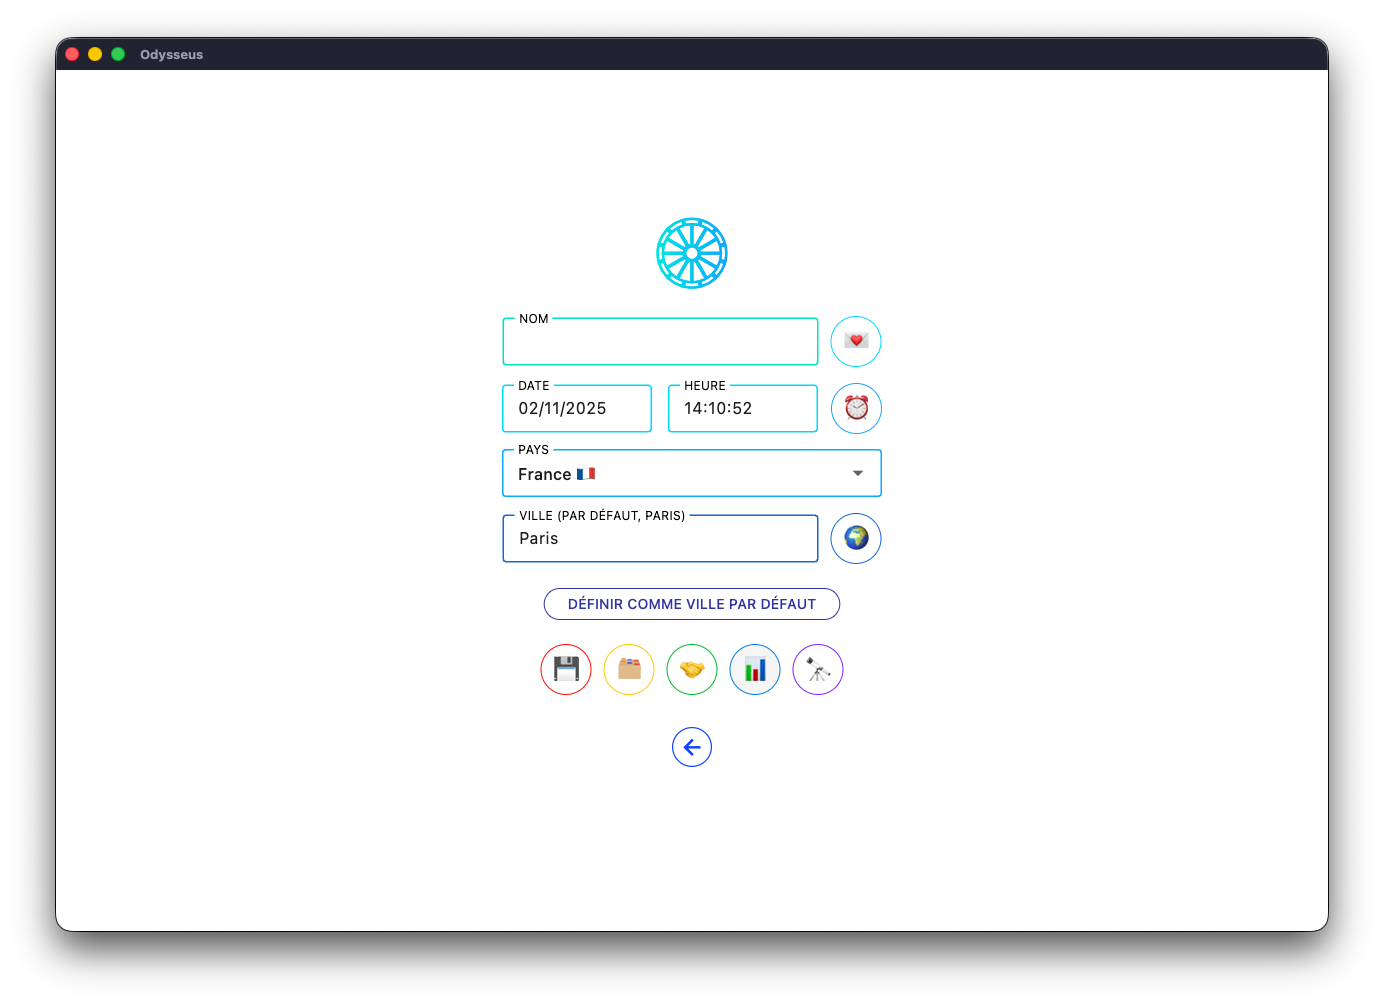
CHART CREATION
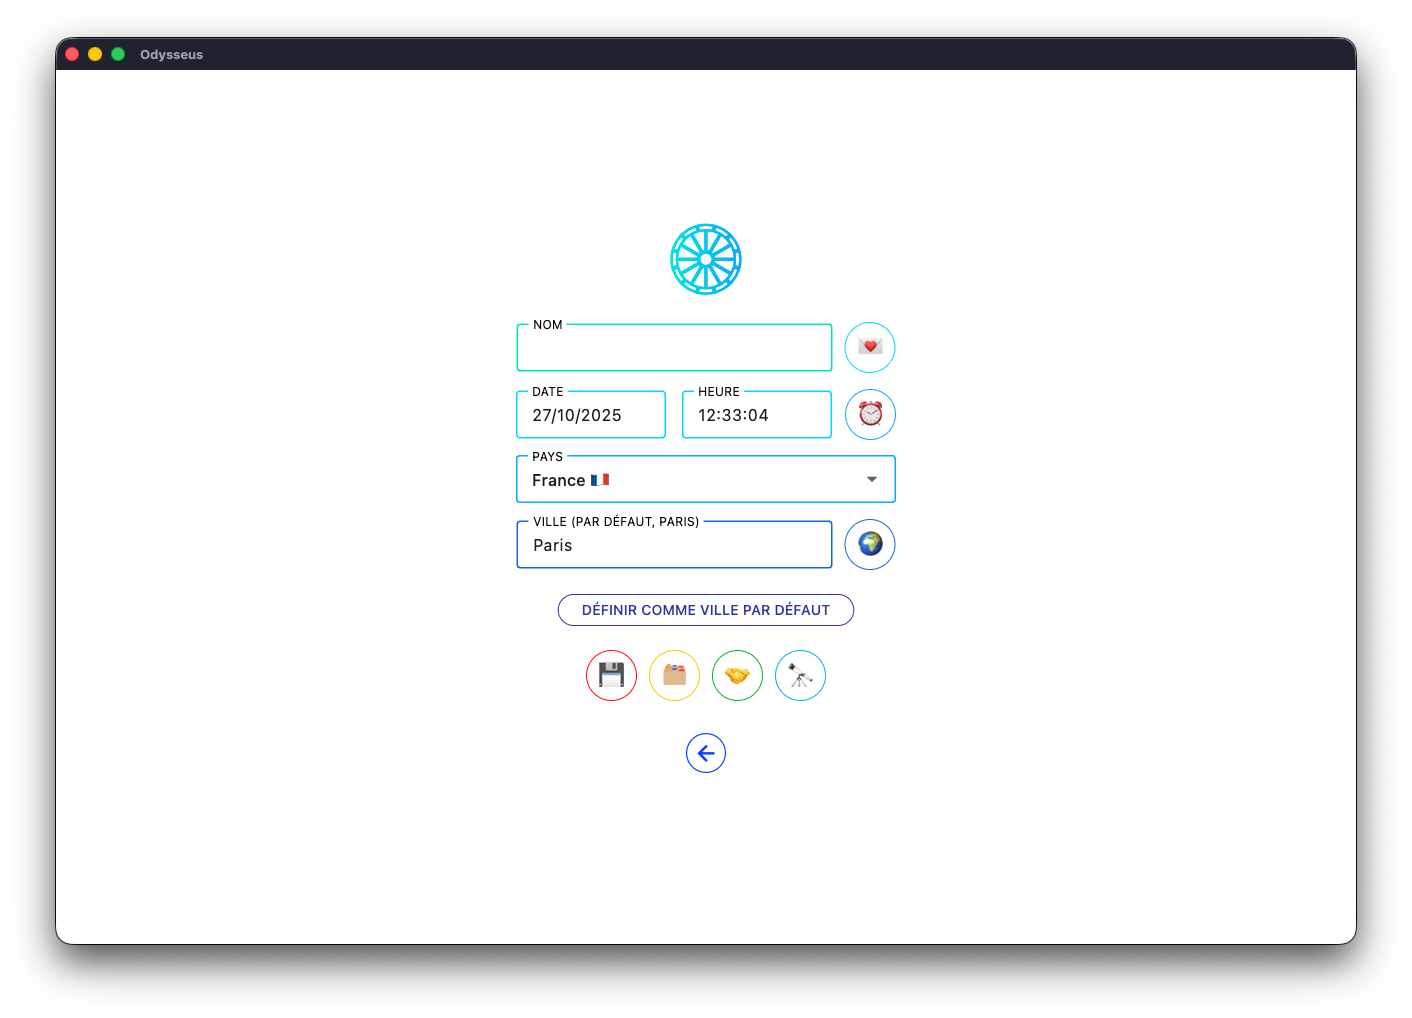
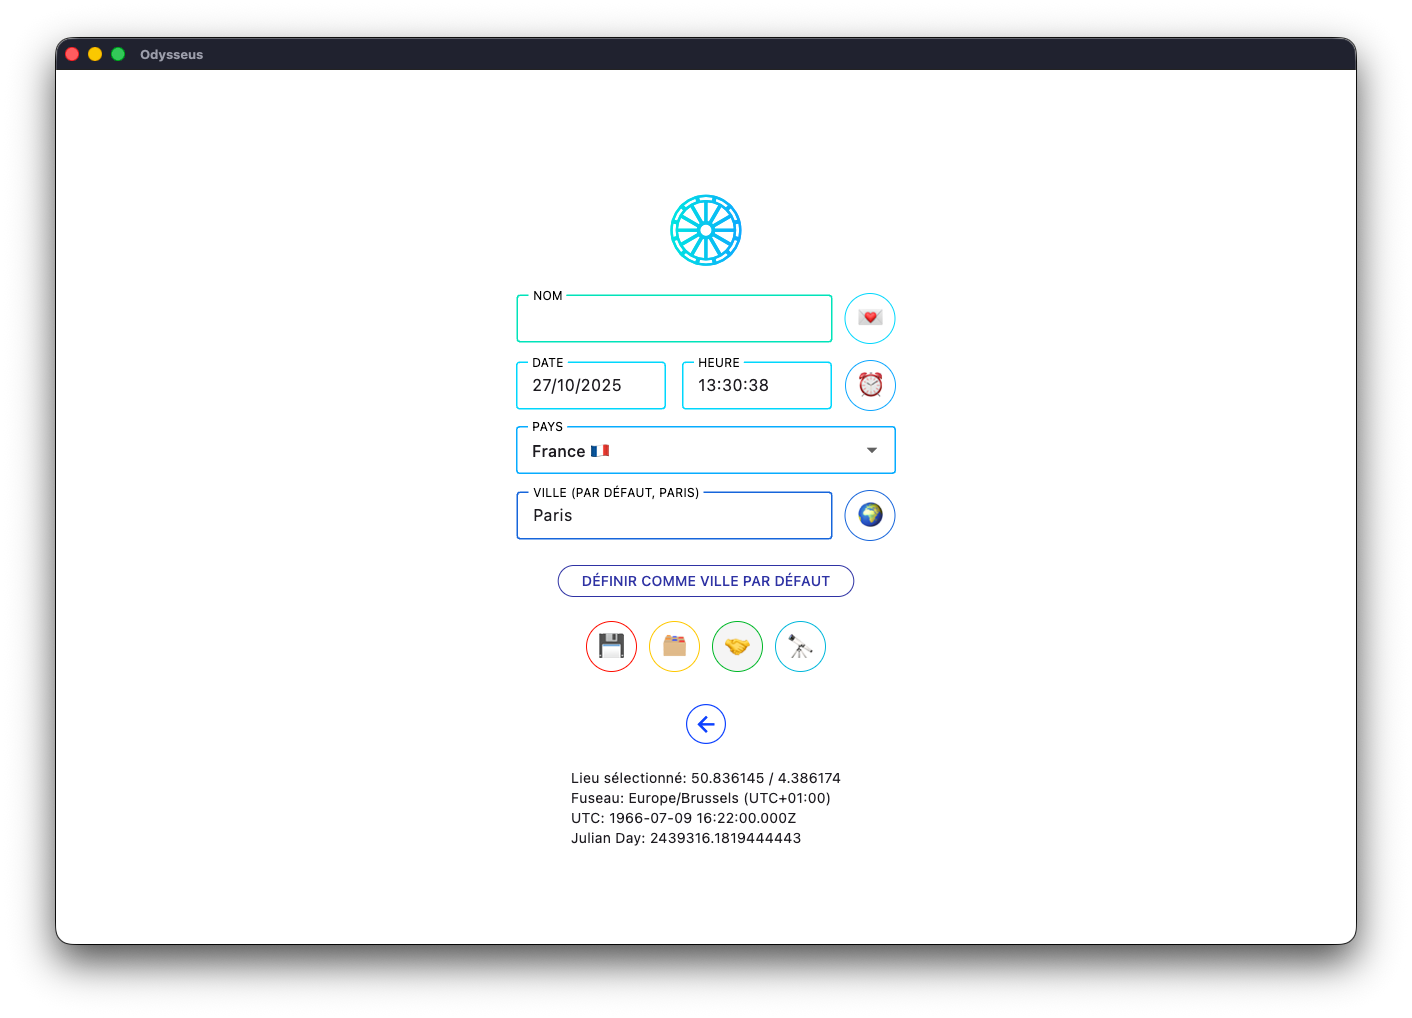
The home page of the “CHART ˘” part is composed of:
- A “NAME” box where you can type the name of the person whose theme you are mounting
- A “DATE” box and a “TIME” box for birth information (for the date, no need to add the / between the days, month and year, simply type all the digits continuously, and the box will self-format; similarly for the time, do not type the: which is between the hour and the minutes, type the 2 digits of the hour and the 2 digits of the minutes, and the box completes itself by putting 00 in place of the seconds automatically, because few people know the seconds of their birth; otherwise, simply click on the box, select the two 00s and exchange them for the right number).
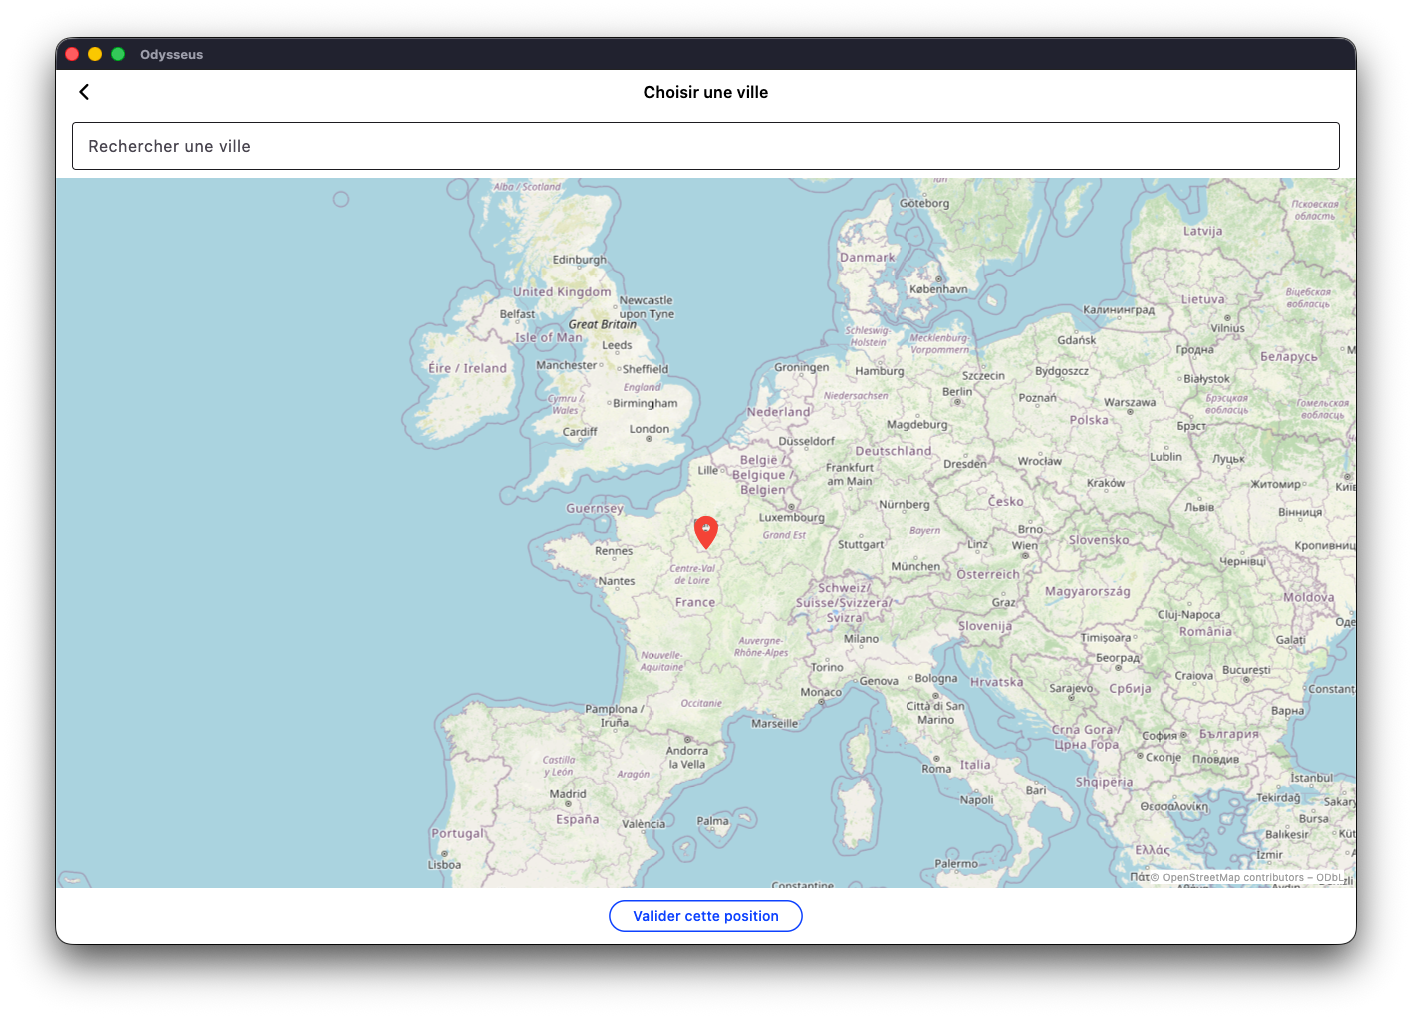
- A “COUNTRY” list followed on the “CITY” box set by default to Paris, but which you can change using the “SET AS DEFAULT CITY” button. You will then have to select the country and then type the first letters of the city. But also, a globe button 🌍 is on the right. By clicking on it, you can directly select the city on a world map:
Other buttons can be found on the home page. First of all, an alarm clock-shaped button ⏰. If you click on it, the form resets to zero and at the current date/time.
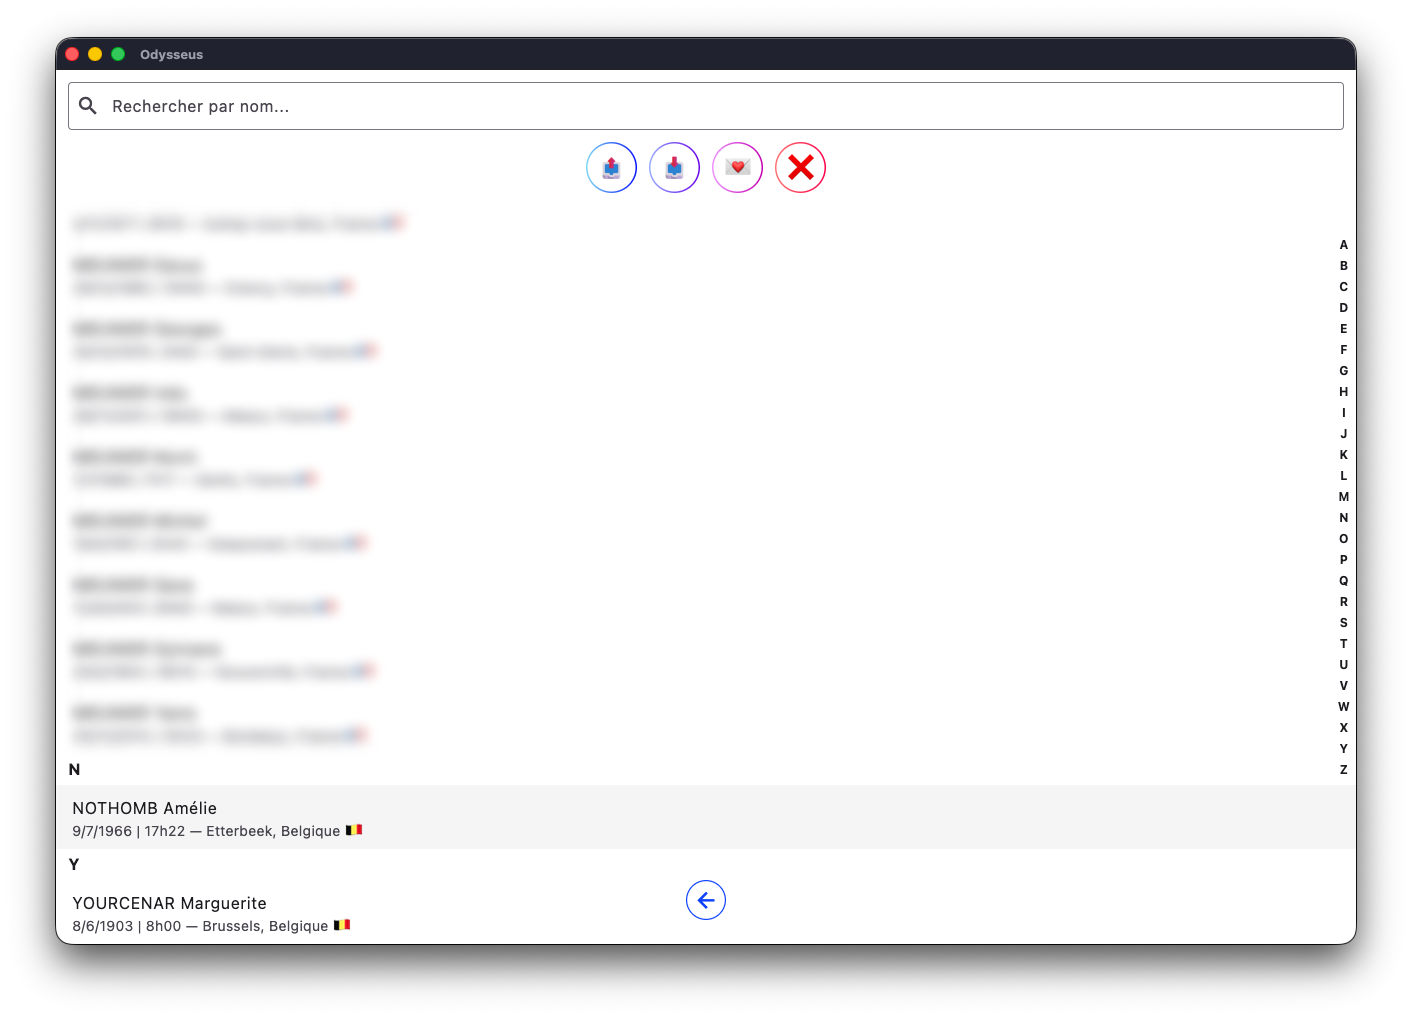
With the floppy button 💾, you will save the theme. You can then find all your themes by clicking on the folder 🗂️.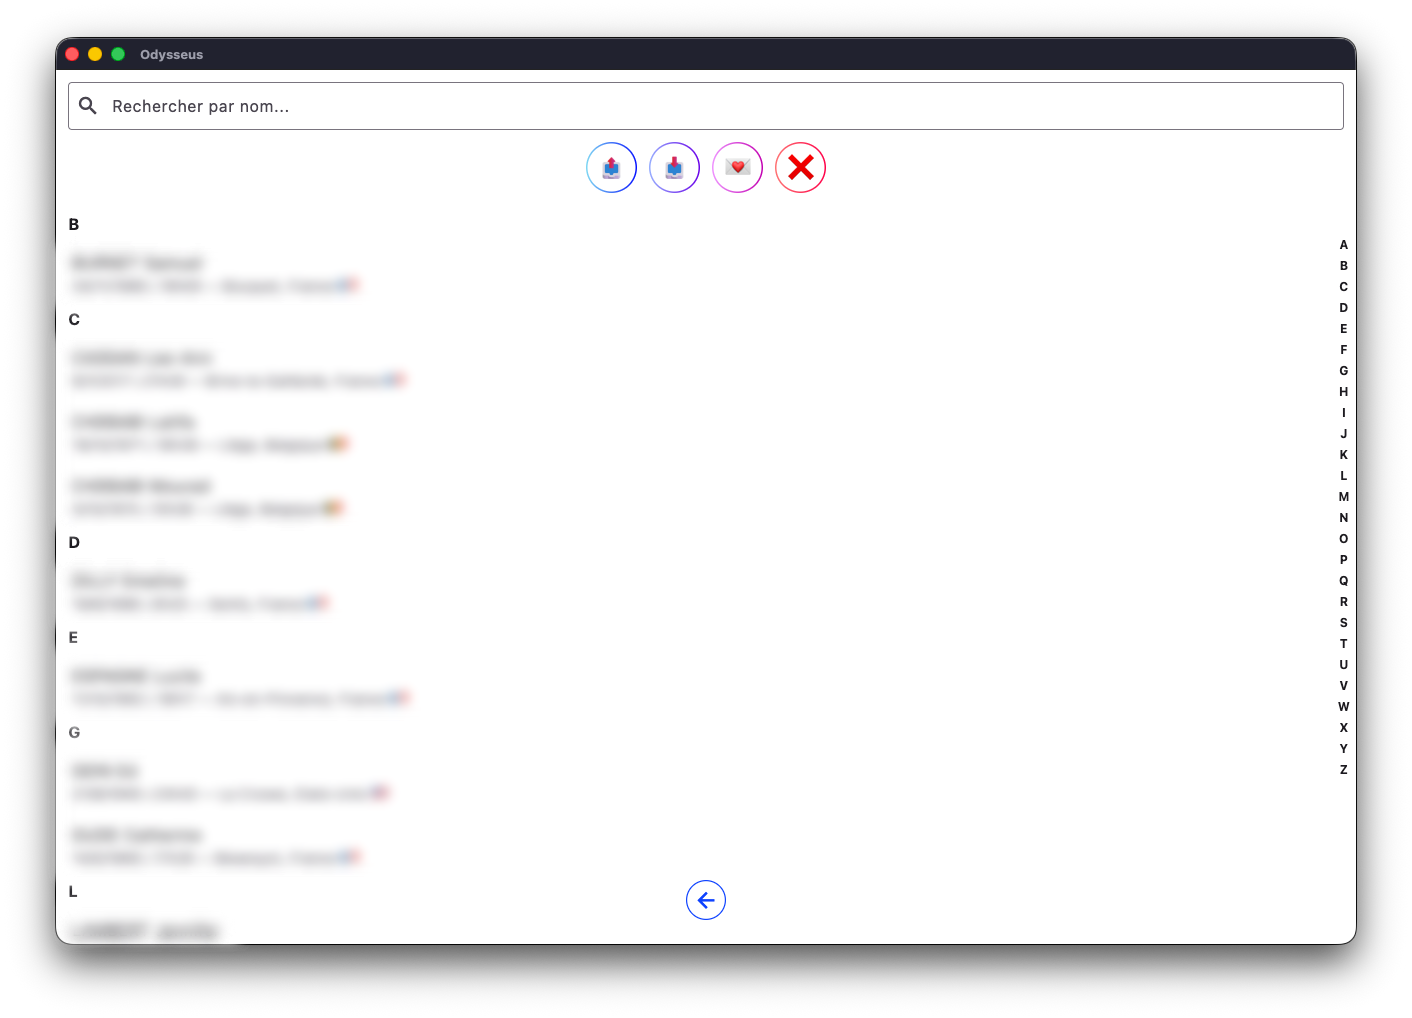
In the new window, you will then find the list of your themes, as well as a search bar at the top to more easily find the one you are looking for if the list is long, two buttons 📤 and 📥 to respectively export and import your themes (remember to make frequent recordings to avoid losing your data if your device has technical problems), as well as a button ❌ to delete the themes of your choice. And finally, the button 💌 that allows you to choose a theme that will be your “favorite”. Once you have clicked on it, you can choose a theme from the list, validate, and back on the theme creation screen, you can click on the button 💌 to the right of the name box to automatically load your favorite theme.
Finally, there are two other buttons: the two-handed button 🤝 which is used to open a synastry (see section concerned at the bottom of the list), and the telescope button 🔭 which is then used to display the theme you have created or opened.
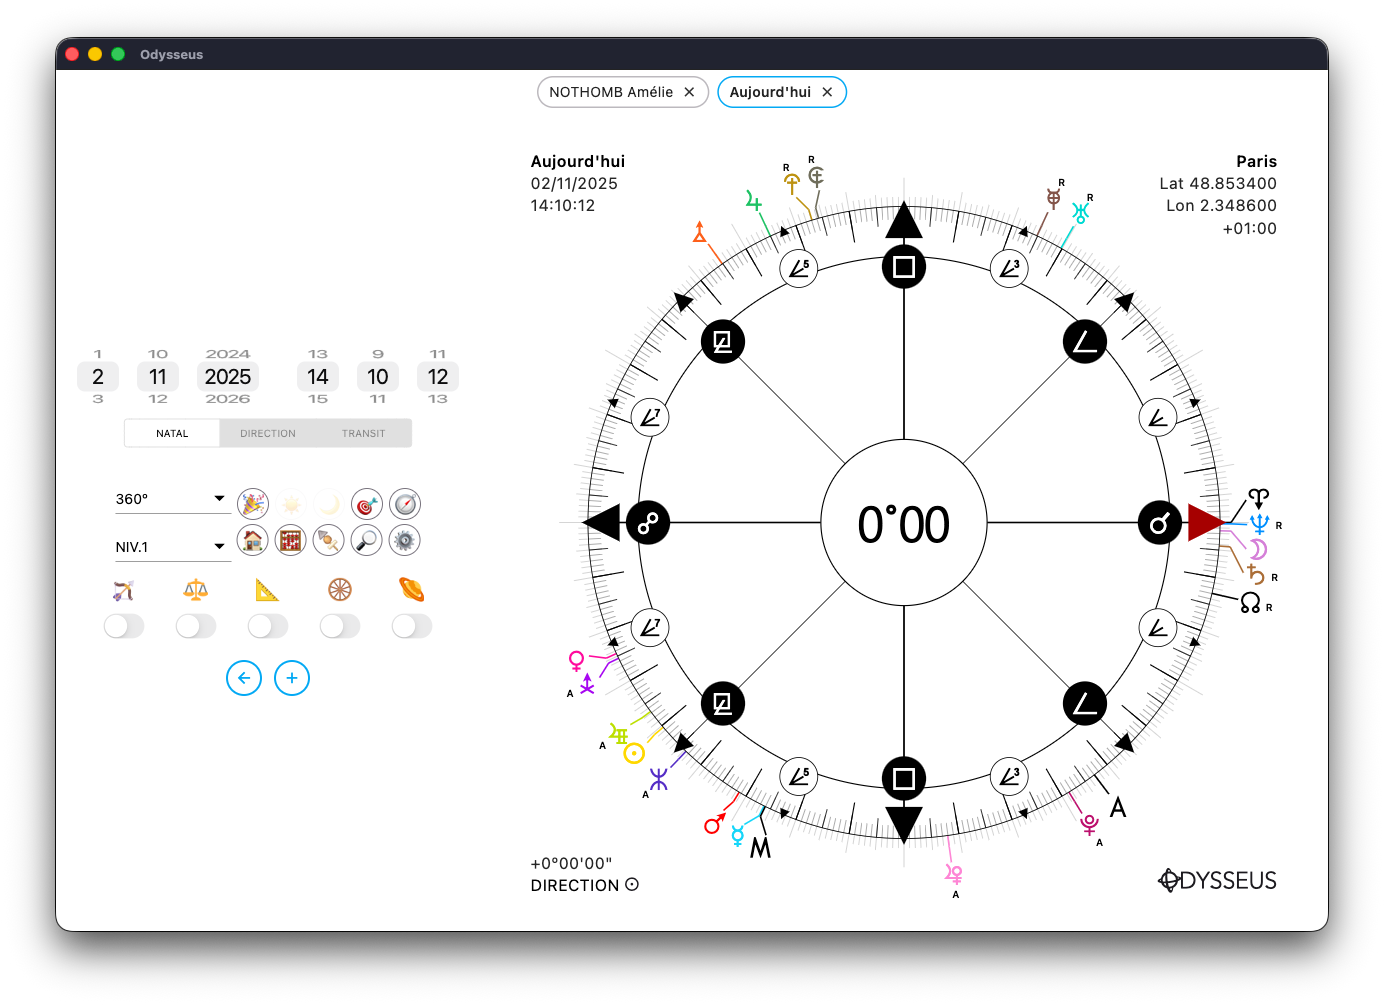
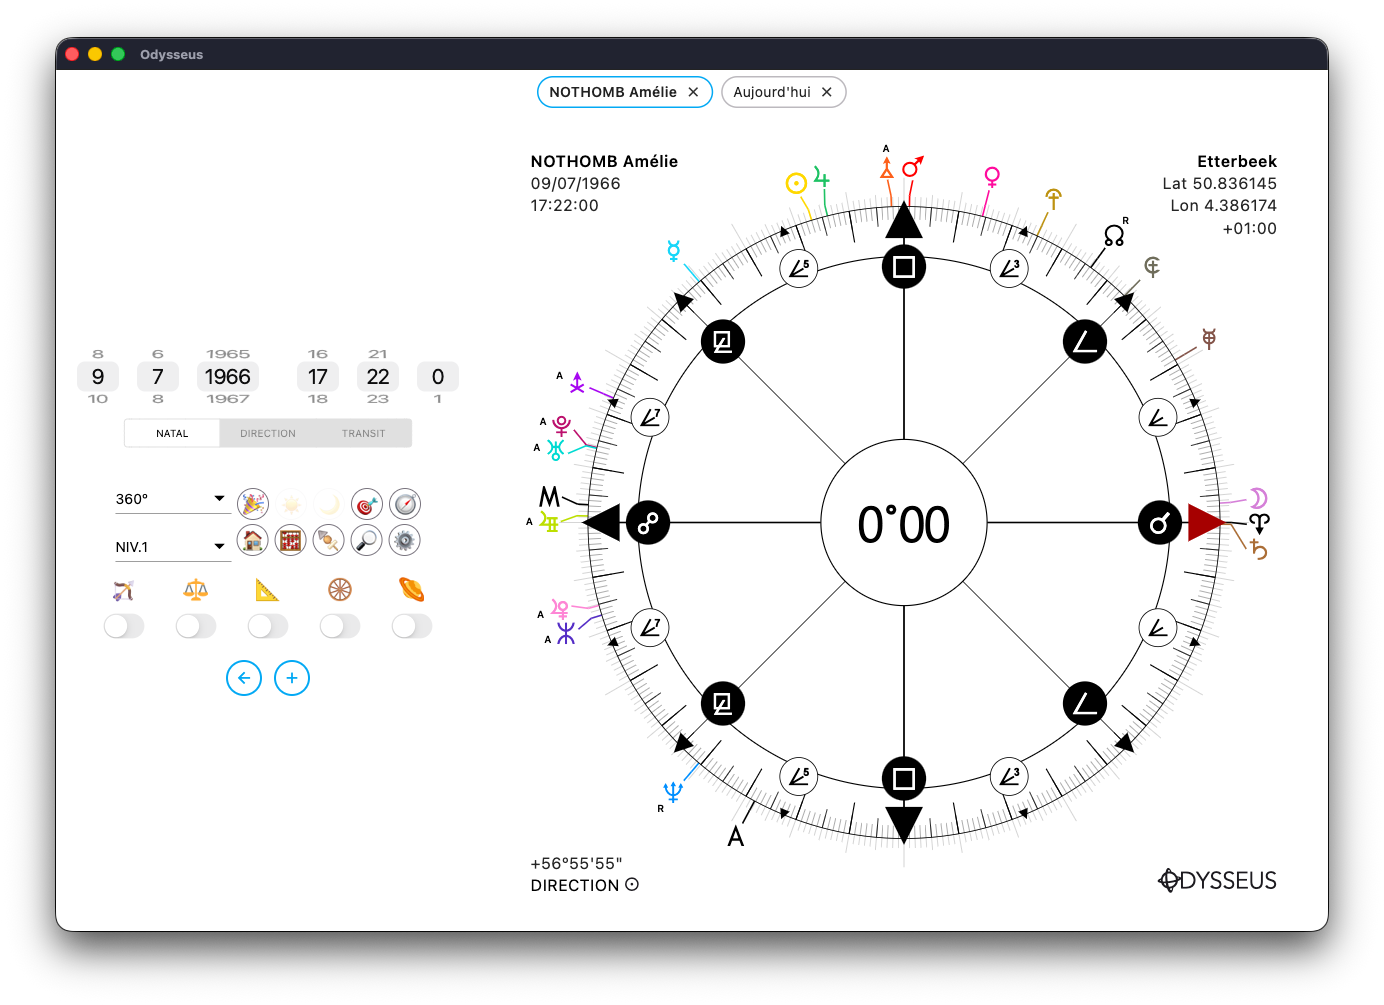
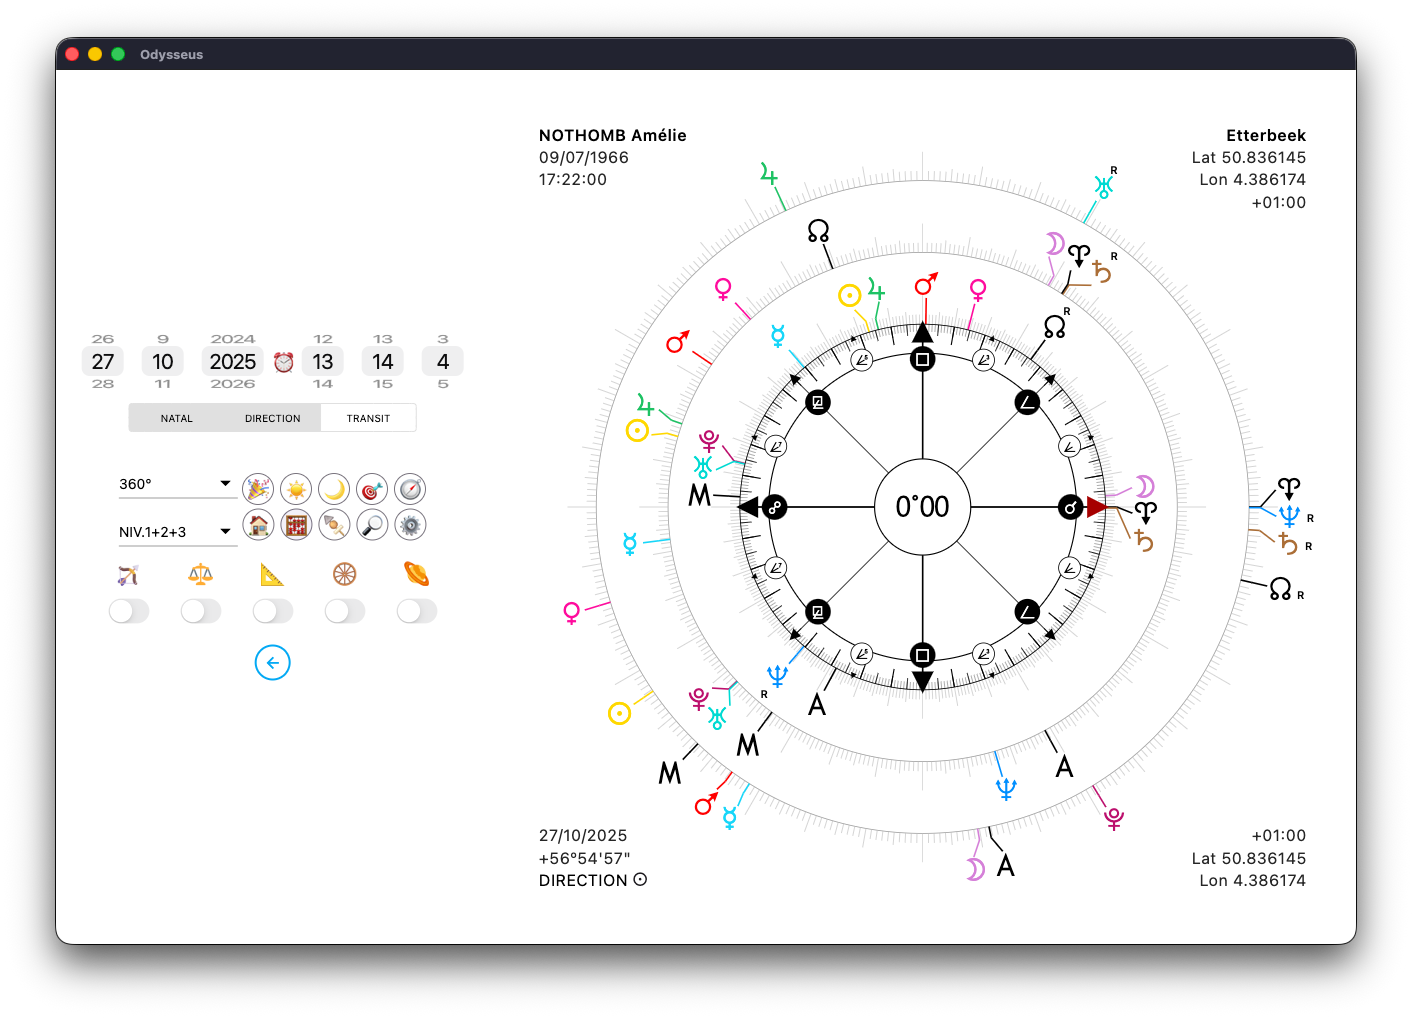
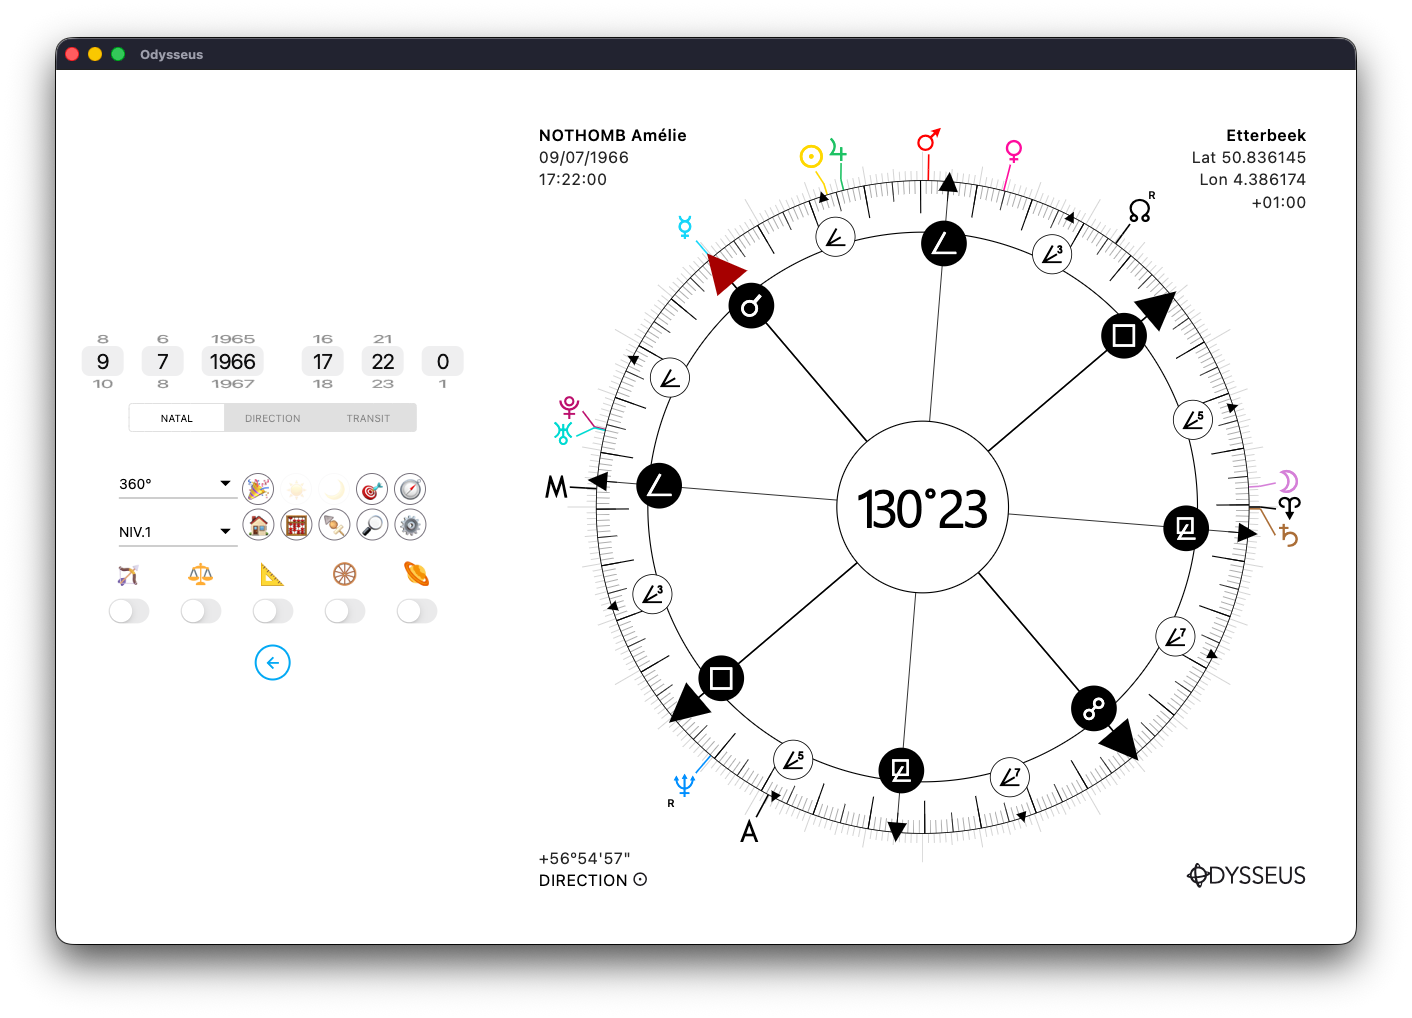
NATAL CHART 🔭
The display of a chart looks like this: a sky map, date and time wheels, a level cursor (natal, direction, transit), wheel and level menus, 10 buttons and 5 switches.
On computer (Mac or Windows), the visual will be the one you see there. On iPad, iPhone and Android, the composition will be the same, but the layout will be vertical and not horizontal (the card in the middle, the wheels and the slider at the top, the buttons, menus and switches at the bottom).
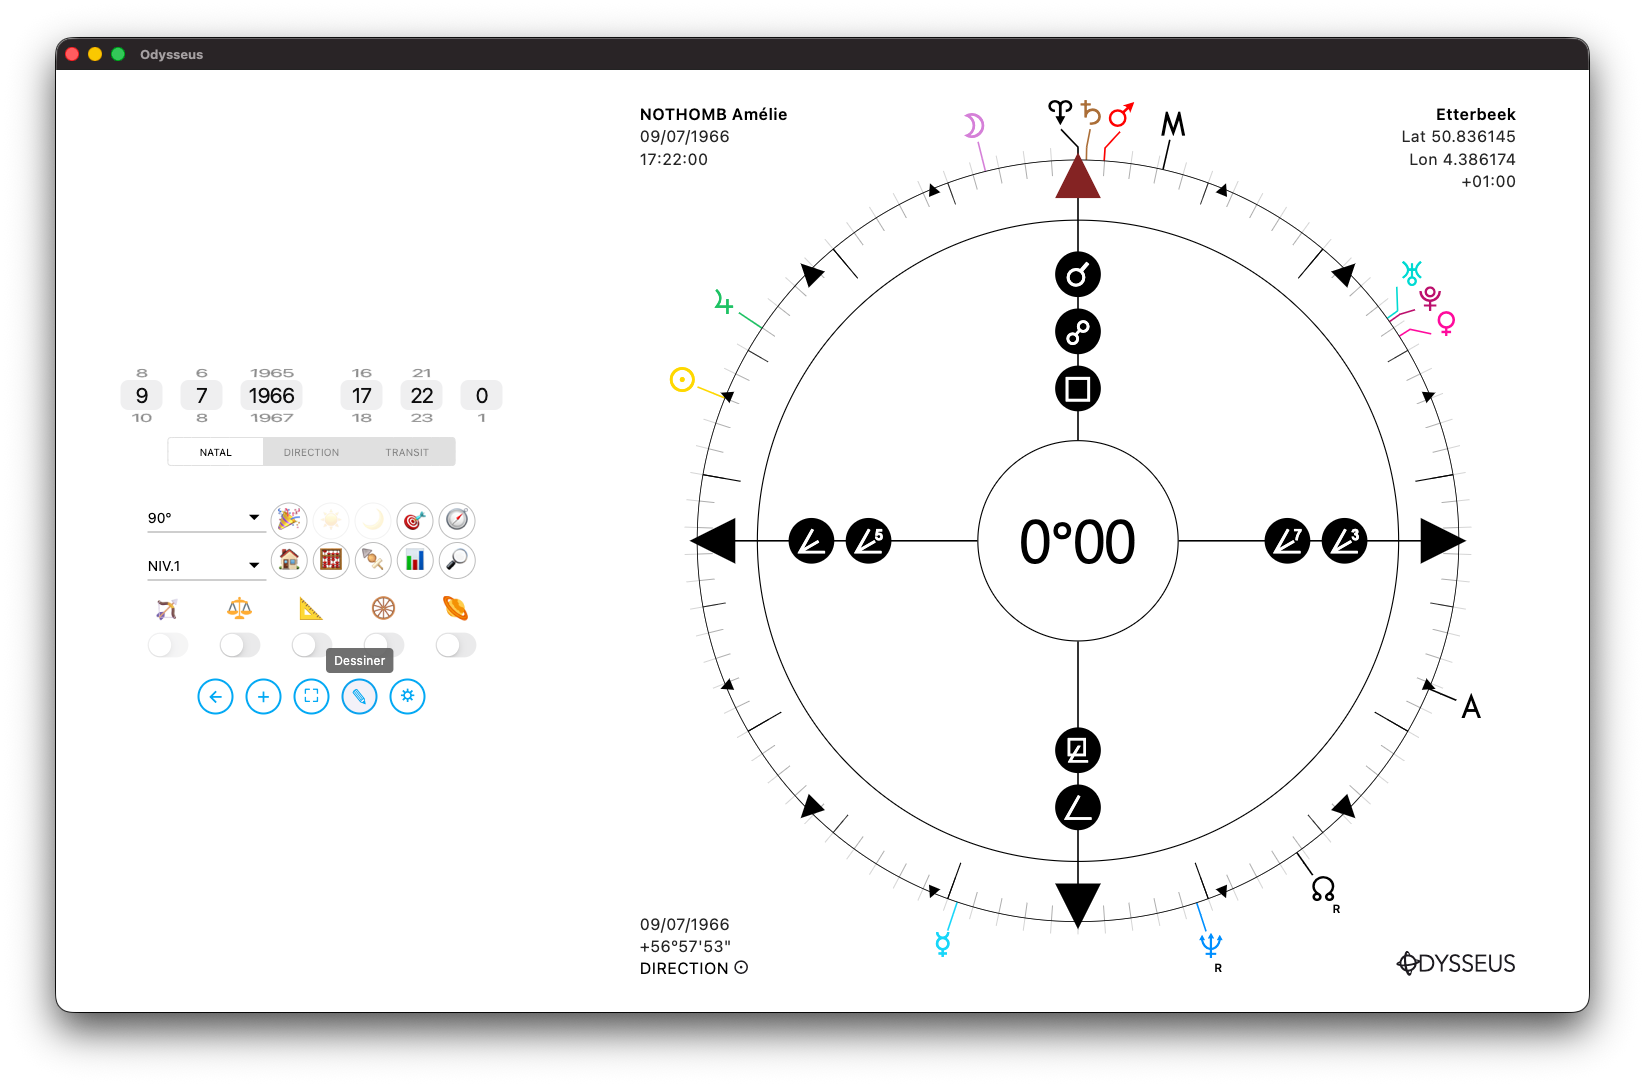
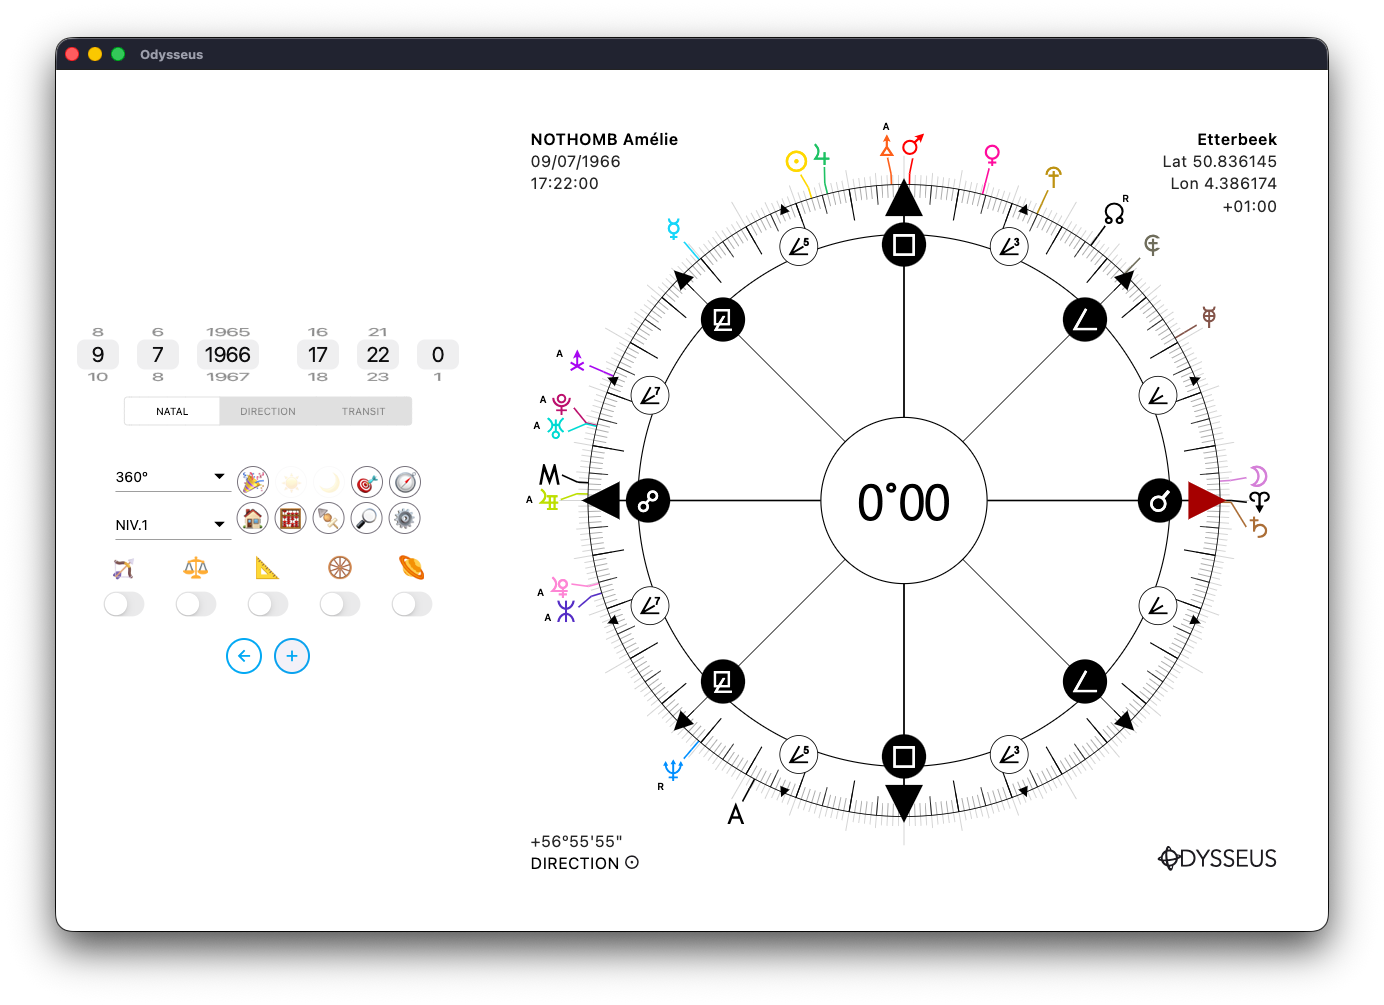
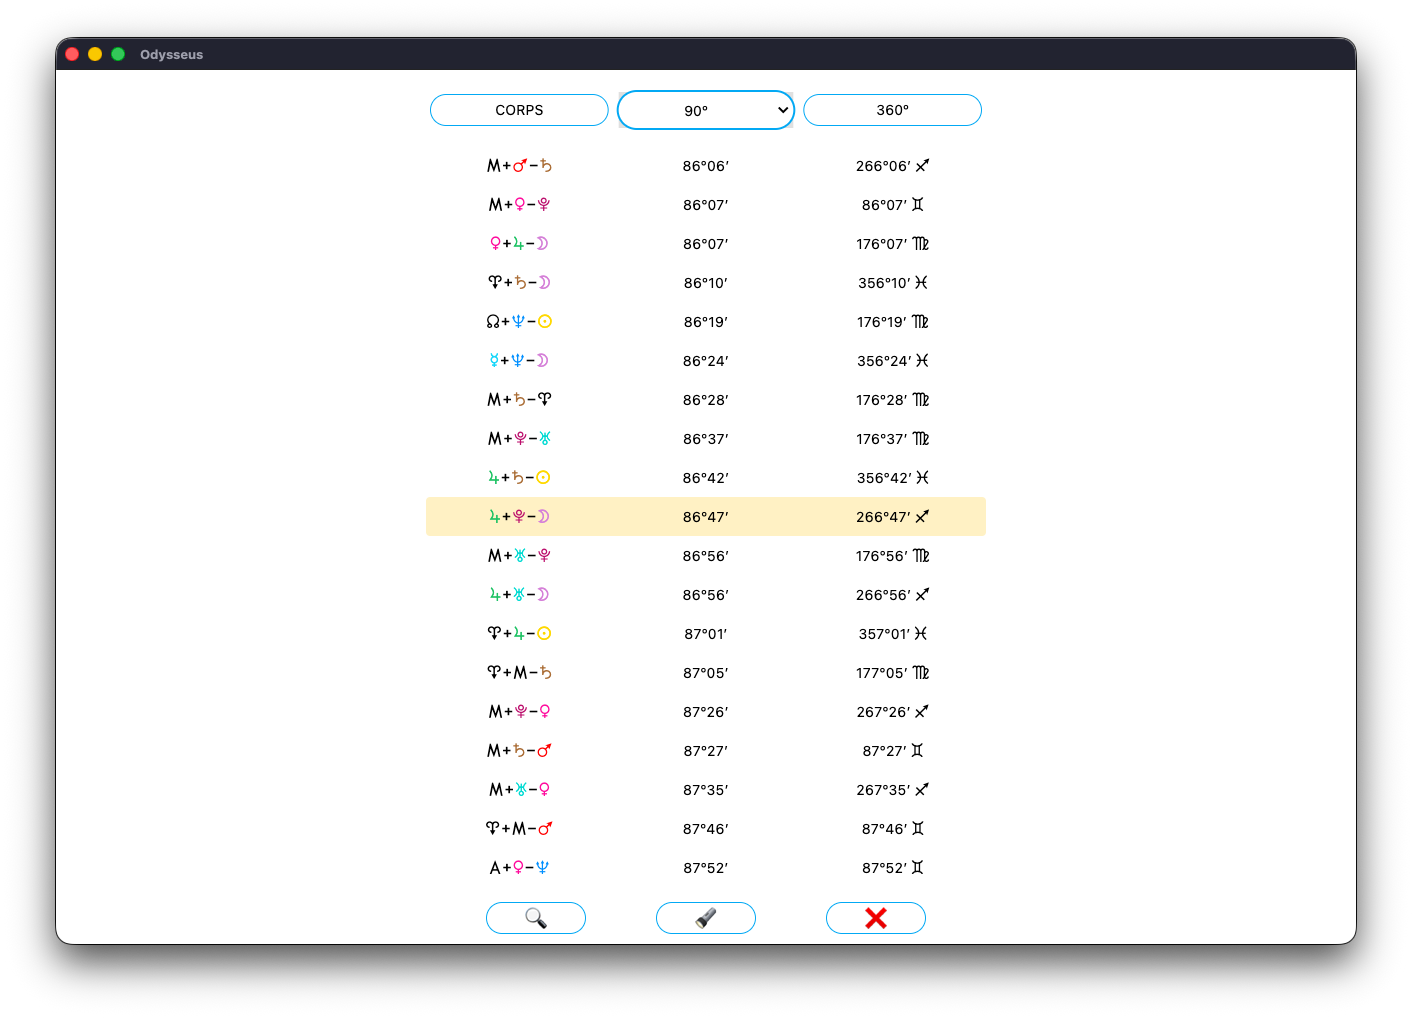
With the drop-down menus, you will have the possibility to display either a 360º wheel: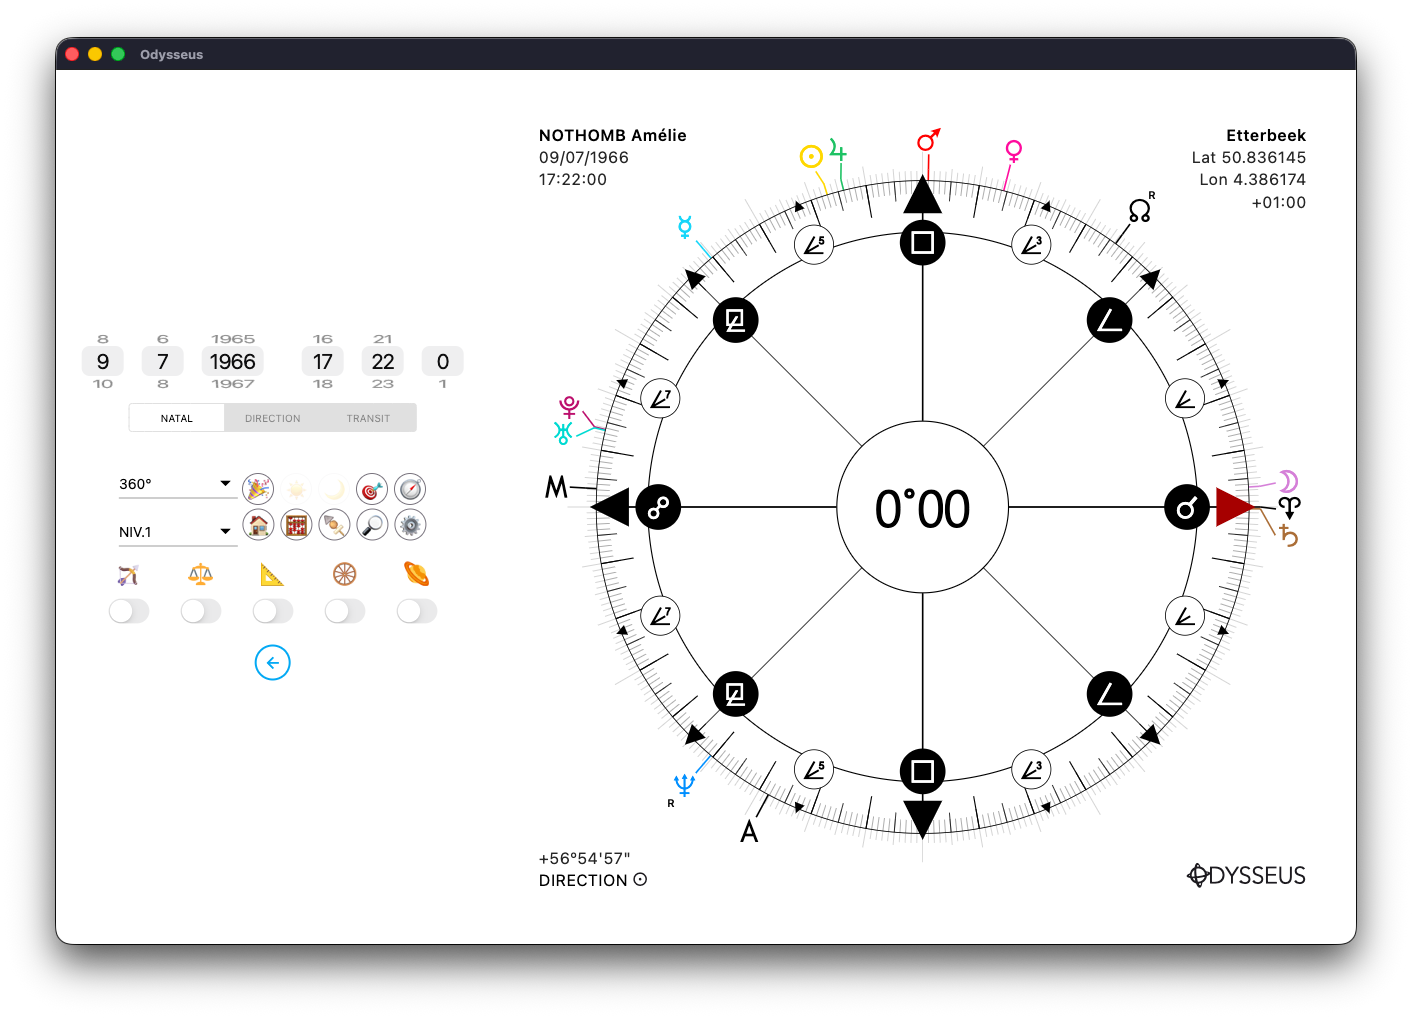
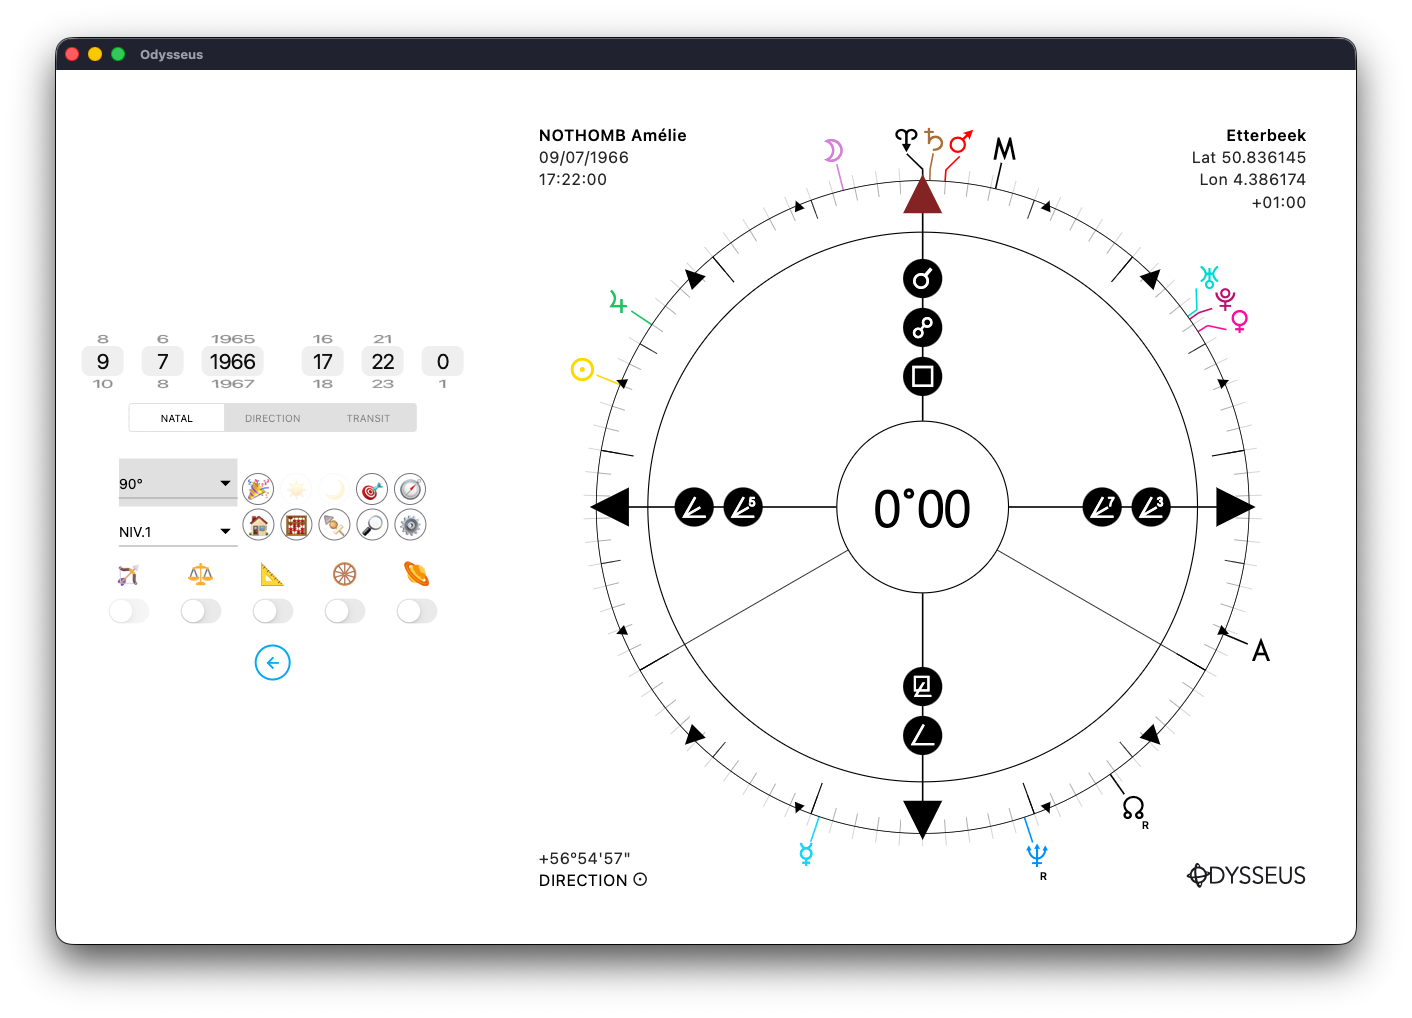
Or 90º:
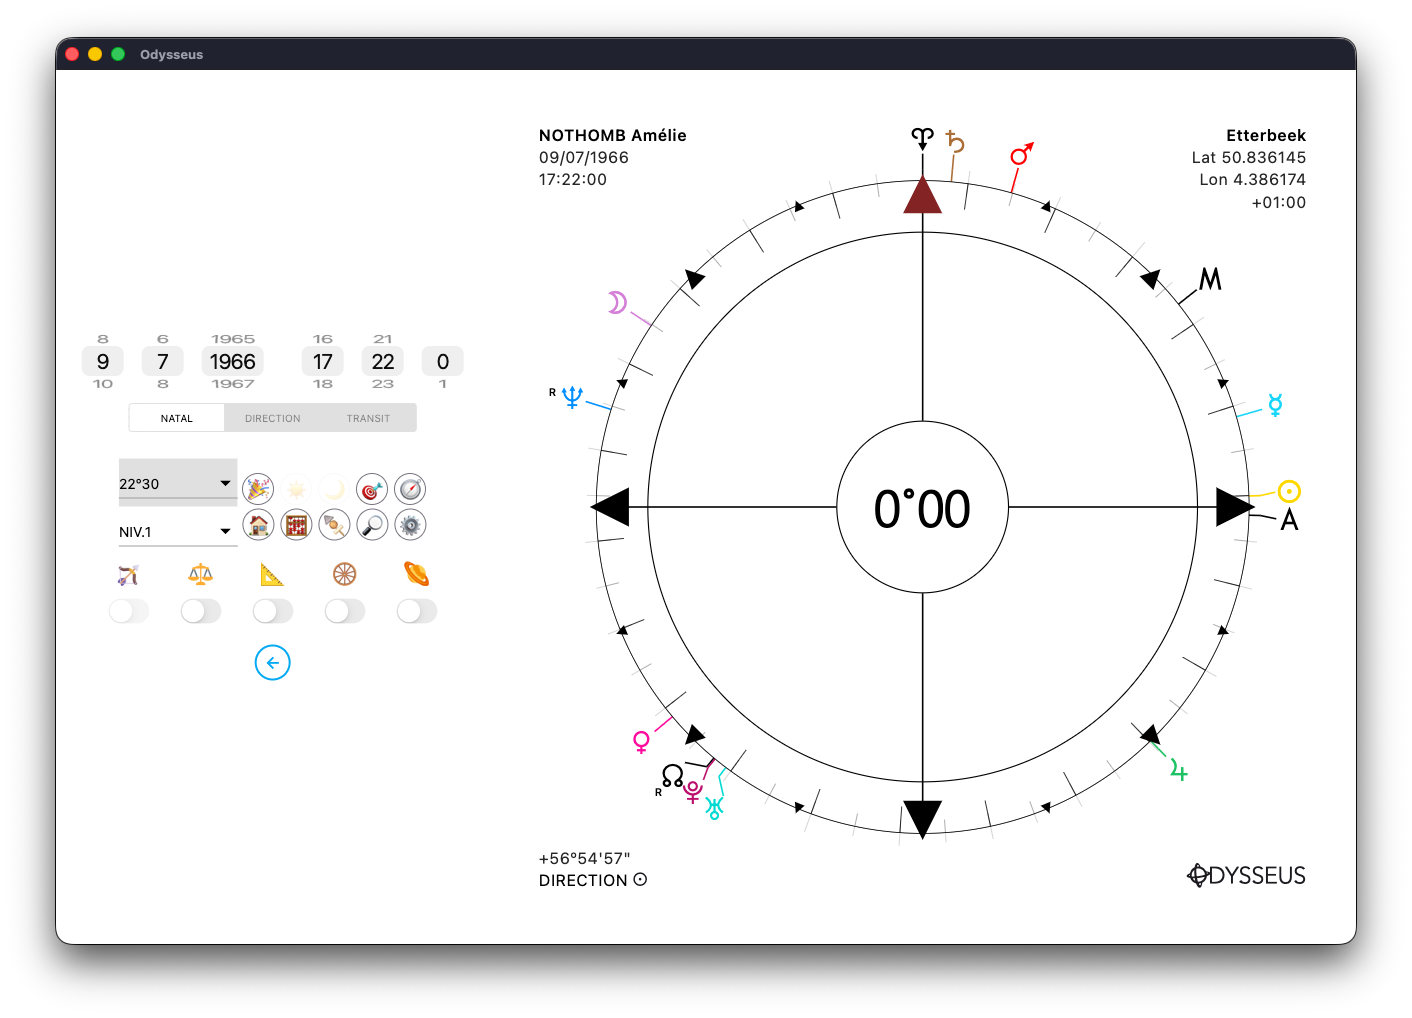
Or 22º30 :
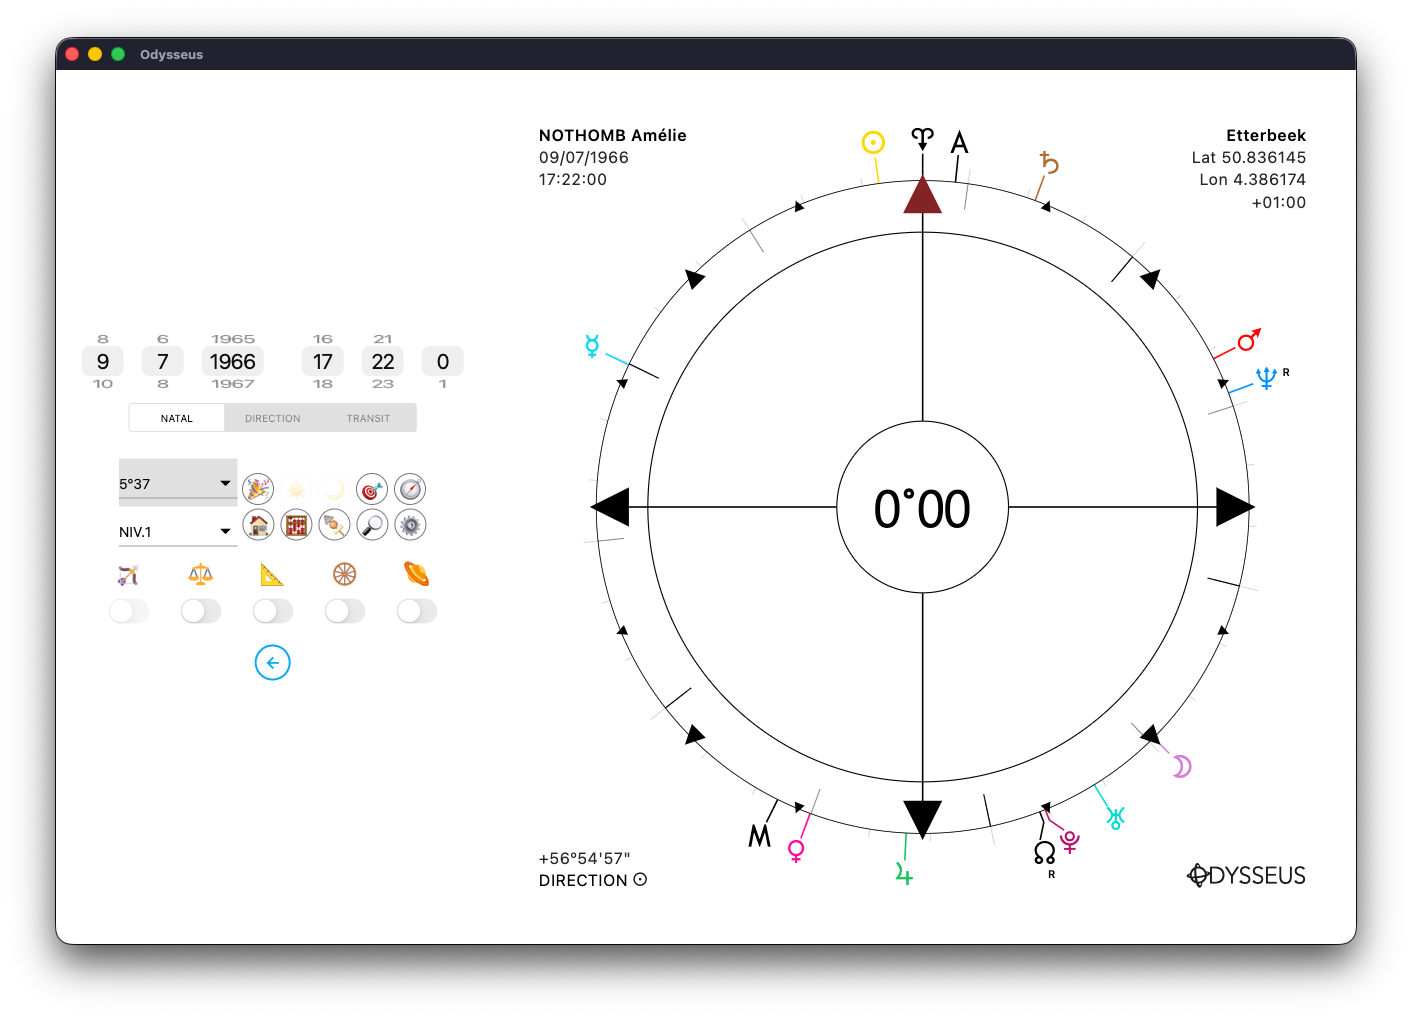
Or 5º37 :
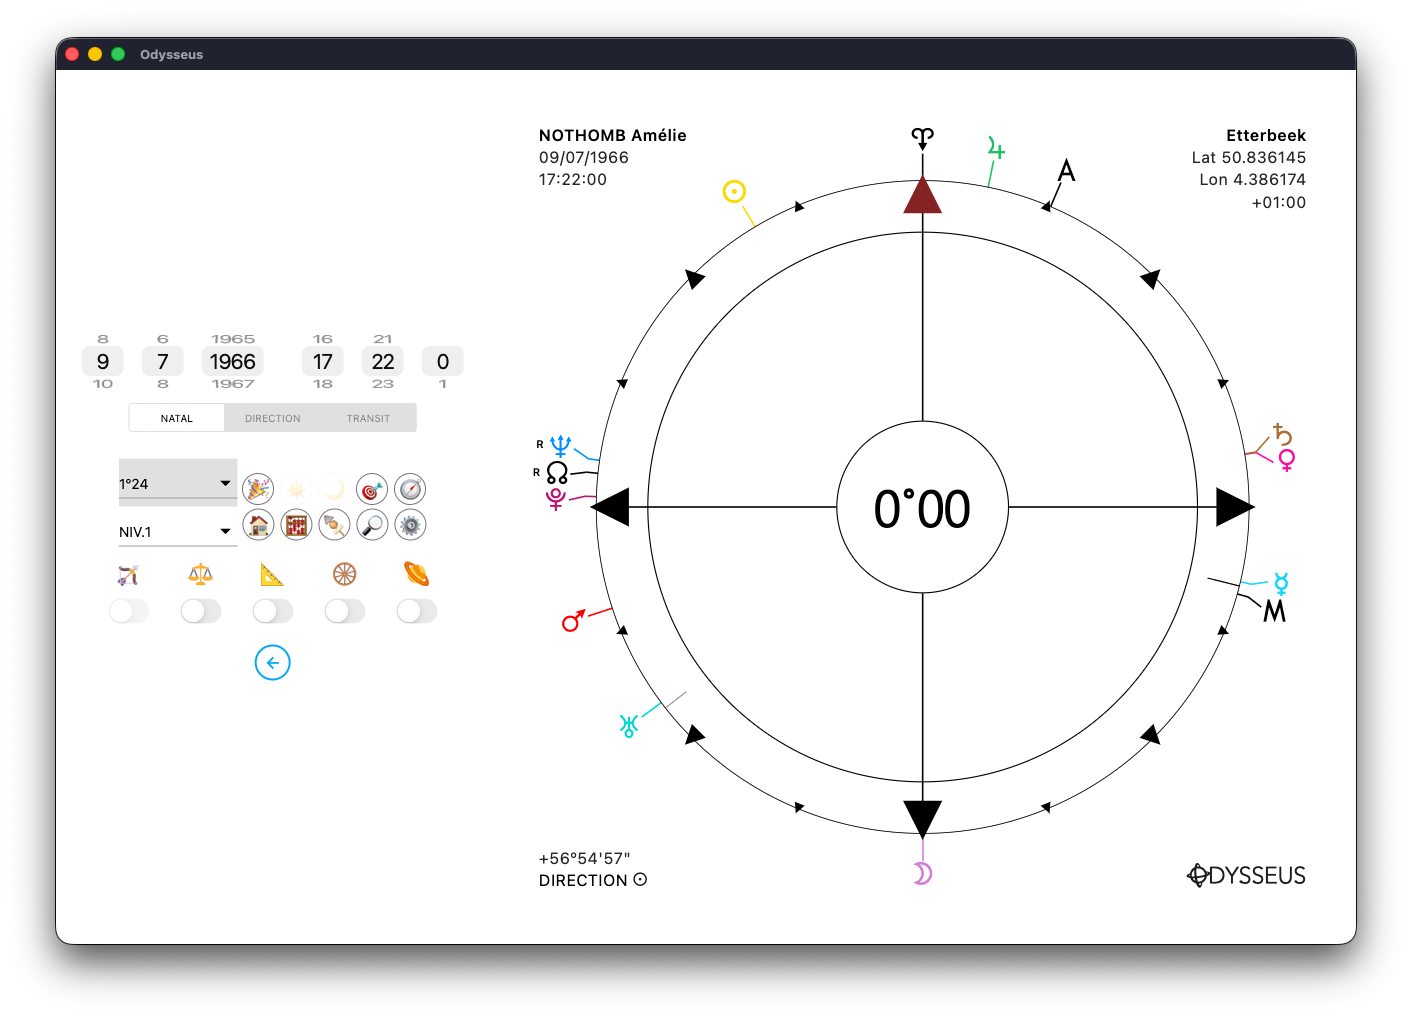
Or 1º24 :
You can also display either Level 1/Natal or Level 2/Direction:
Either Level 3/Transits:
Either Level 1+2 (Natal+Direction)
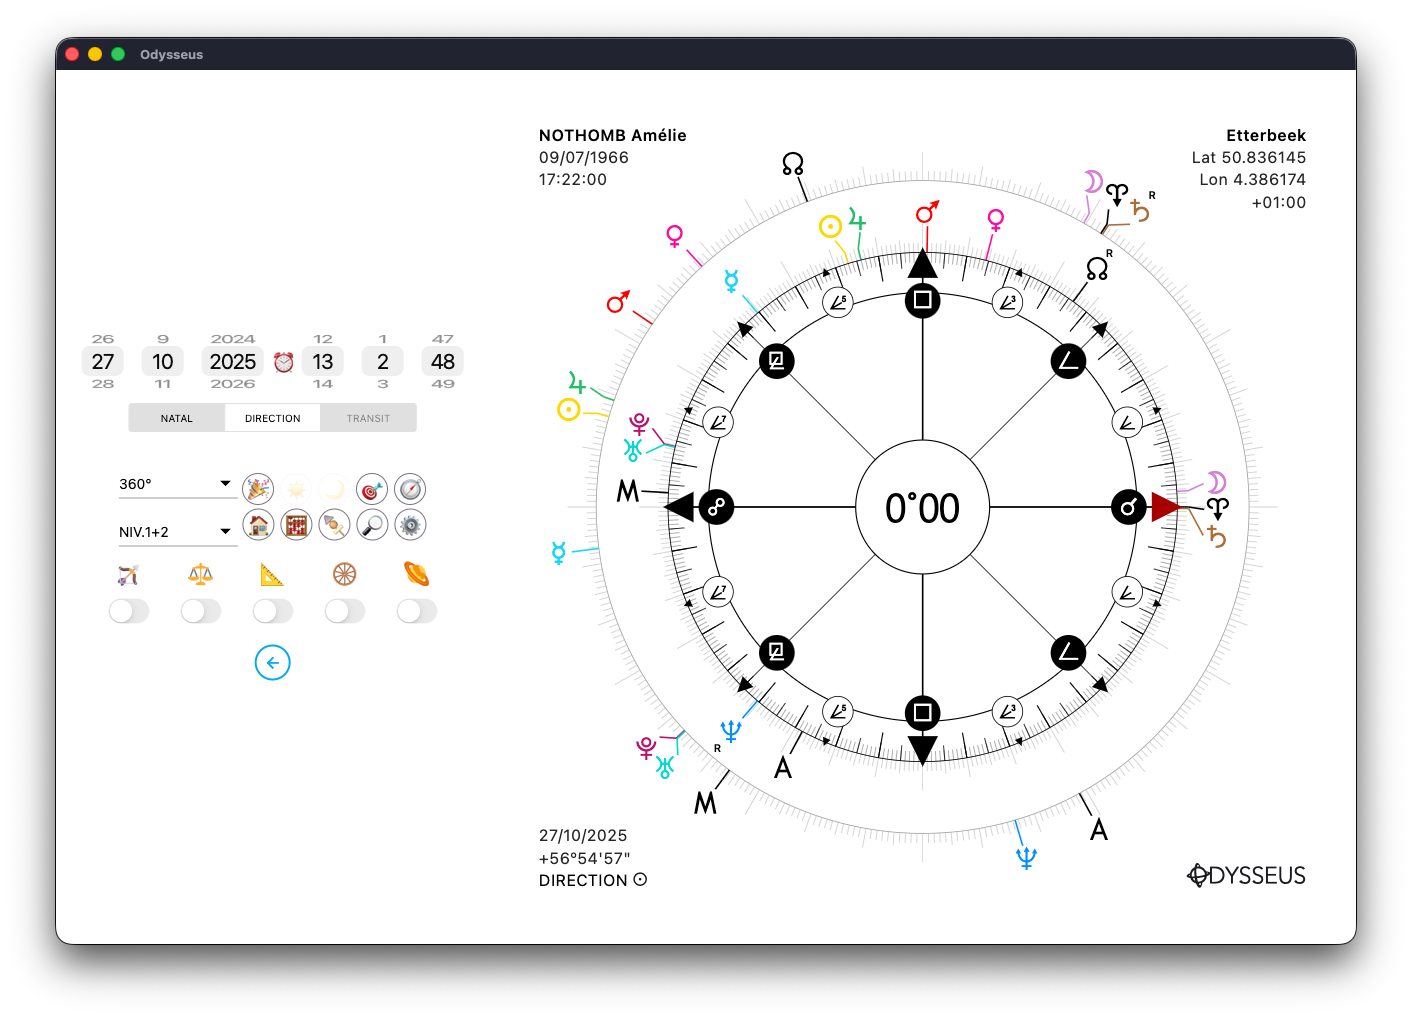
Either Level 1+3 (Natal+Transit)
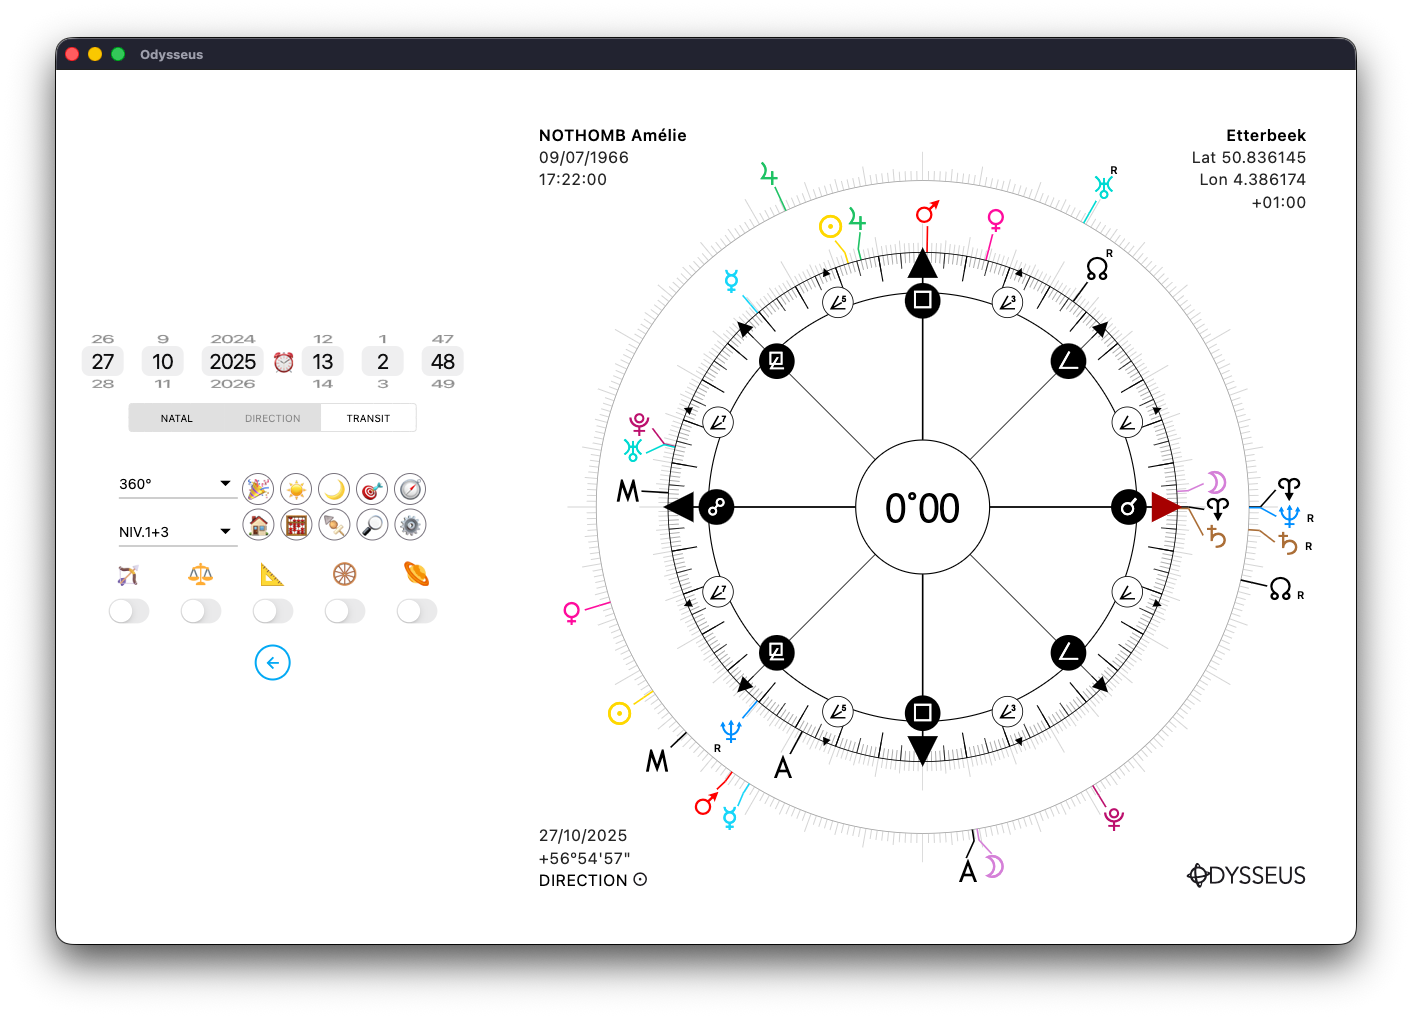
Either Level 2+3 (Direction+Transit):
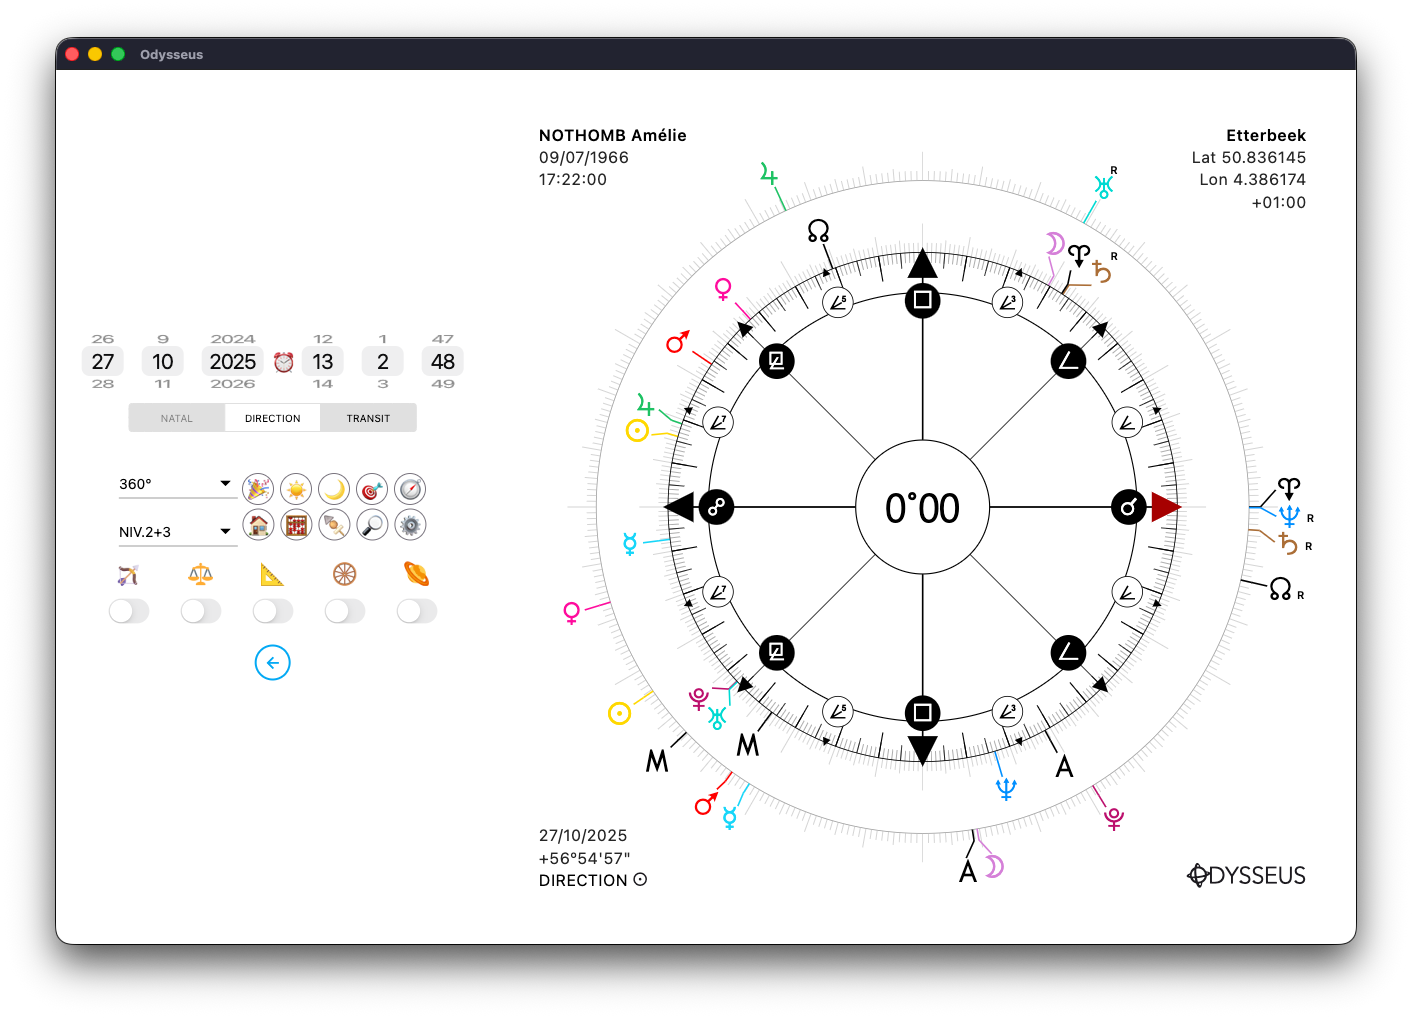
Or the 3 Levels at the same time:
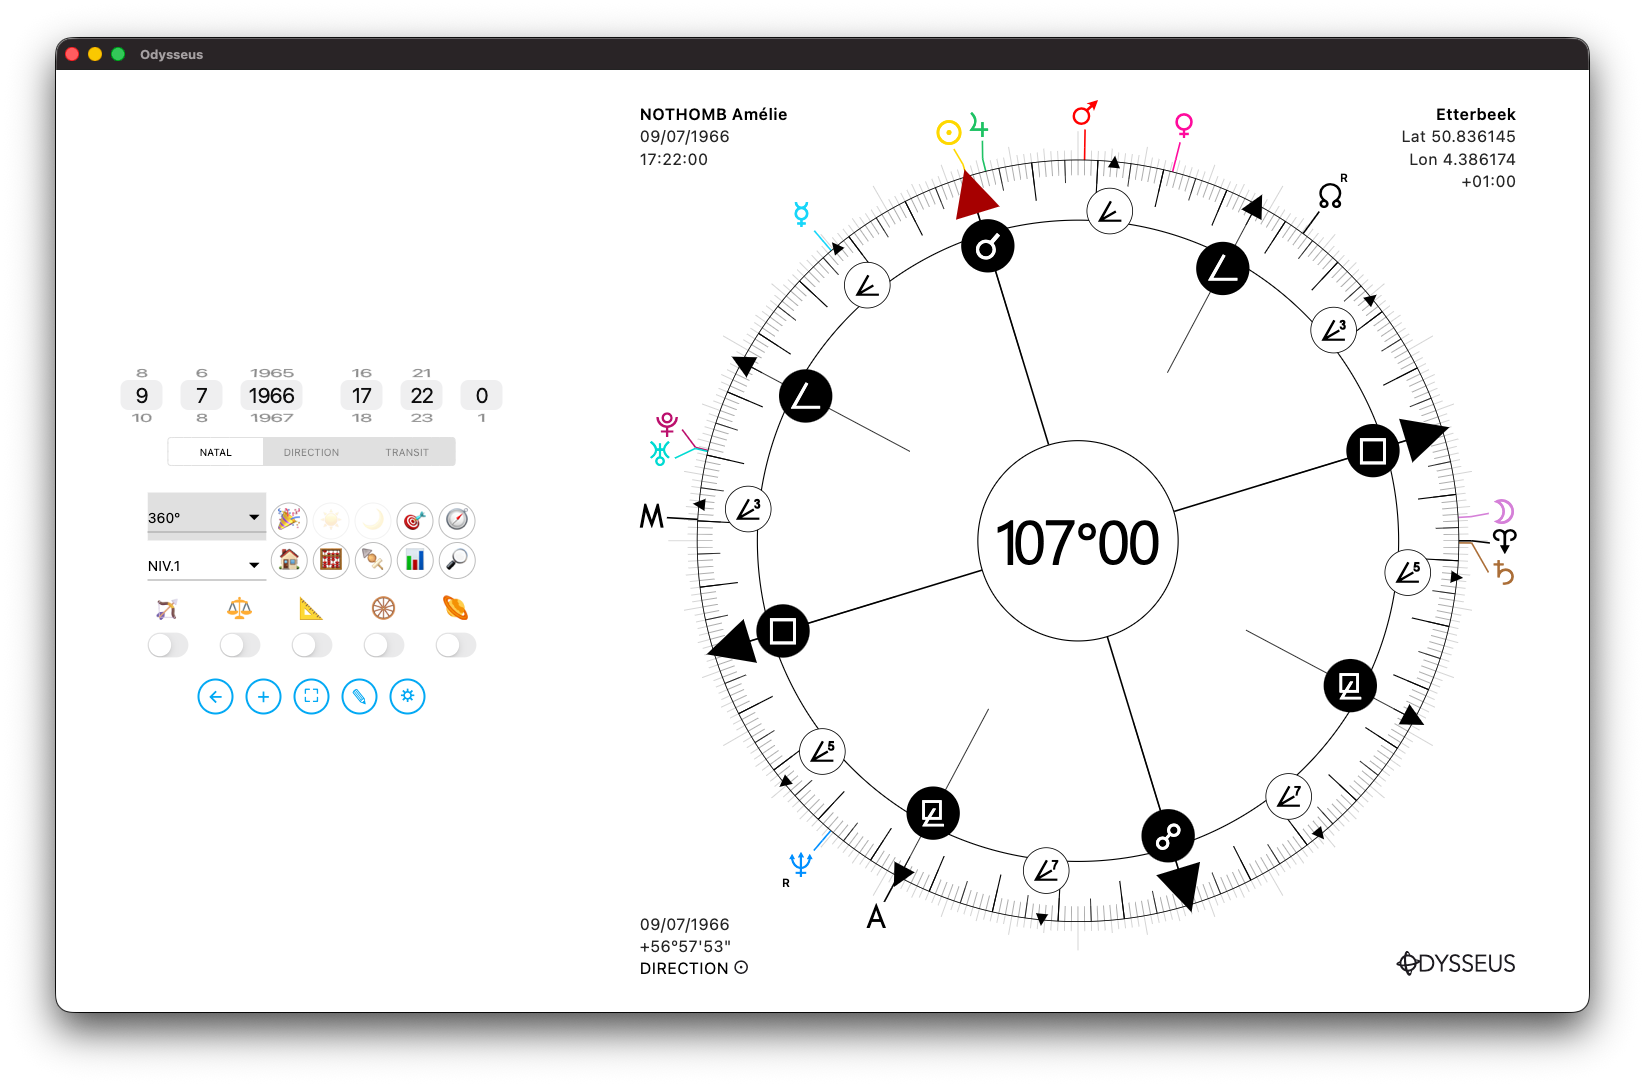
When you are on the 360º wheel, the degrees in the center are displayed by default in the 360º format:
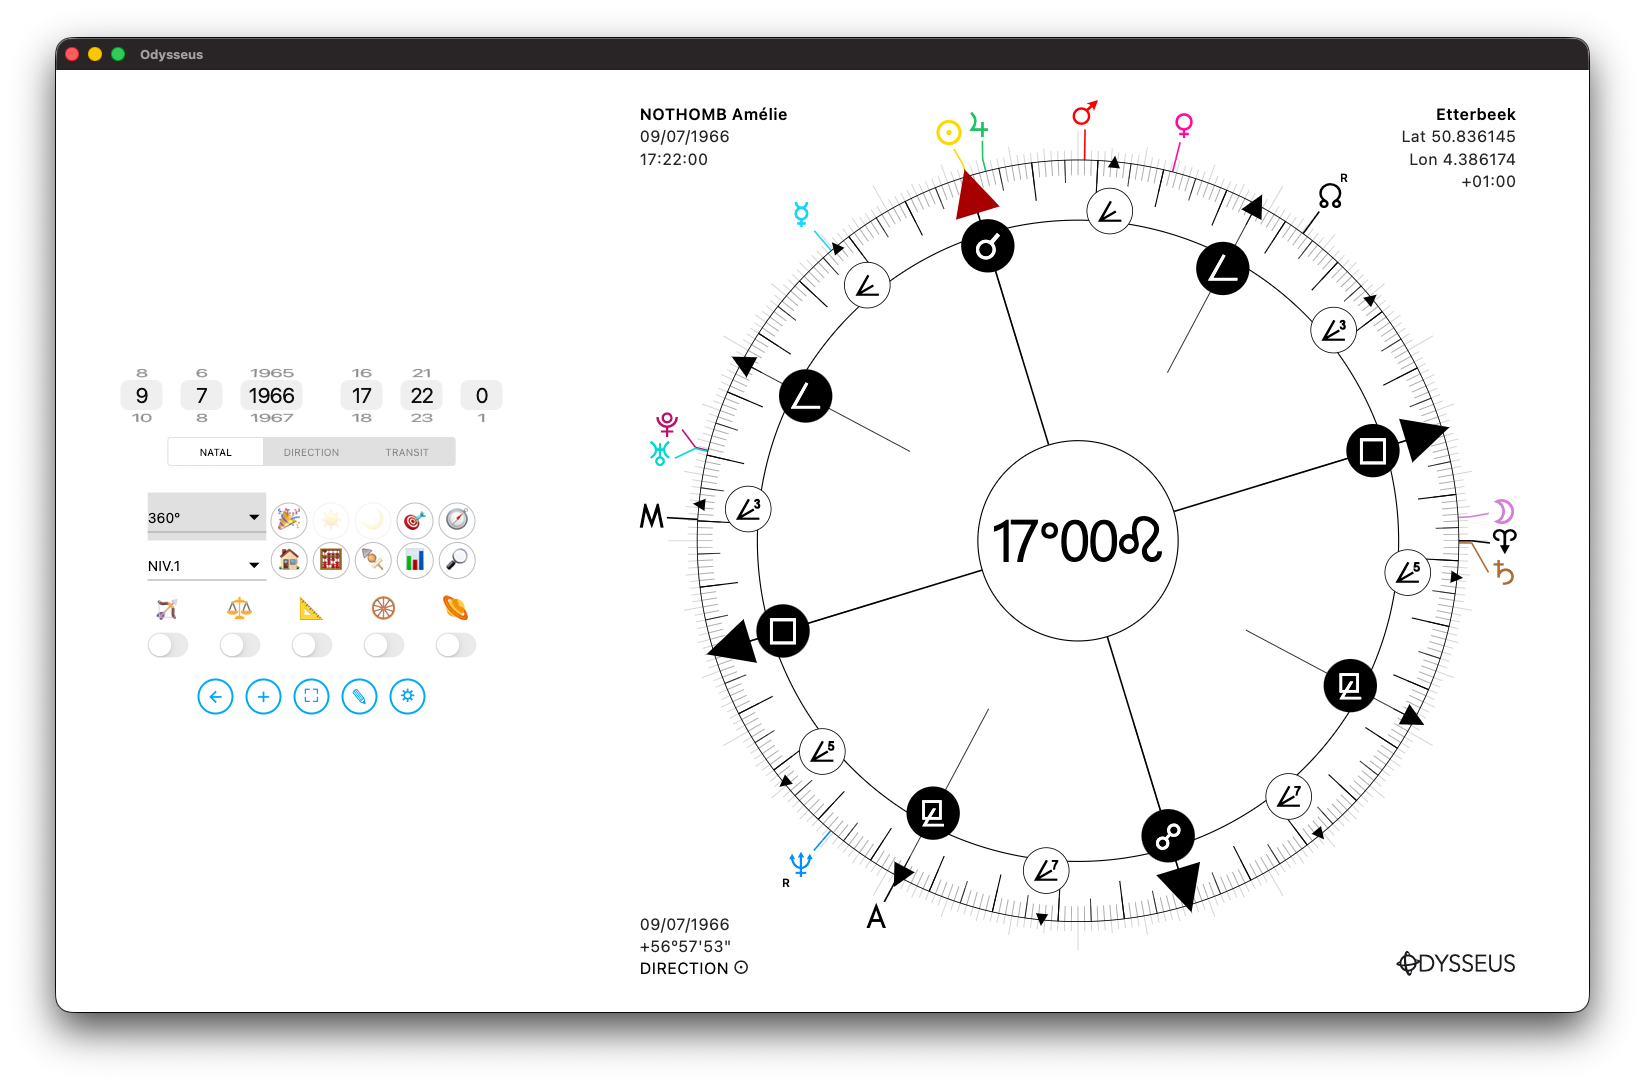
But it is possible to display these degrees in 30º segments followed by the zodiac sign. This can be adjusted in the configuration panel:
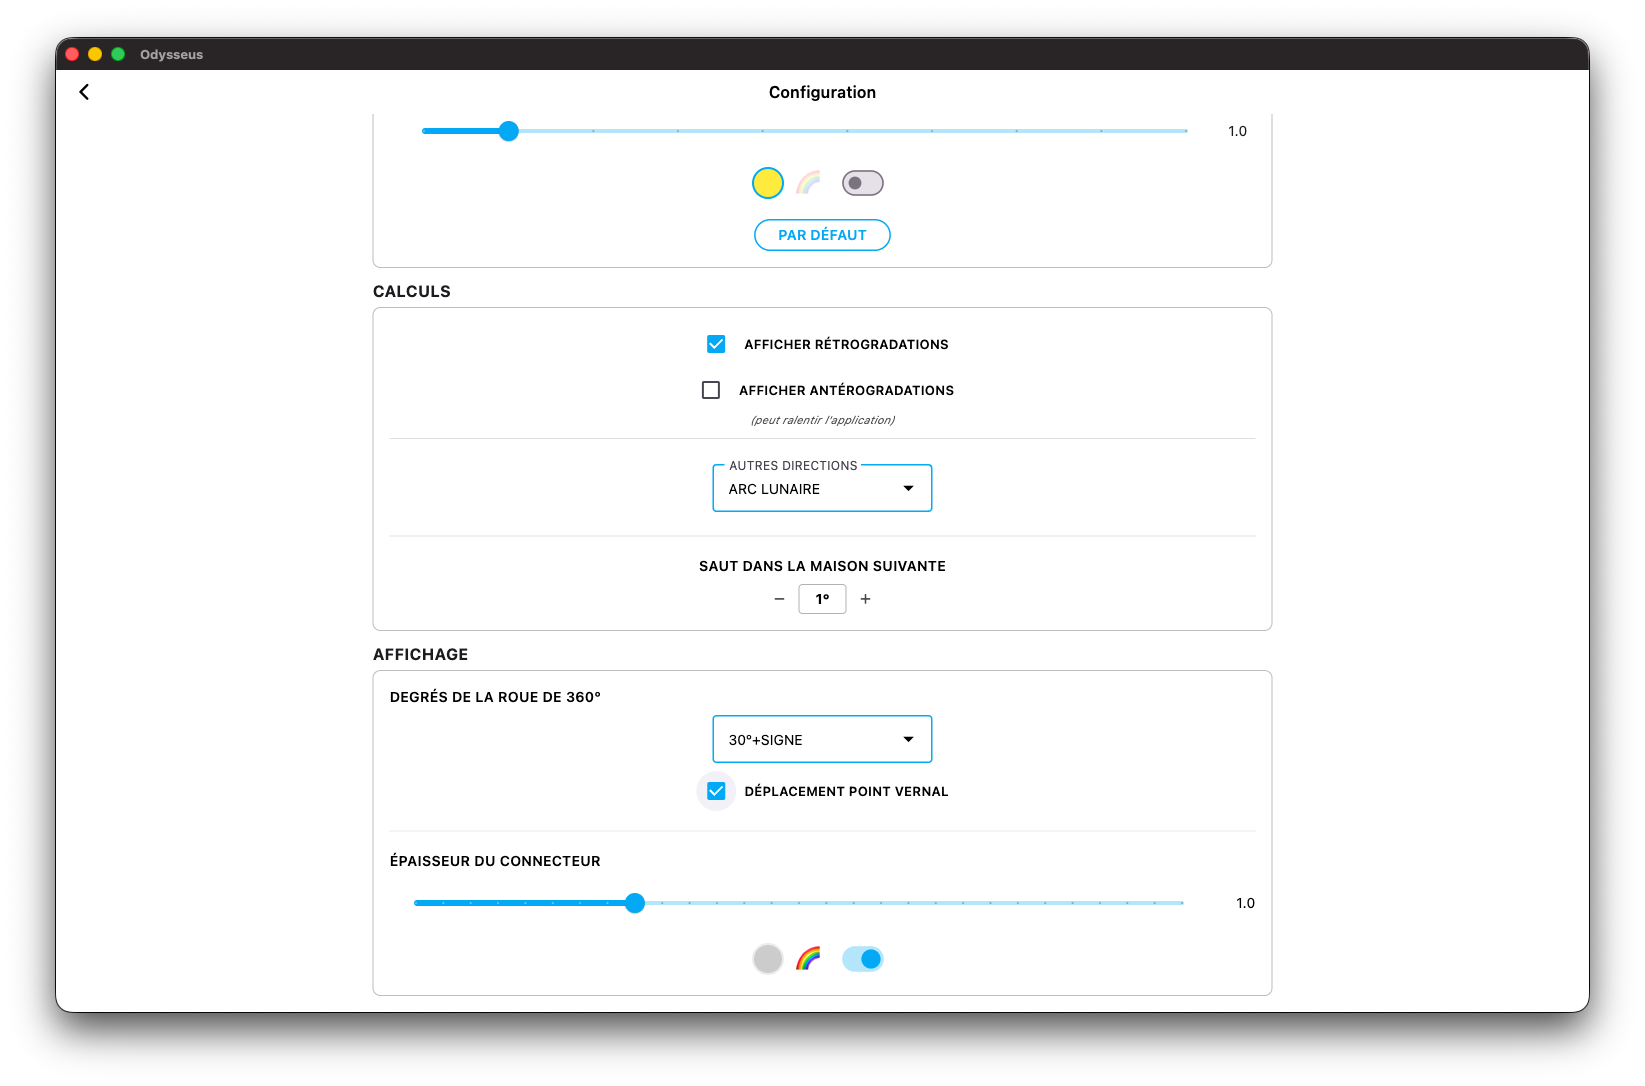
Also, when displaying these degrees, if you are on one of the wheel modes showing DIRECTION, you will see by default that the degrees remain the same regardless of the level:
But in the configuration panel, you will have the option to take into account the movement of the Vernal Point of level 2 (DIRECTION). Then, when the switch is set to DIRECTION, the degrees + sign displayed at the center of the wheel will reflect this movement of the Vernal Point. So use this only if you know what you are doing.

DRAWING TOOL ✎ (Mac/Windows only)
On the sky map page, you will find a pencil-shaped button ✎.
Click on it to engage drawing mode, or by doing CTRL+D/CMD+D.
So, click on a planet and move the mouse while holding down the button. A line will be drawn from the planet and will stop where you release the mouse button. If you go to another planet, the route will take on the colour of both planets.
With a long press on the button ✎ or with CTRL+E/CMD+E, you will erase all the lines.
With CTRL+Z/CMD+Z, you will cancel the last line drawn.

TABS ⊕
FEATURE EXCLUSIVE TO THE DESKTOP APPLICATION (Mac/Windows)
When you are on a chart, a small ⊕ button now appears next to the back arrow. By clicking it, the open chart is kept in memory, and the application brings you back to the chart creation page.

There, you can enter a name and the date/time information, then click the telescope 🔭 again to open it…
At the top of the page, you will then find the tabs for the different charts that are open. You just need to click on the title of a tab to switch directly to it, or on the small x to close the window.
The windows are independent from one another. You can therefore display the 360º wheel on one and the 90º wheel on the other, or enable midpoint display on one side and cusp mode on the other, without one chart interfering with the other. The only option that is necessarily shared is the planet display. The settings you apply to the planets (default or custom) will be shared across all wheels.
PLANETS
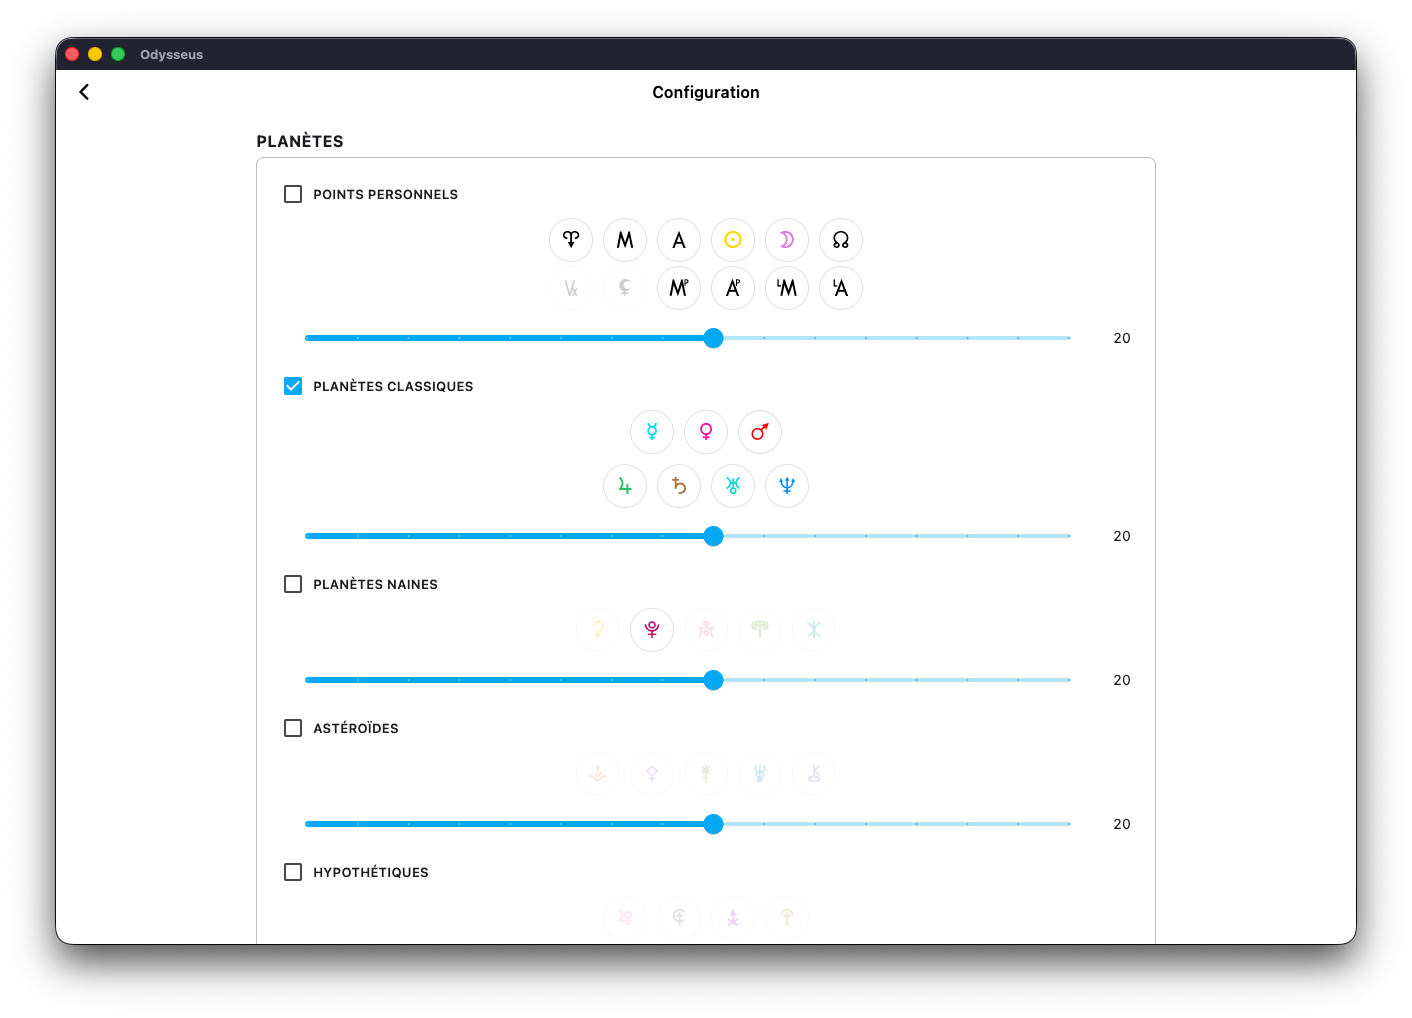
On the screen, you will find a gear-shaped button ⚙️ that you can click to go to the Settings panel and choose the planets to add or remove from the wheels.
The latter are classified into 5 categories: Personal Points, classic planets, dwarf planets, asteroids and hypothetical. A clickable box is located directly to the left of the title of each section to allow you to display them all at once or deselect them all at once.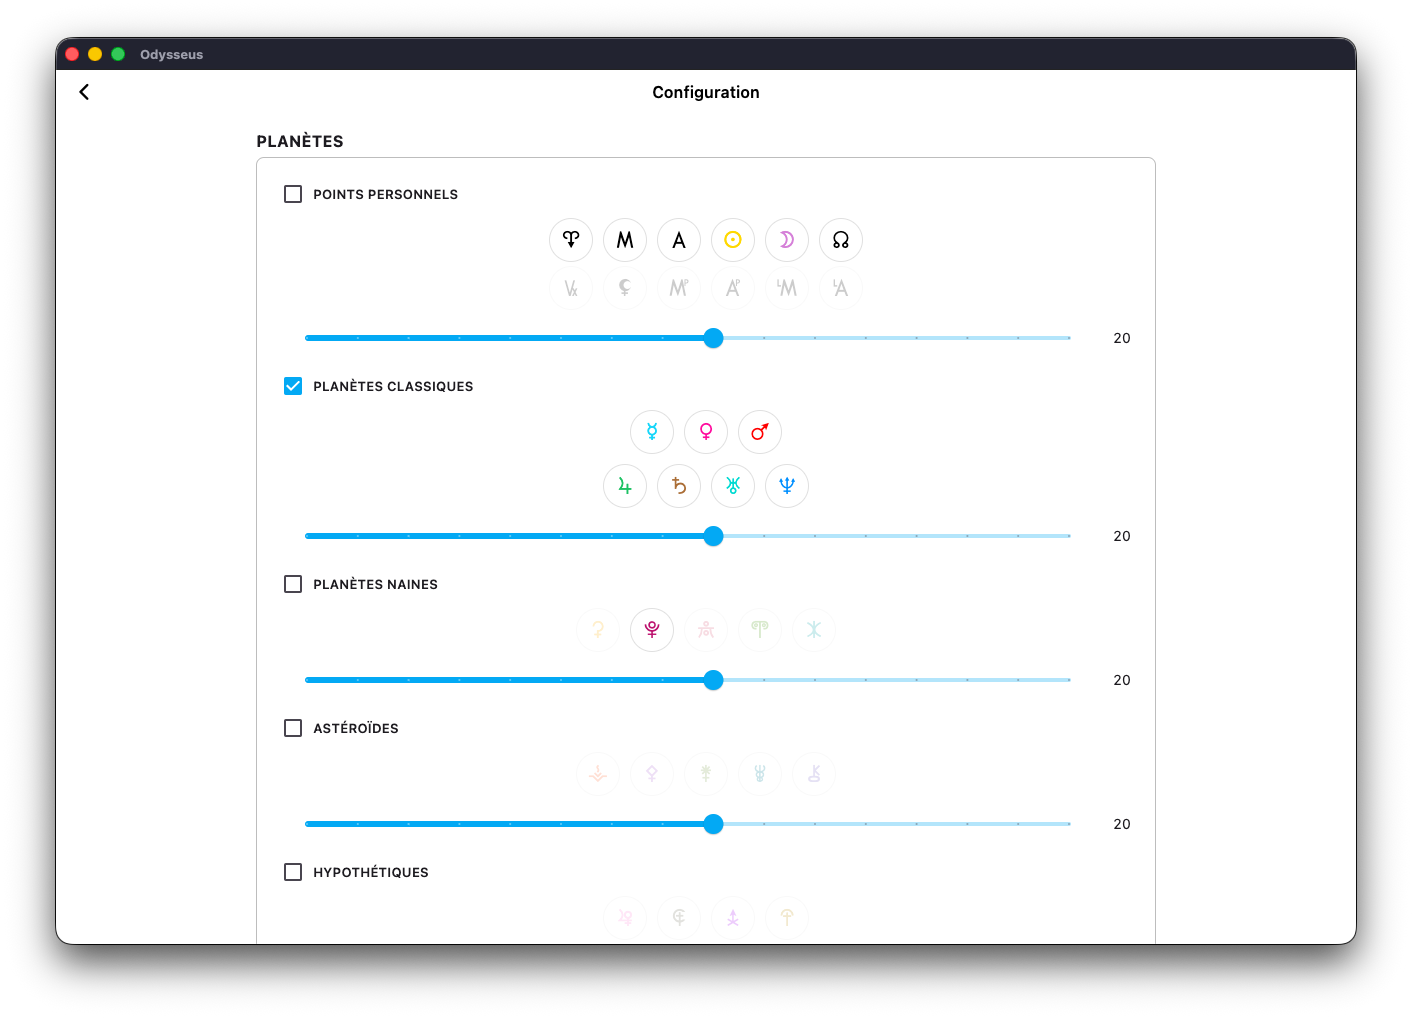
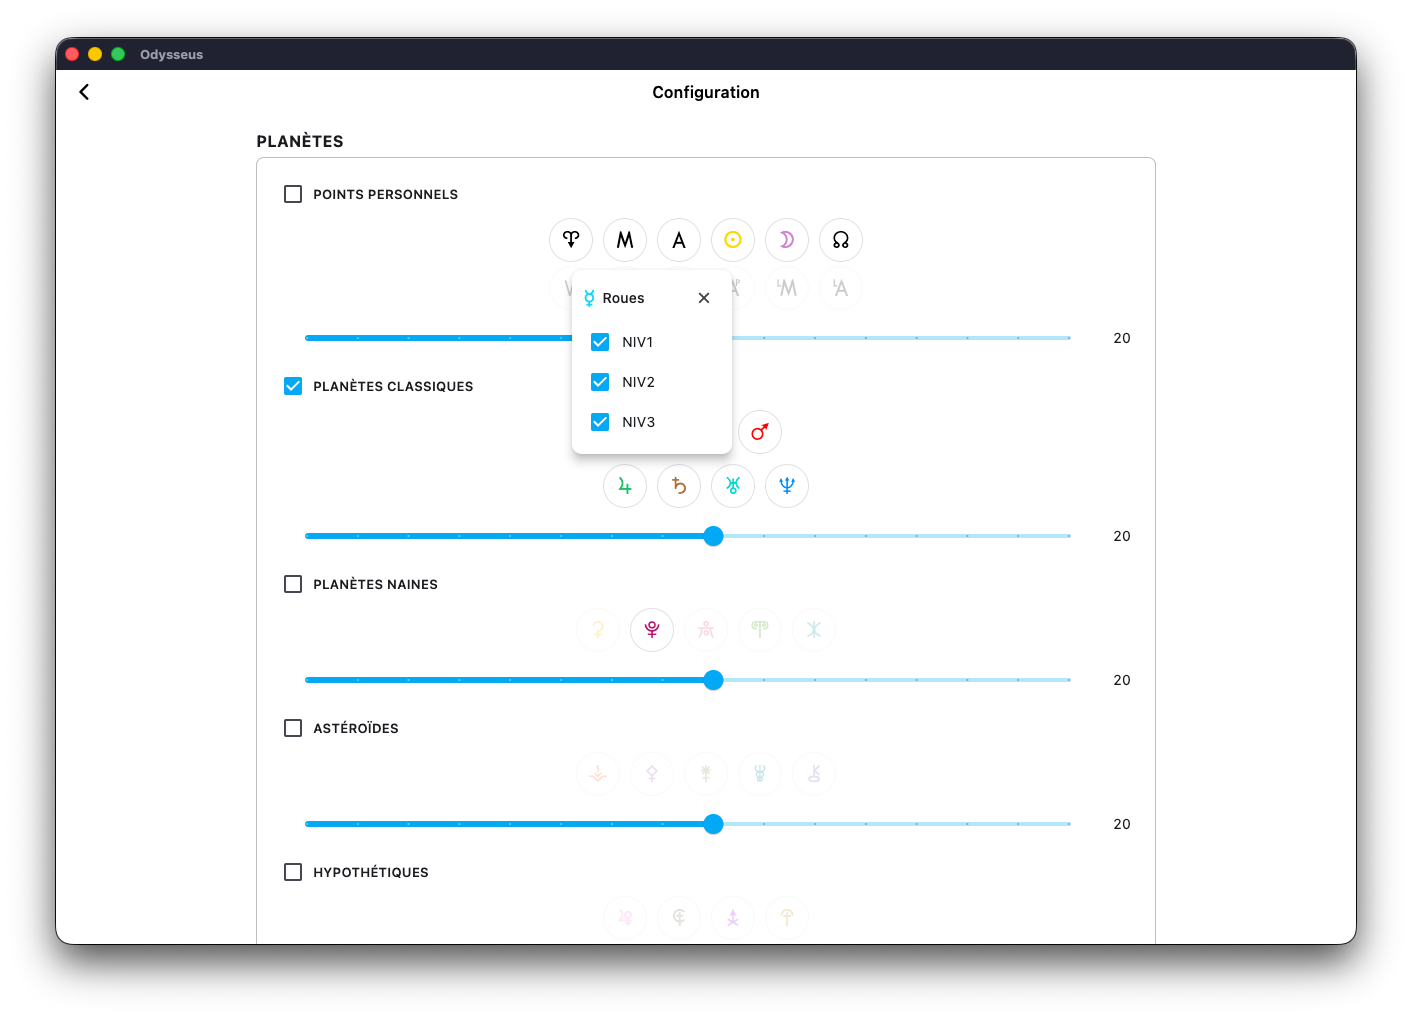
You can also long press the planet buttons to choose the specific level on which to make them appear, or change the size of the planets using the cursor.
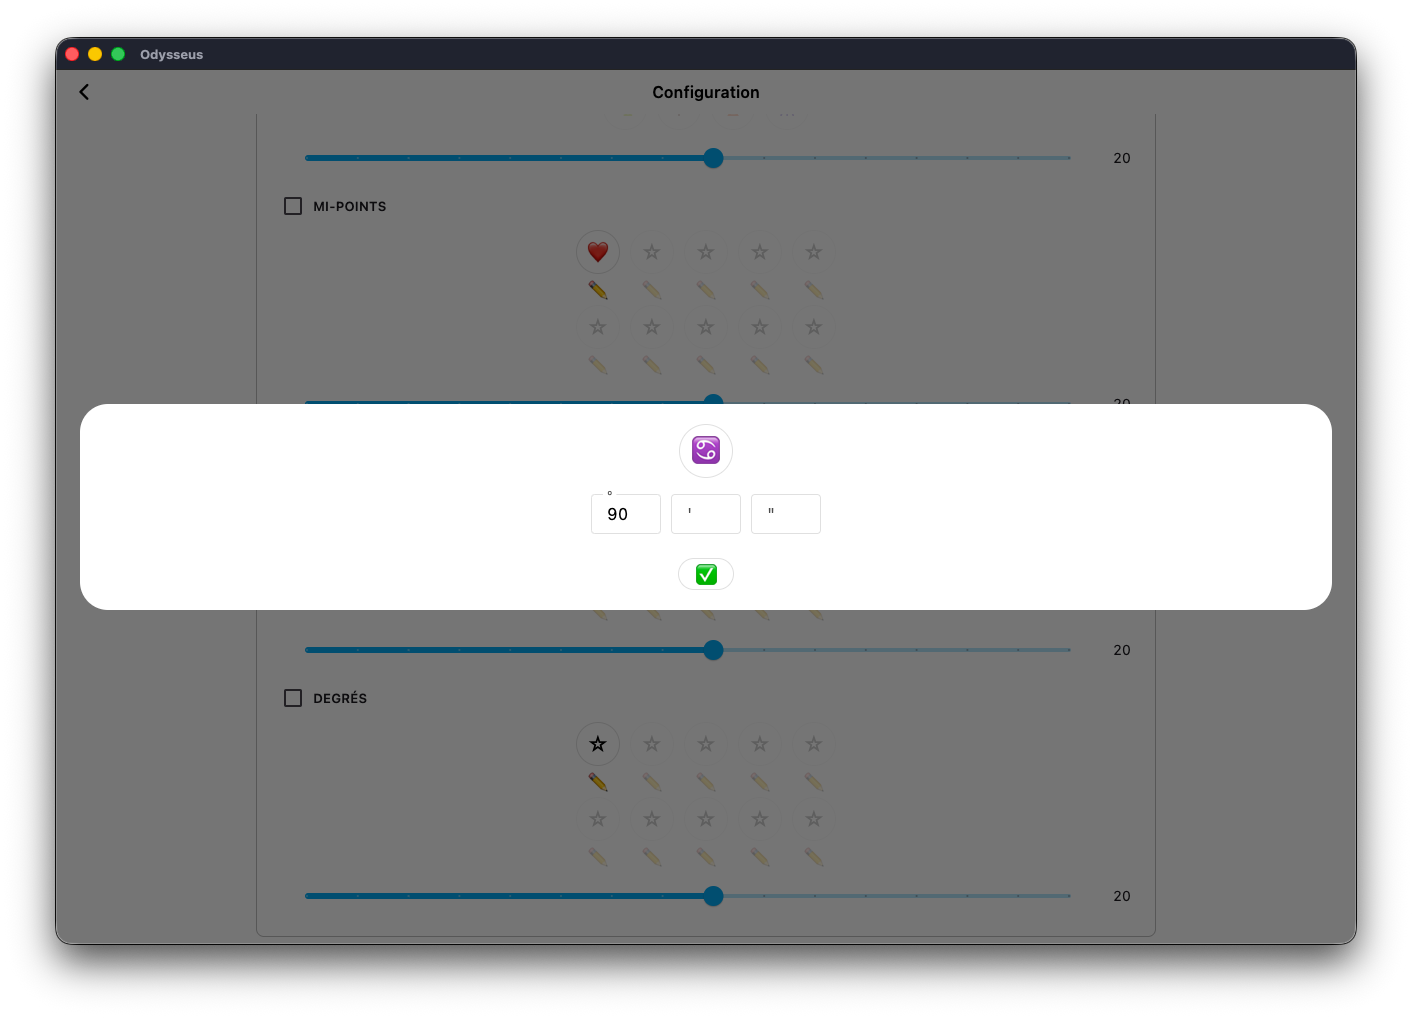
Below these sections, you will find 3 subblocks of 2×5 customizable buttons, to display half-points, sensitive points or degrees directly on the wheel.

To begin, click on one of the stars ?:

This activates the button. To edit it, click on the pencil ✏️ just below:
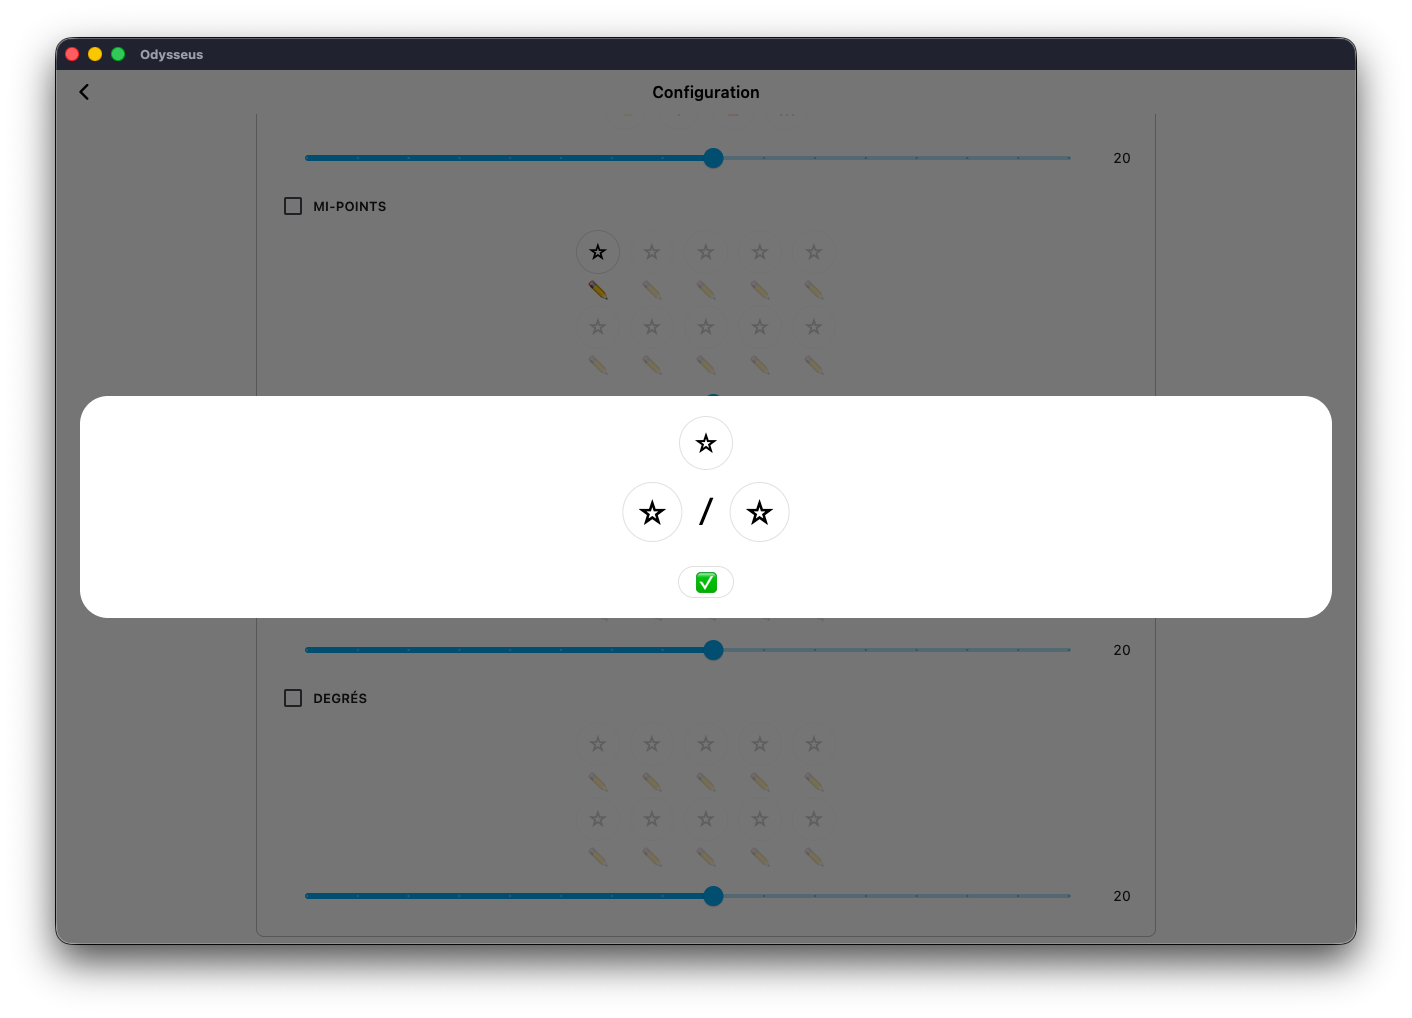
Then appear 3 stars ? and a validation button ✅. By clicking on the star ? from the top, you can select the visual of the button via an emoji list: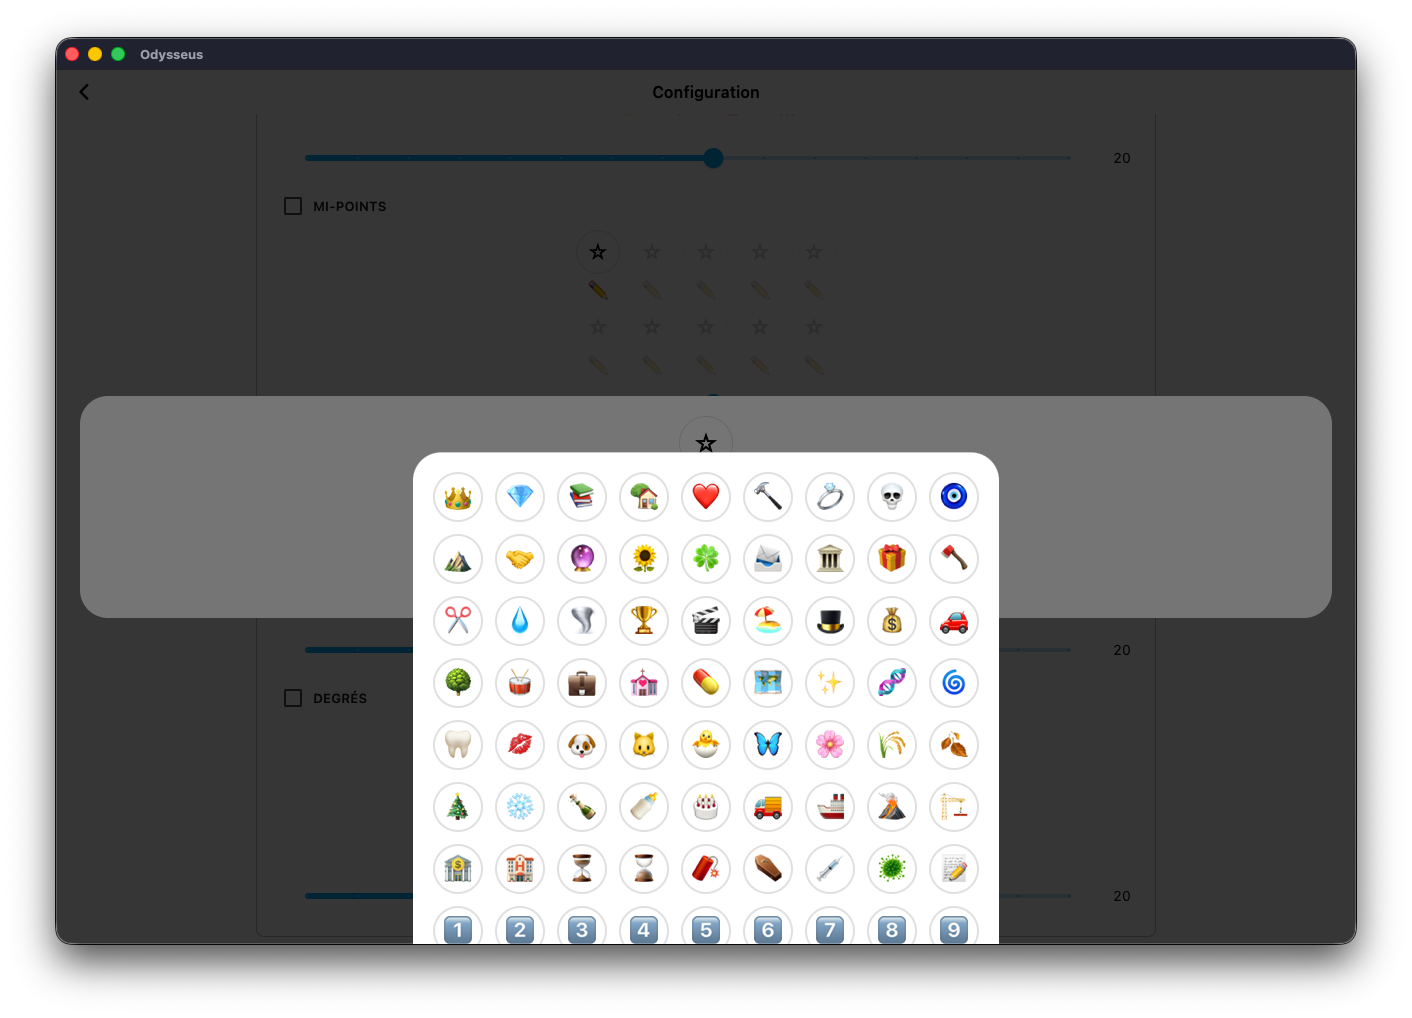
Then you can then select the planets that make up the half-point if you edit a half-point, as here:

Click on one of the stars ?, and select the planet of your choice:
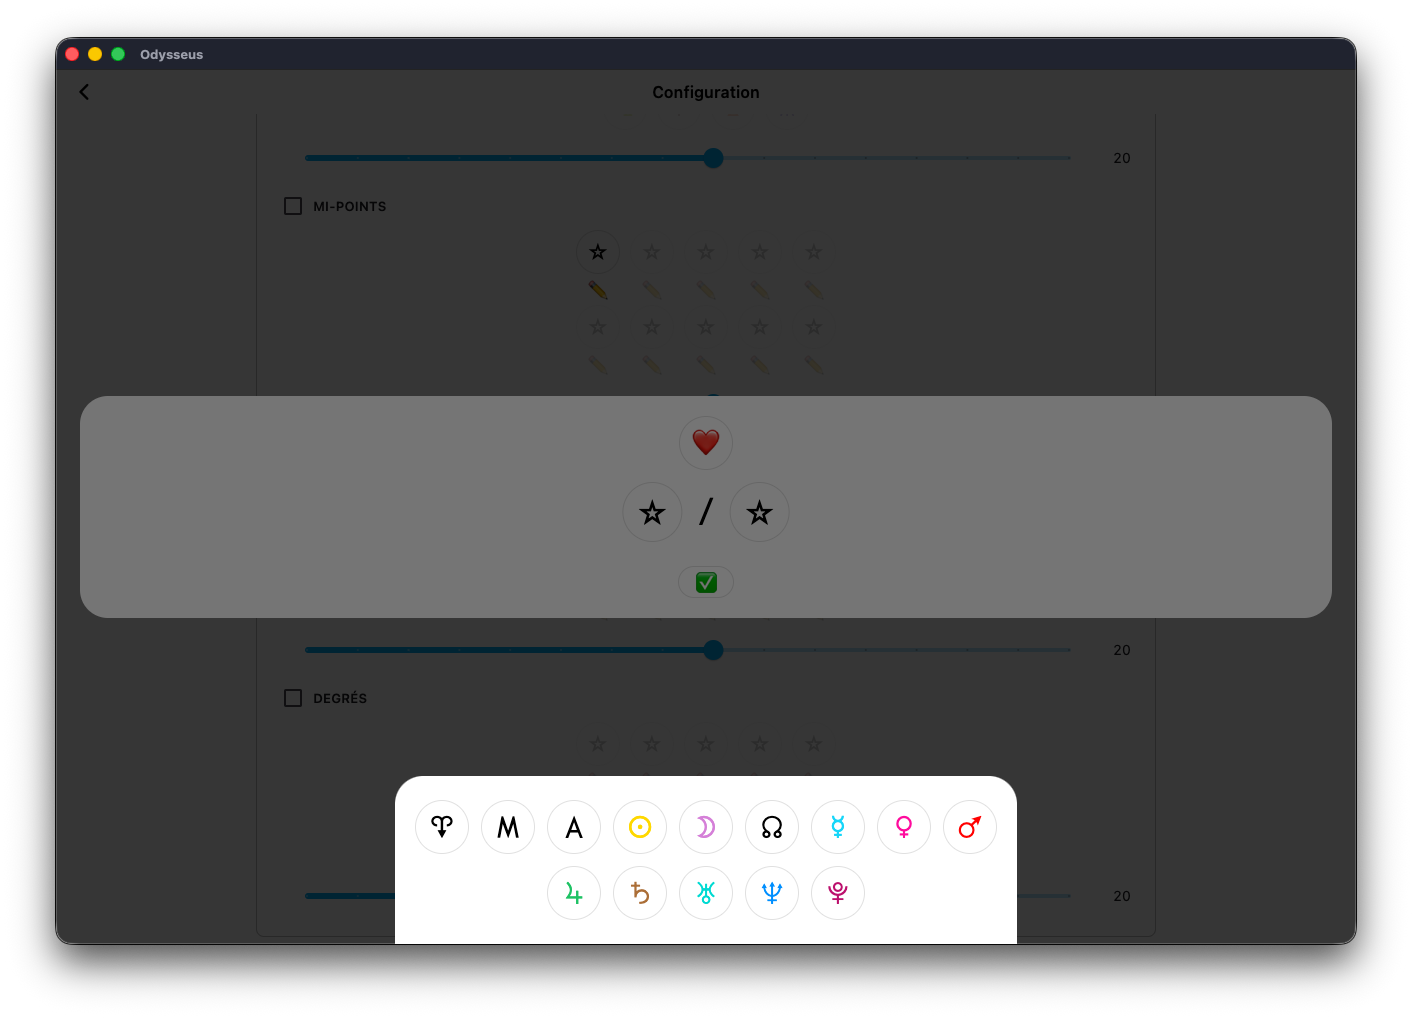
And do the same with the second button:
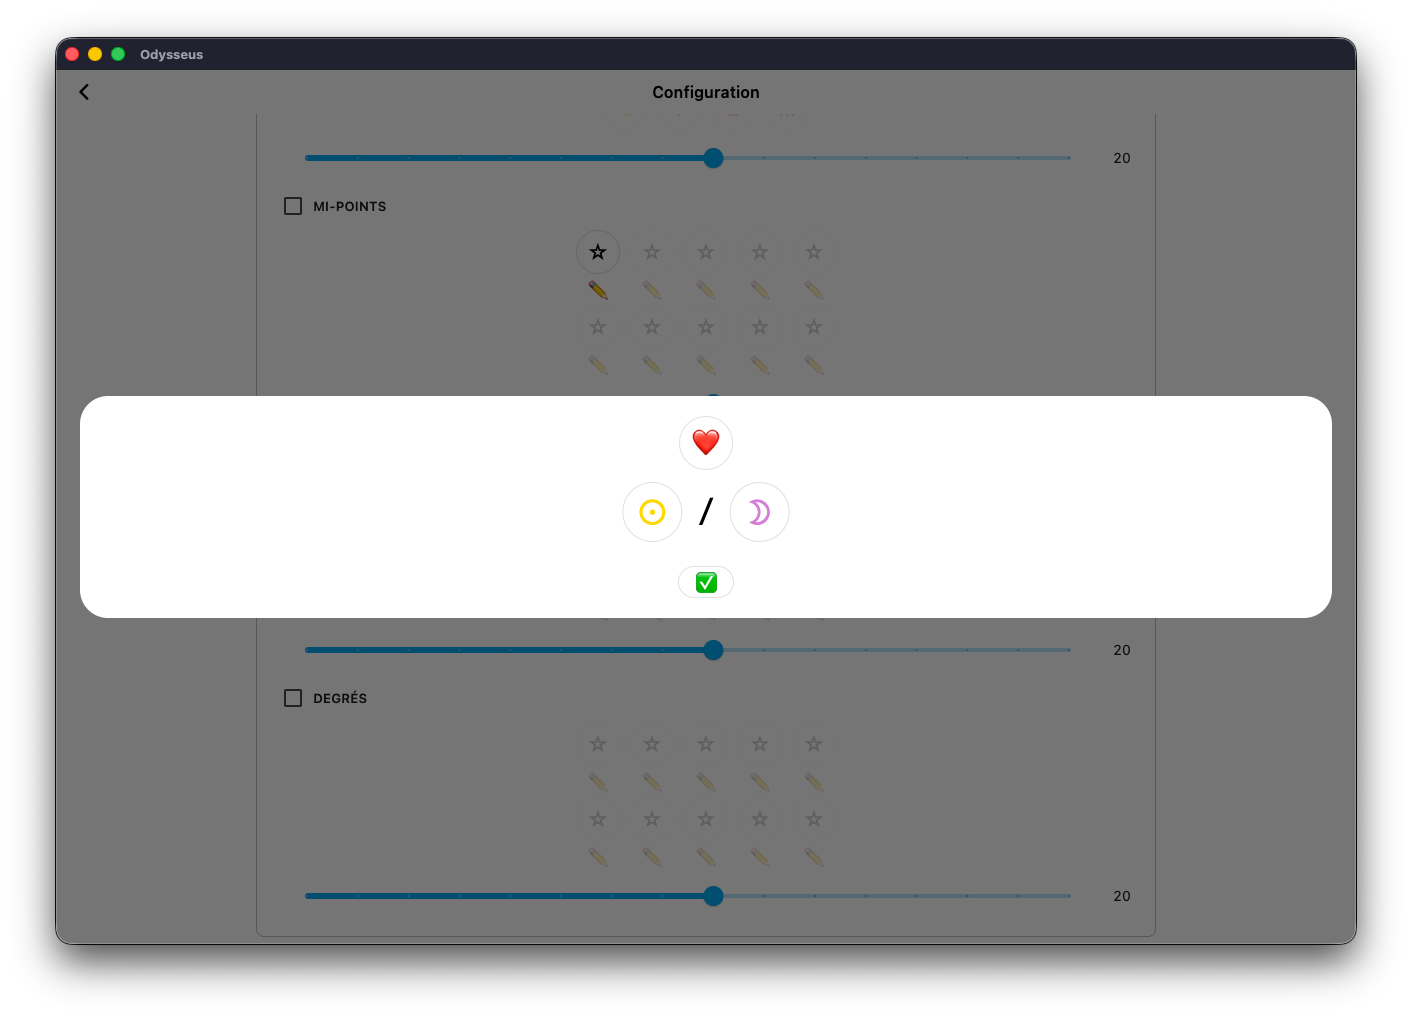
Then validate ✅.
You can do the same with planetary picture (sensitive points), so with three factors: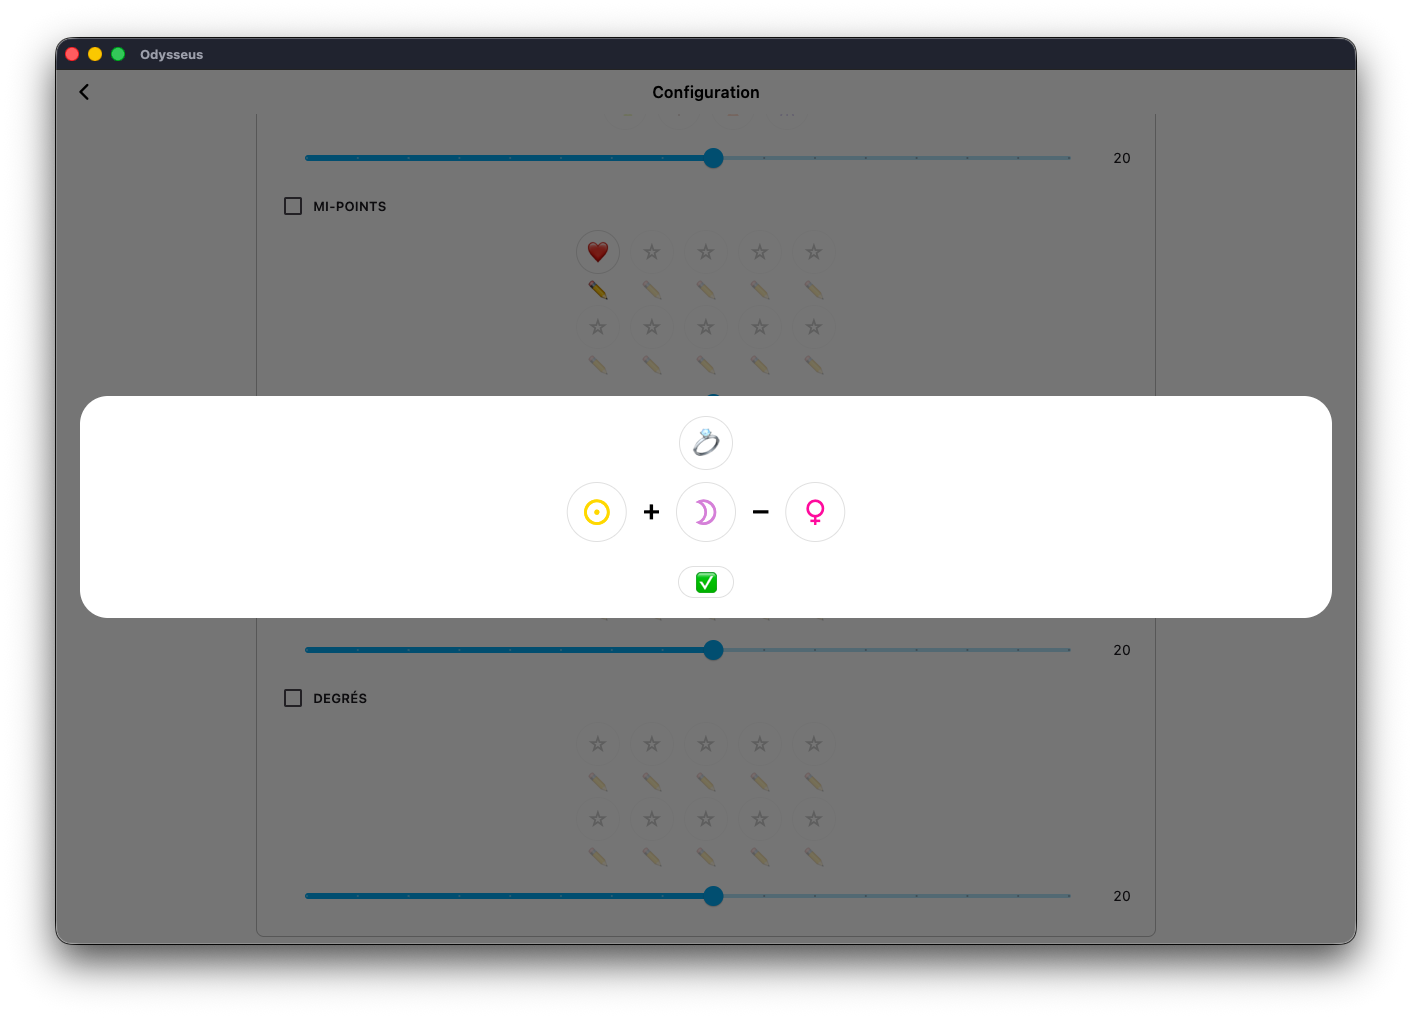
Or with a factor to appear on a specific degree:
Once you have validated ✅, you can return to the map with the arrow at the top left of the window, and your points will appear directly on the theme:
CONNECTORS
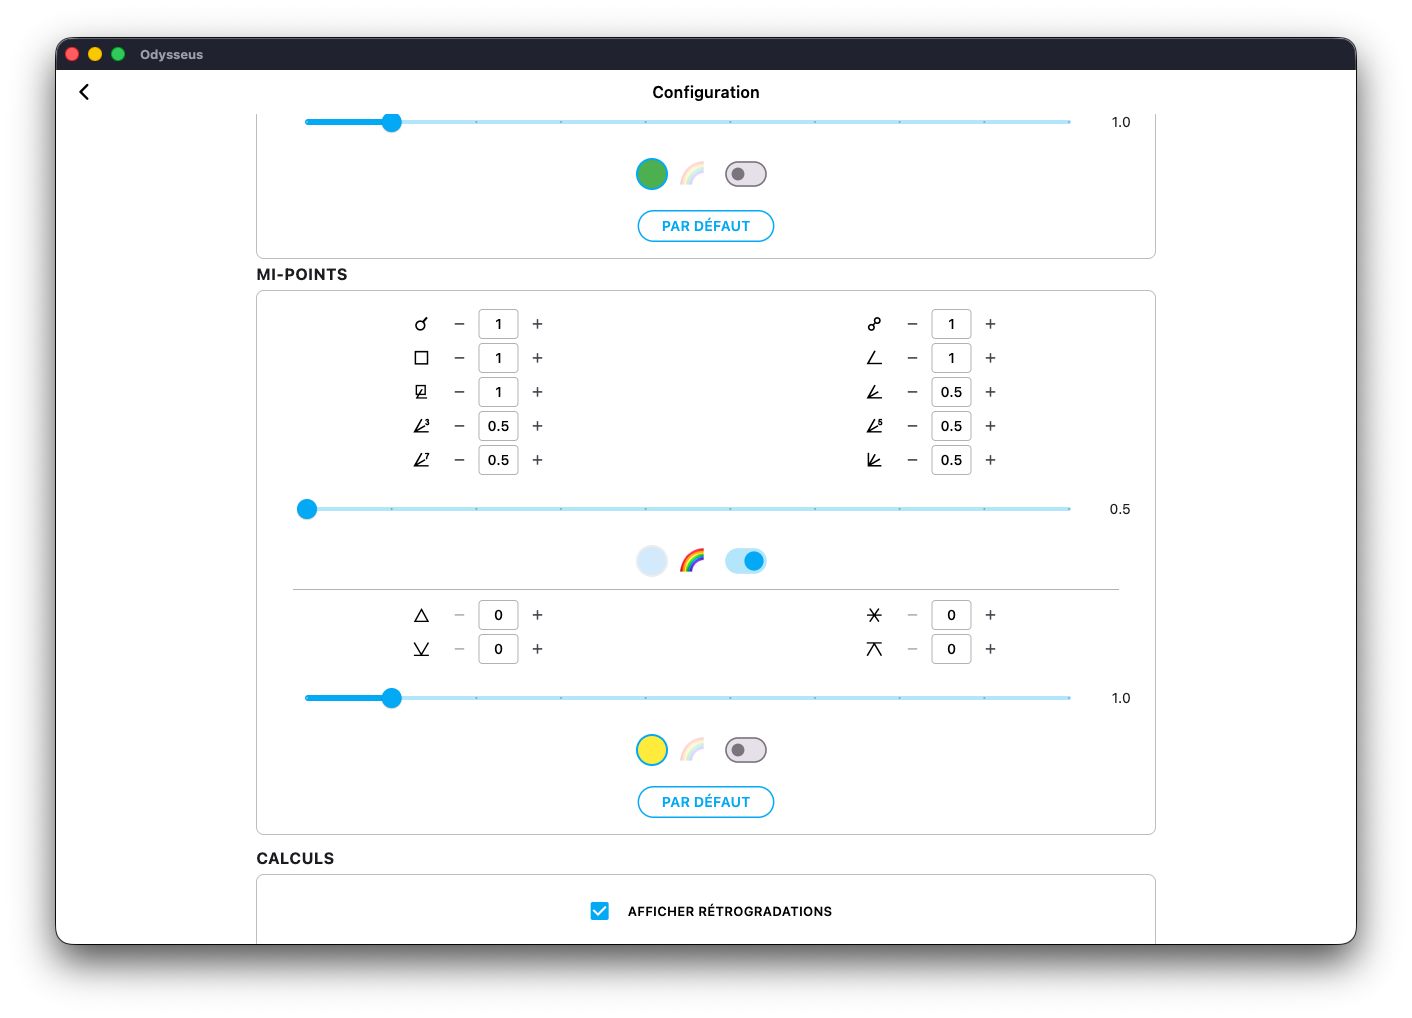
By clicking on the gear ⚙️ to go to the Settings panel, you will find at the bottom the “GRAPHICS” section in which there is a “CONNECTOR THICKNESS” slider and a small switch next to a rainbow.

The connector is this line that connects the planet to the wheel on the theme page. Sometimes, on some screens, this route can be difficult to see. Thus, with the cursor, you can change its size. And by deactivating the switch (which allows the connector to have the same color as the planet it connects to the wheel) you can then click on the pellet to the left of the rainbow to choose the color you want to assign to the connectors.
Thus, you can customize their display according to your preferences. Here, the connectors are black and thicker.
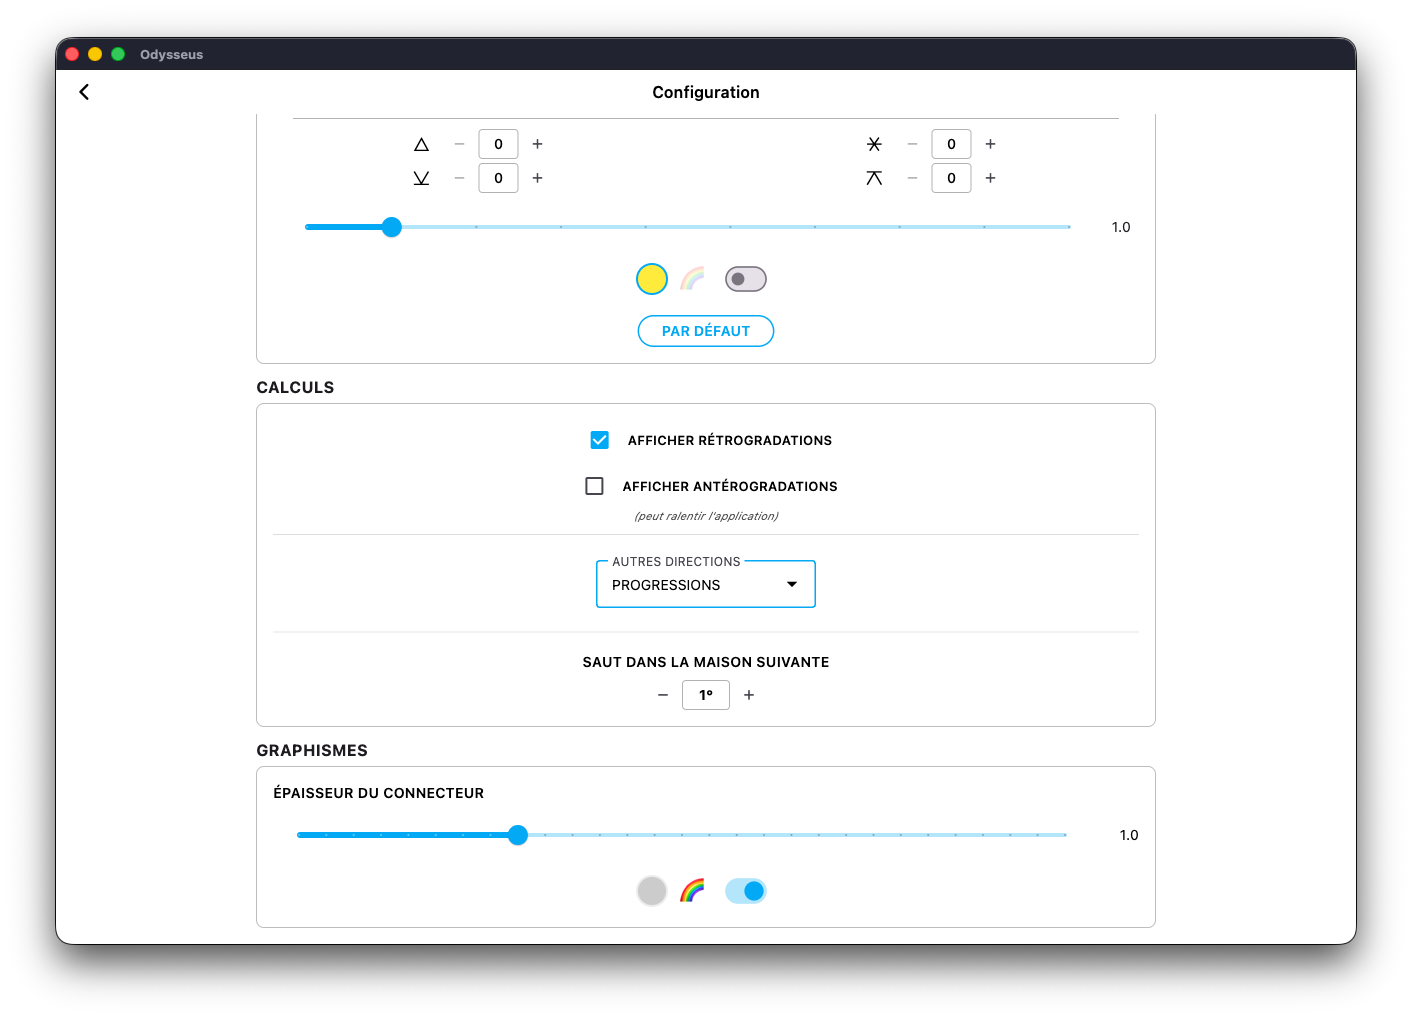
RETROGRADES & ANTEROGRADES
By clicking on the gear ⚙️ to go to the Settings panel, you can find in the CALCULATIONS block two boxes “SHOW RETROGRADES” and “SHOW ANTEROGRADES” that you can click or not.
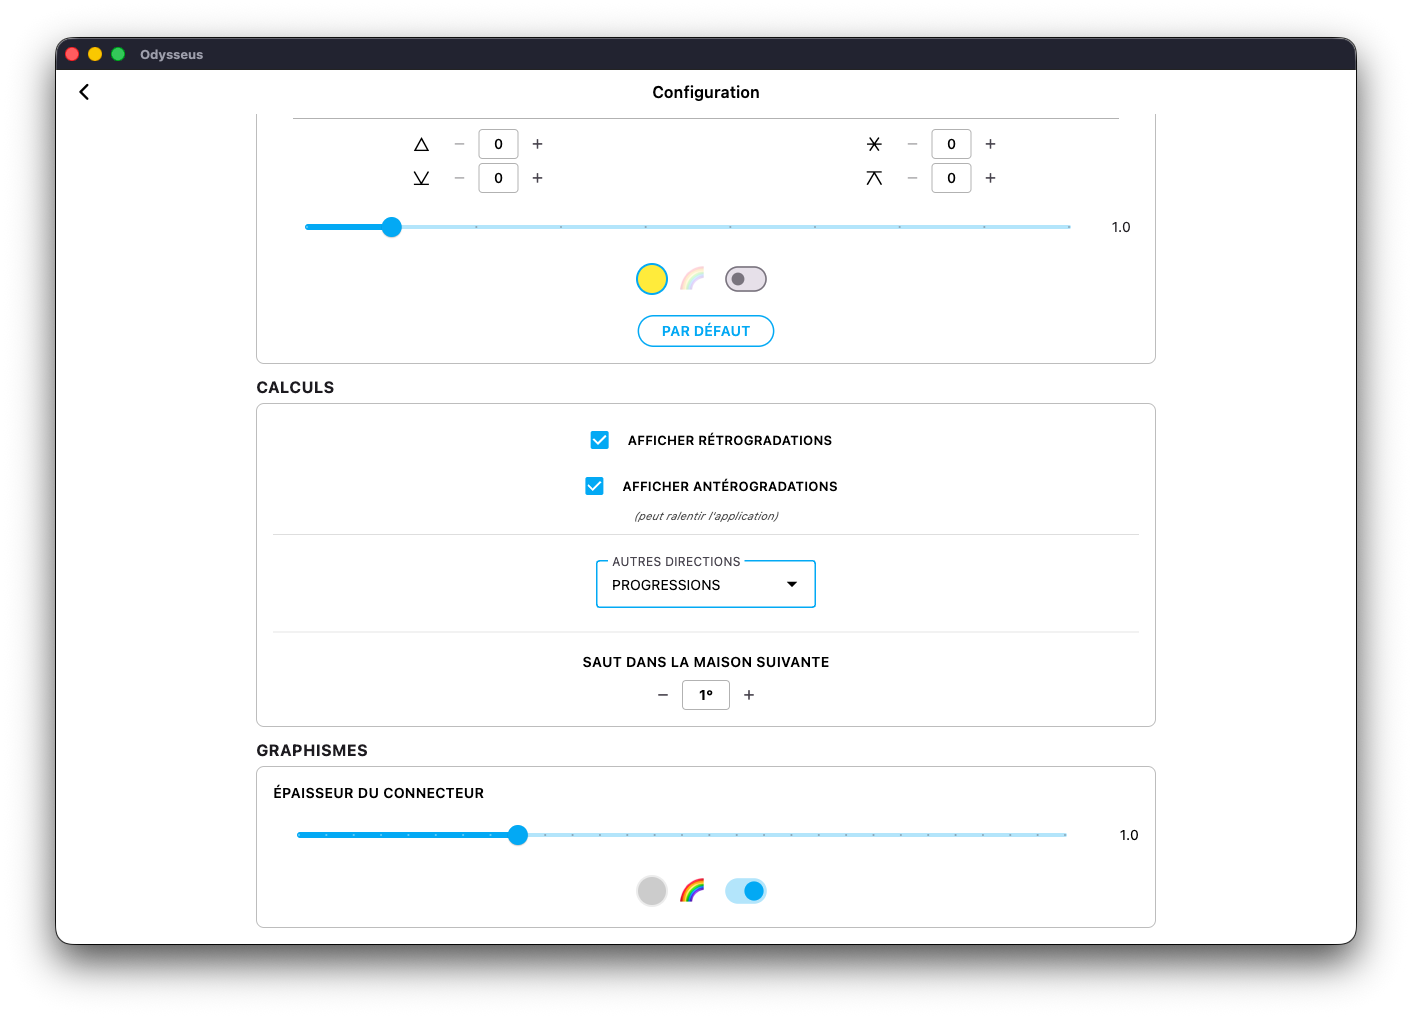
However, beware of anterogradations that require a lot of calculation resources and can slow down some devices. Only display them if you need them. Indeed, retrogrades do not need to be calculated. The ephemeris mention them, so no calculations to be made. Anterogradations, on the other hand, require very heavy checks which can slow down the application during date/time changes.

And so you will find a small R or a small A next to the planets that are in either state. Otherwise, nothing.
GUIDE ☸️
When you are on a map with only one level, clearly seeing where each planet is in terms of longitude is simple. Especially since a simple click on each planet turns the wheel in its direction and displays its longitude in the center. You can even click a little next to the planet, the application will detect the closest one and calibrate itself on it. Also, you can make a long press on the wheel to turn it a quarter turn.
However, when you find yourself on a multi-level chart, things can get more complicated. You can then use the switch just below the image of the wooden wheel:

The switch turns green and lines then appear on the wheel to find your way in space and see if certain planets form an angle with the red pointer of the wheel. By turning the wheel, this “guide” turns at the same time. Here, on the image, we see a 360º dial with a 16-spoke guide, thus defining the angles of conjunction, opposition, semi-squares, sequi-squares, sedeciles and its multiples. But if you do not want to use the finest aspects, you just have to make a long press on the image of the wooden wheel, in order to remove the finest aspects. In the image above, we have 16 rays. By making a long press on the wooden wheel:

…we shift to 8 spokes (therefore showing the conjunctions, opposition, squares, semi-squares and sesqui-squares). If we do a long press again:
…we shift to 4 rays (therefore showing conjunction, opposition, squares). A new long support:

And there is no more radius. Only a single line from the red arrow to the periphery.
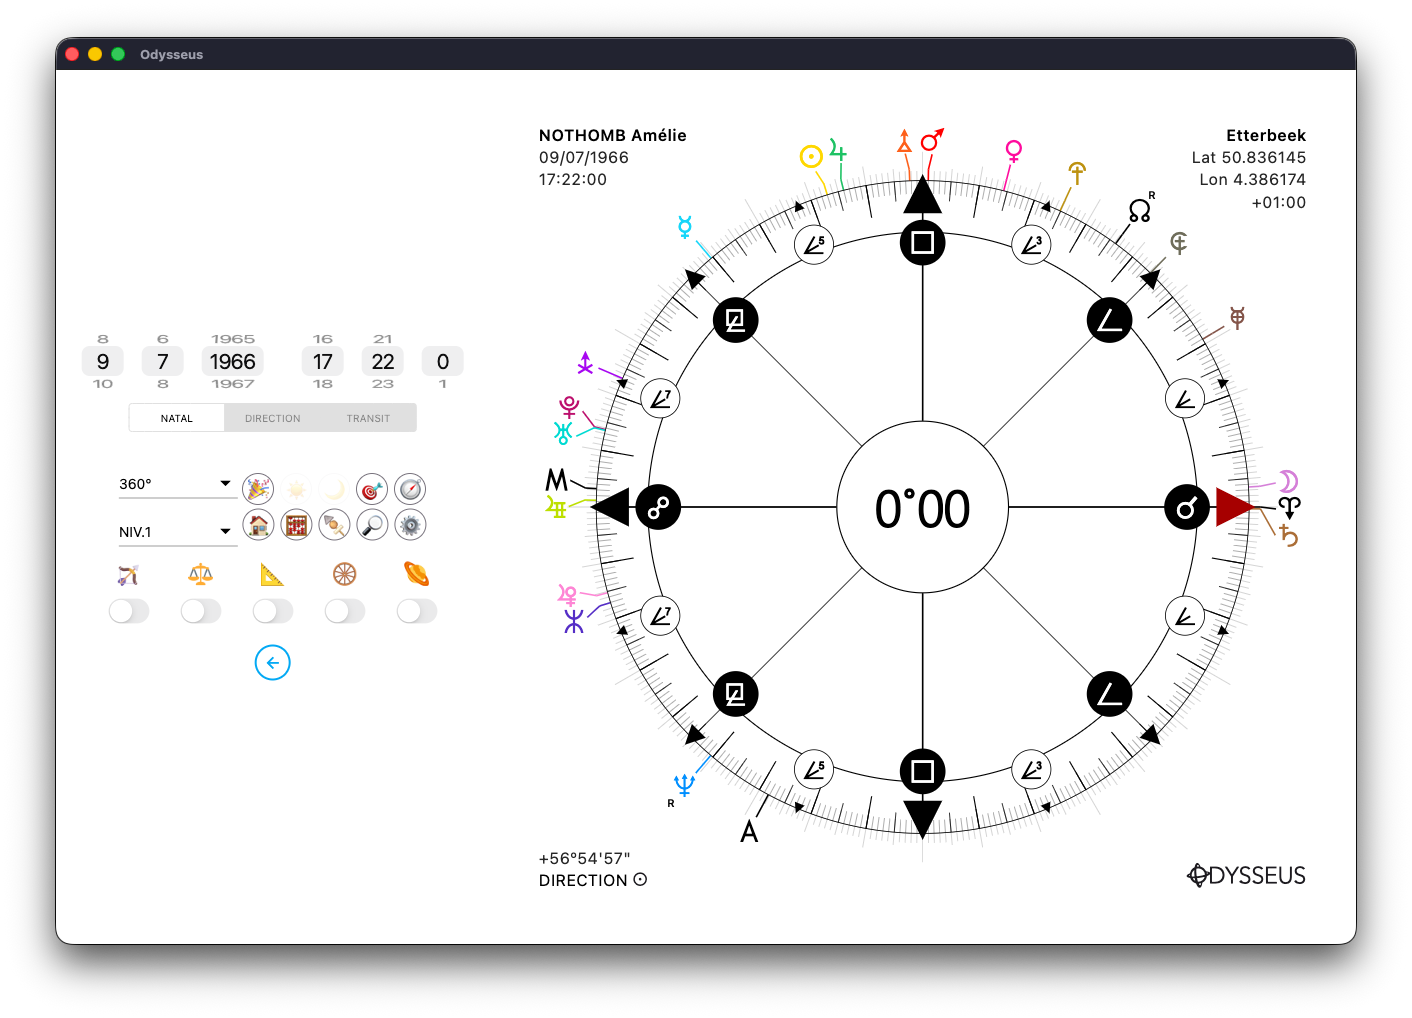
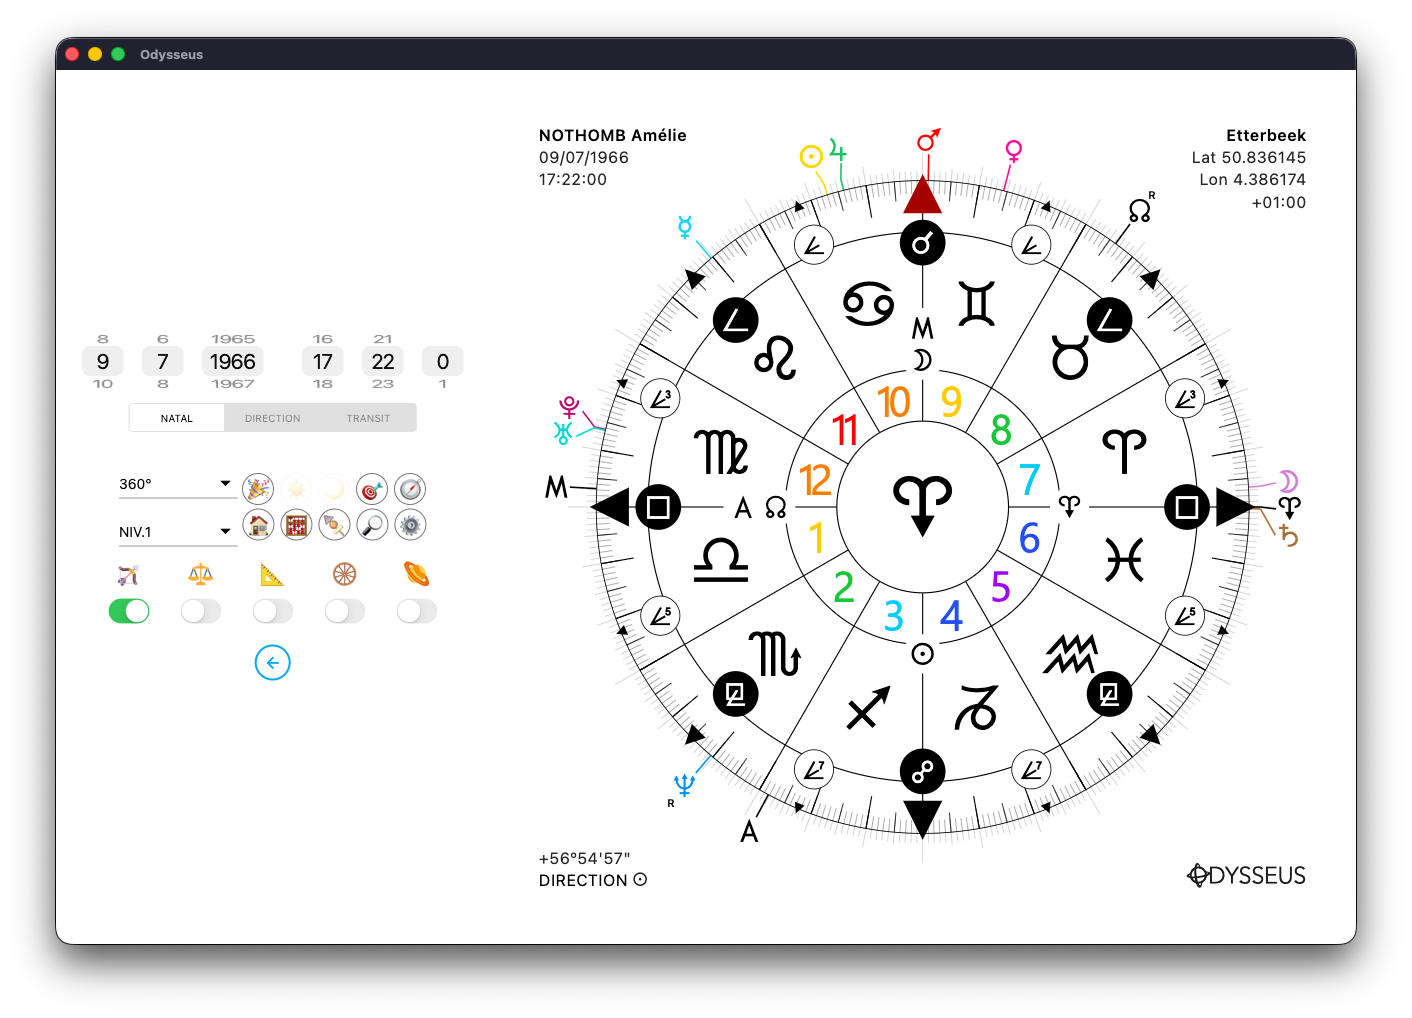
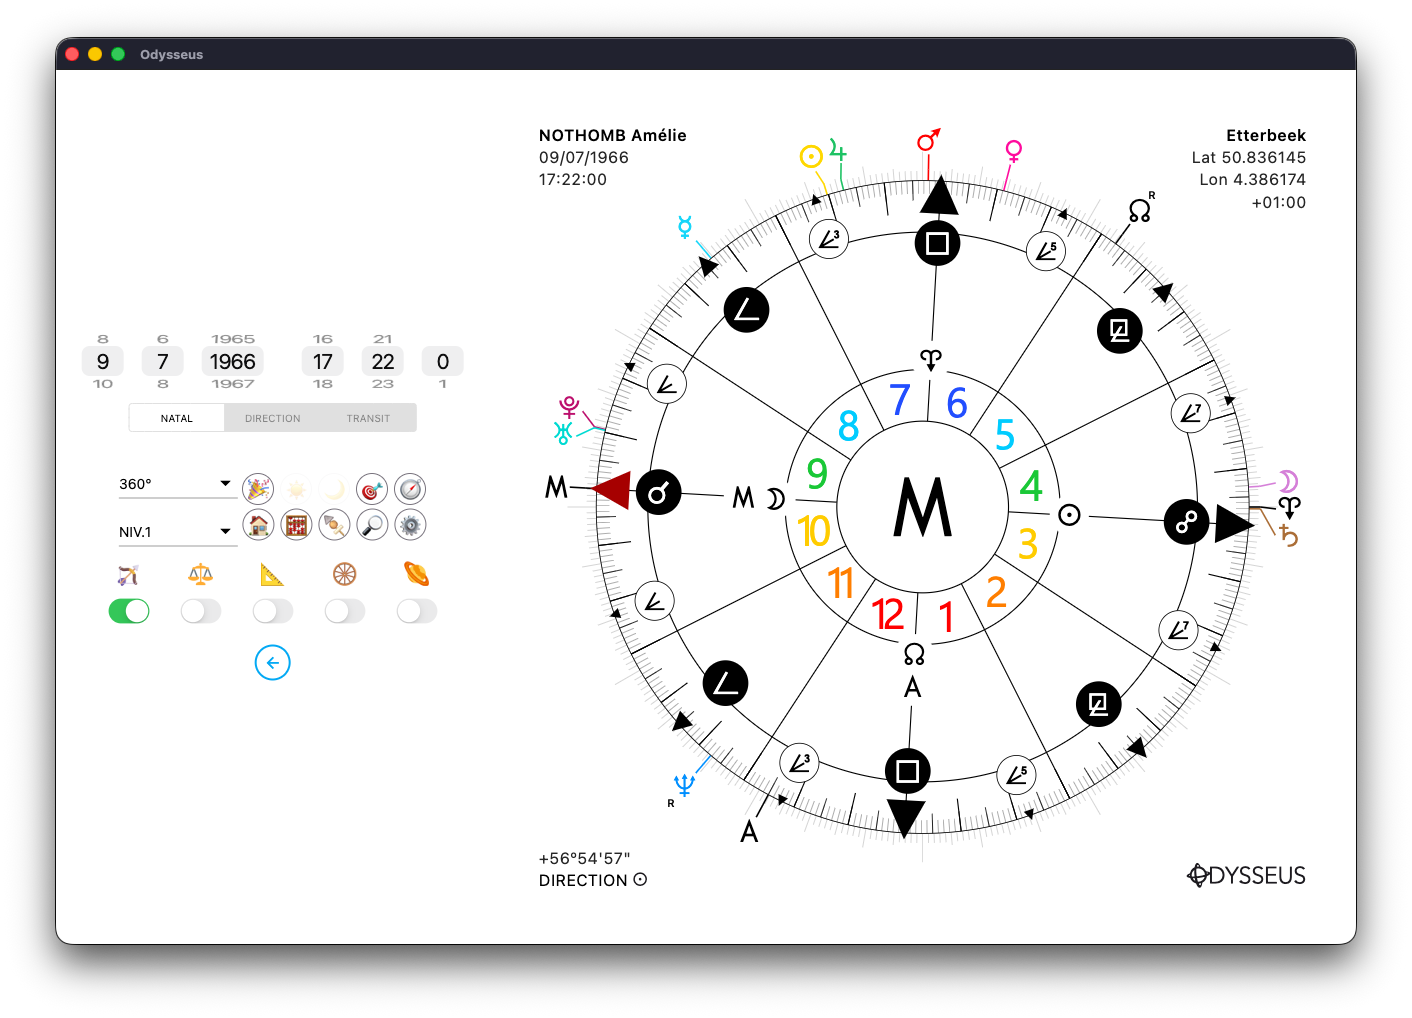
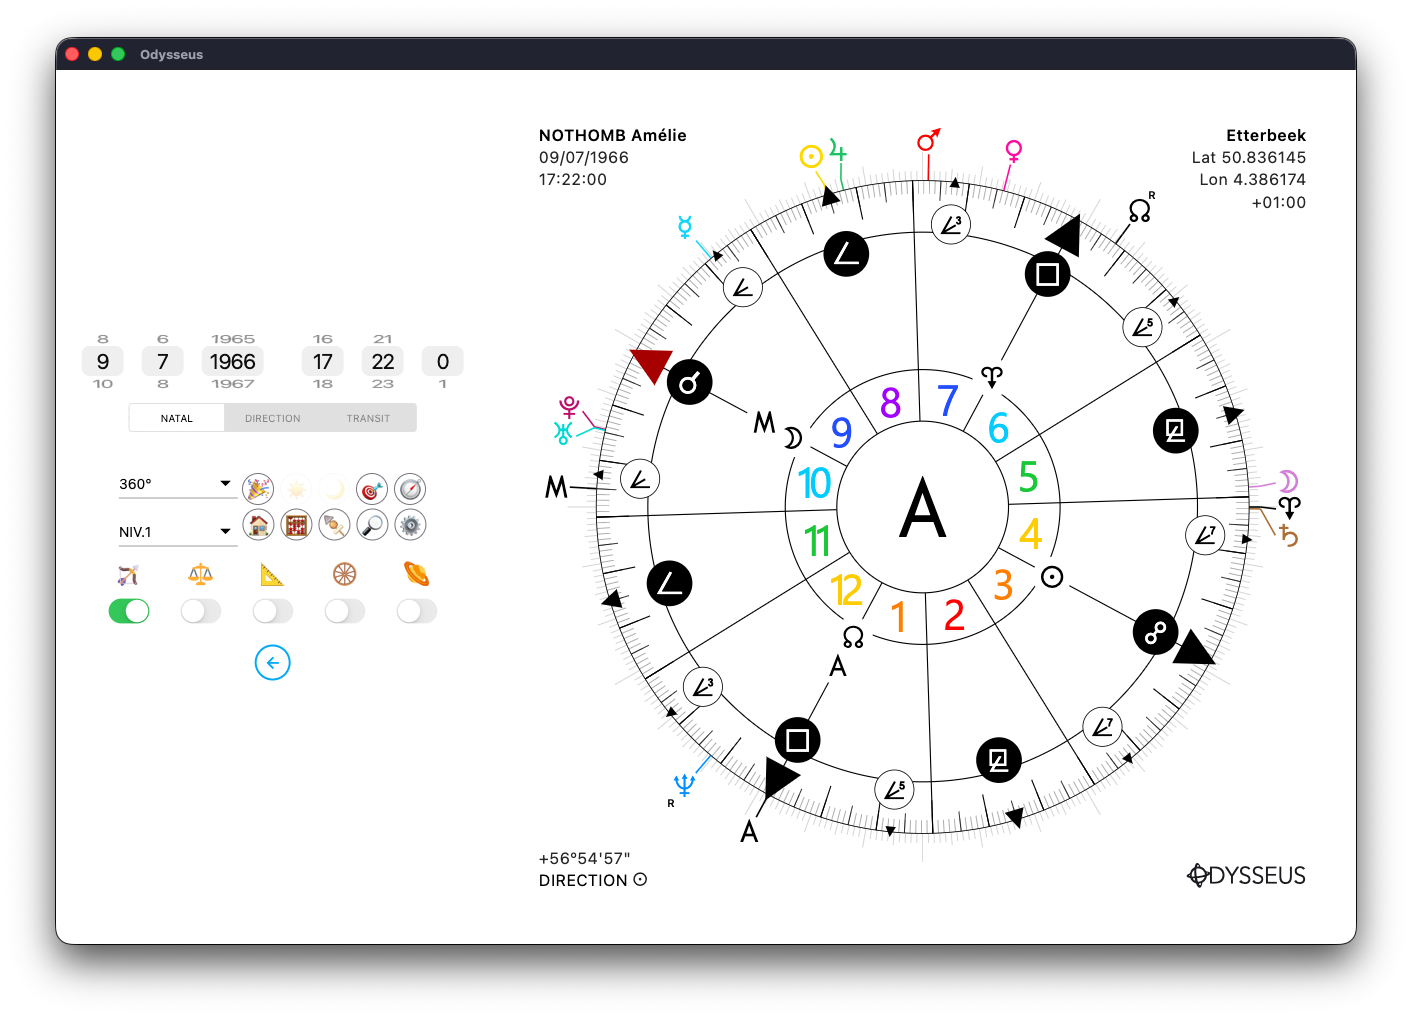
HOUSES 🏠
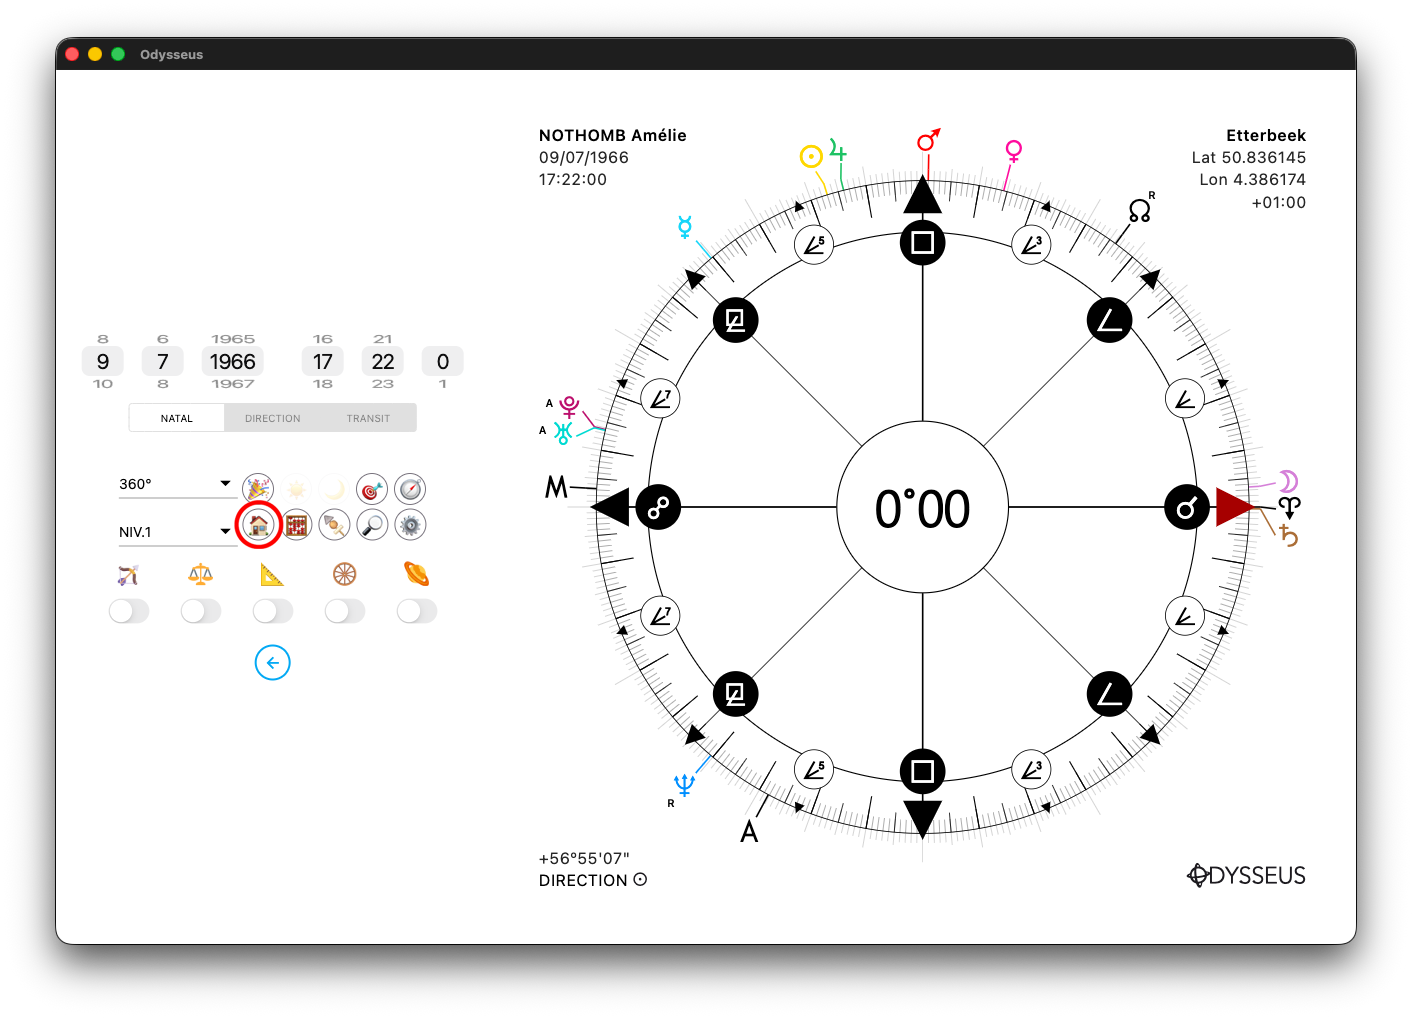
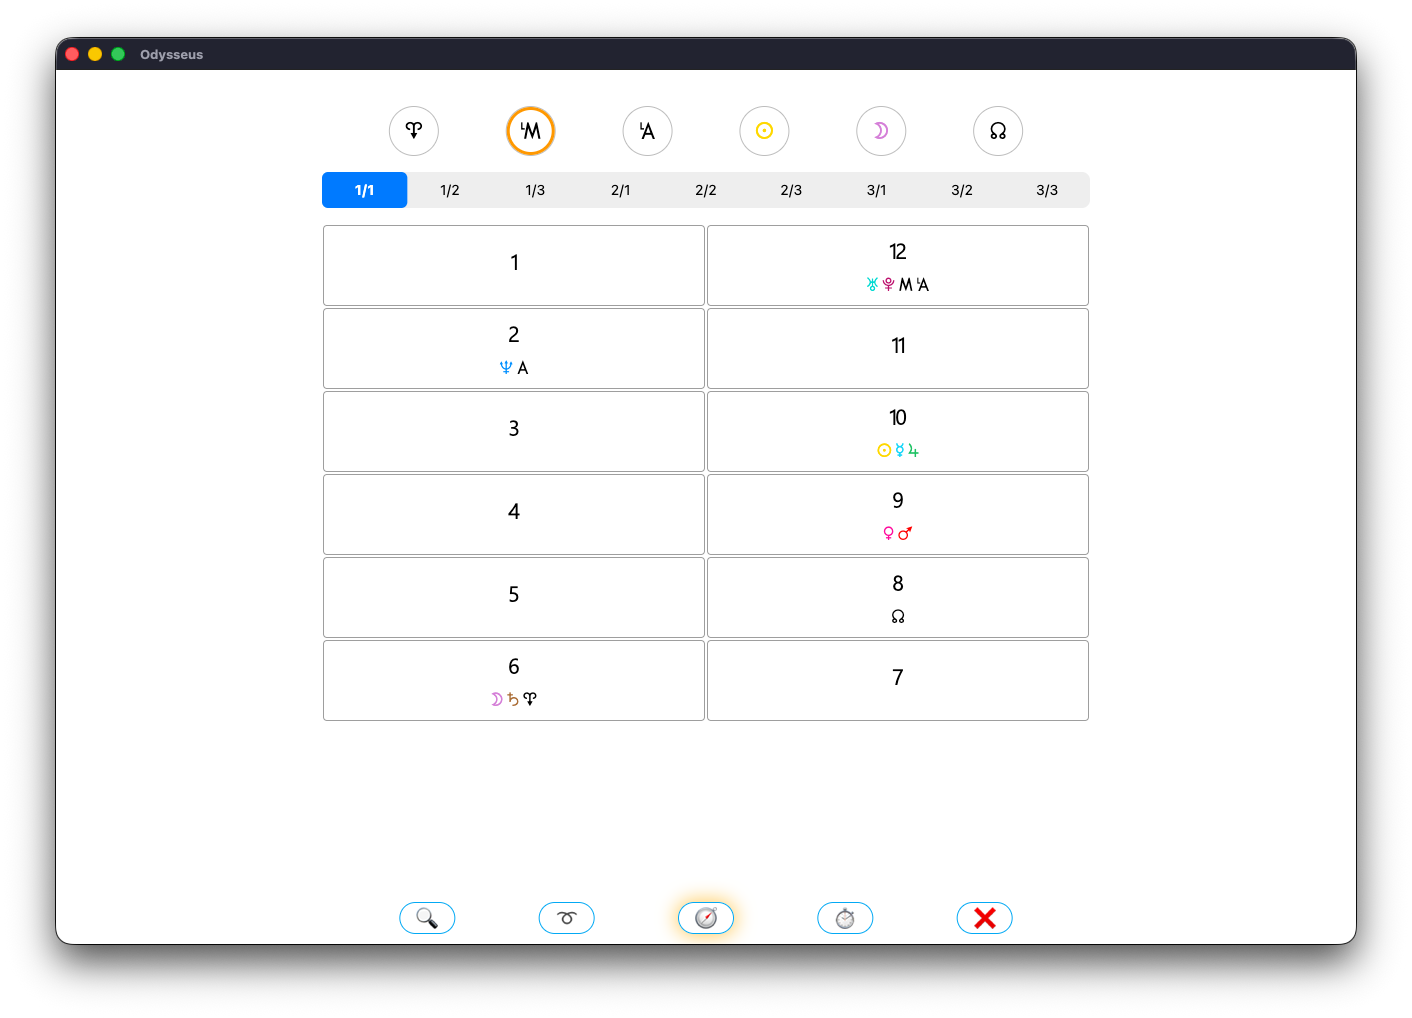
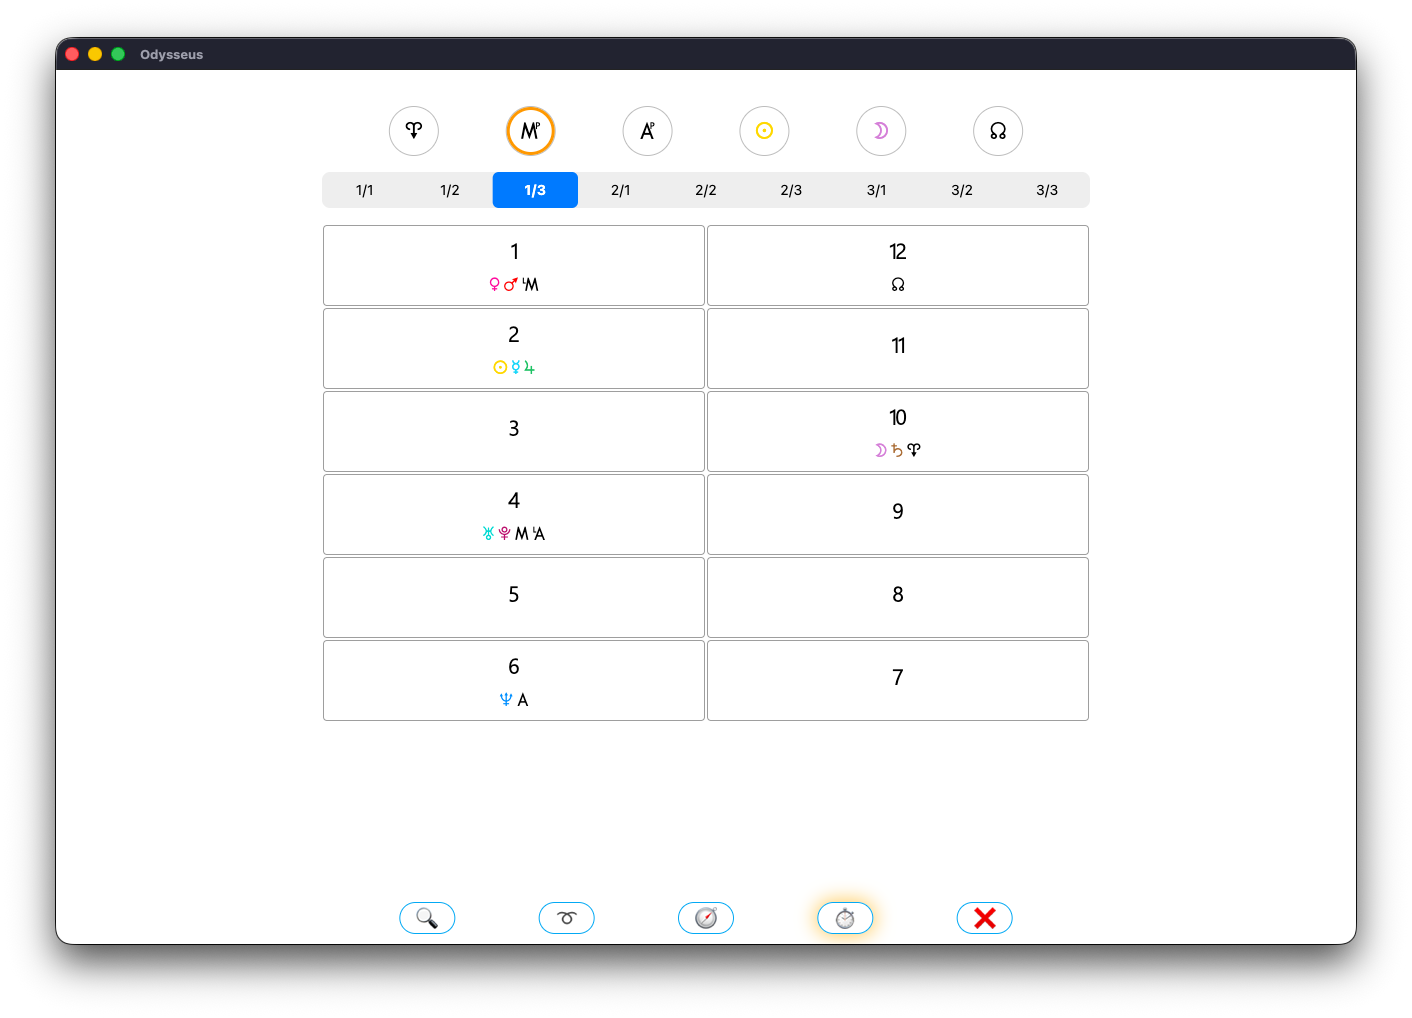
On the theme page, by clicking on the Houses 🏠 button, you open the House Table. Inside, you will find 6 buttons at the top, 5 at the bottom, and in the centre, the House Tables.
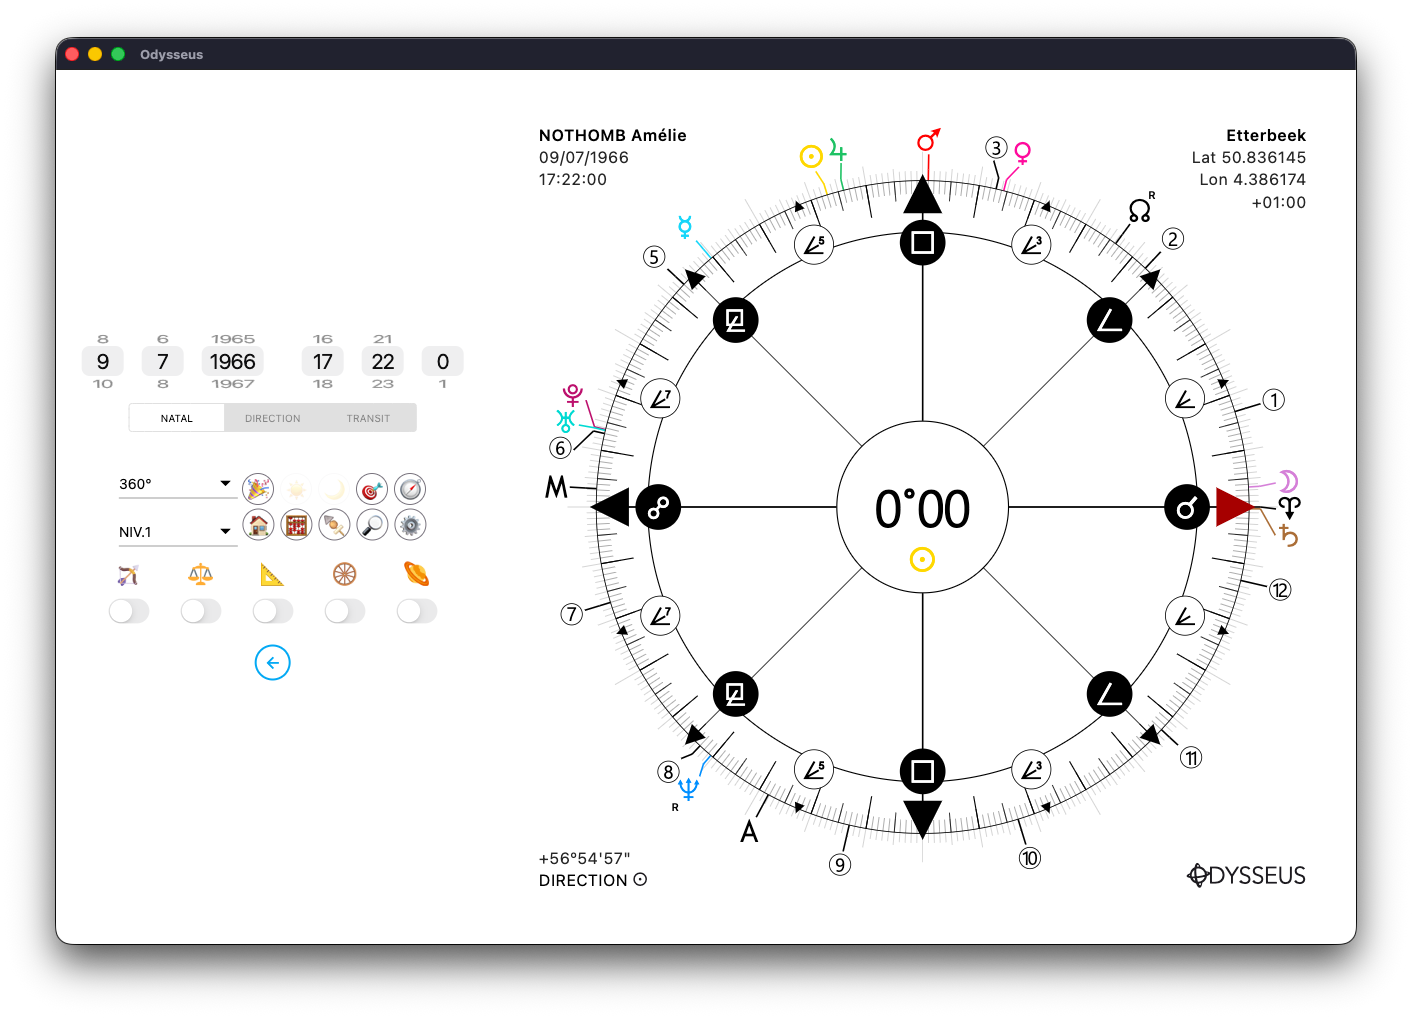
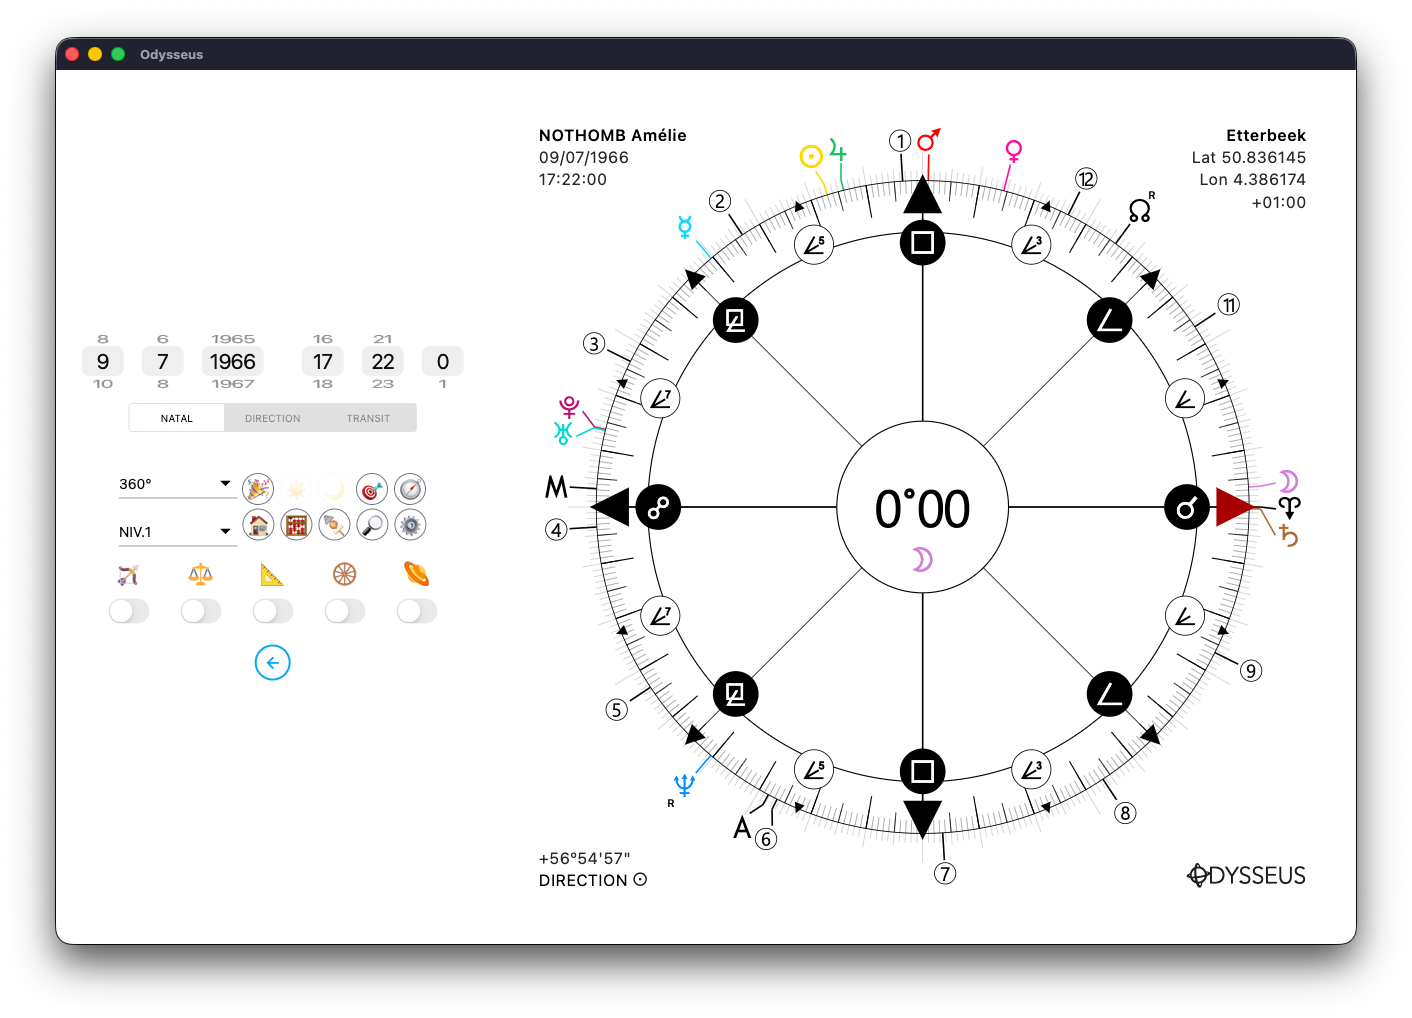
The 6 buttons at the top represent the domification systems of Uranian astrology: Vernal Point A for the signs of the zodiac / Houses of the Earth, Midheaven <, Ascendent >, Sun N, Moon Y and Lunar Node W.
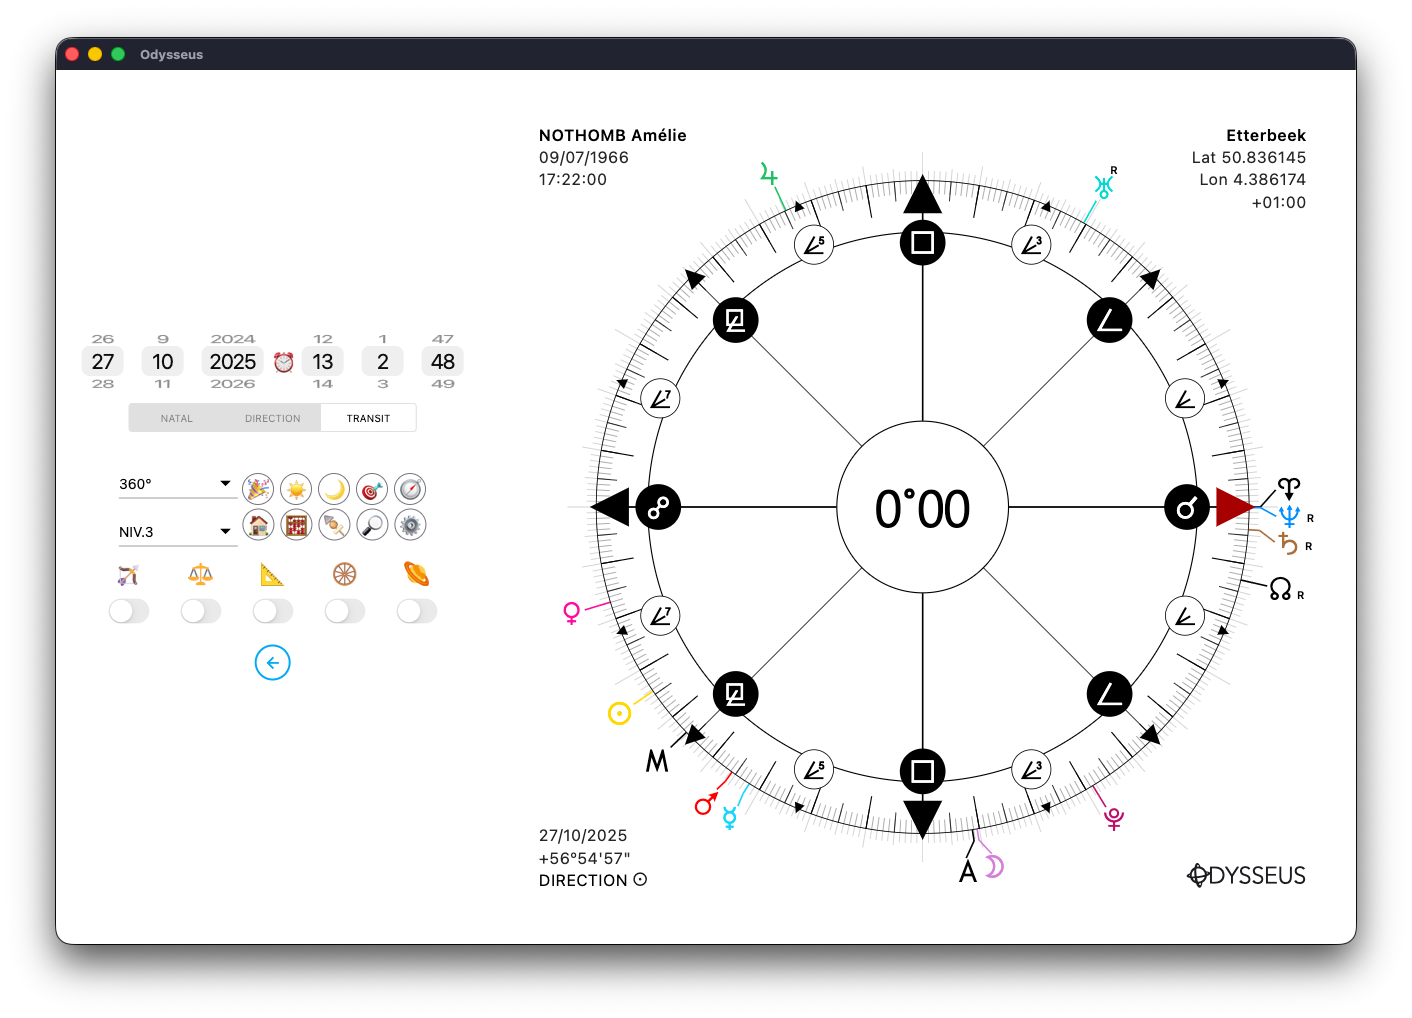
Just below, there is a slide with 9 positions to choose such level of planets such level of Houses:
- 1/1: natal planets in the birthplaces
- 1/2: natal planets in the directed houses
- 1/3: native planets in transit houses
- 2/1: planets directed in the birthplaces
- 2/2: planets directed in the directed houses (naturally identical to 1/1 unless we pass the directions in progression)
- 2/3: planets directed in transit houses
- 3/1: transit planets in birthplaces
- 3/2: transit planets in directed houses
- 3/3: transit planets in transit houses
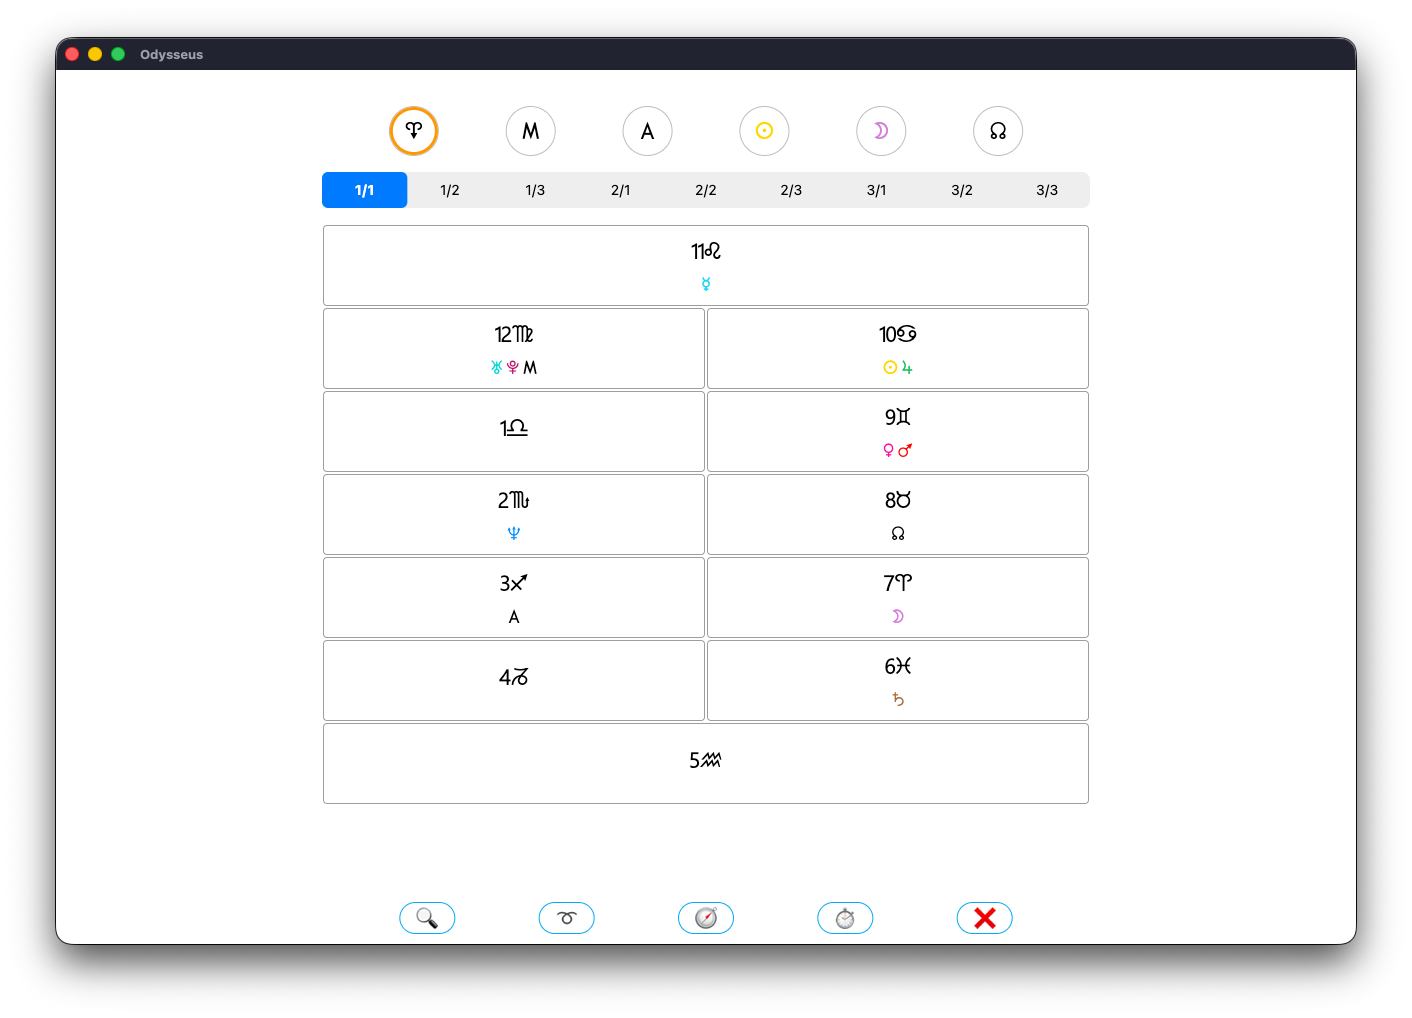
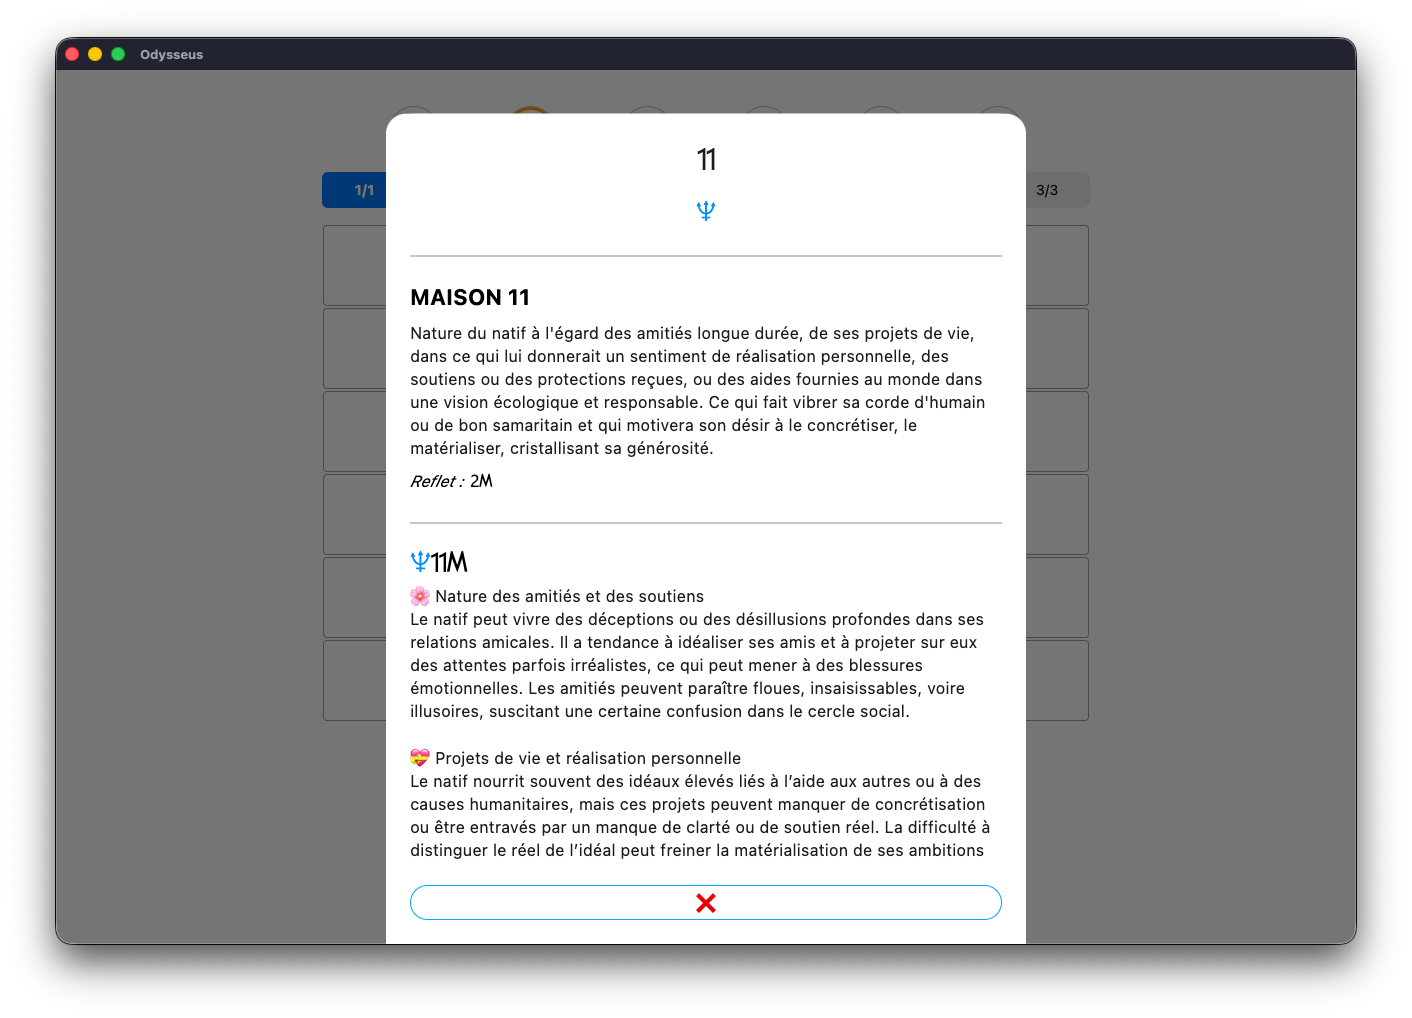
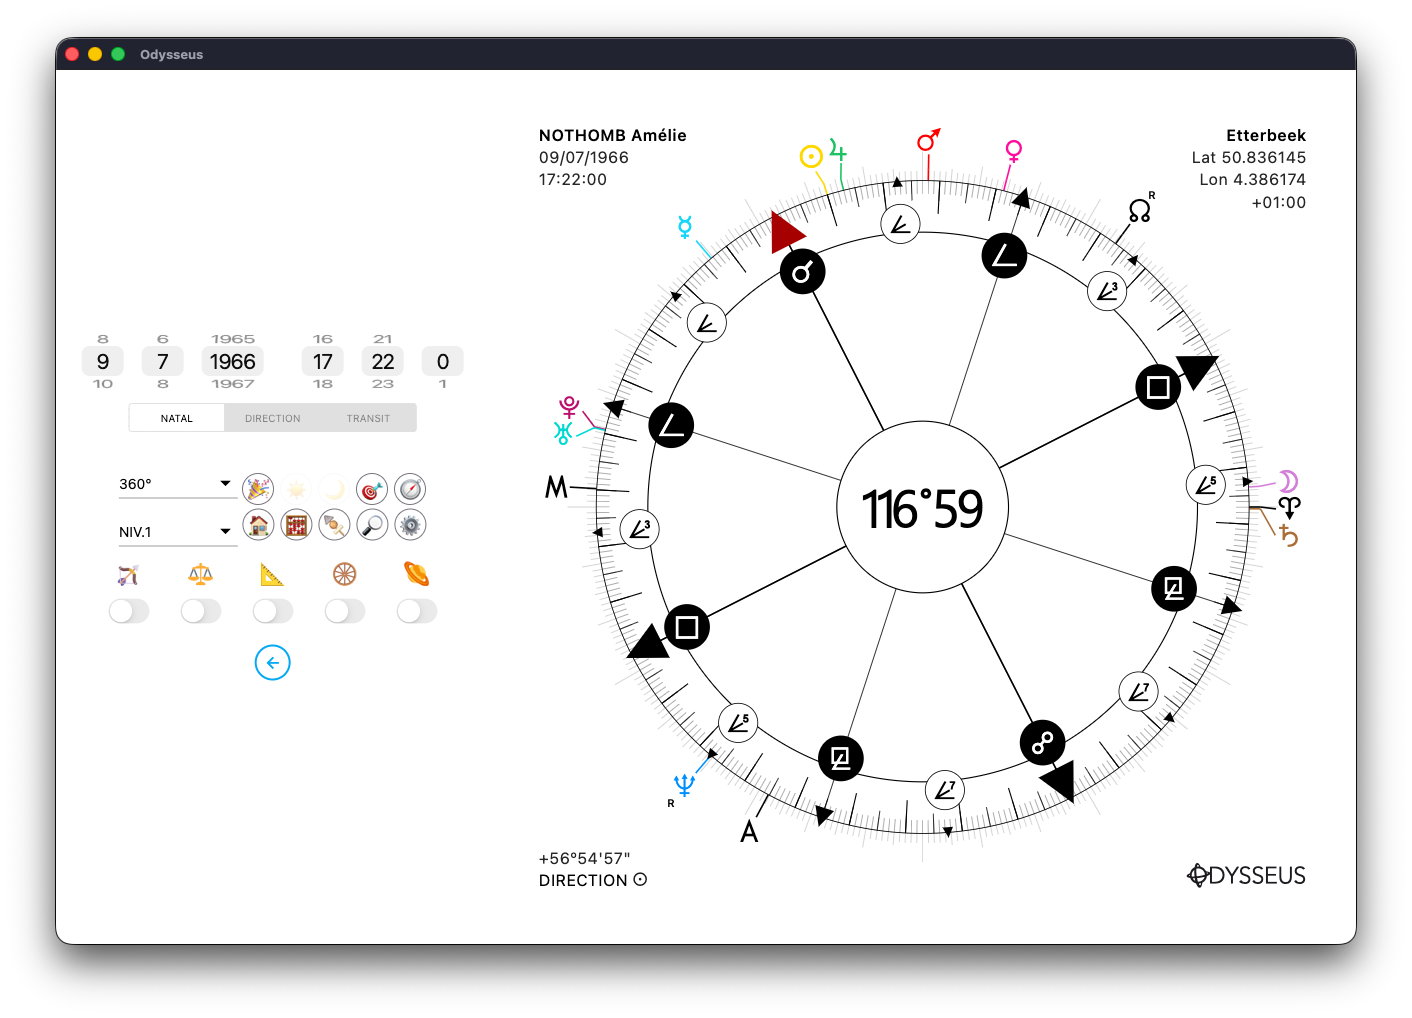
By clicking on a cell in the table, you open the definition of the corresponding House and the definition of the planets in this House:
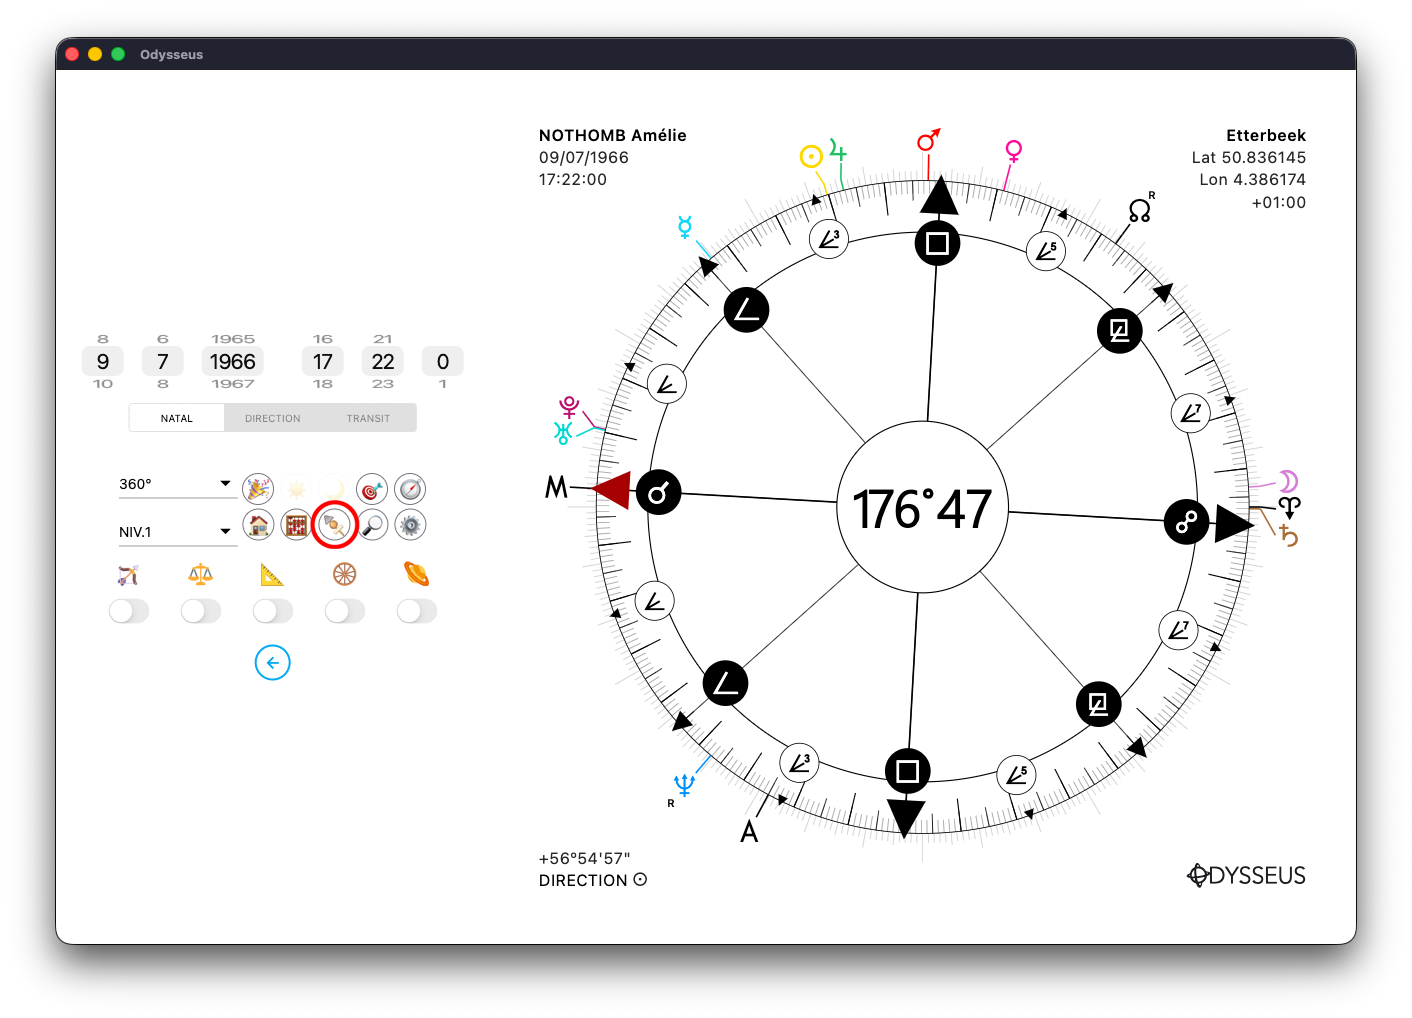
But if you are looking for the definition of a specific configuration, such a planet in such a House of such a system, just click on the magnifying glass button 🔎 to open the Codex Houses page.
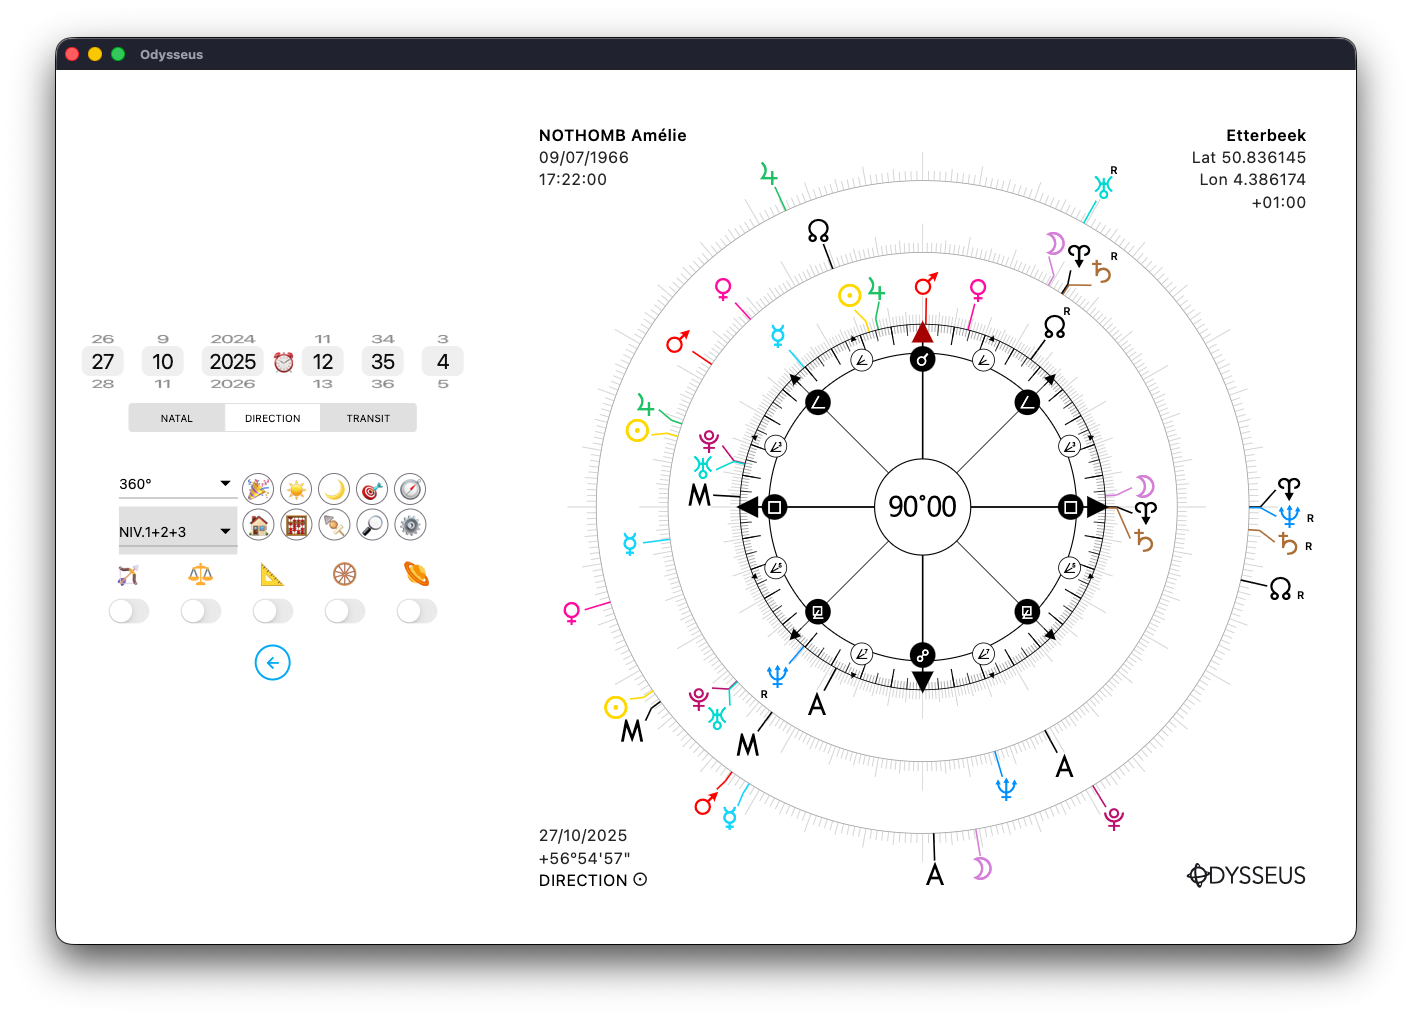
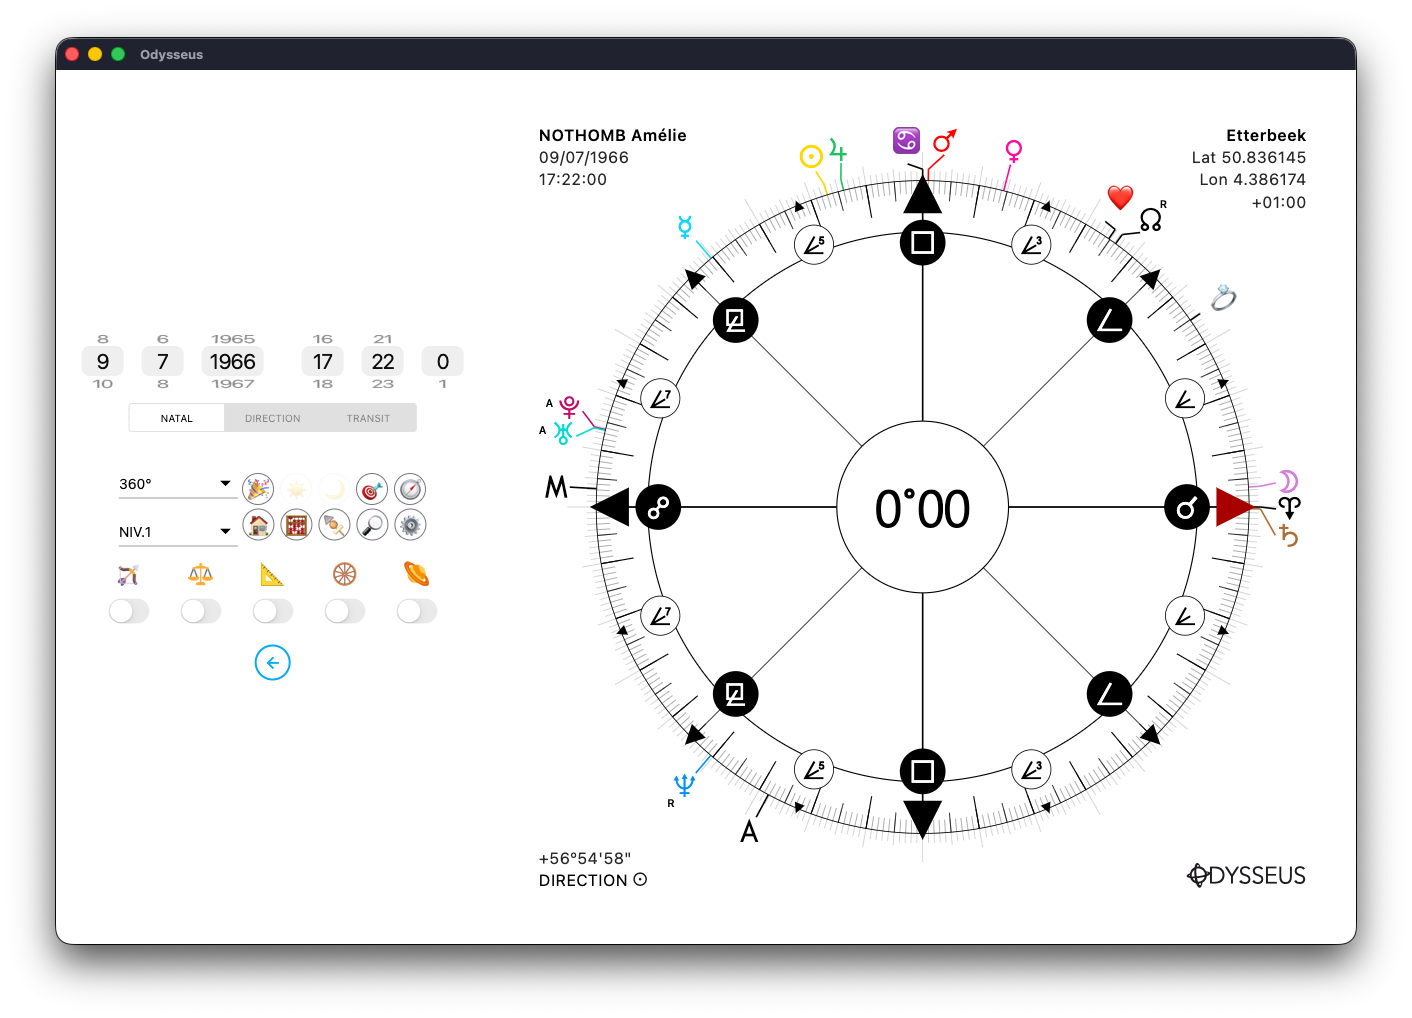
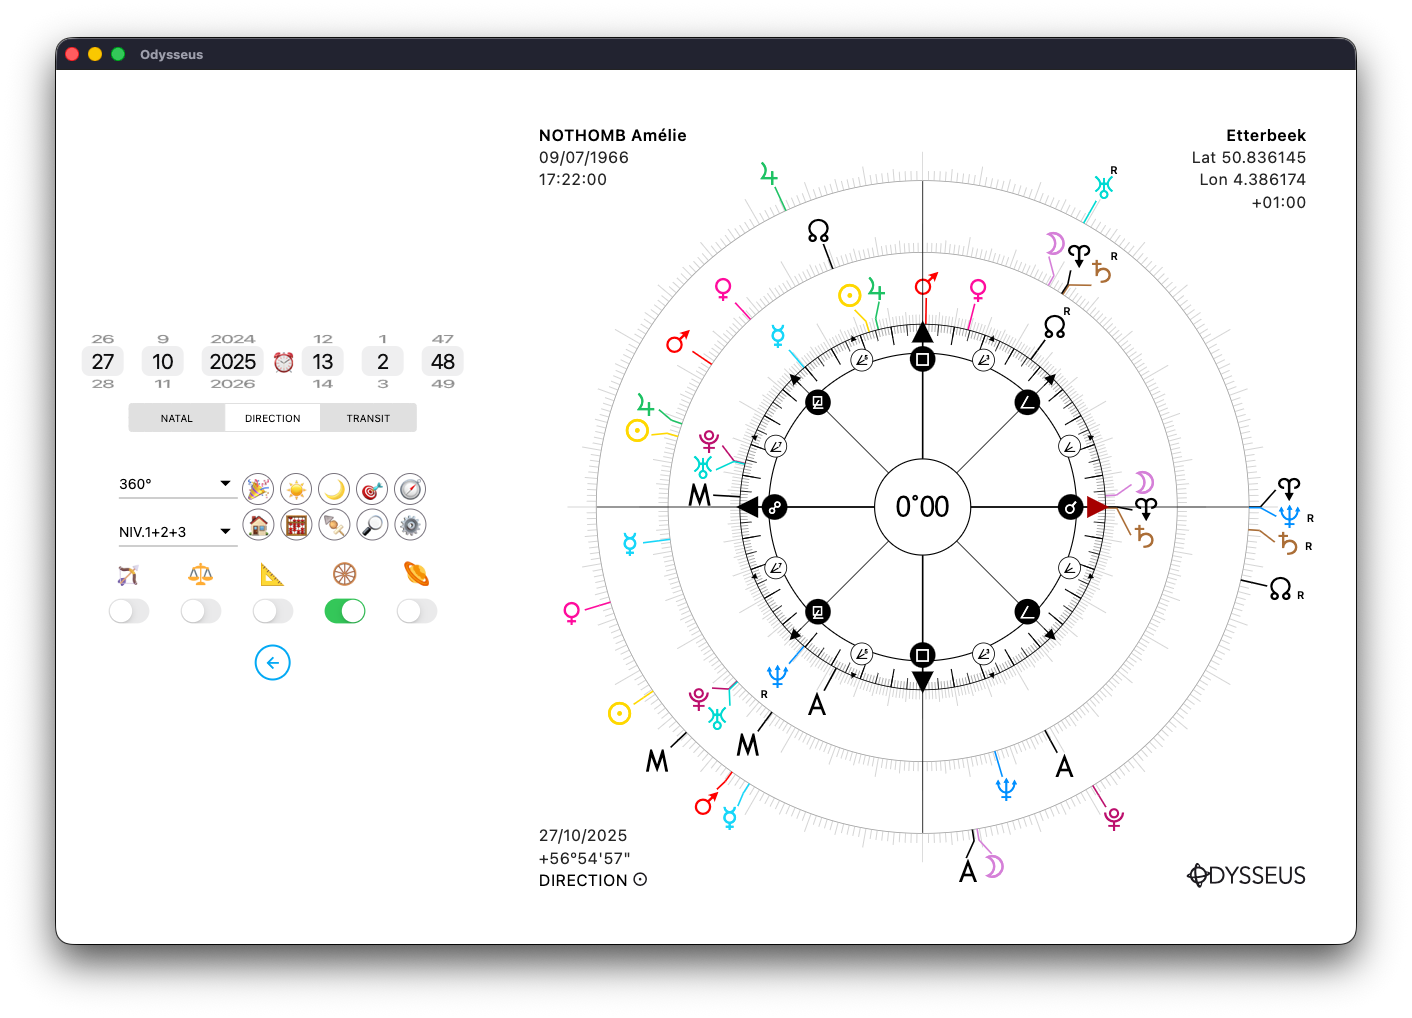
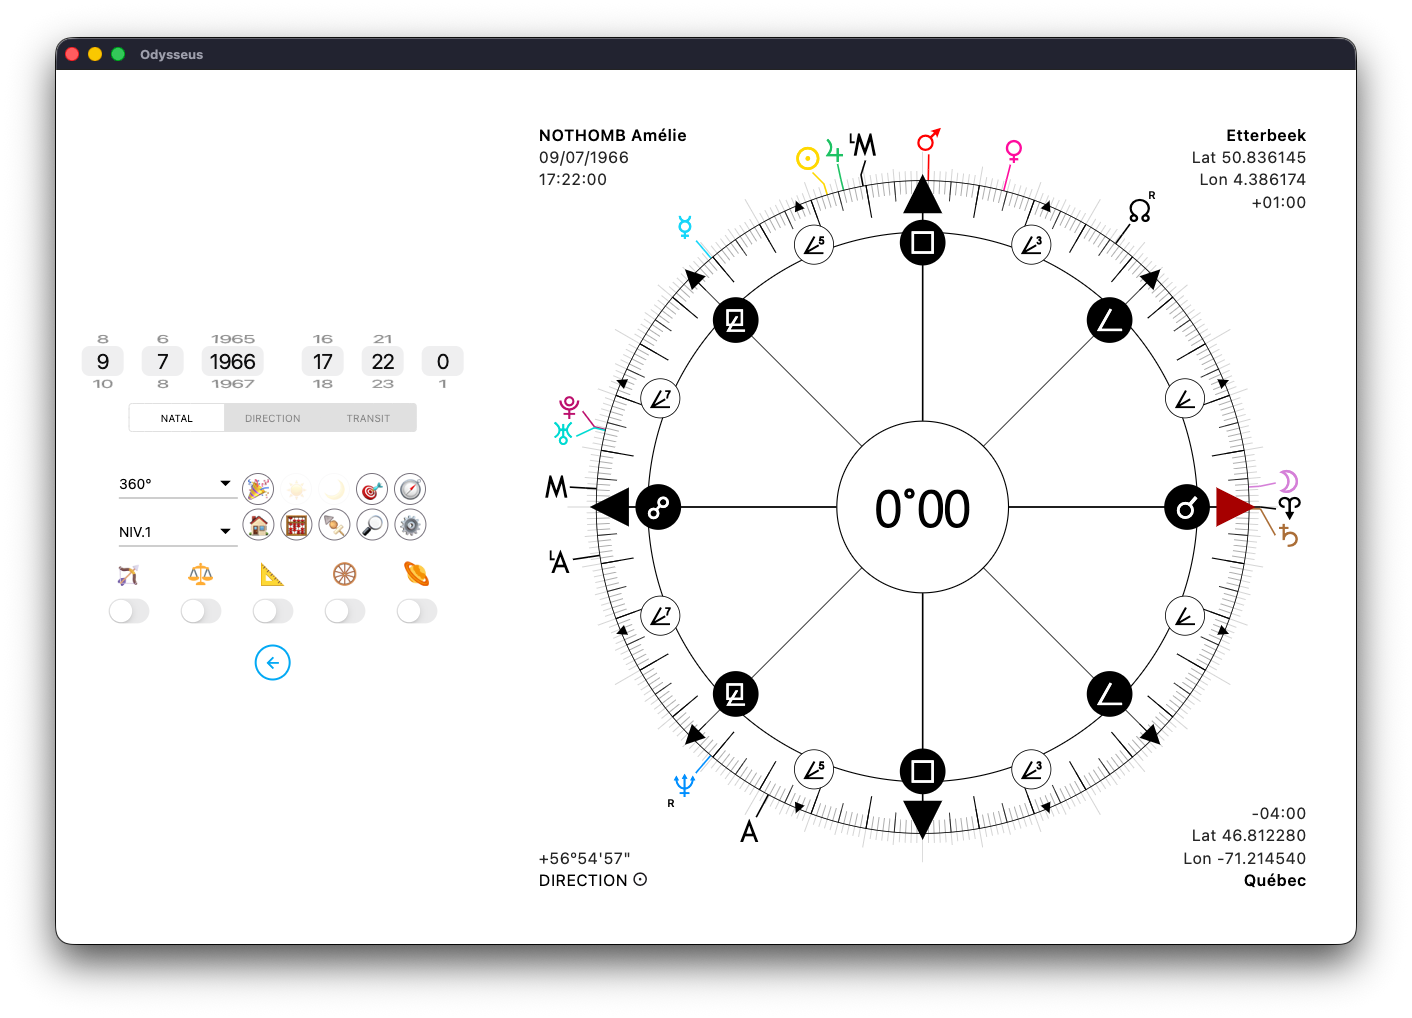
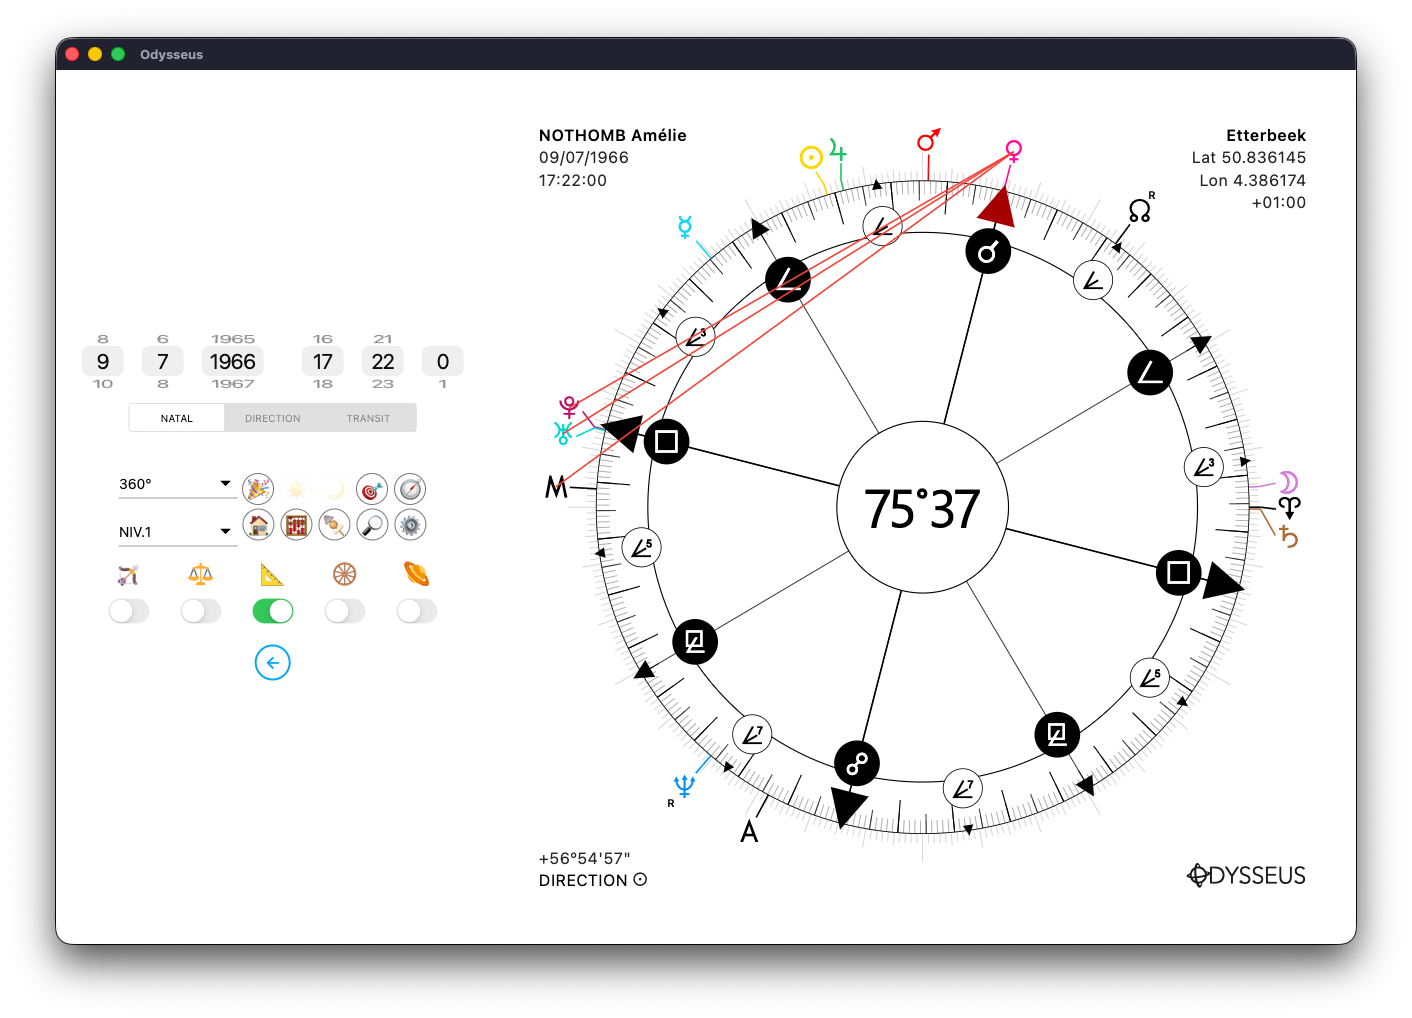
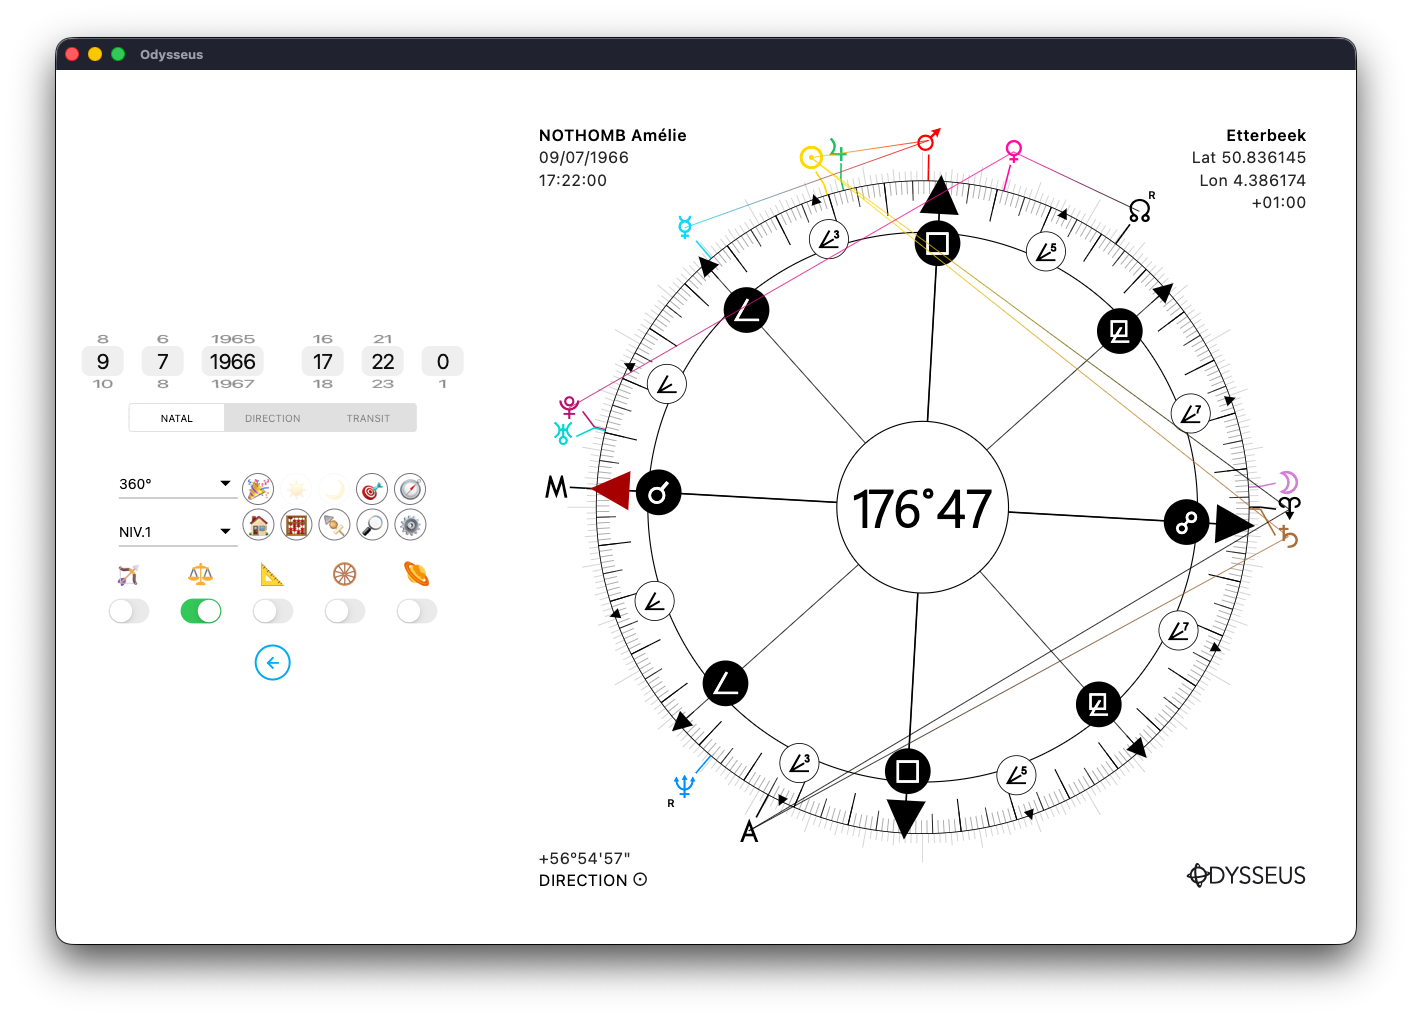
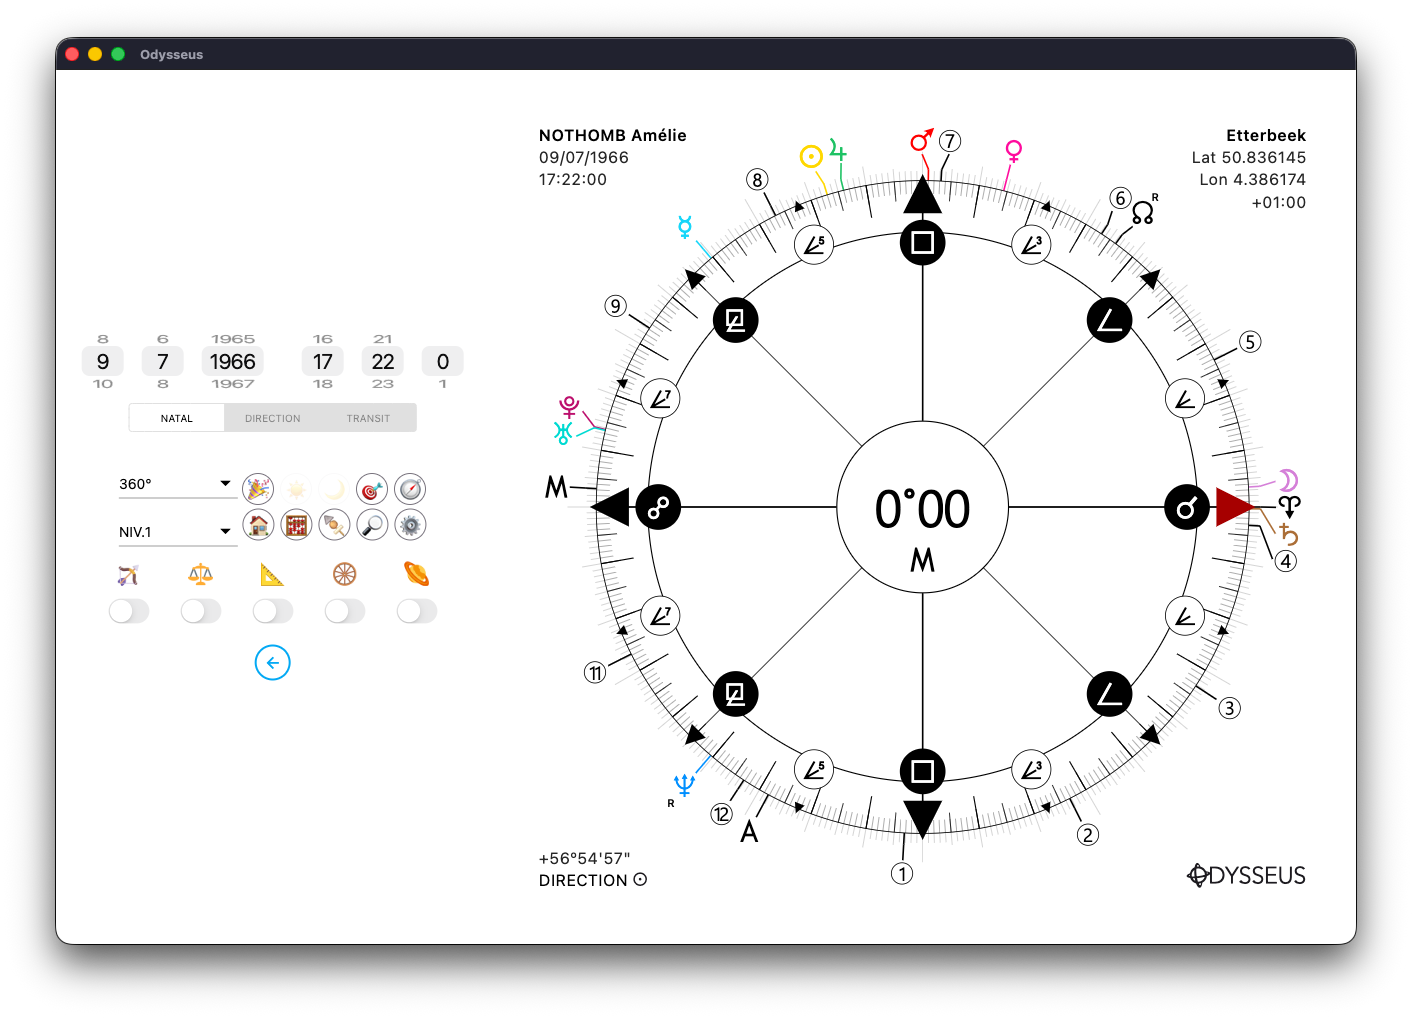
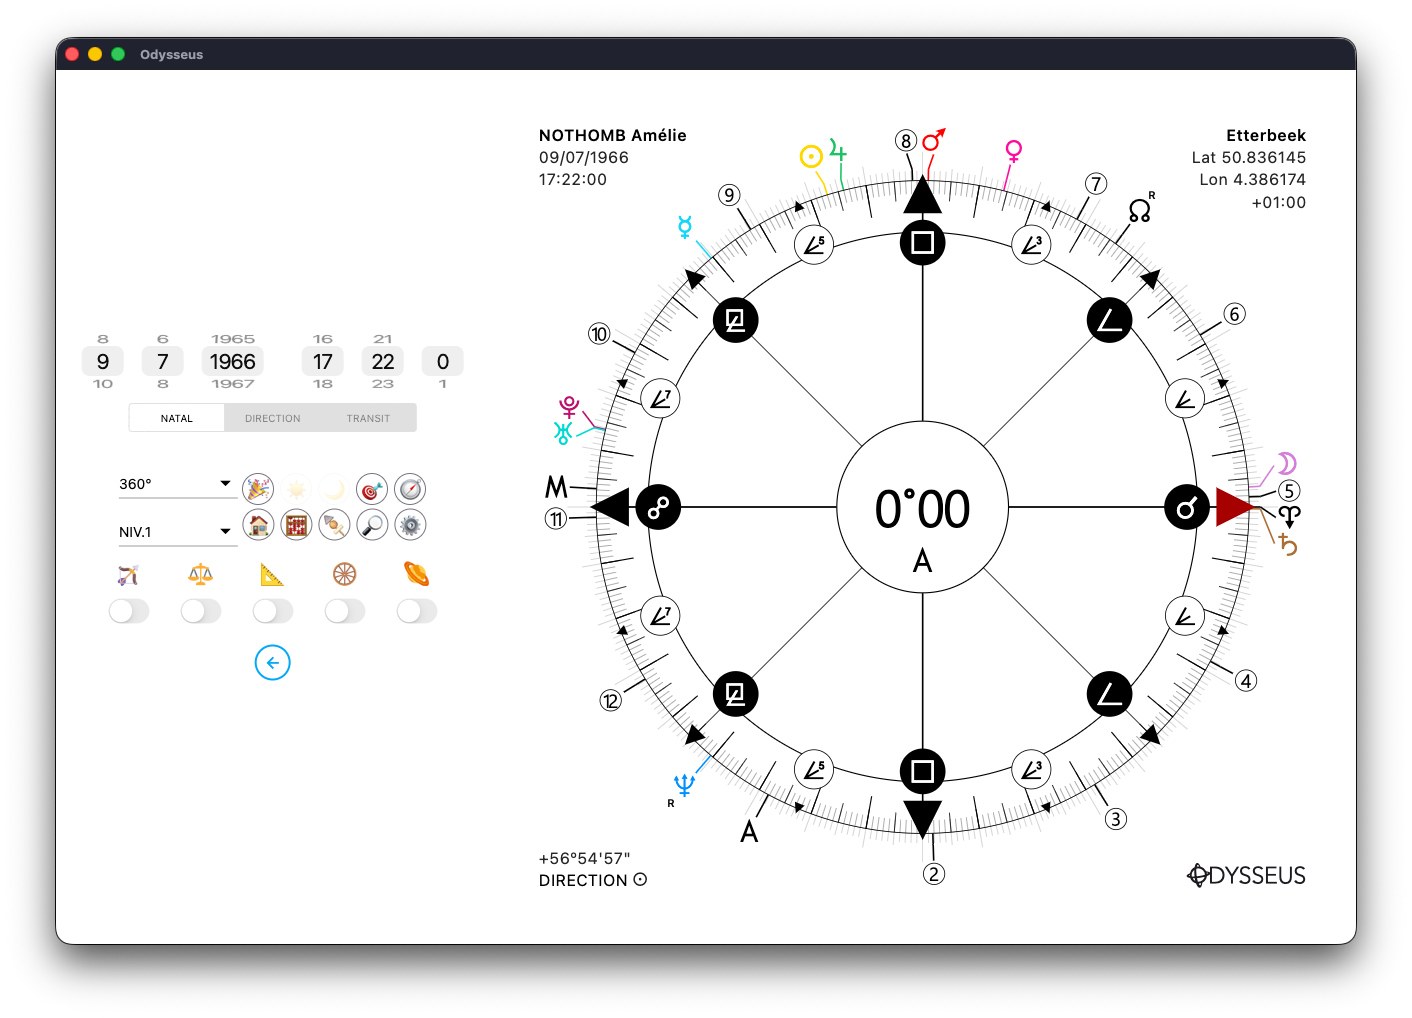
It is traditional in astrology to take into account the planets that are close to a cusp as belonging to the next House. To see this, a button ➰ allows you to jump into the following House:
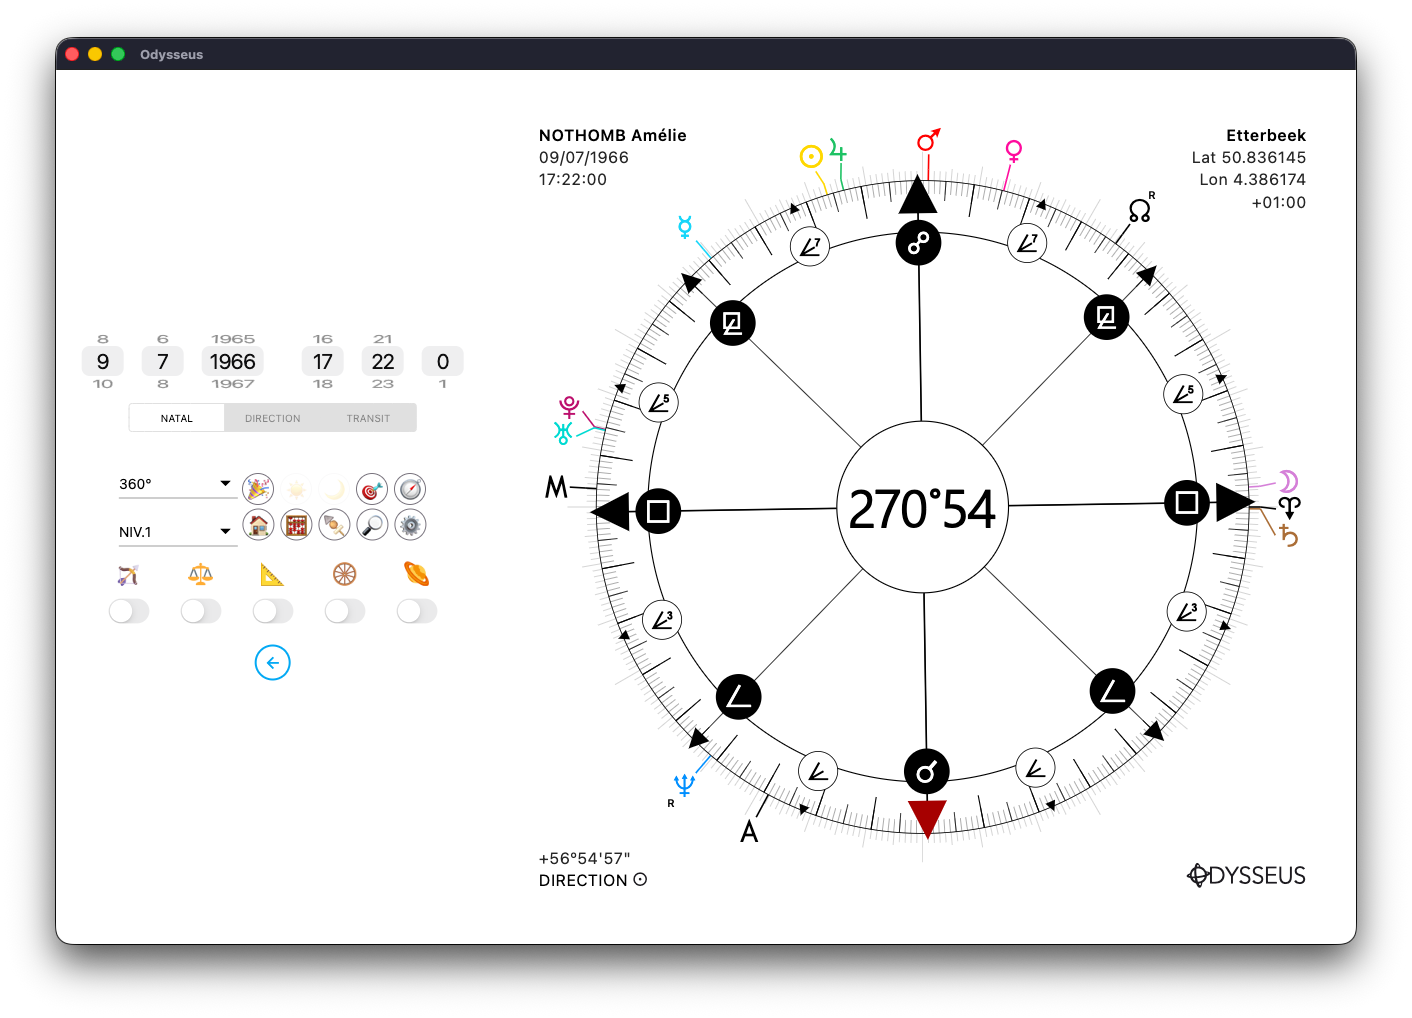
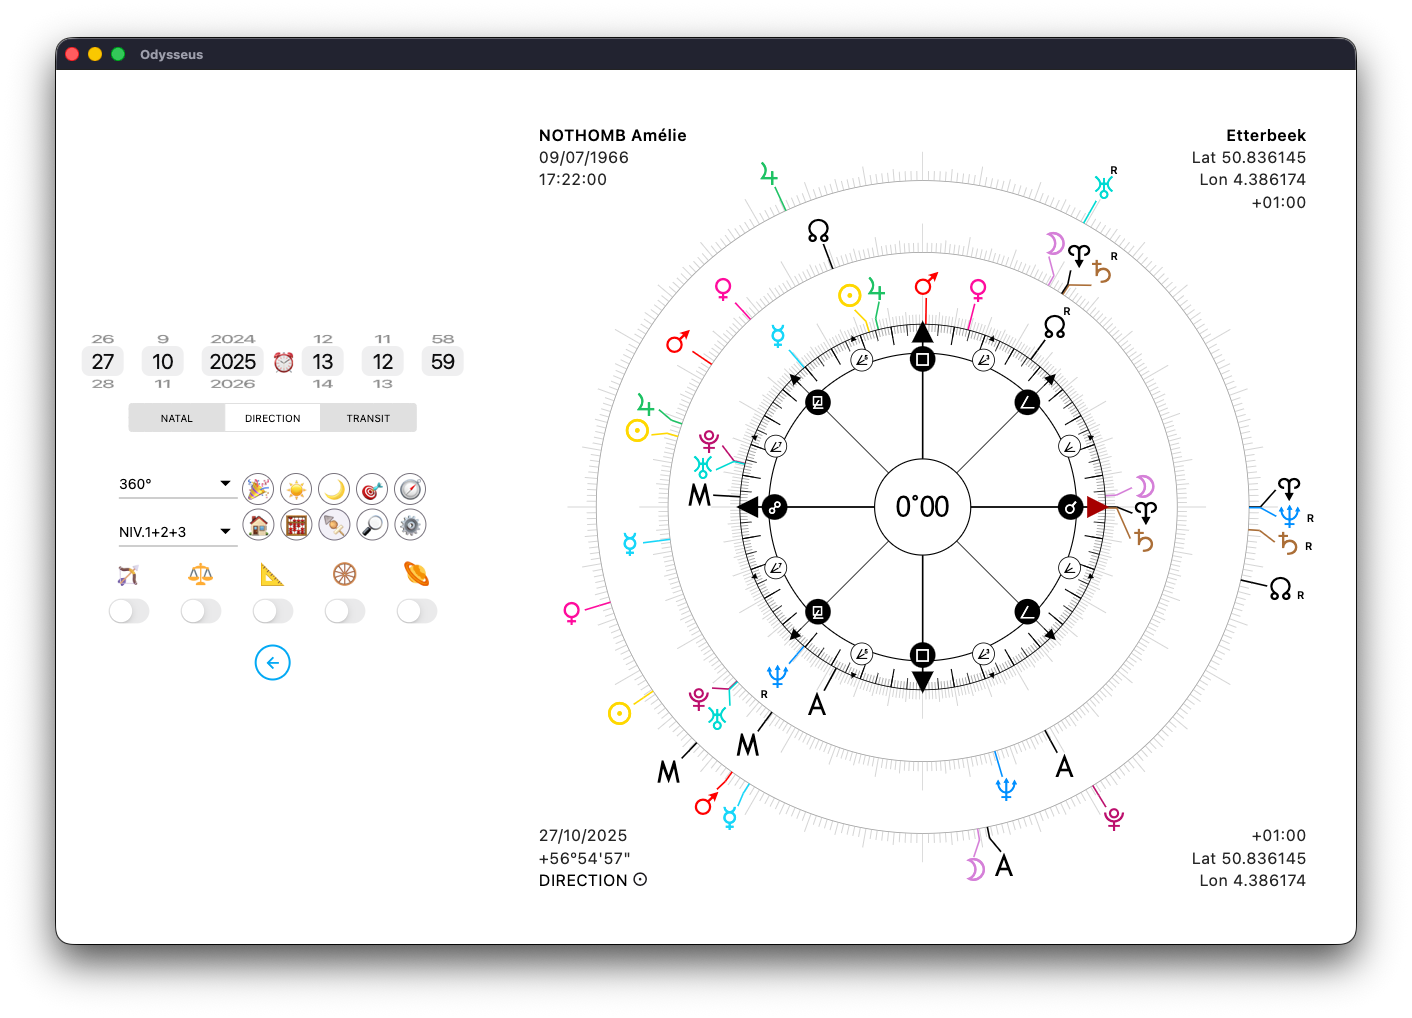
Here, for example, we see that the planets Uranus T and Pluto V belong to House 5 of the Sun N. While if we click on the passage button in the following House ➰:

…They then pass through House 6 (which is extremely relevant in the case of Amélie Nothomb, whose theme is here).
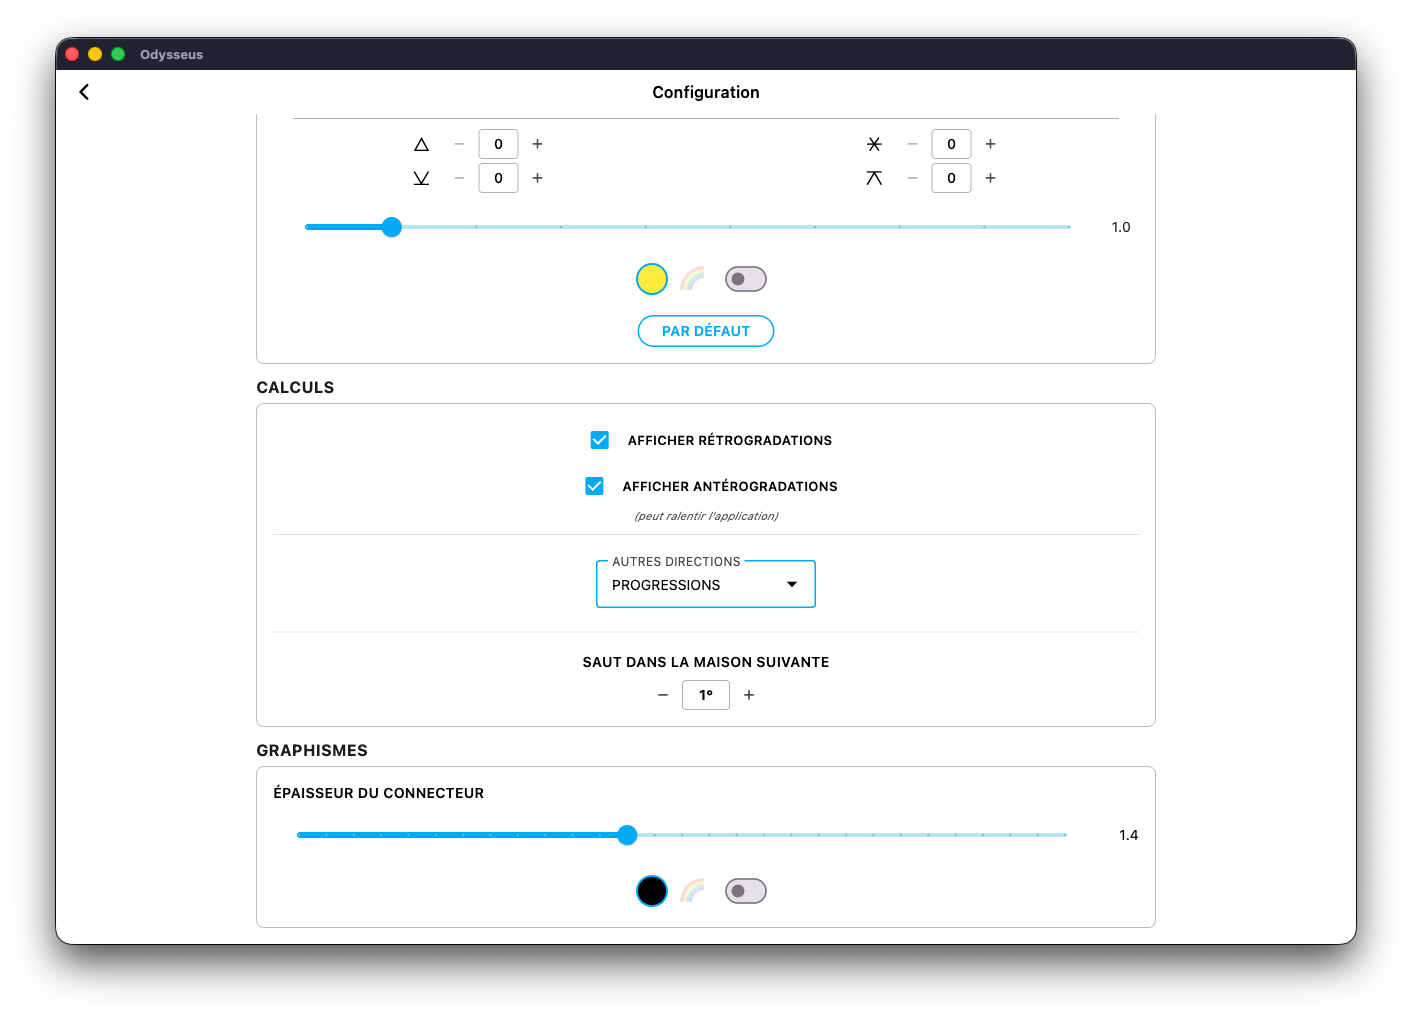
This “leap into the next House” is set in the Settings panel ⚙️ in degrees (here at less than 1º, the planet passes through the next House).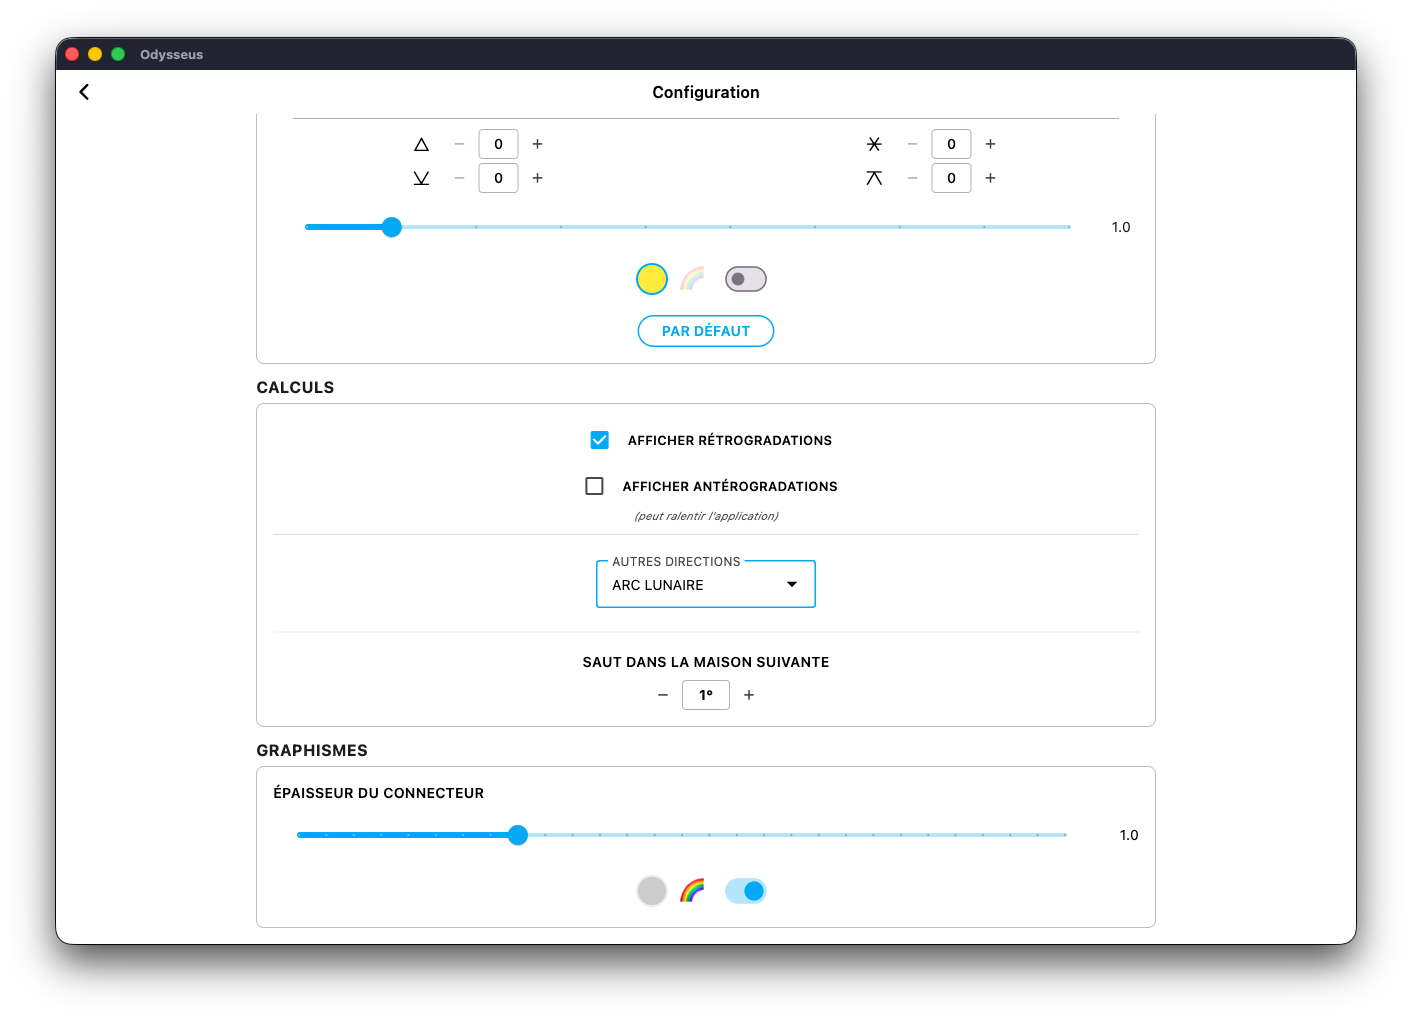
You will notice that among the 5 buttons of the House Table, there are 2 that include a compass 🧭 and a stopwatch ⏱️. To use these buttons, the Progressed Meridian |, the Progressed Ascendent ¢, the Local Meridian ‡ and the Local Ascendent † must be activated in the Settings panel ⚙️.
By default, on the level 1 wheel, you will only see the Local Meridian ‡ and the Local Ascendent †, right next to their “classic” counterpart. Simply because these points show what they would be like if the person had been born elsewhere. We will therefore proceed with a relocation. To do this, click on the compass button 🧭 next to the chart:

This will open a new window where you can choose a city (and a country).
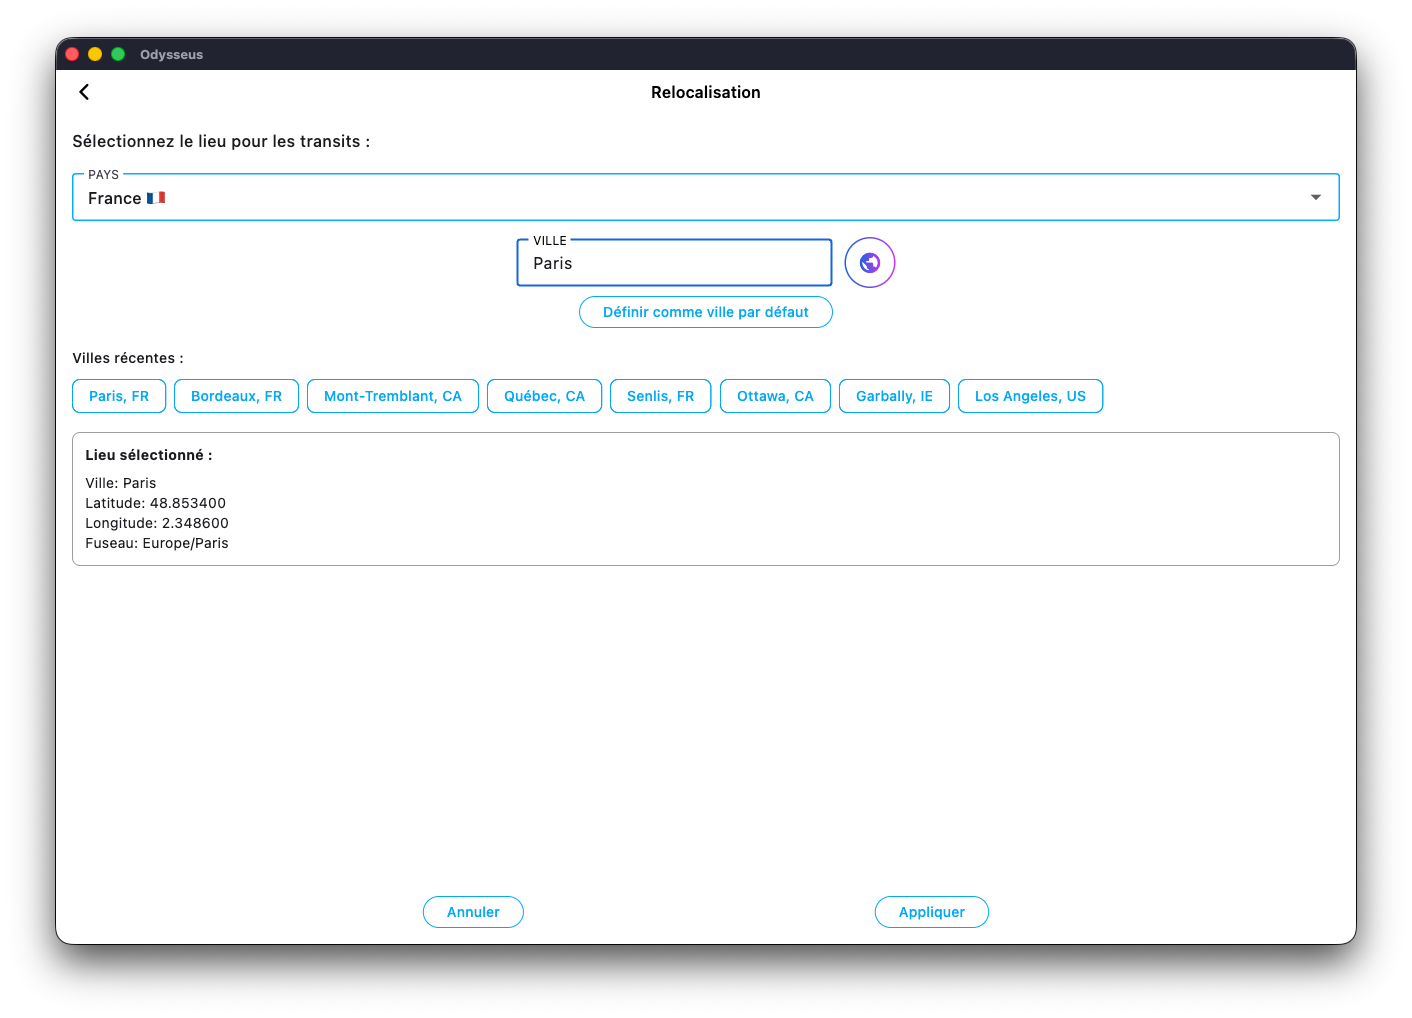
If, for example, I select Quebec and validate:
I see that the Local Meridian ‡ and the Local Ascendent † have moved. If now I go back to the House Table 🏠 and click on the compass button 🧭, the buttons at the top of the Midheaven < and the Ascendent > have changed to become the Local Meridian ‡ and the Local Ascendent †. By clicking on it, I will see their Houses, and no longer those of their classic counterparts.
If now I take a look at the level 3 wheel, the transits, I will see that this is where the Progressed Meridian | and the Progressed Ascendent ¢ appear. Because they are transit points that move about 1º per day.

If now I go back to the Table of Houses 🏠 and click on the stopwatch ⏱️… nothing will change. Because, in fact, the Progressed Meridian | and the Progressed Ascendent ¢ only appear if the slide is on 1/3, 2/3 or 3/3. Because the second digit, after the /, defines the level of the Houses. We want to see the Houses of the Progressed Meridian | and the Progressed Ascendent ¢ . However, the latter belong to the level of transits. So we have to get on? /3 to see them appear. Here, on 1/3, we look at the native planets in the Transit Houses, and then the Progressed Meridian | and the Progressed Ascendent ¢ appear.
Finally, last button but you probably guessed the usefulness, the red cross button ❌ which is simply used to close the window.
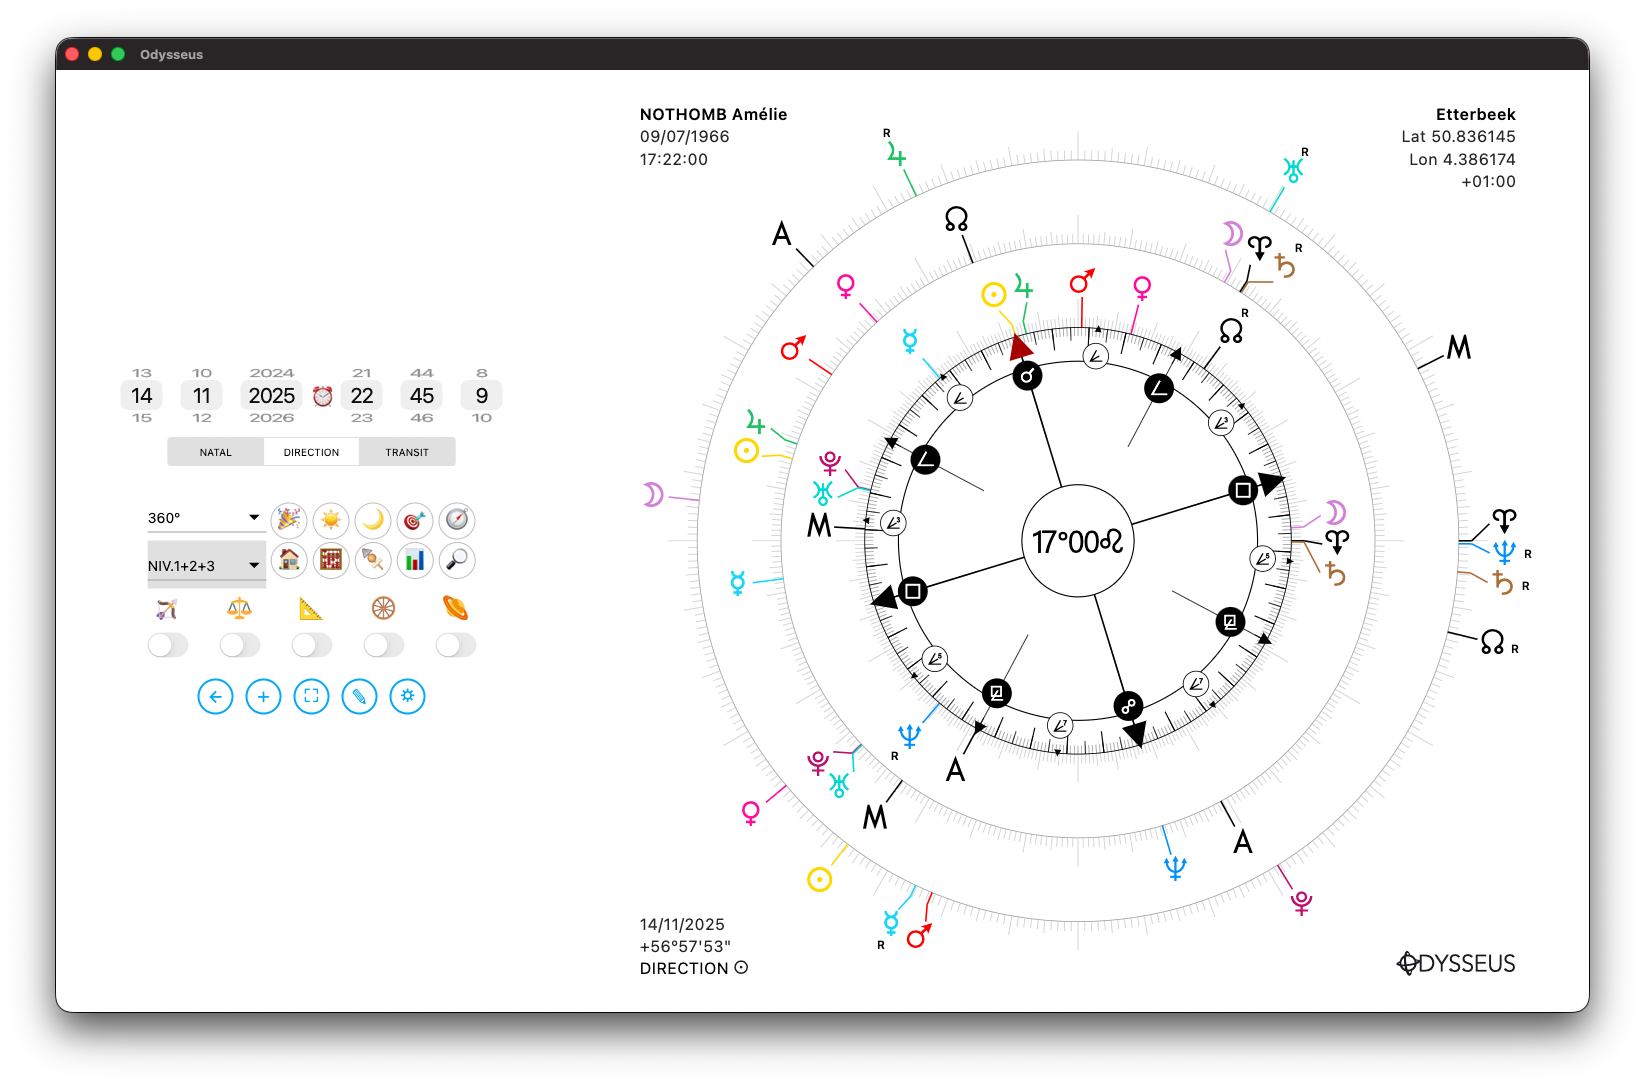
ANGLES 📐
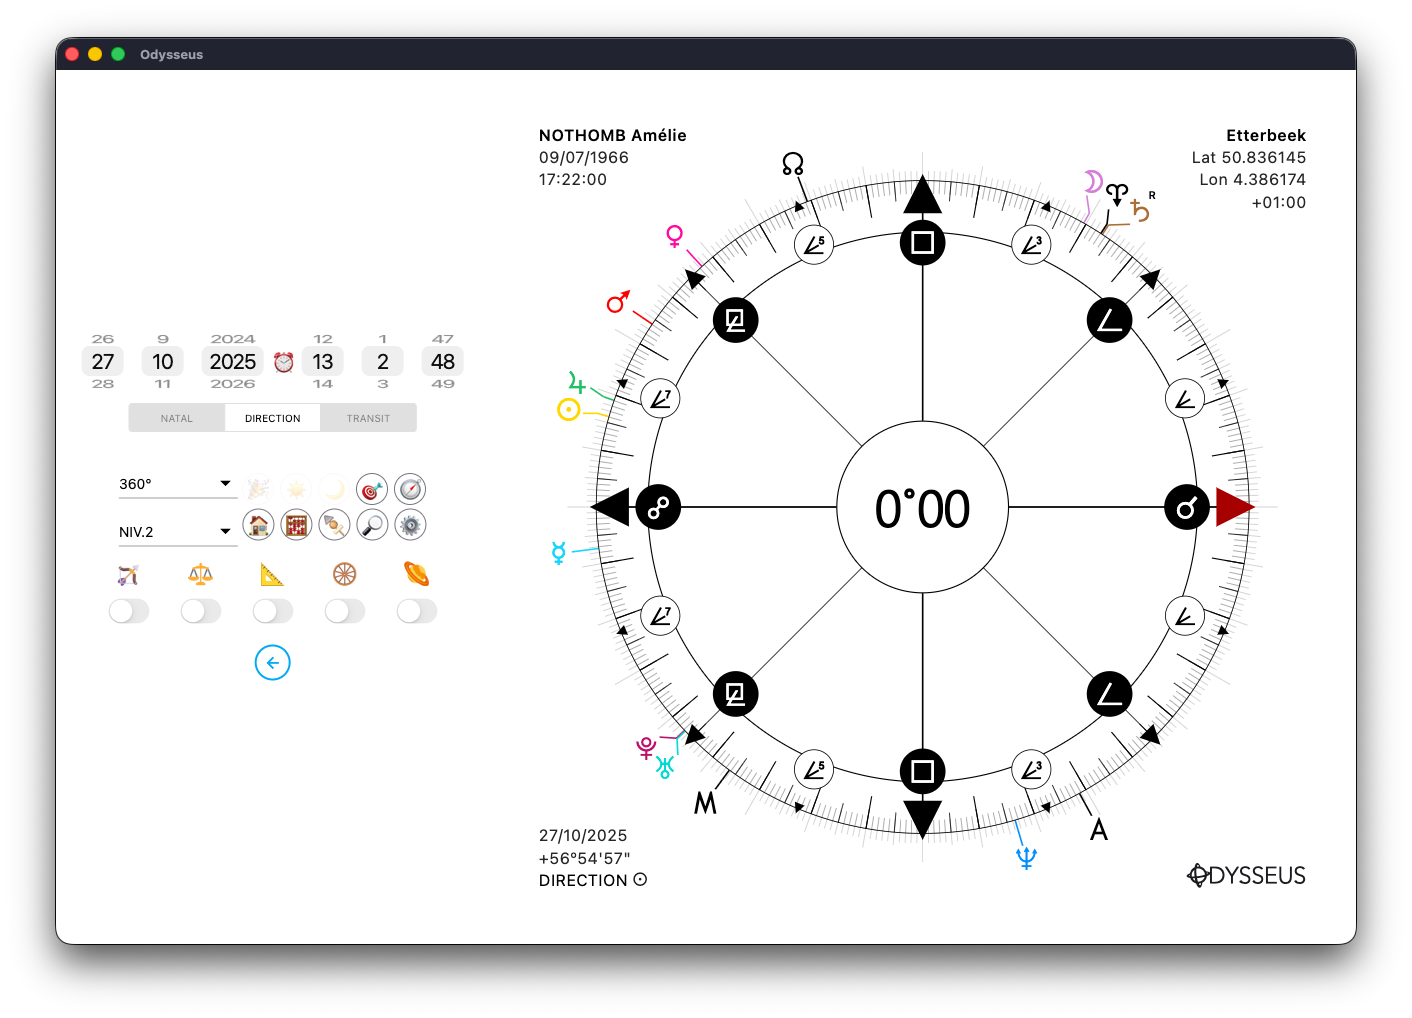
By activating the switch below the set square / triangle image:
…The latter goes green and the wheel pointer then displays traces in the direction of certain planets. This function is used to display the planets in relation to certain points of the wheel, in accordance with the angles set in the Settings panel ⚙️:
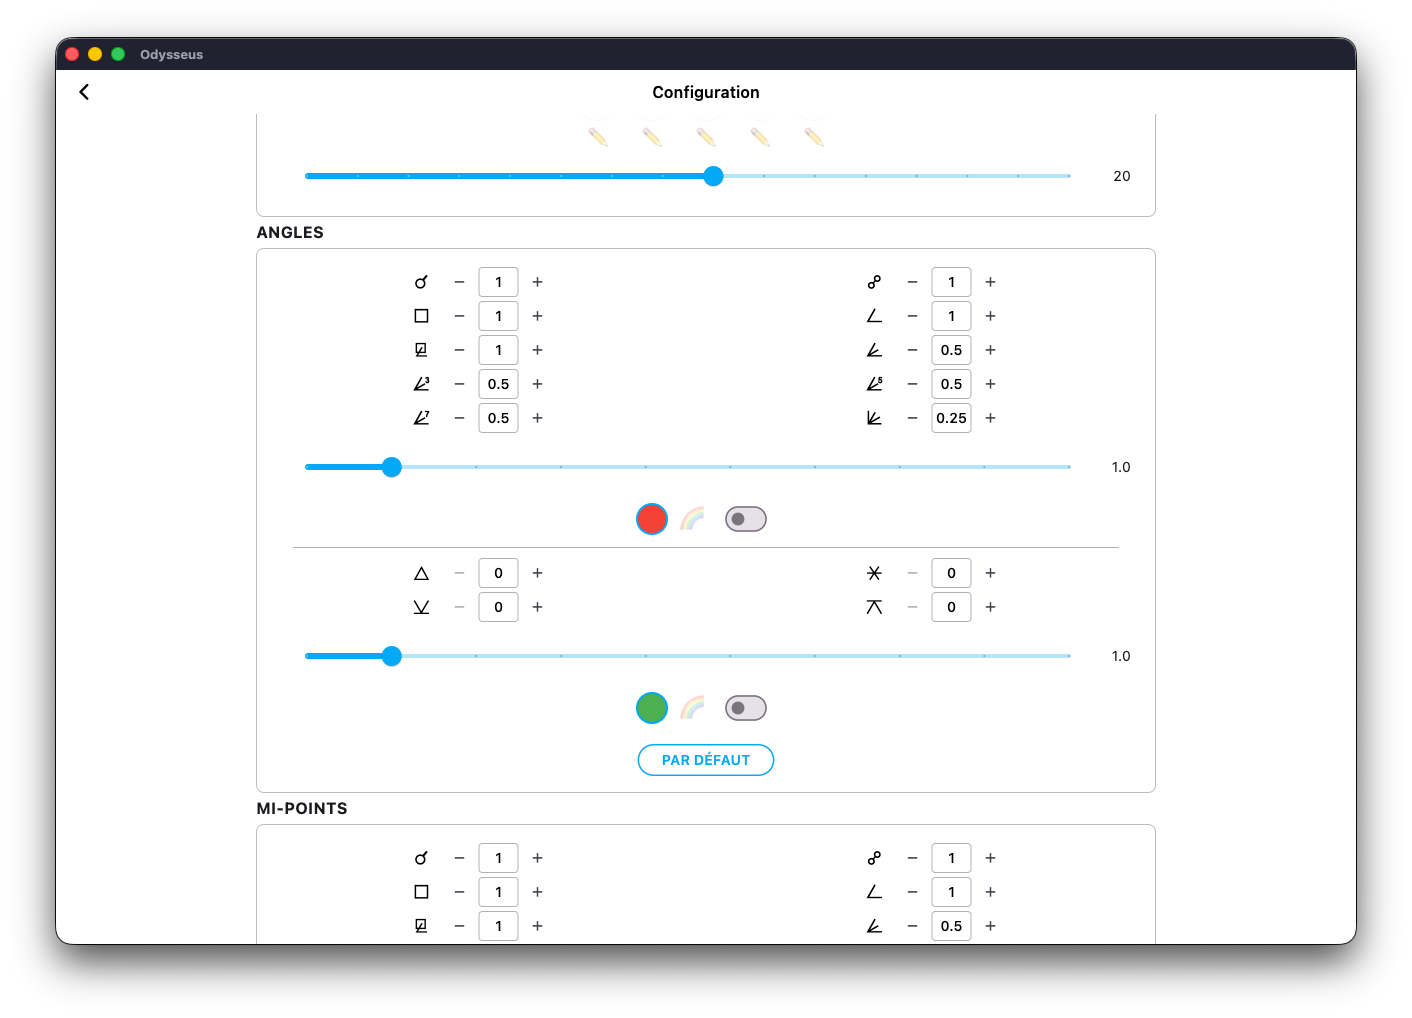
You will find this in the ANGLES block. By default, only the so-called “hard” angles are activated, because they are those used in Uranian astrology. But if you want to use the so-called “soft” angles, it’s up to you to fill in the desired orbs in the corresponding boxes. Otherwise, leave everything by default.
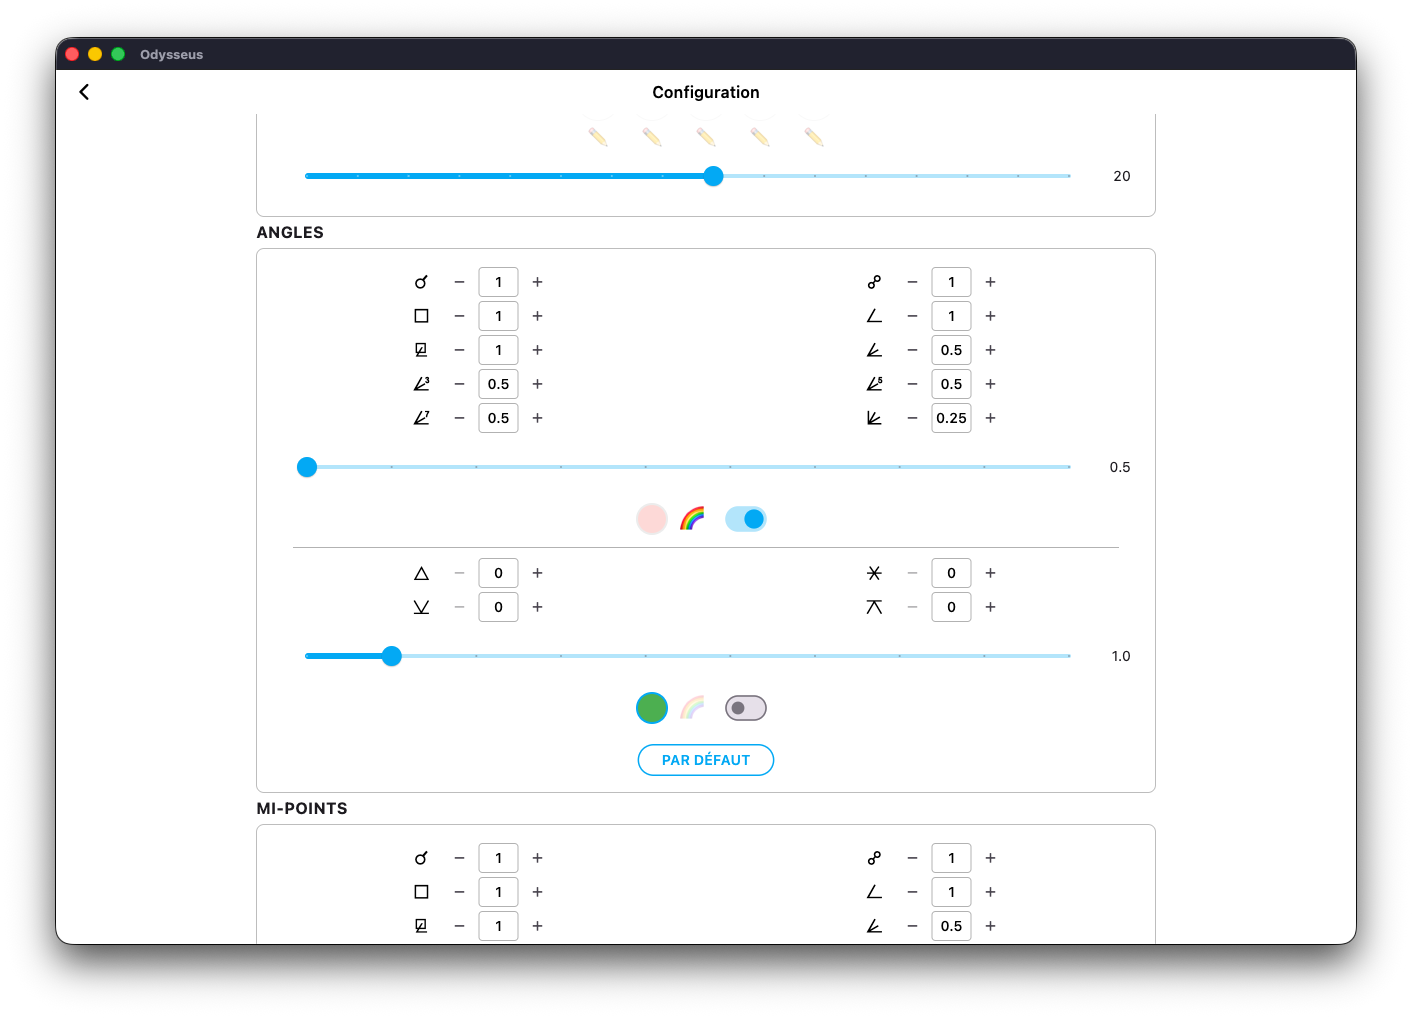
You also see that a cursor and a button can be activated. The cursor changes the thickness of the lines displayed on the dial, and the button their colour. By default, they are in red. If you click on the red pellet, you can choose another colour. Otherwise, you can click on the switch next to the rainbow and the lines will then be a mixture of black (pointer colour) and the colour of each planet.

Also, it is possible to simply make a long press on the set square:
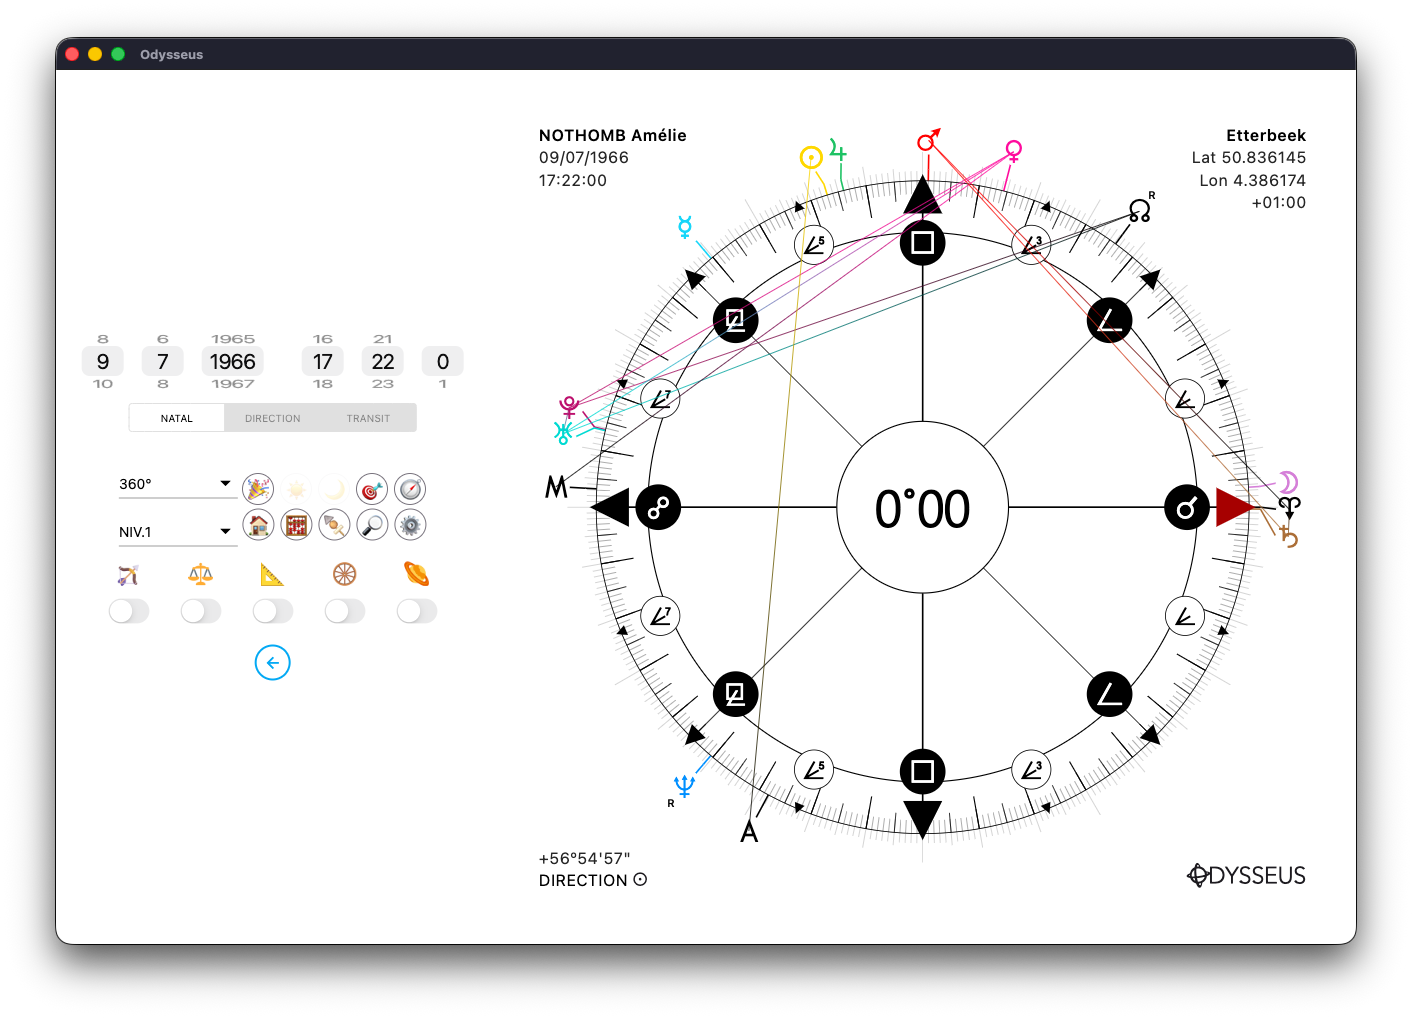
And then all the angles formed between all the planets concerned appear. A new long click will make them disappear.
By double-clicking on the square, you will open an aspectarian:
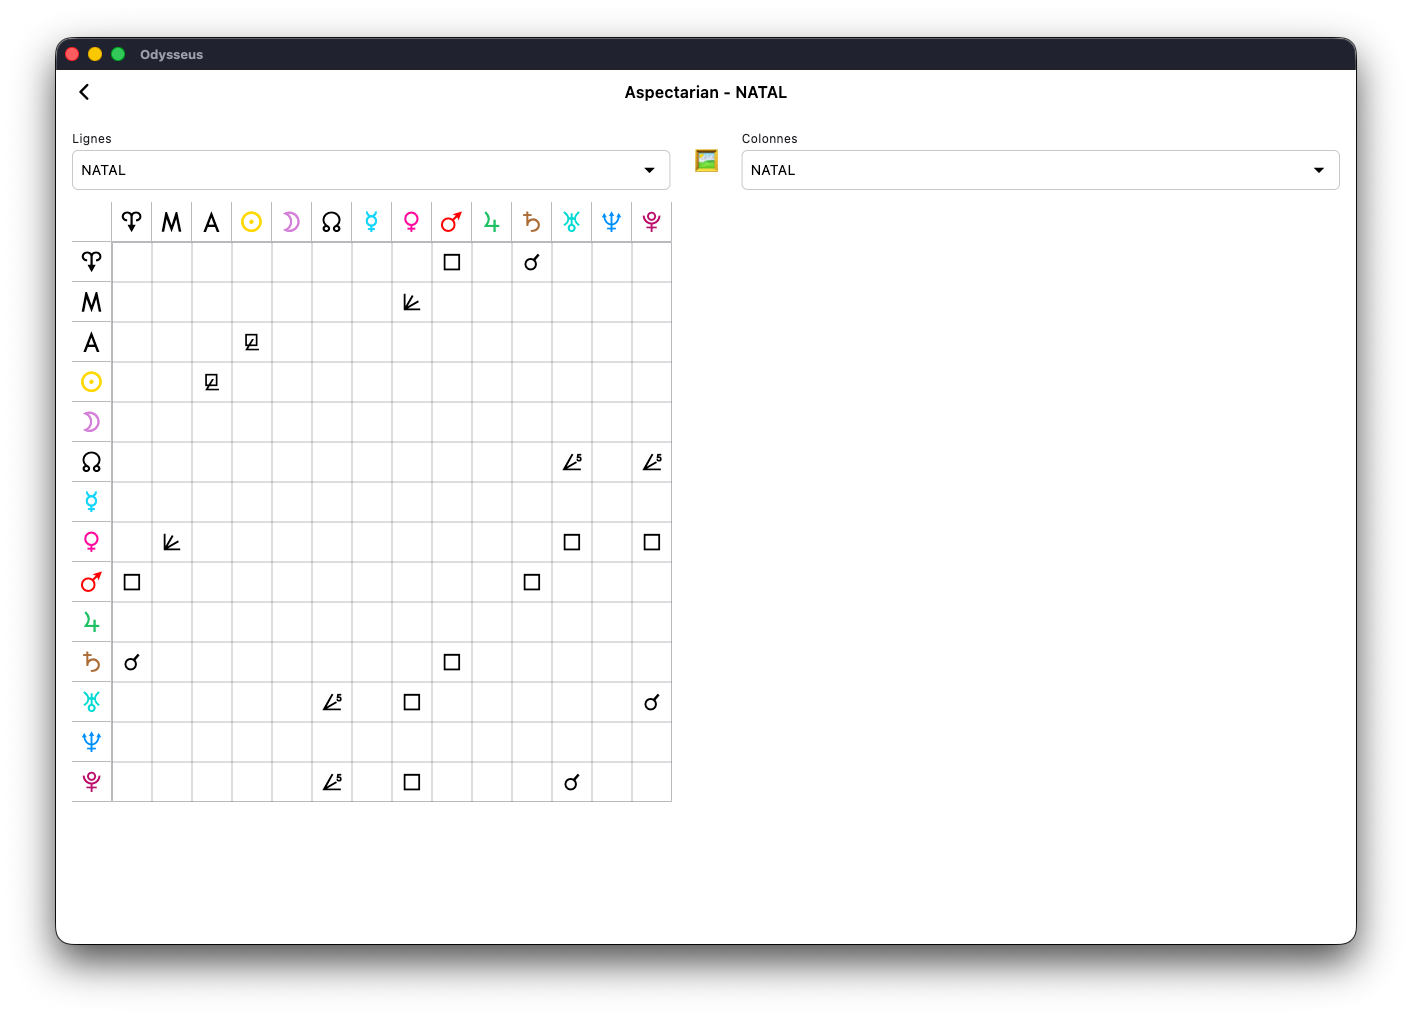
It is a table showing the angles formed between such and such a planet. You can select the levels concerned. And if you hover your mouse or press an angle:
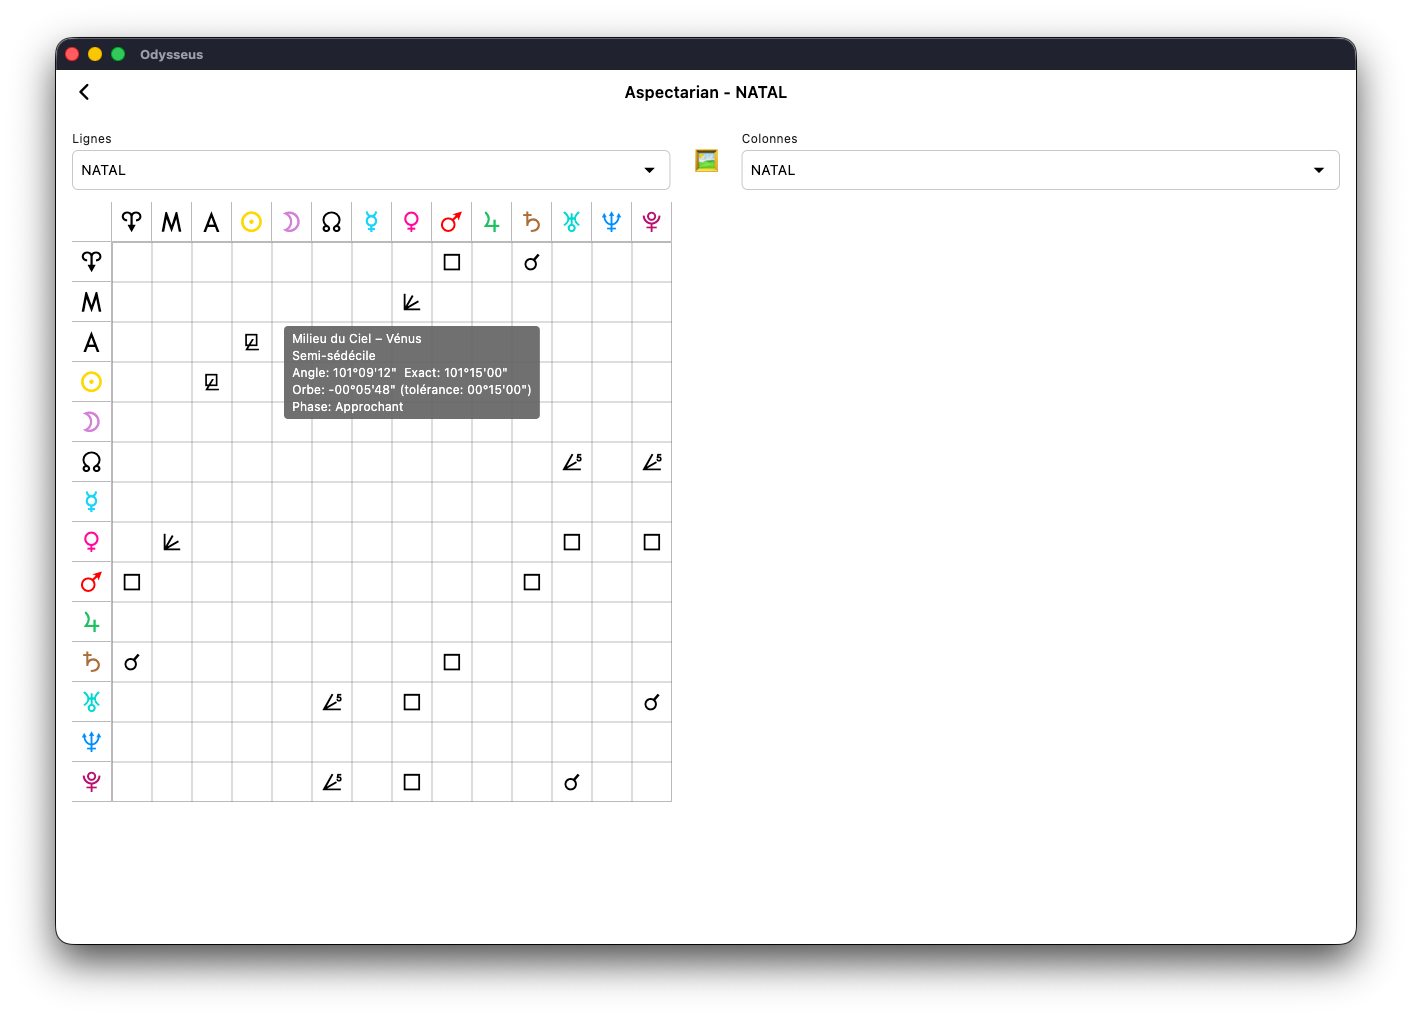
You will have the description of the planets concerned, the angle formed, its precision and its nature.
Finally, if you click on the painting emoji 🖼️: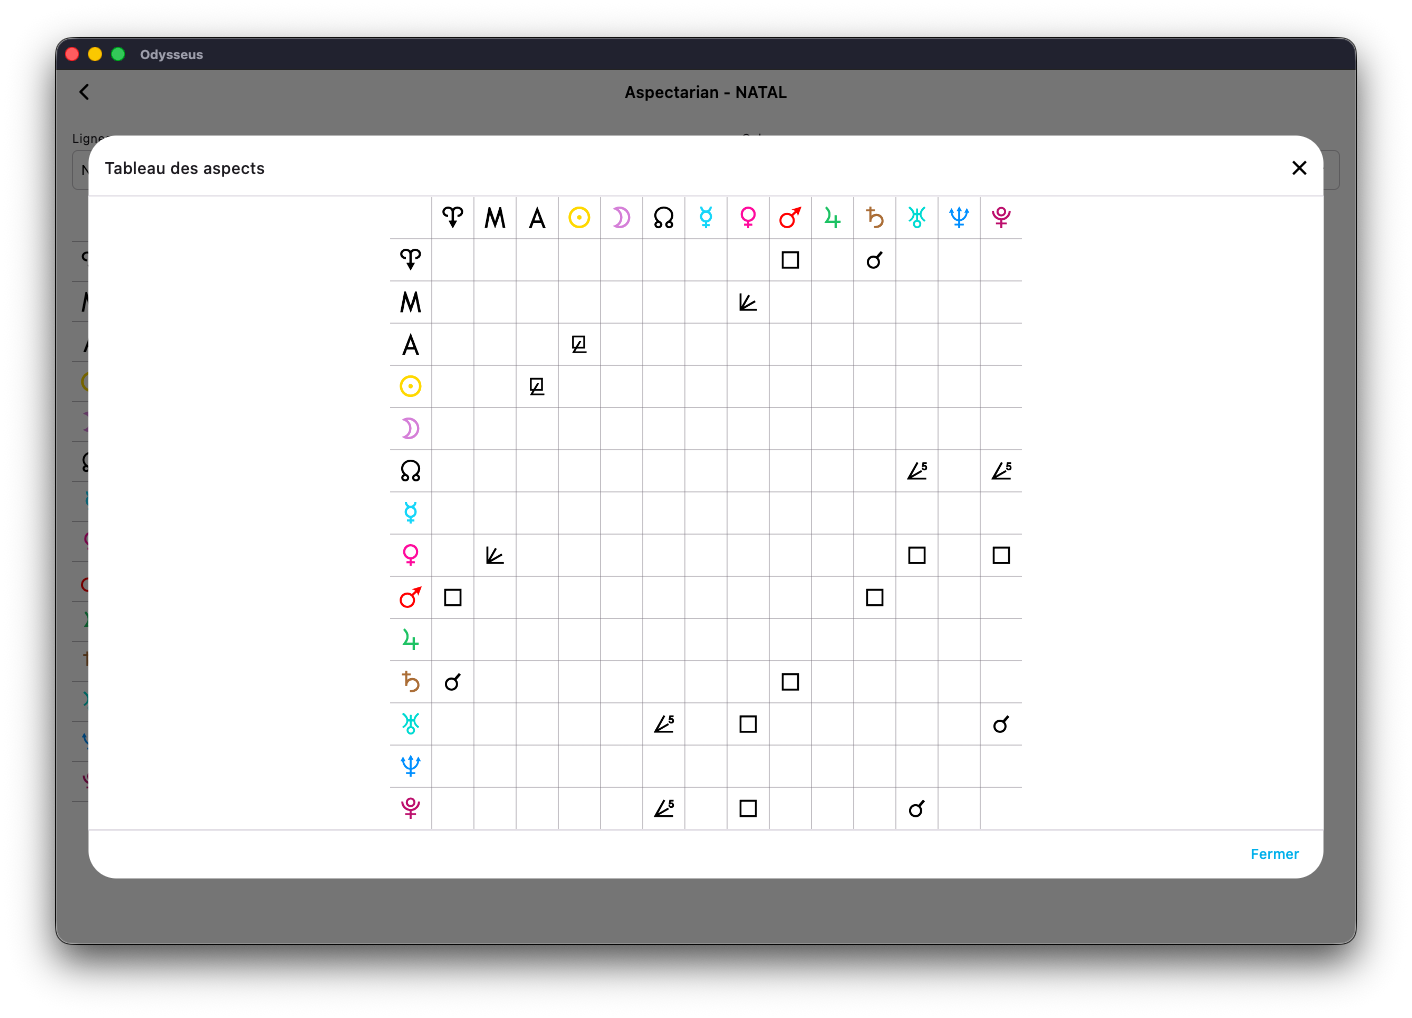
All the aspectarian will appear on a single image that with a right click or a long press you can save on your device.
MIDPOINTS 🧮
By clicking on the switch below the scale:

…the half-points on which the dial is turned are displayed in blue.
The display settings are configured in the Settings panel ⚙️:
You not only have the possibility to adjust the angles concerned (direct or indirect midpoints) as well as to activate if necessary those formed by soft angle (if you use them), to choose the orb for each aspect at the midpoint, but also to change the colour and thickness of the lines:
Either by clicking on the coloured pellet to choose another colour, or by activating the rainbow switch so that the lines take the colour of the planets concerned, then move the cursor to the chosen thickness:
Here, the lines have been refined and passed in the colour of the planets. If you display several levels and want to see the midpoints on a particular level, simply change the slider from NATAL to DIRECTION or TRANSIT according to your choice, as here:
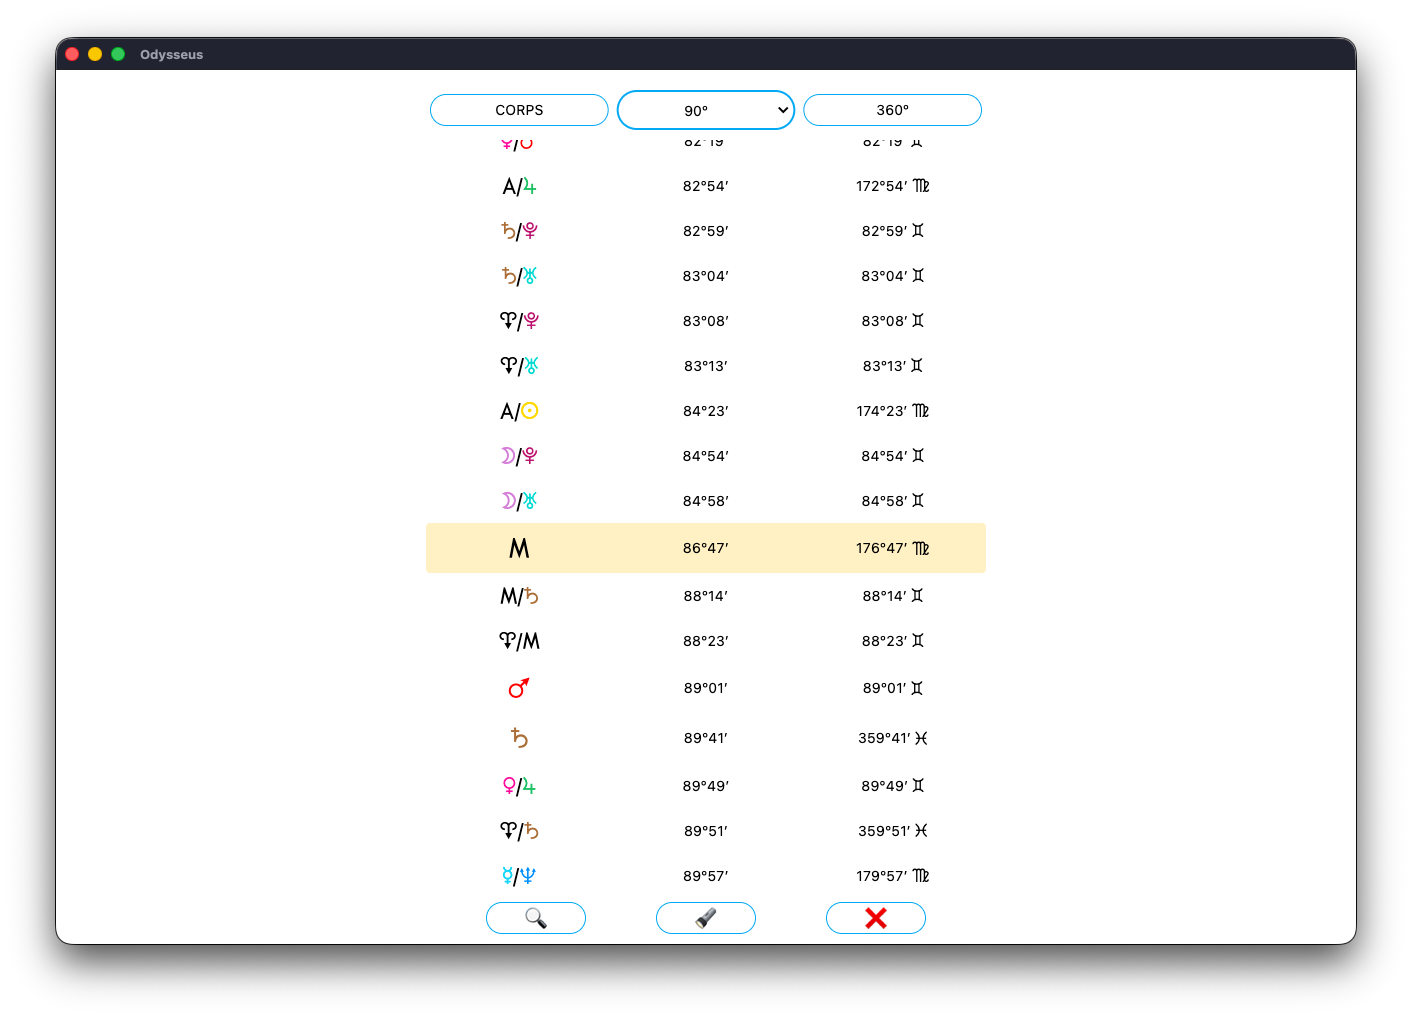
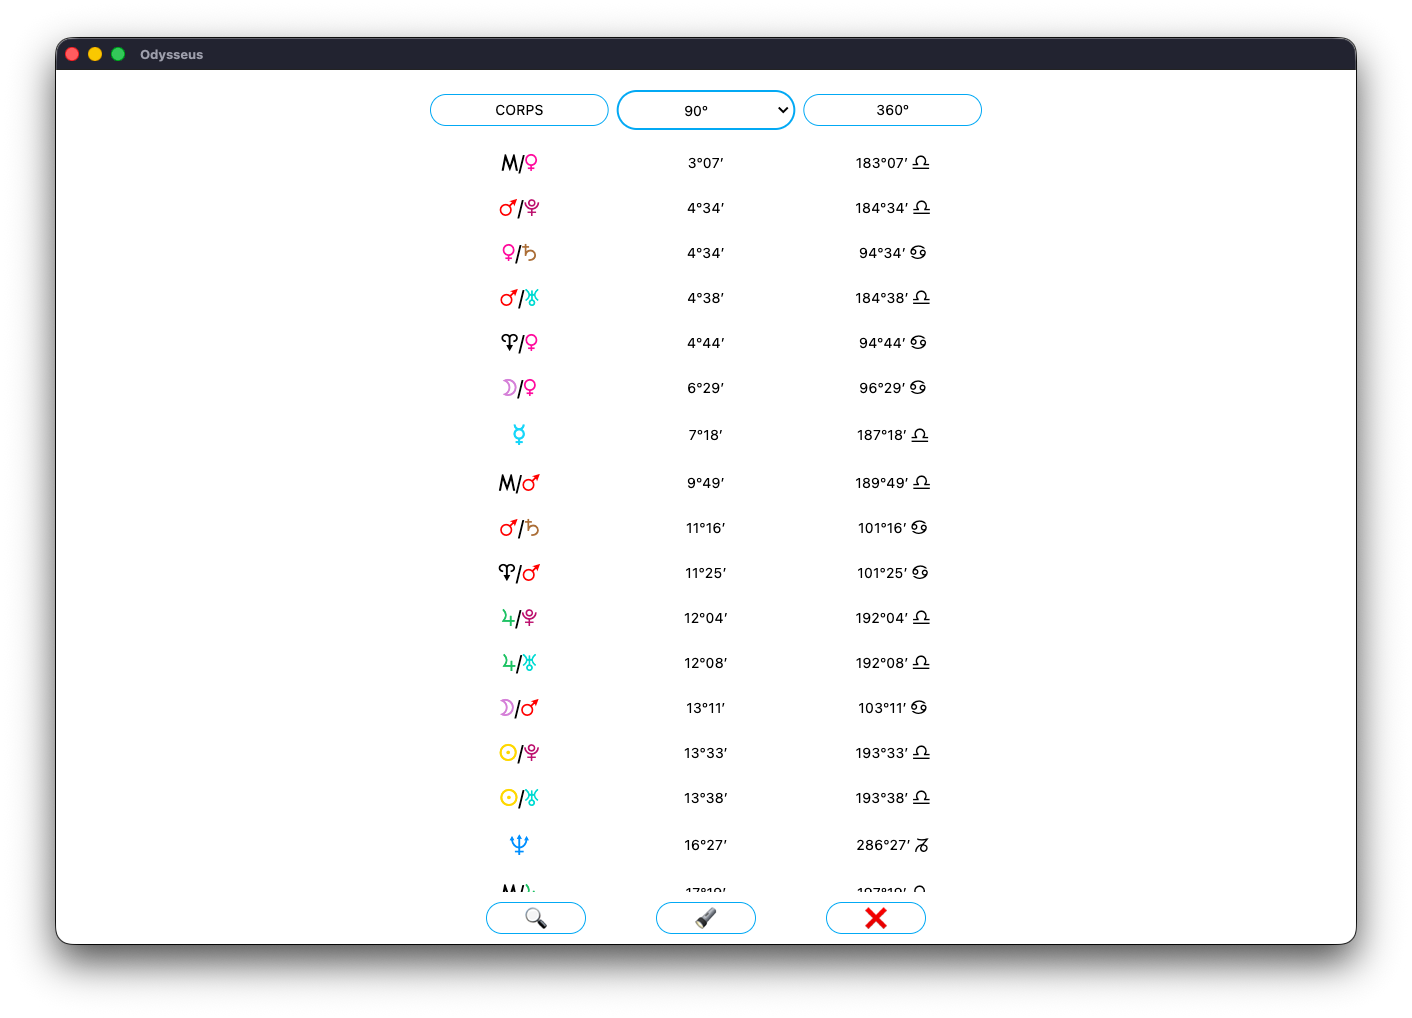
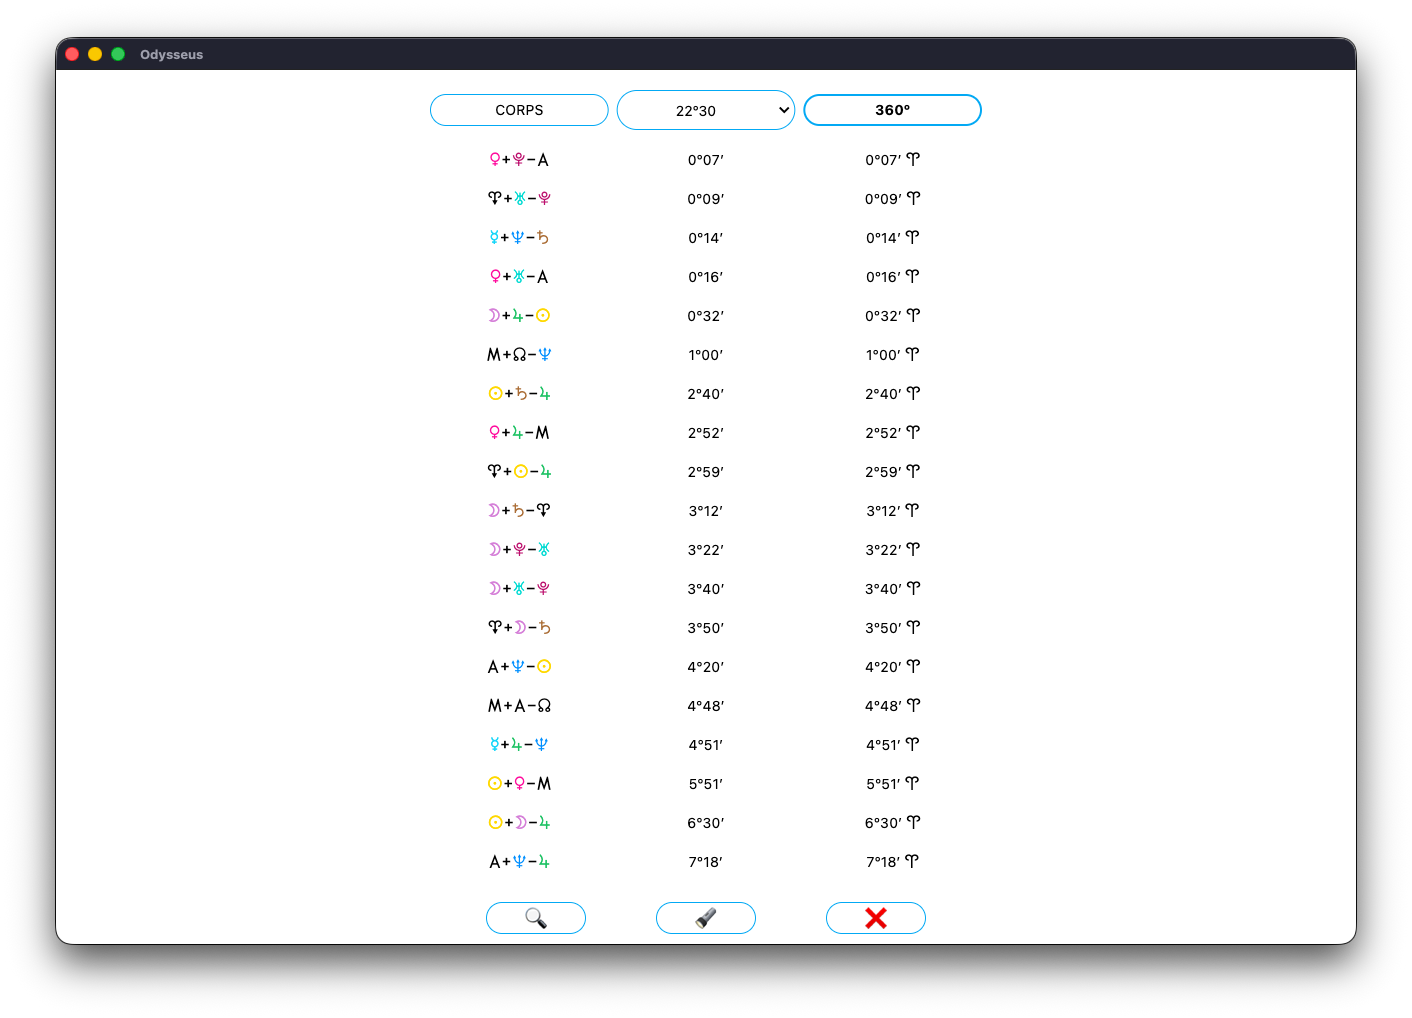
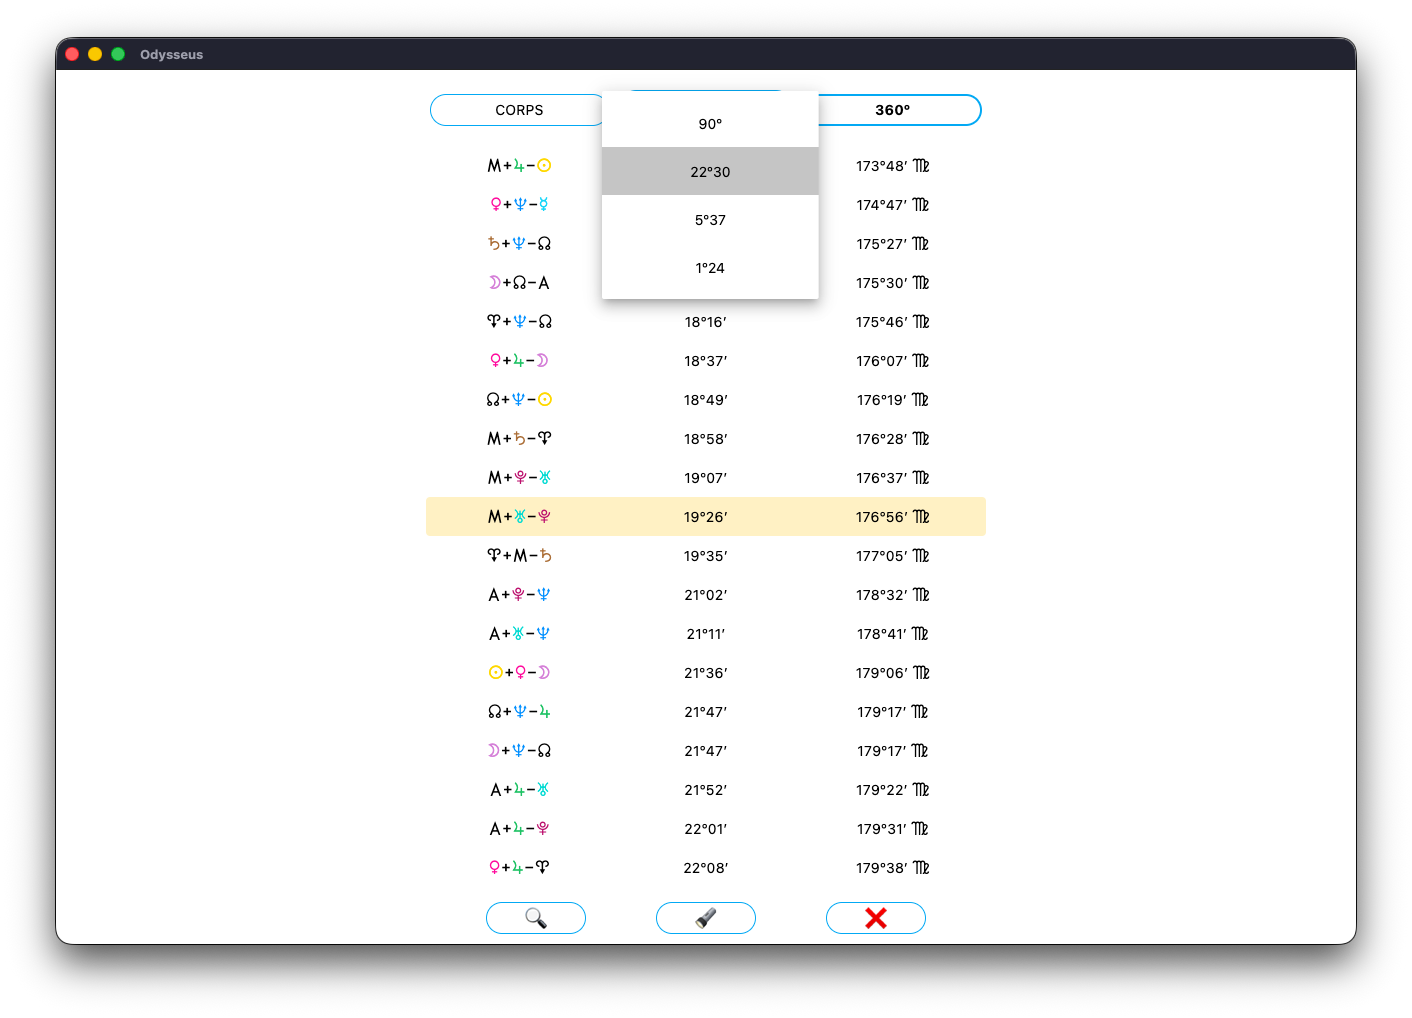
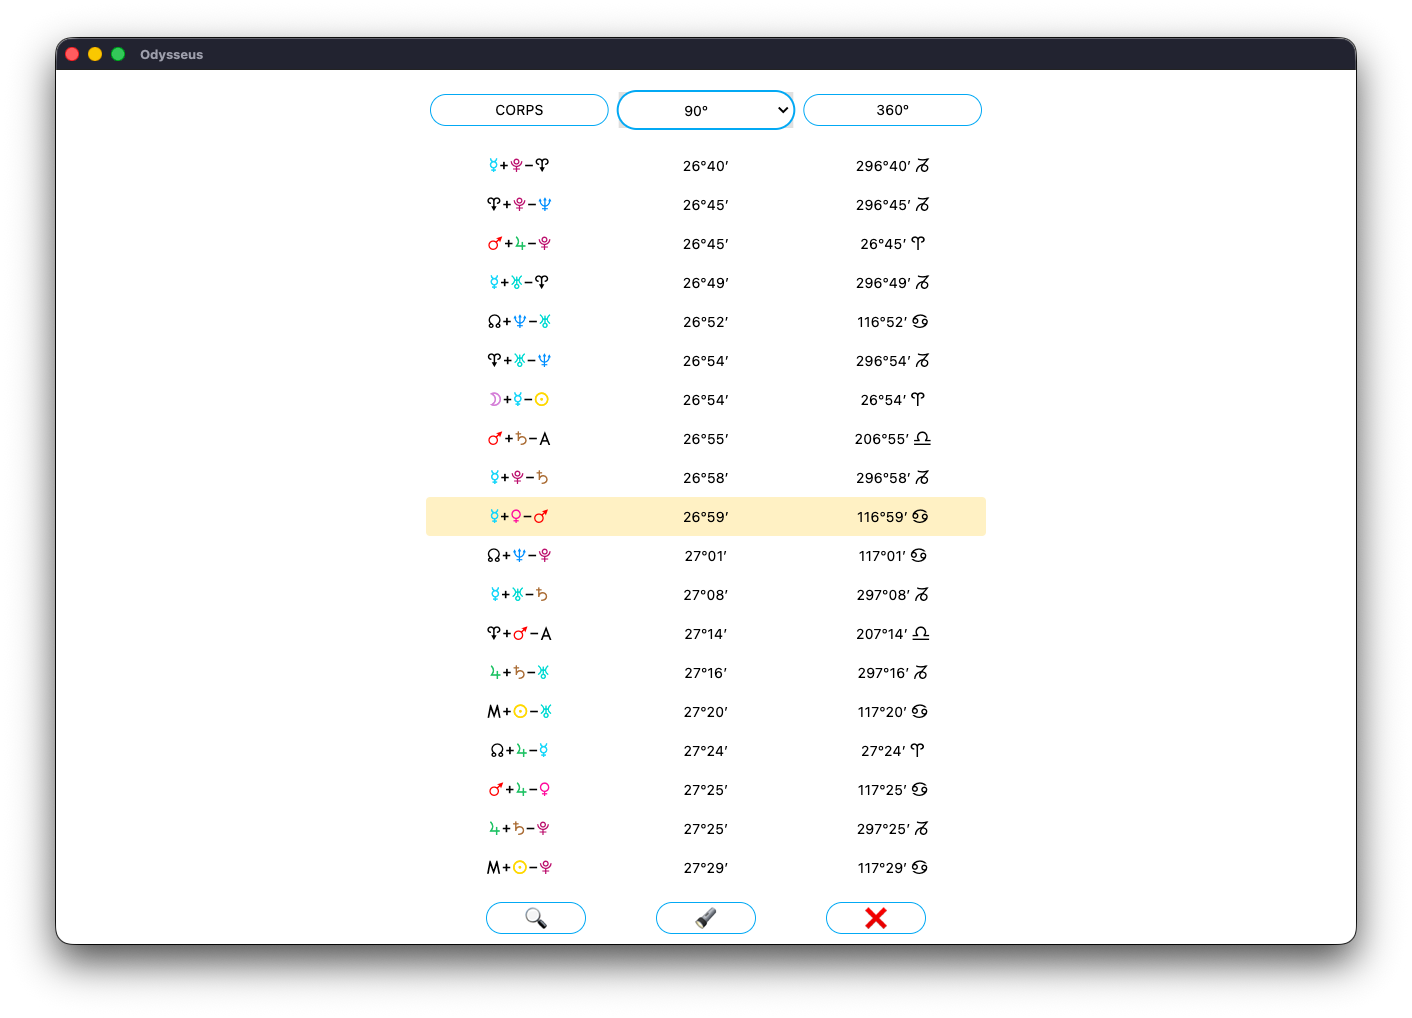
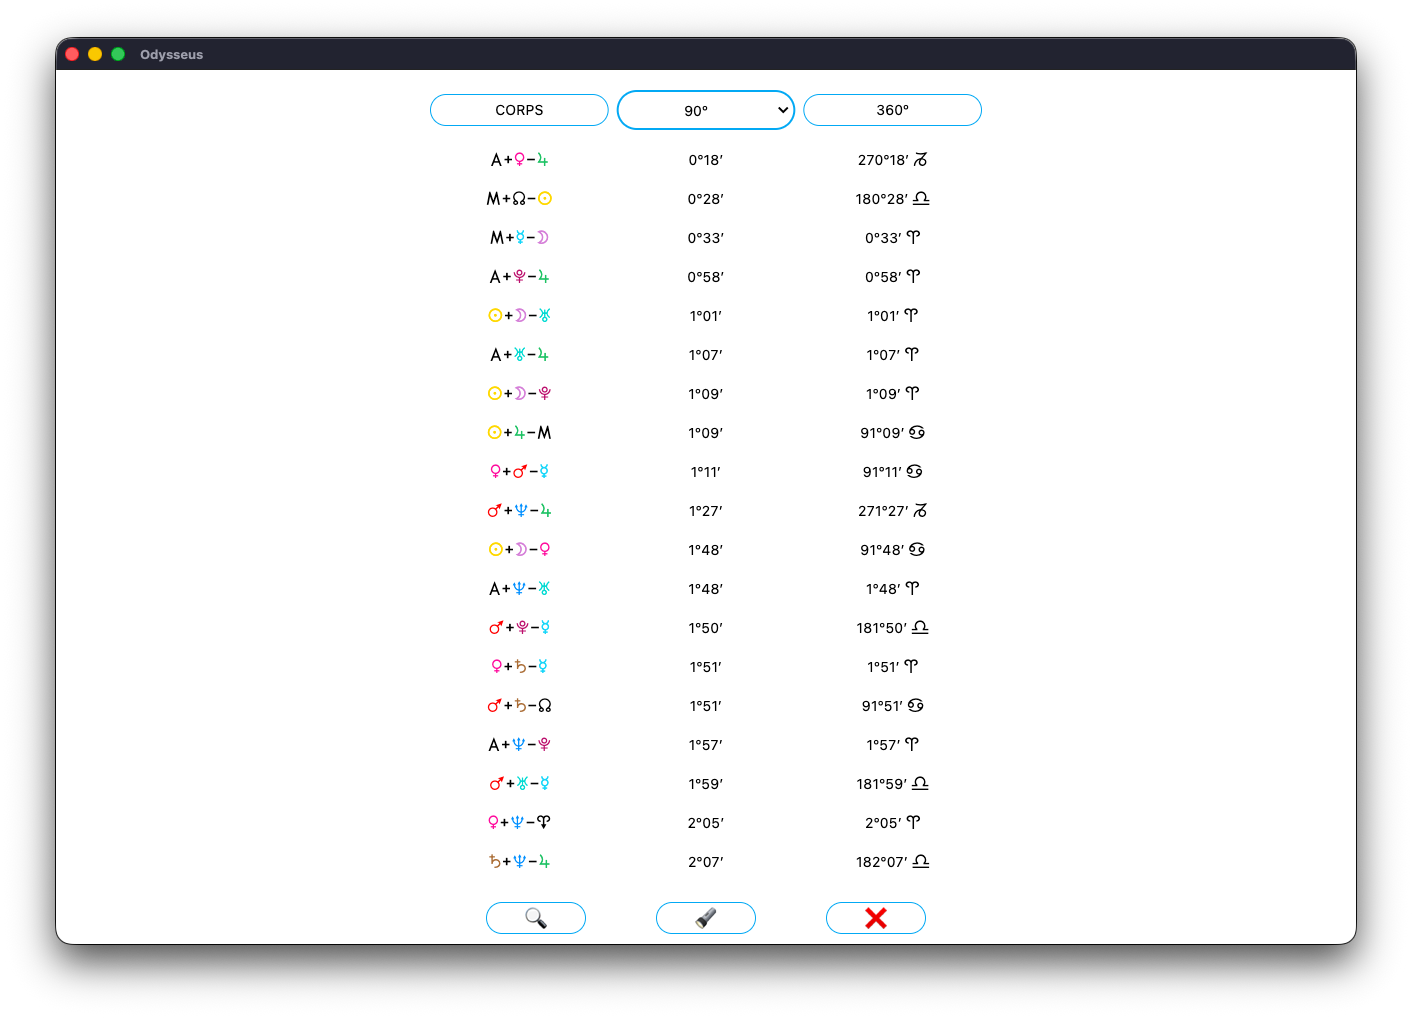
Also, by clicking on the button on the abacus 🧮, you will bring up the listing which has 3 columns (BODY, a modulo of your choice and 360º) in order to show the positions of each element in a listing sorted in the default order:
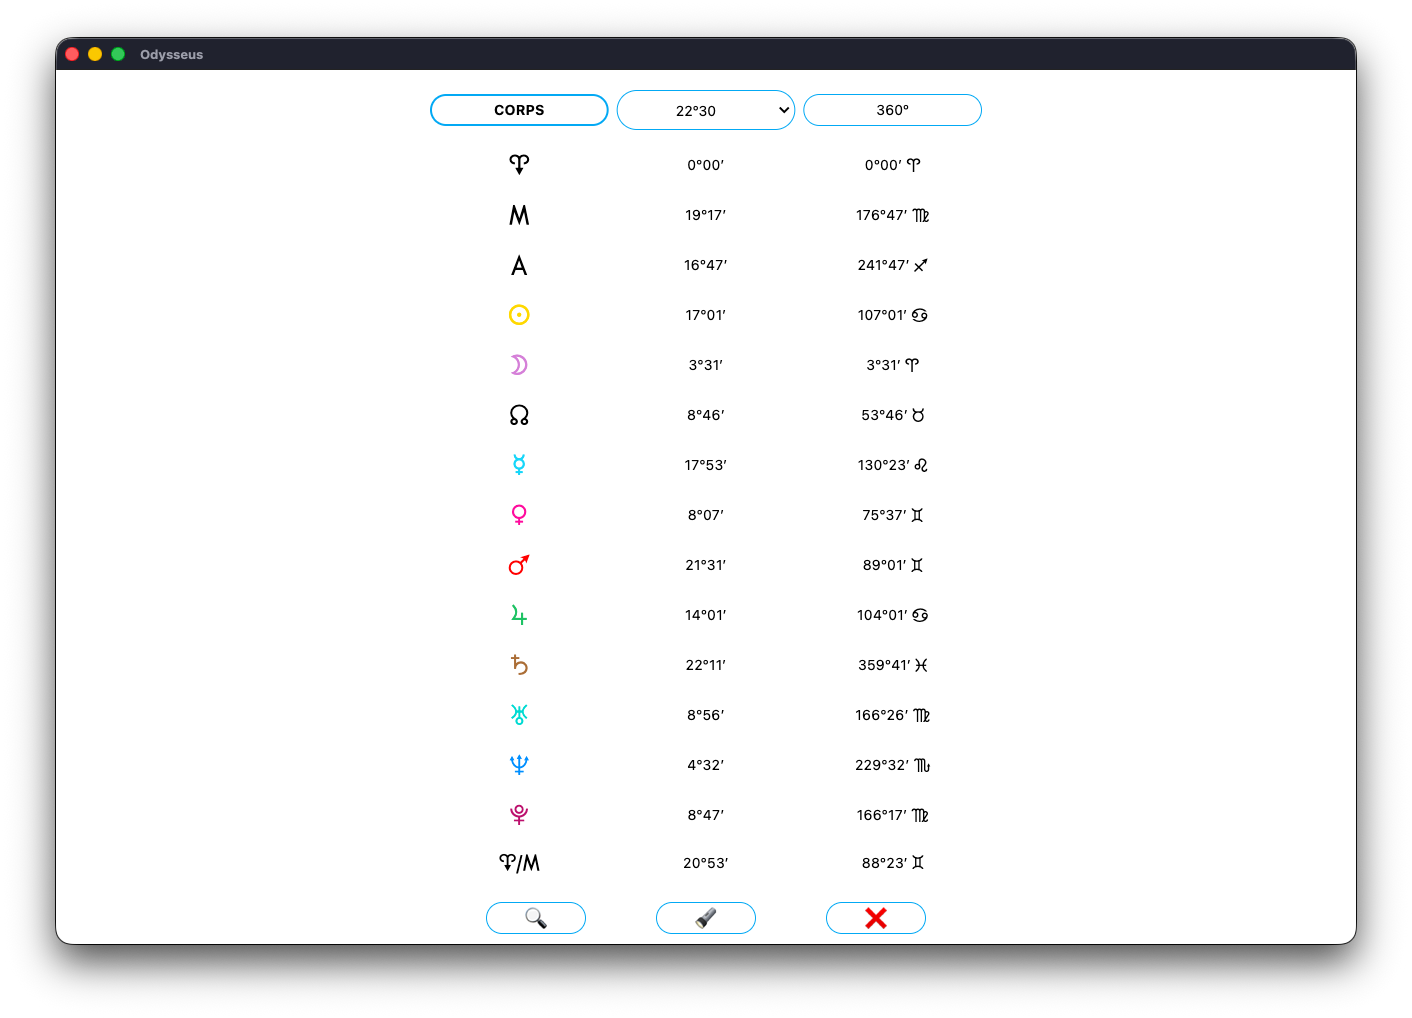
By clicking on the flashlight 🔦, you search in the listing for the point closest to the wheel cursor:
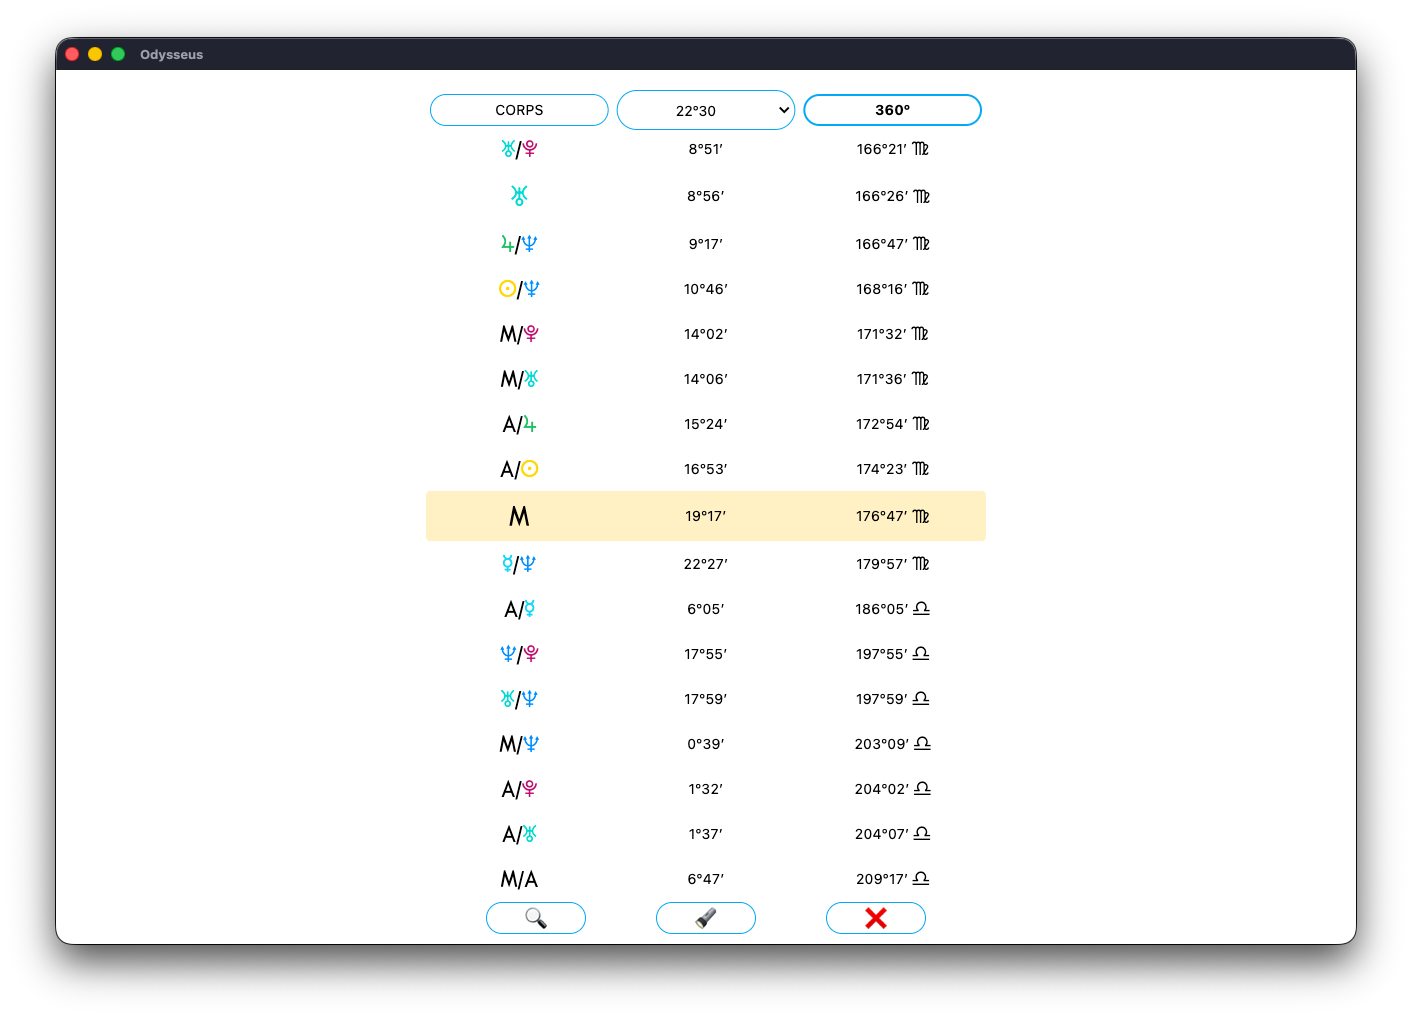
And by clicking on 360º or choosing a modulo from the list, you will change the sorting of the 2nd column:

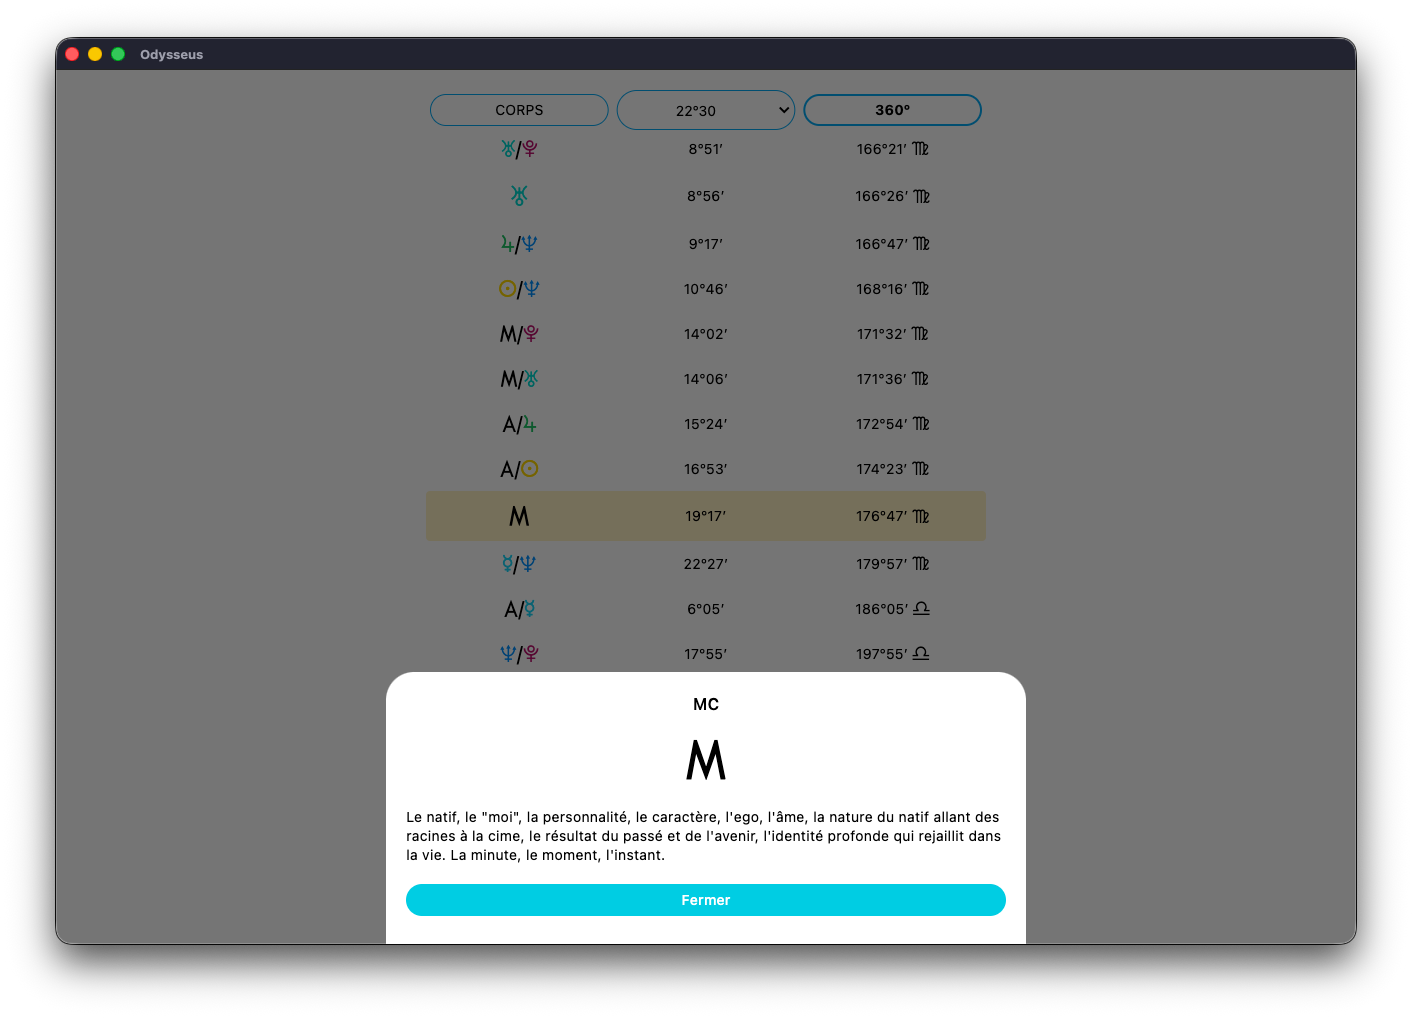
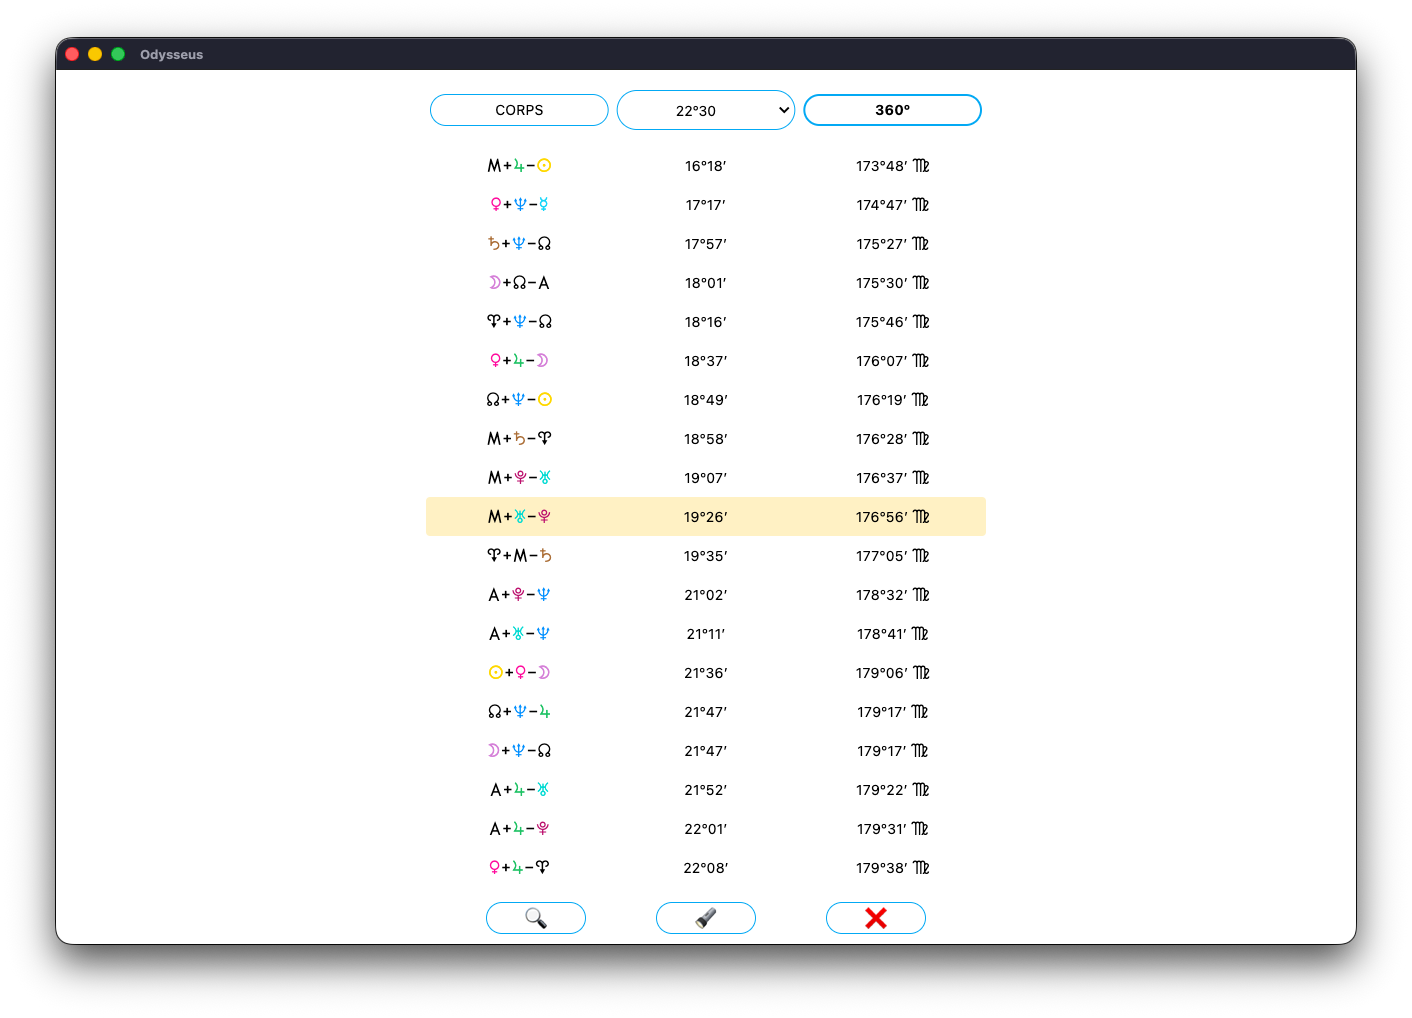
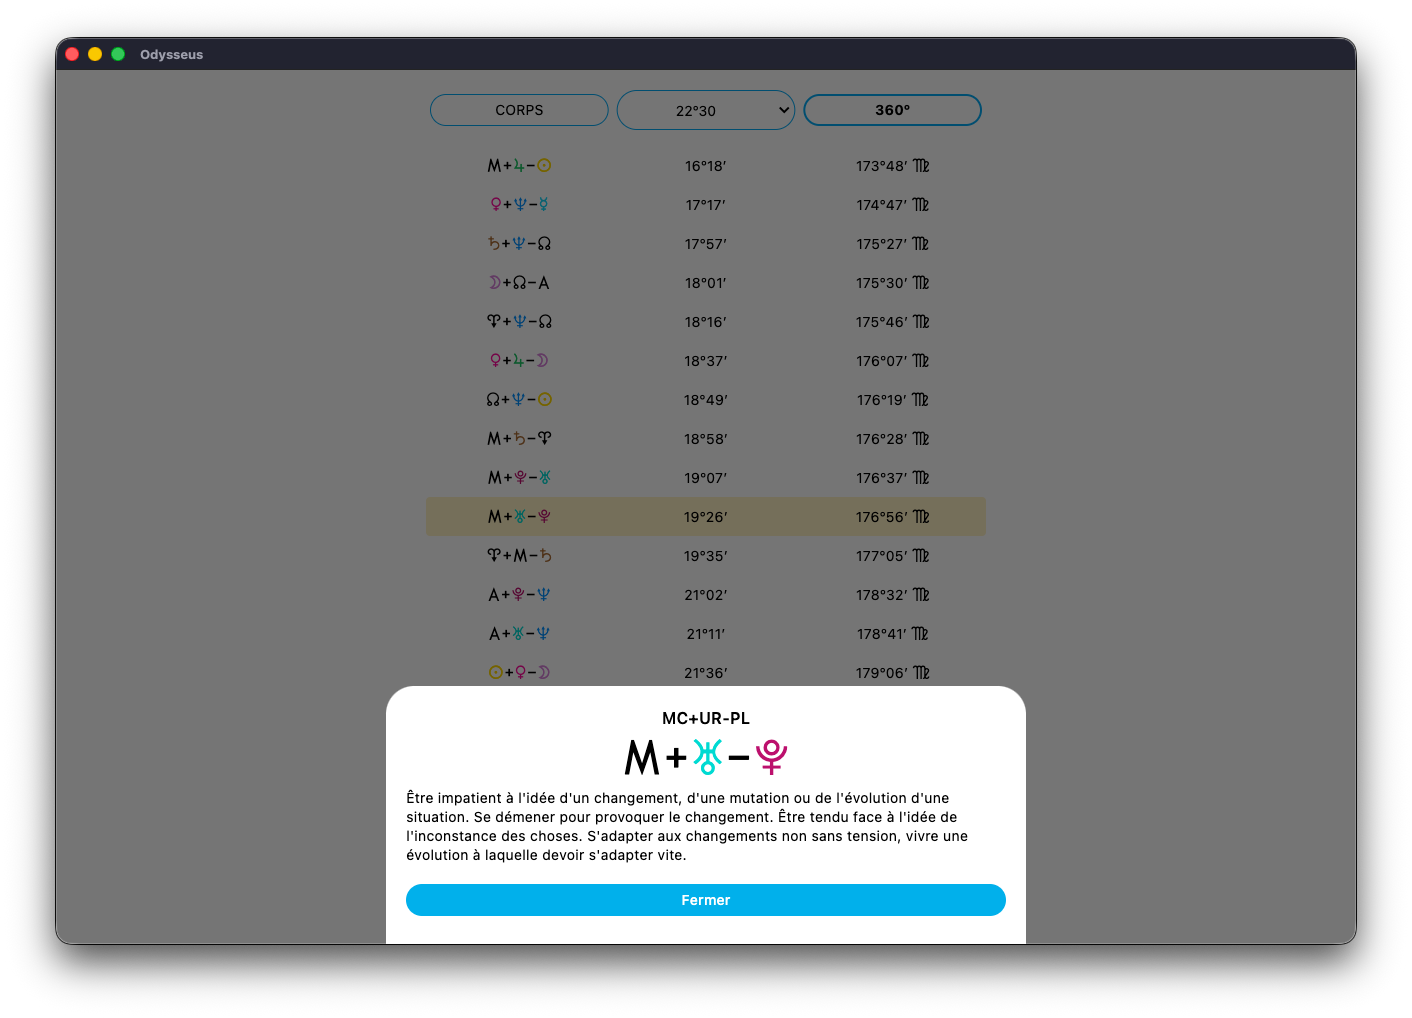
If you want to have the definition of one of the elements in the list (planet or midpoint) long press it, and the definition will appear:
By clicking on the magnifying glass button 🔎, you will be able to find a specific element in the list. Here, we have 2 buttons by default.
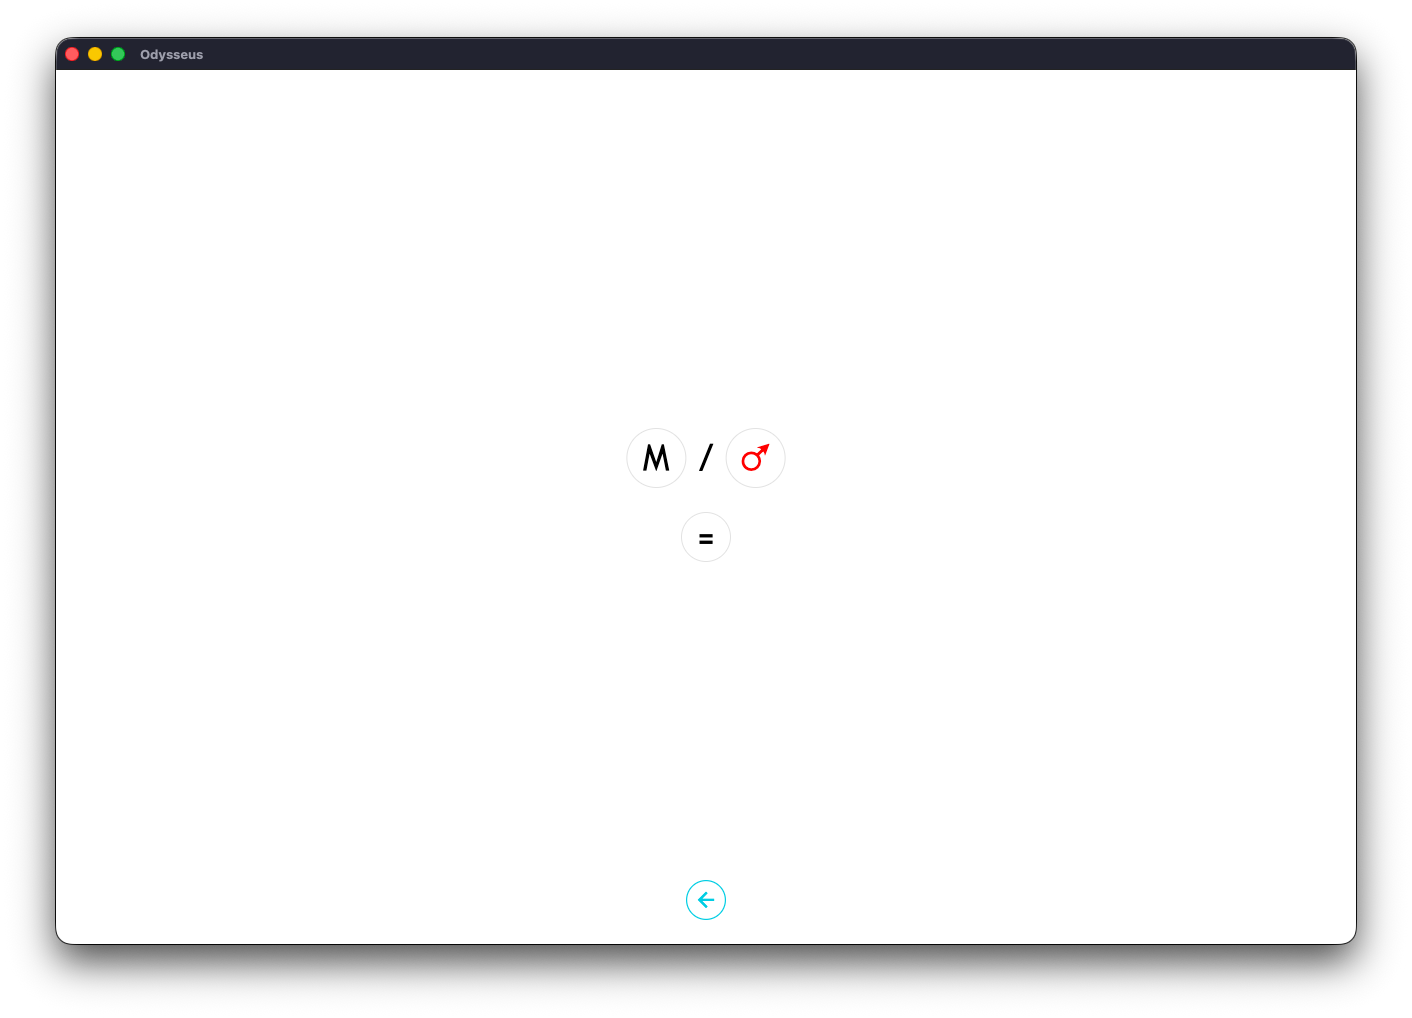
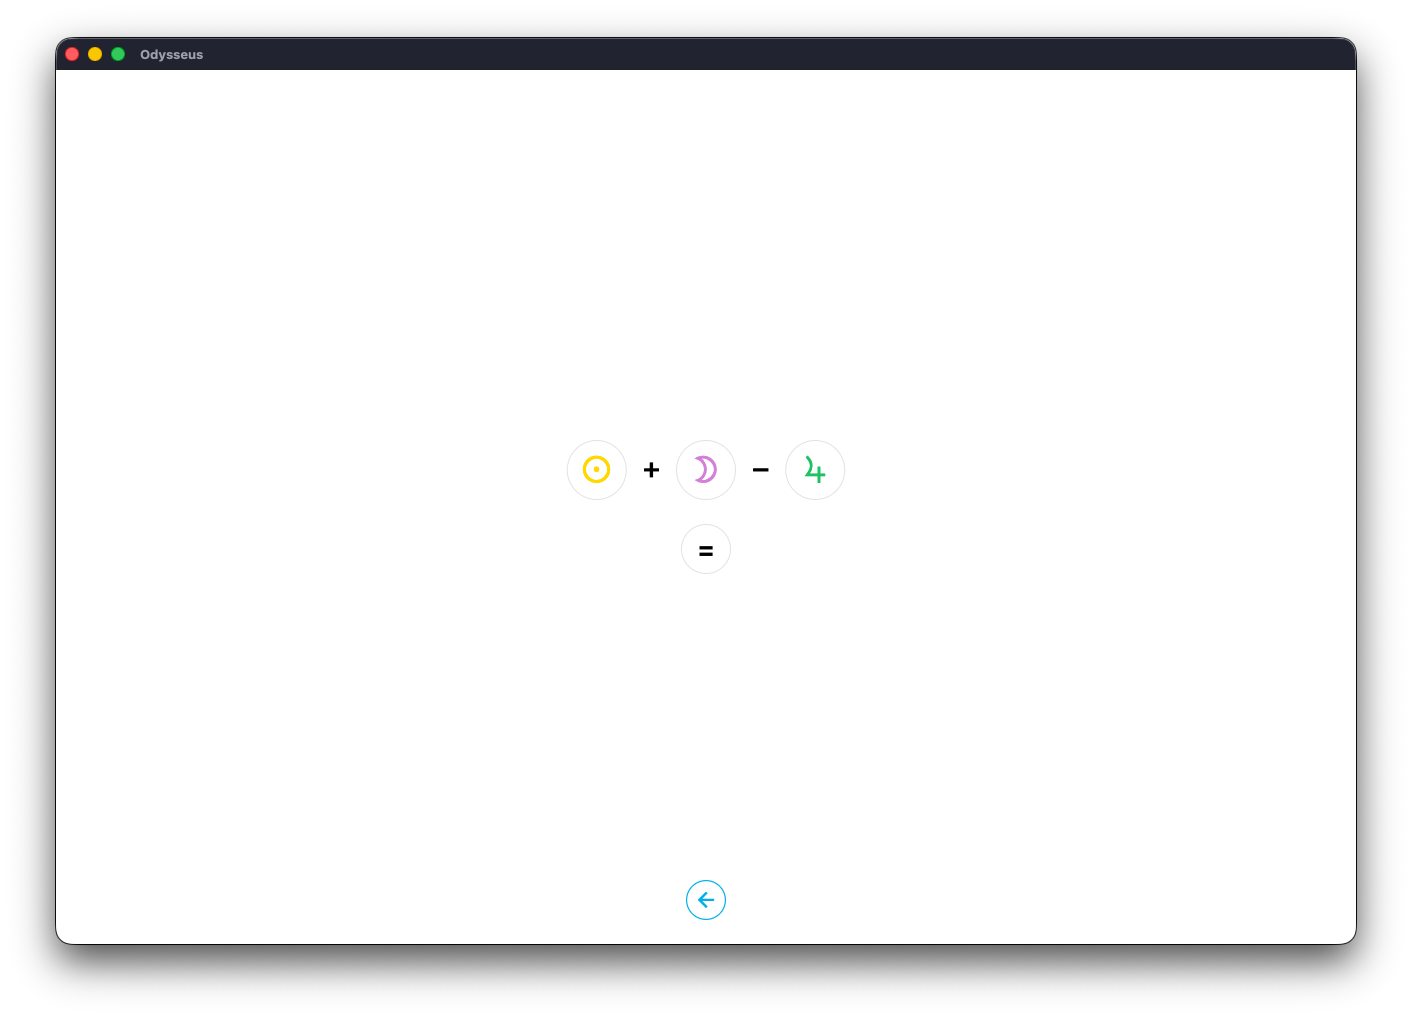
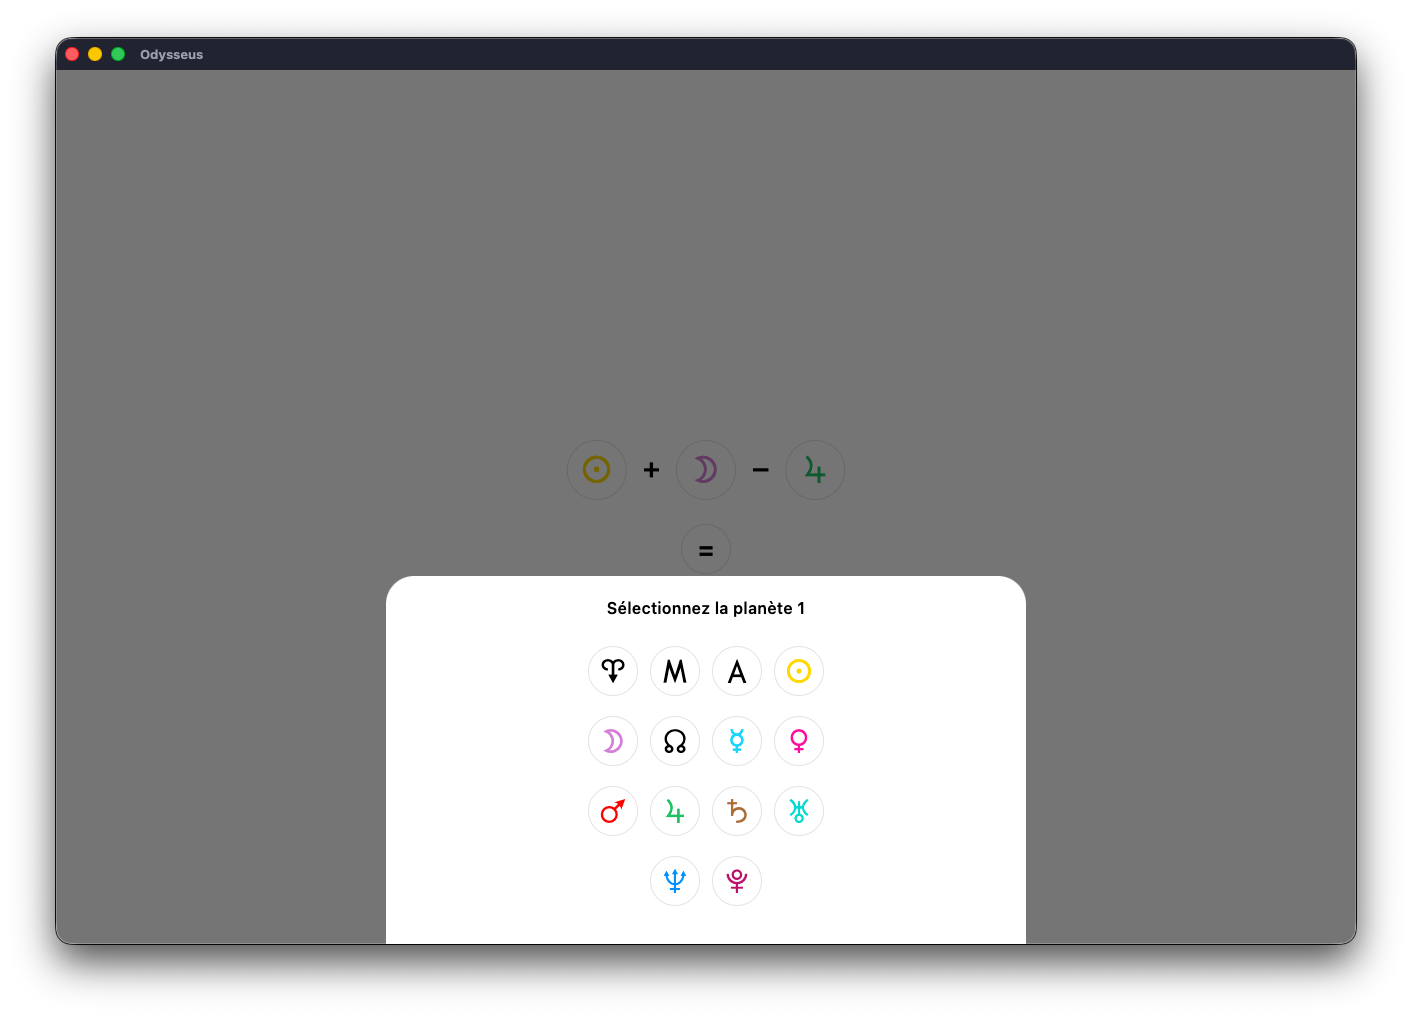
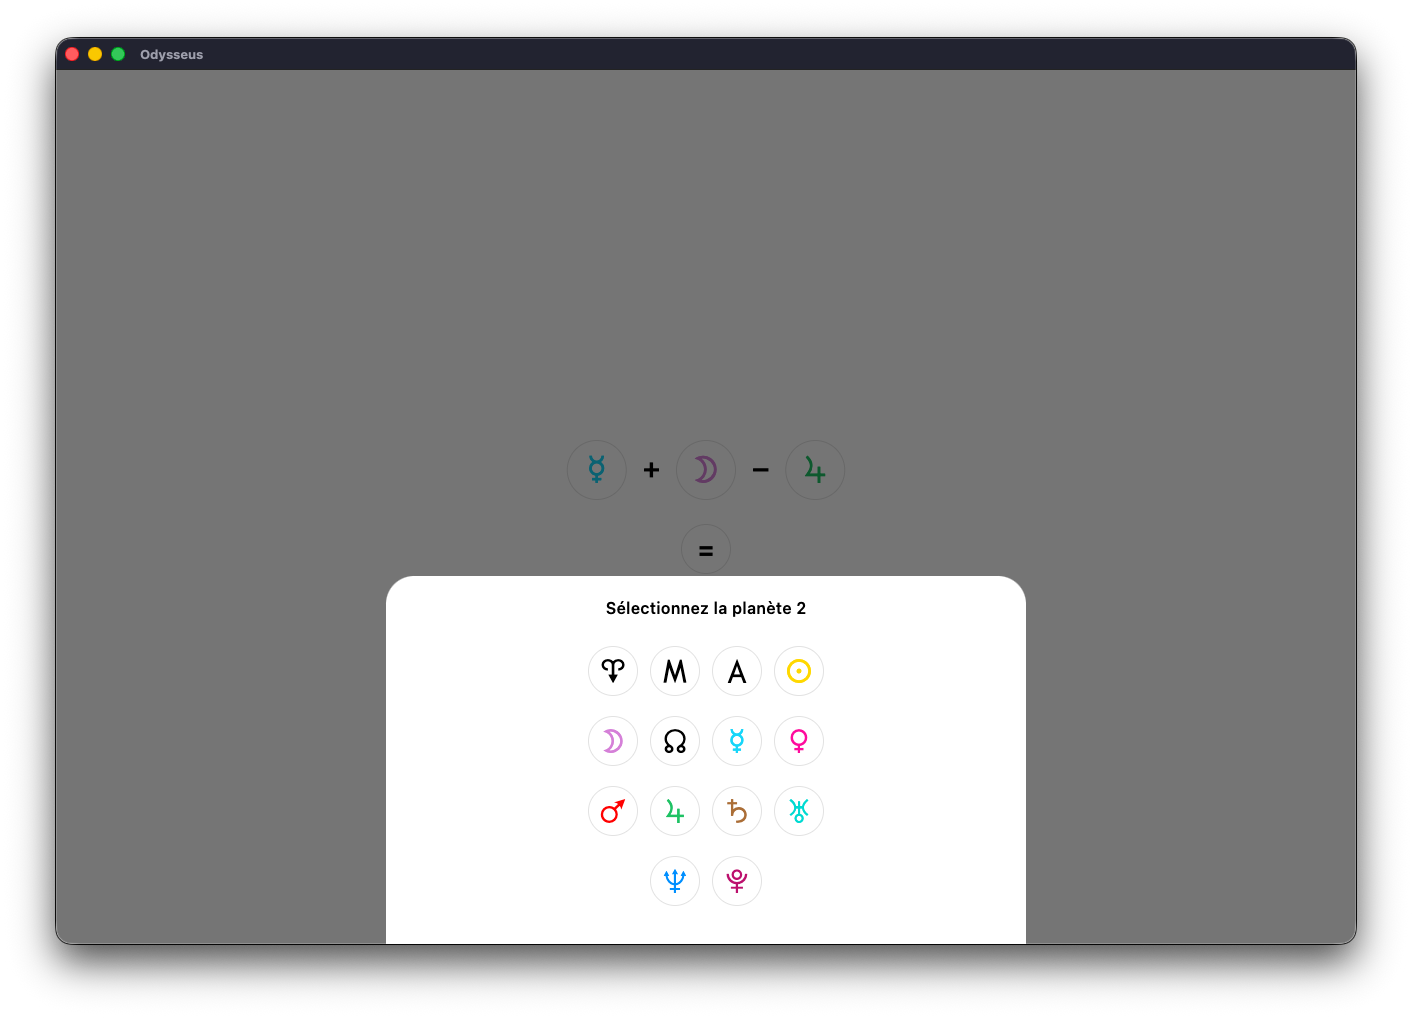
Click on the first one, on the left, and choose the planet you want as the first midpoint factor:
Then the second:
Here we will look for the Mercure O/P Venus midpoint:
If you are looking for a planet and not a midpoint, put the same planet twice. Then click on = to start the search.
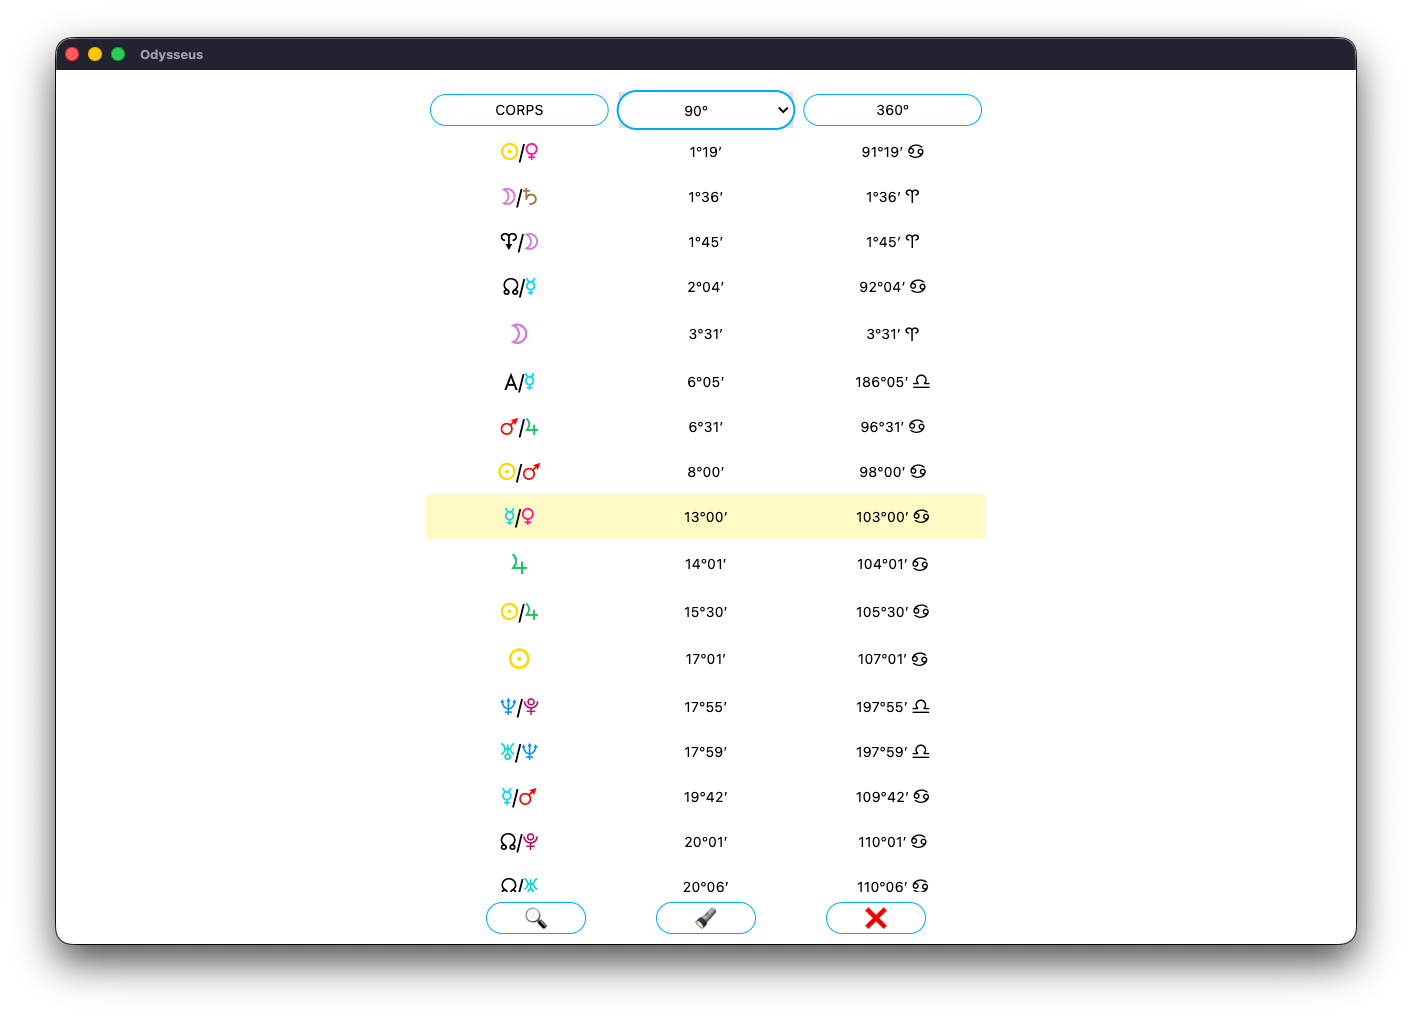
The line concerned is then highlighted. If you click on it briefly:
The window closes and the dial is turned directly on the midpoint concerned. Here, we can clearly see the line connecting Mercury O to Venus P, thus proving that the wheel is in the right place. Yet there is another way to find a midpoint.

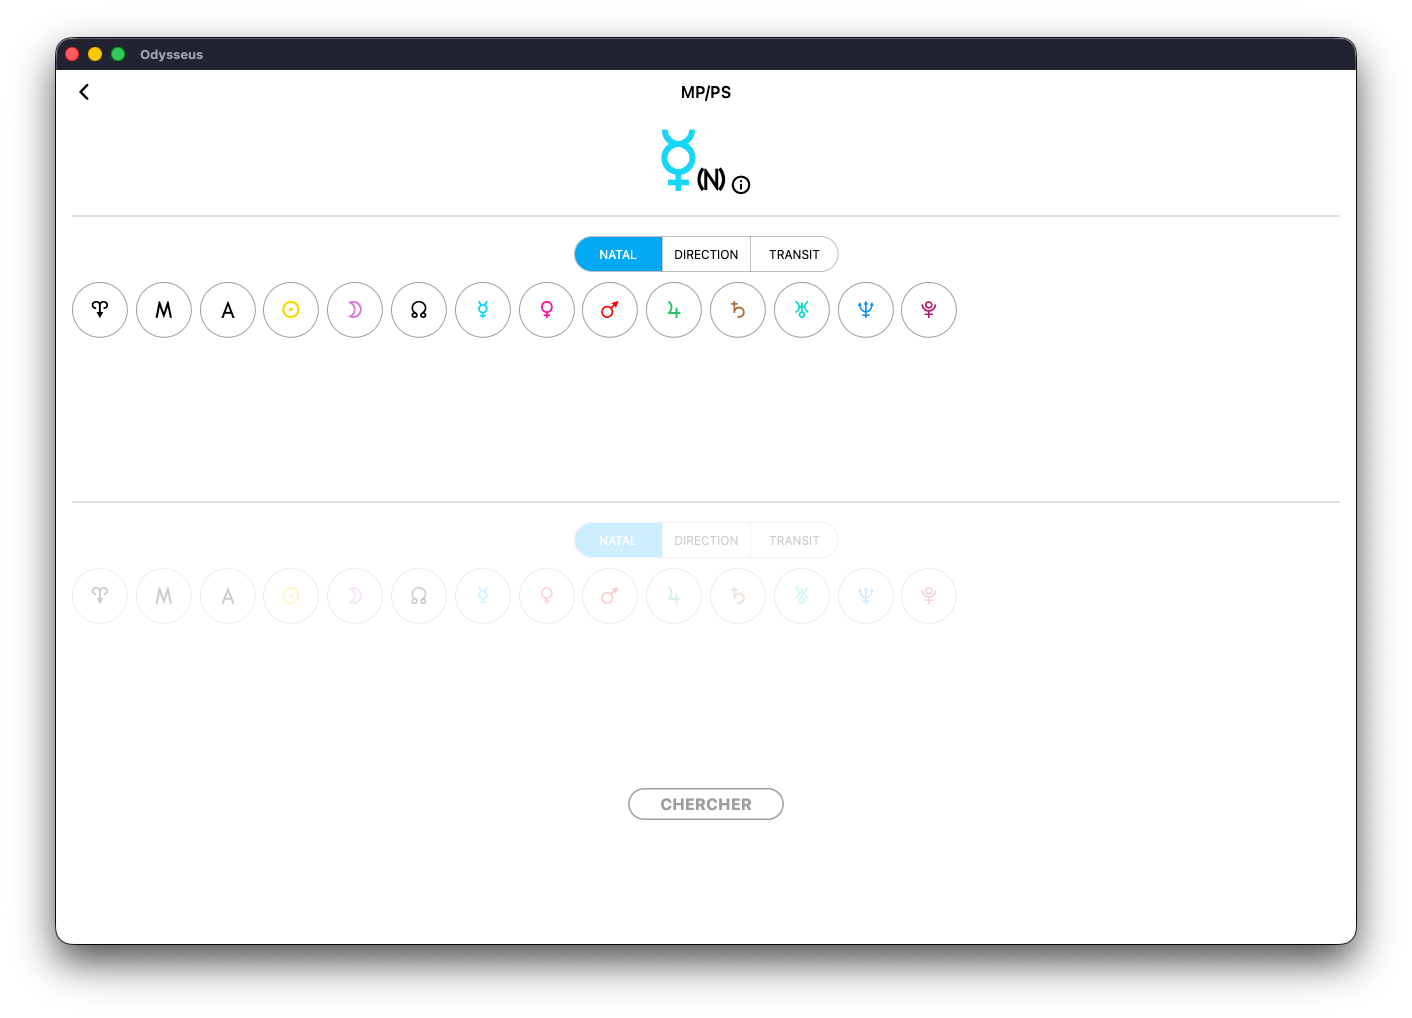
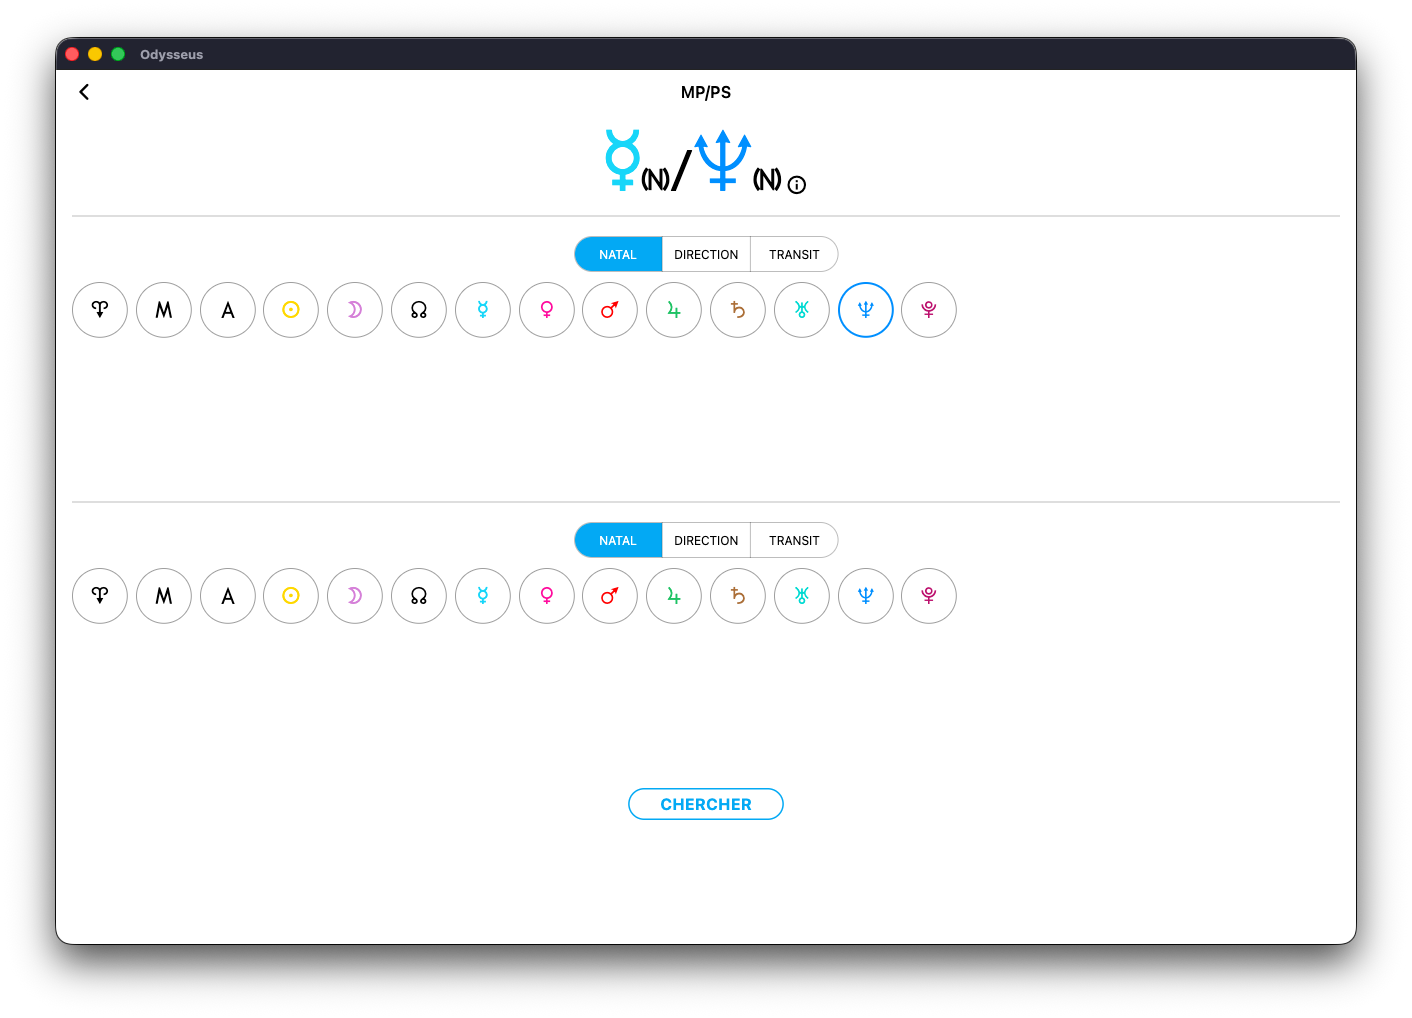
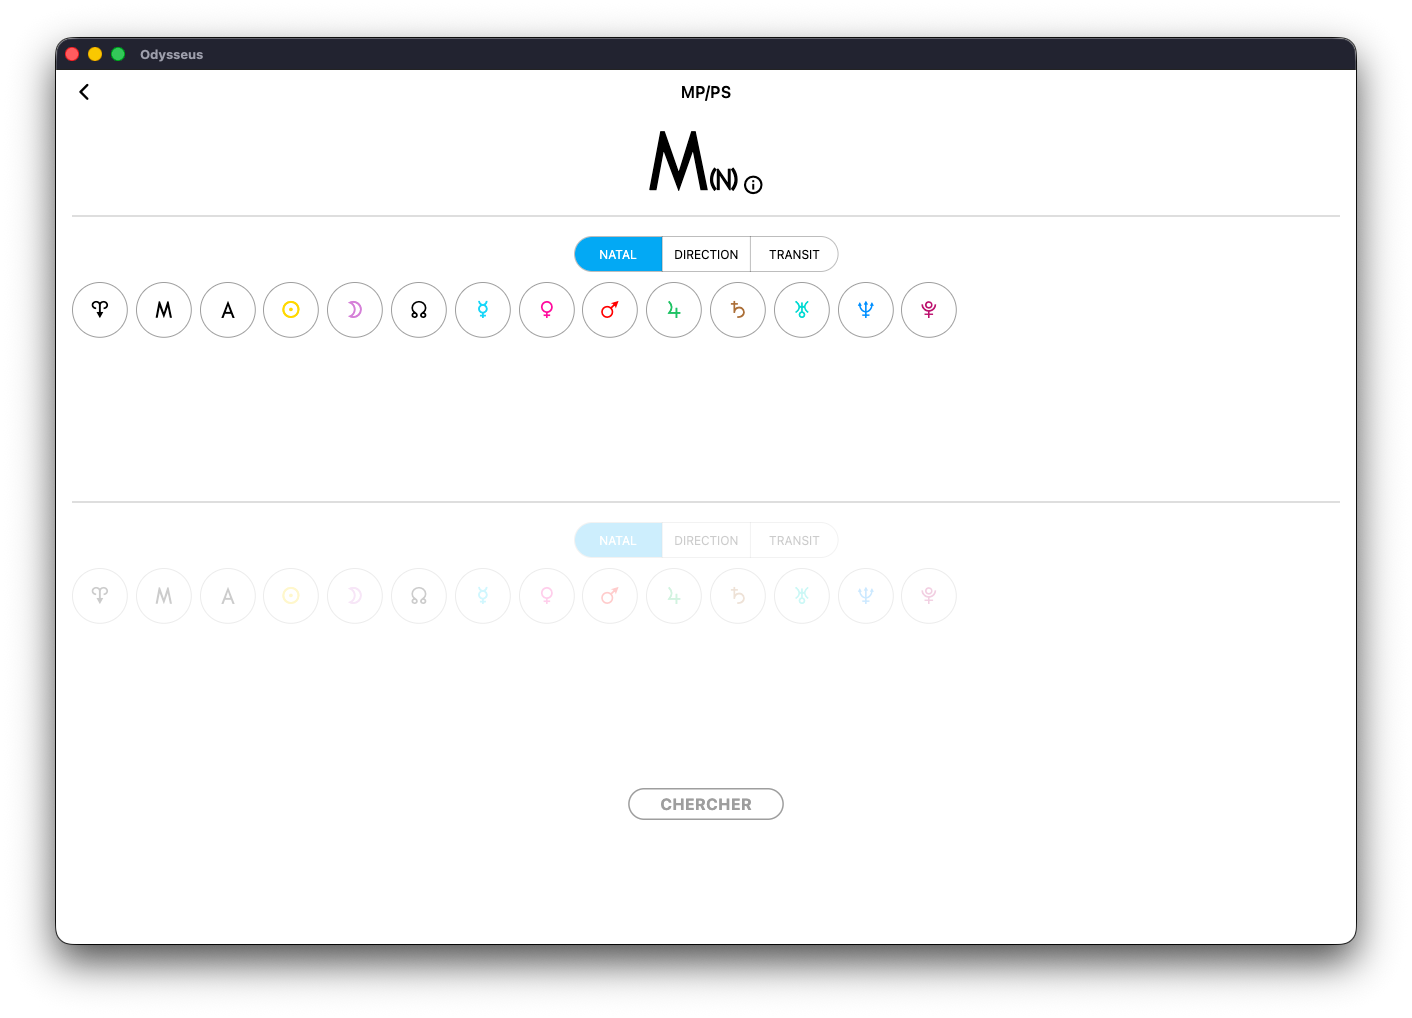
Make a long press on a first planet. For example here, Mercury O:

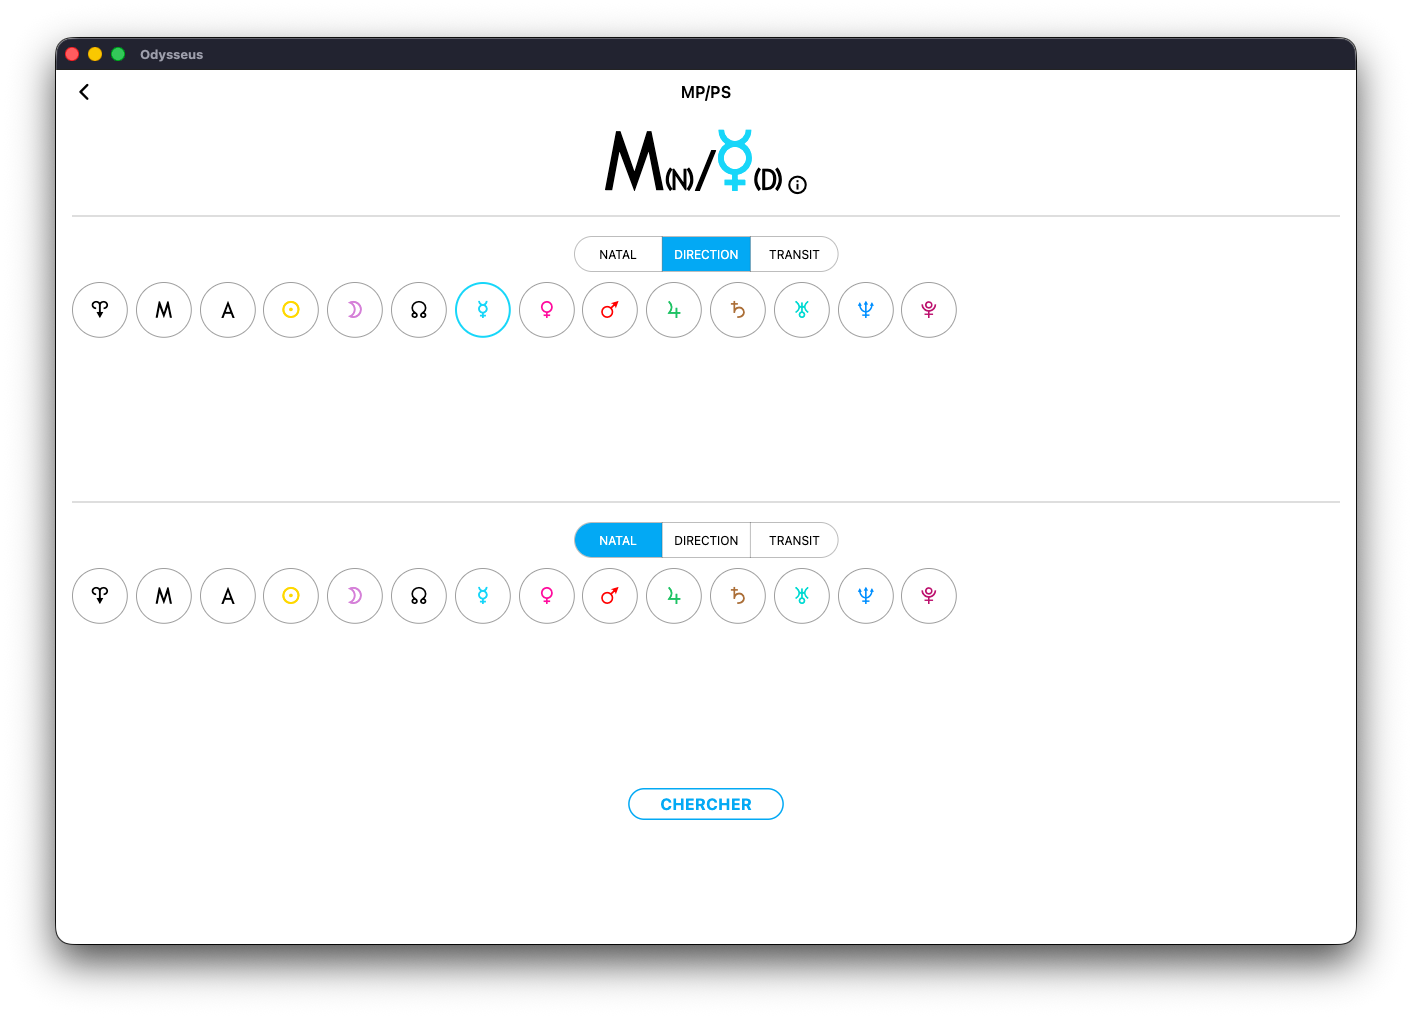
A window (MP/SP) opens displaying the symbol at the top. You can then choose a second planet from the line of available planets. Here, let’s choose Neptune U:
You see the two appear at the top, followed by a small ⓘ. If you click on it, you will have the definition of the midpoint in question:

If you then click on “SEARCH”, the window closes and the wheel rotates directly on the midpoint, as seen here:
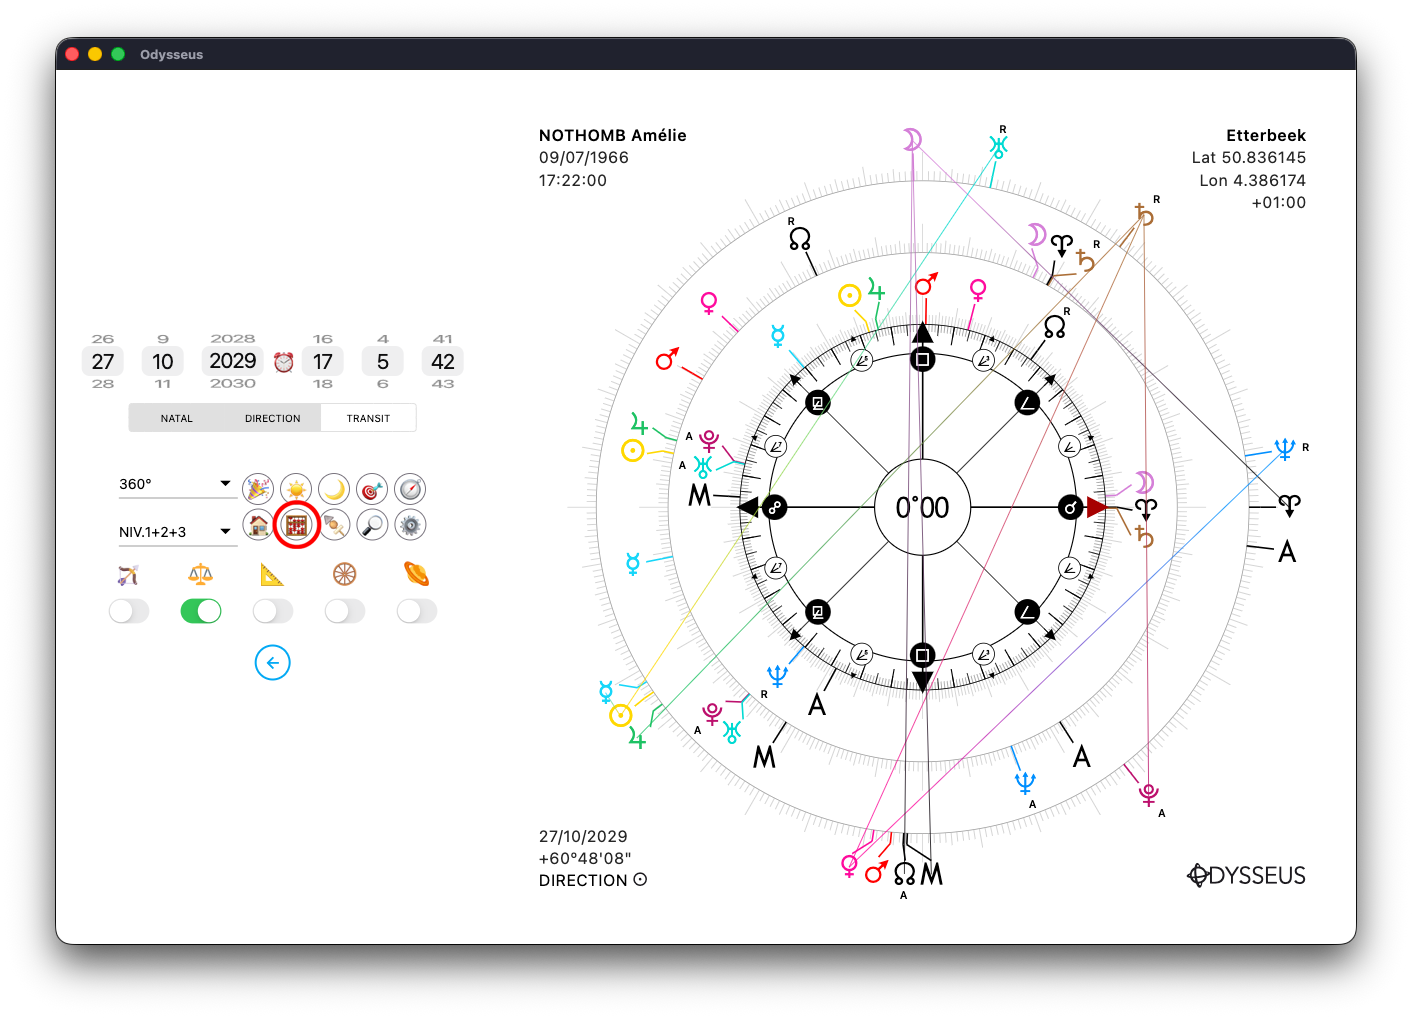
If you are on a multi-level wheel, as in the following image, and you want to see the listing of another level than the natal, just put the cursor on another level, as here with DIRECTION, then click again on the abacus 🧮:
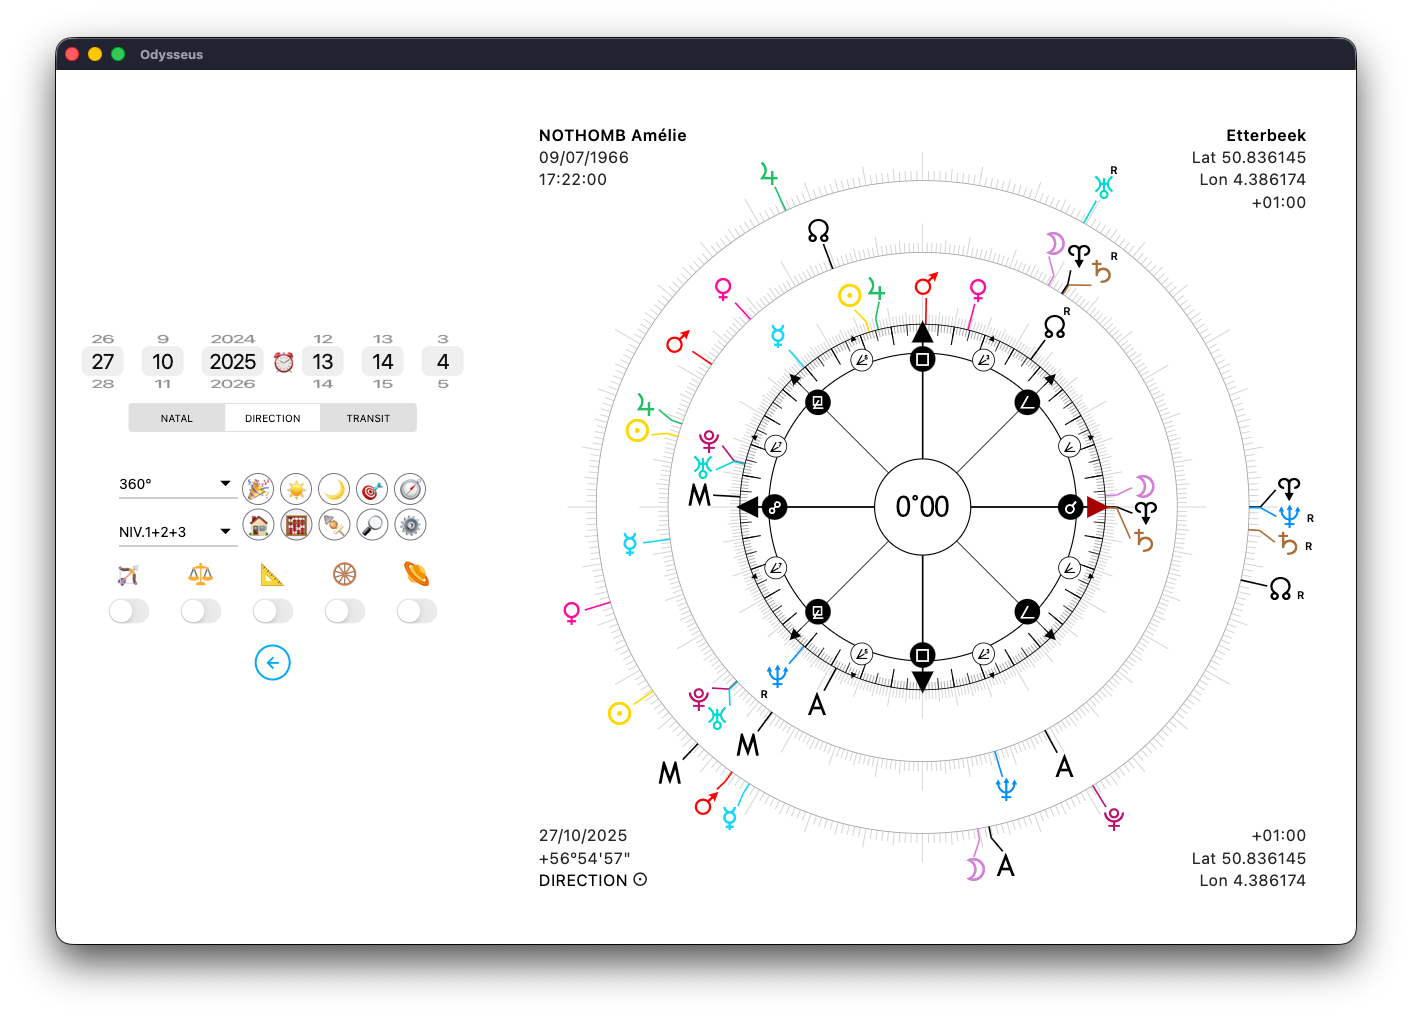
…and the listing that is displayed is that of the designated level:
Ditto with the TRANSIT level, then a click on the abacus 🧮:

…Which displays the level 3 listing:
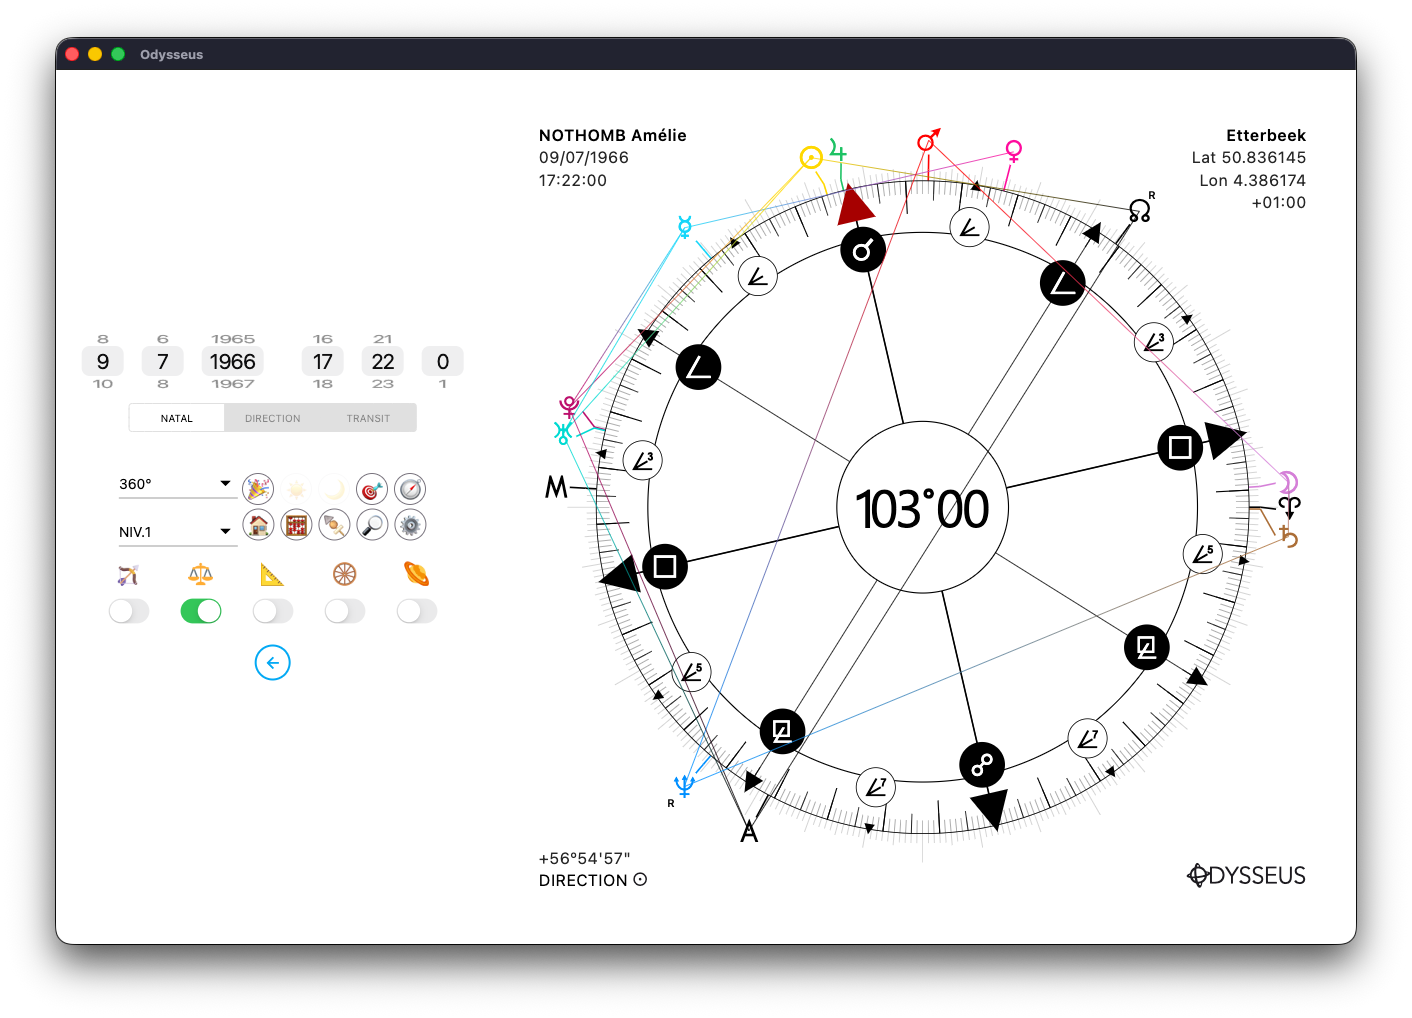
It is also possible to search for midpoints from the wheel by mixing the levels. If you click for a long time on a planet of a certain level, you will have the MP/SP window that will first select this planet of the level concerned. Here, if I click on the Midheaven < level 1, MP/SP opens:

I can then select a second planet and position the cursor for example on DIRECTION to find the midpoint between a level 1 planet (Midheaven <) and a level 2 planet (Mercury O). This obviously concerns only an advanced practice of a confirmed astrologer.

Then click on SEARCH:
And we can then see that the red arrow of the dial is between the Midheaven < and Mercury O directed.
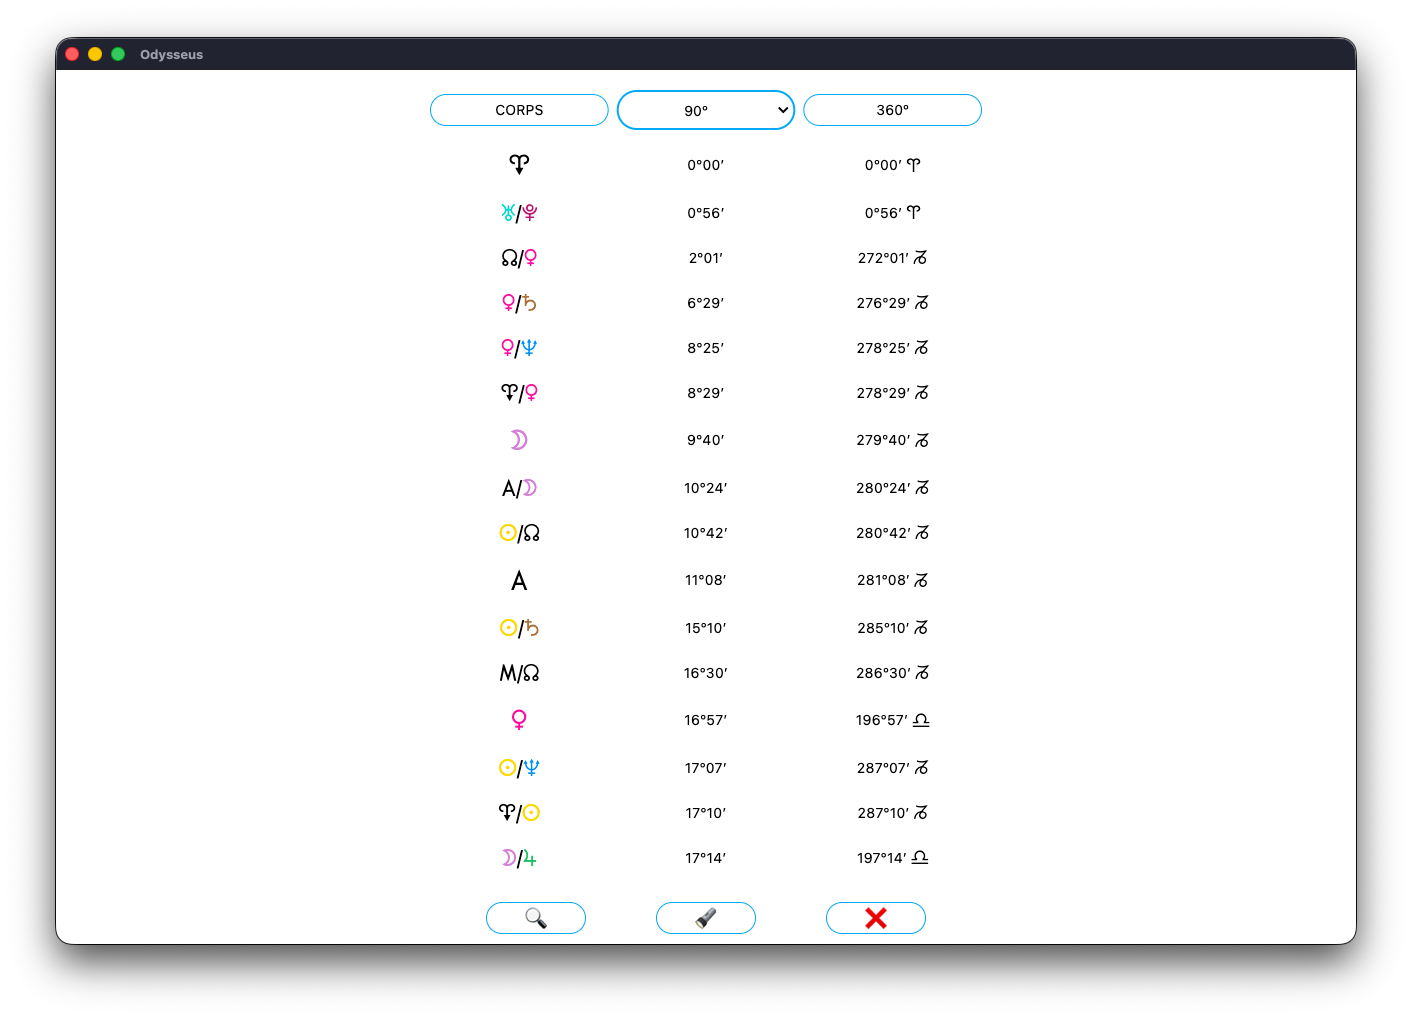
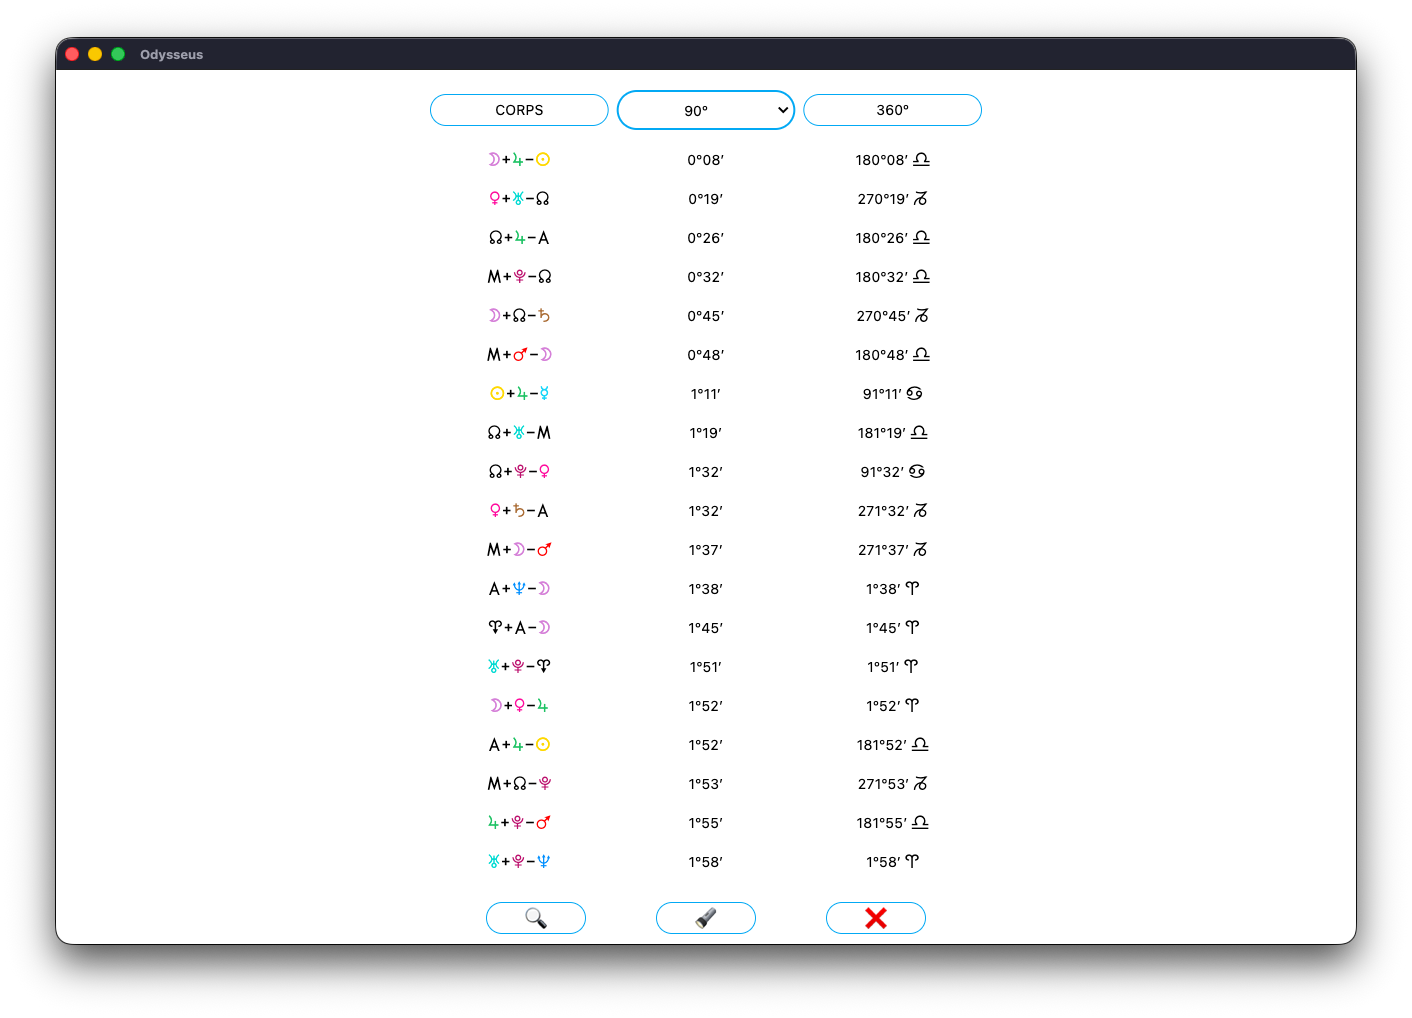
PLANETARY PICTURES 🍢
It’s quite common to look for which sensitive point a chart factor falls upon, whether in the natal chart or on other levels. That’s exactly what the skewer button 🍢 is for (yes, that was the only emoji available that could visually place an element between two others… I could have used this one 🍡, but it looked a bit too tasty).
So, by selecting a factor or a point on the wheel, I click on the skewer 🍢
And just like for midpoints 🧮, a three-column listing appears: sorted by BODY, by modulo, or on 360º.
At the bottom is the flashlight button 🔦, used to locate which degree the wheel is oriented toward:
The corresponding line is then highlighted. A long press on it displays its definition:
Changing the modulo recalculates the wheel according to the selected harmonic:
Which refreshes the list and its correspondences:
The magnifying glass button 🔎 allows you to search for a specific planetary picture:
As usual, you’ll find clickable planetary buttons to choose which planets to search for. By clicking the first button on the left:
You select the first planet. Then, with the second button:
You select the planet that forms a midpoint with the first. And finally, the third:

To look for the third factor, or the transiting factor depending on your query:
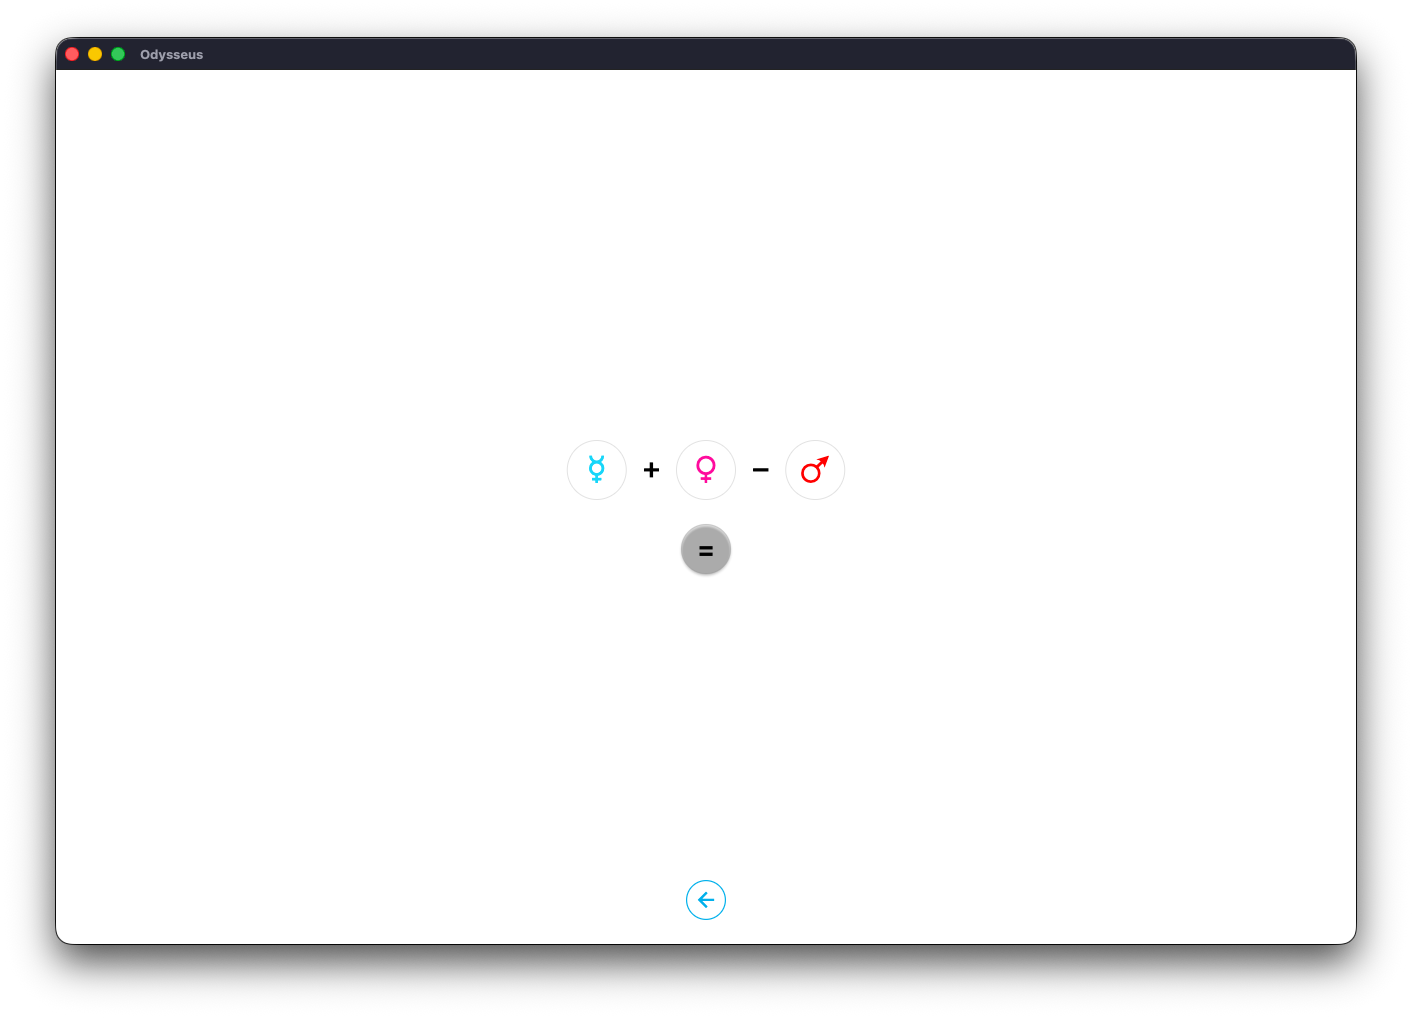
A click on = starts the search:
The line is highlighted again. A single tap closes the window…
And the wheel positions itself at the correct degree.
It’s also possible to use the listing on the other chart levels simply by sliding the level selector. For instance, here on DIRECTION, then a click on the skewer 🍢
And the new listing now belongs to level 2.

Same thing with the TRANSIT position:
And the listing now corresponds to level 3.
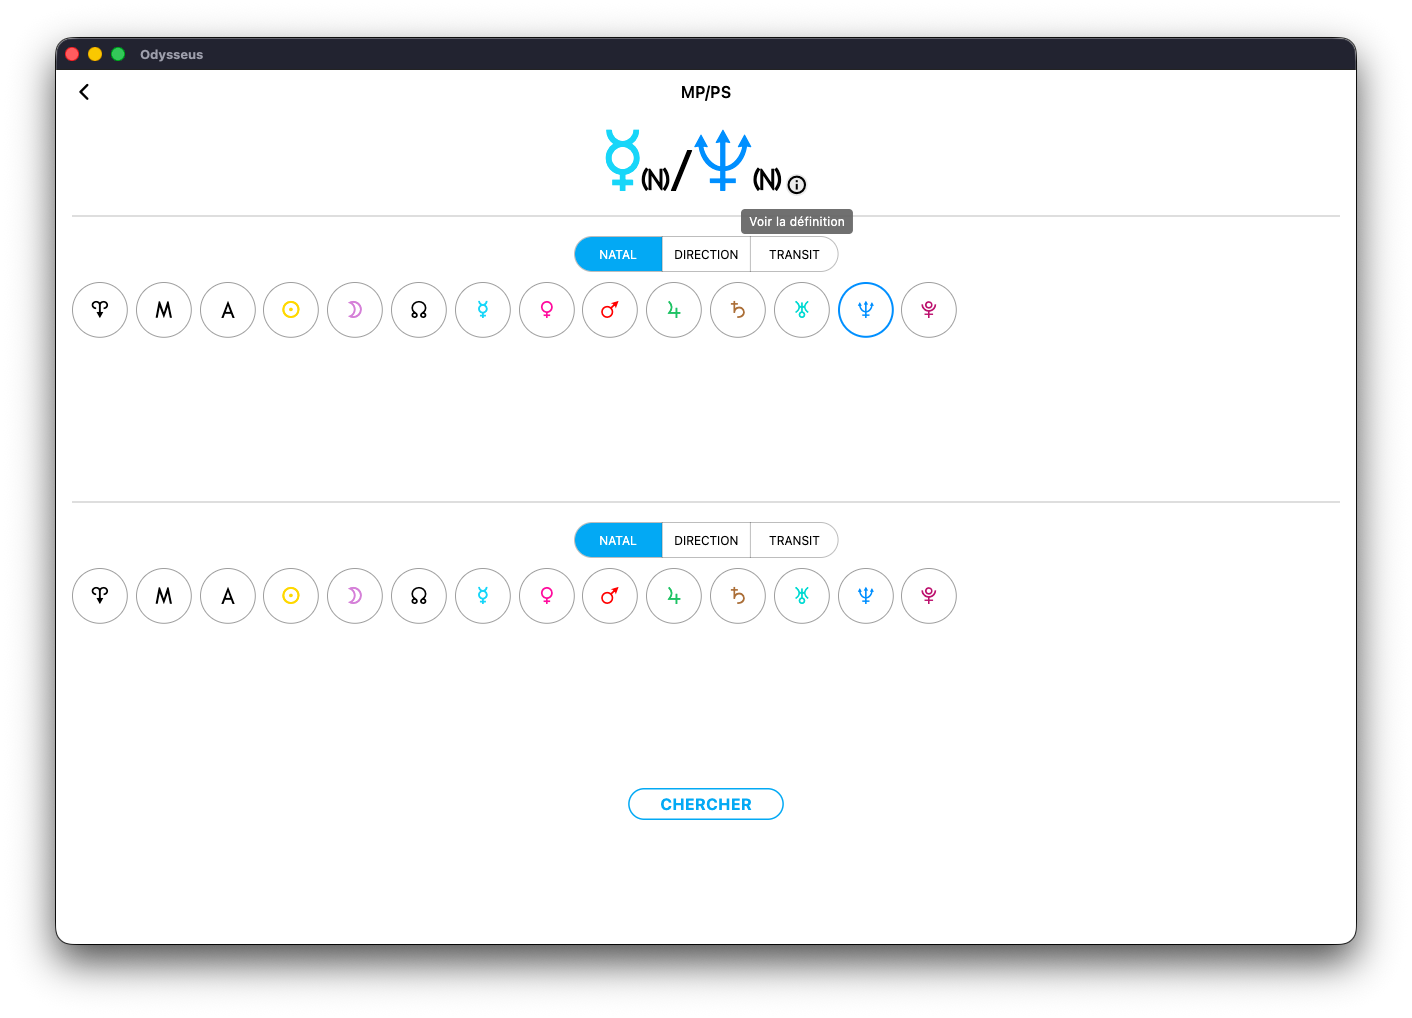
You can also search for a sensitive point in another way, using the MP/SP panel. To do so, make a long press on the first factor:
Here with Mercury O:
The panel opens. You can then select a second factor, here Neptune U:
The two are displayed as a midpoint O/U.
But if you add a third planet using the last line at the bottom of the window…
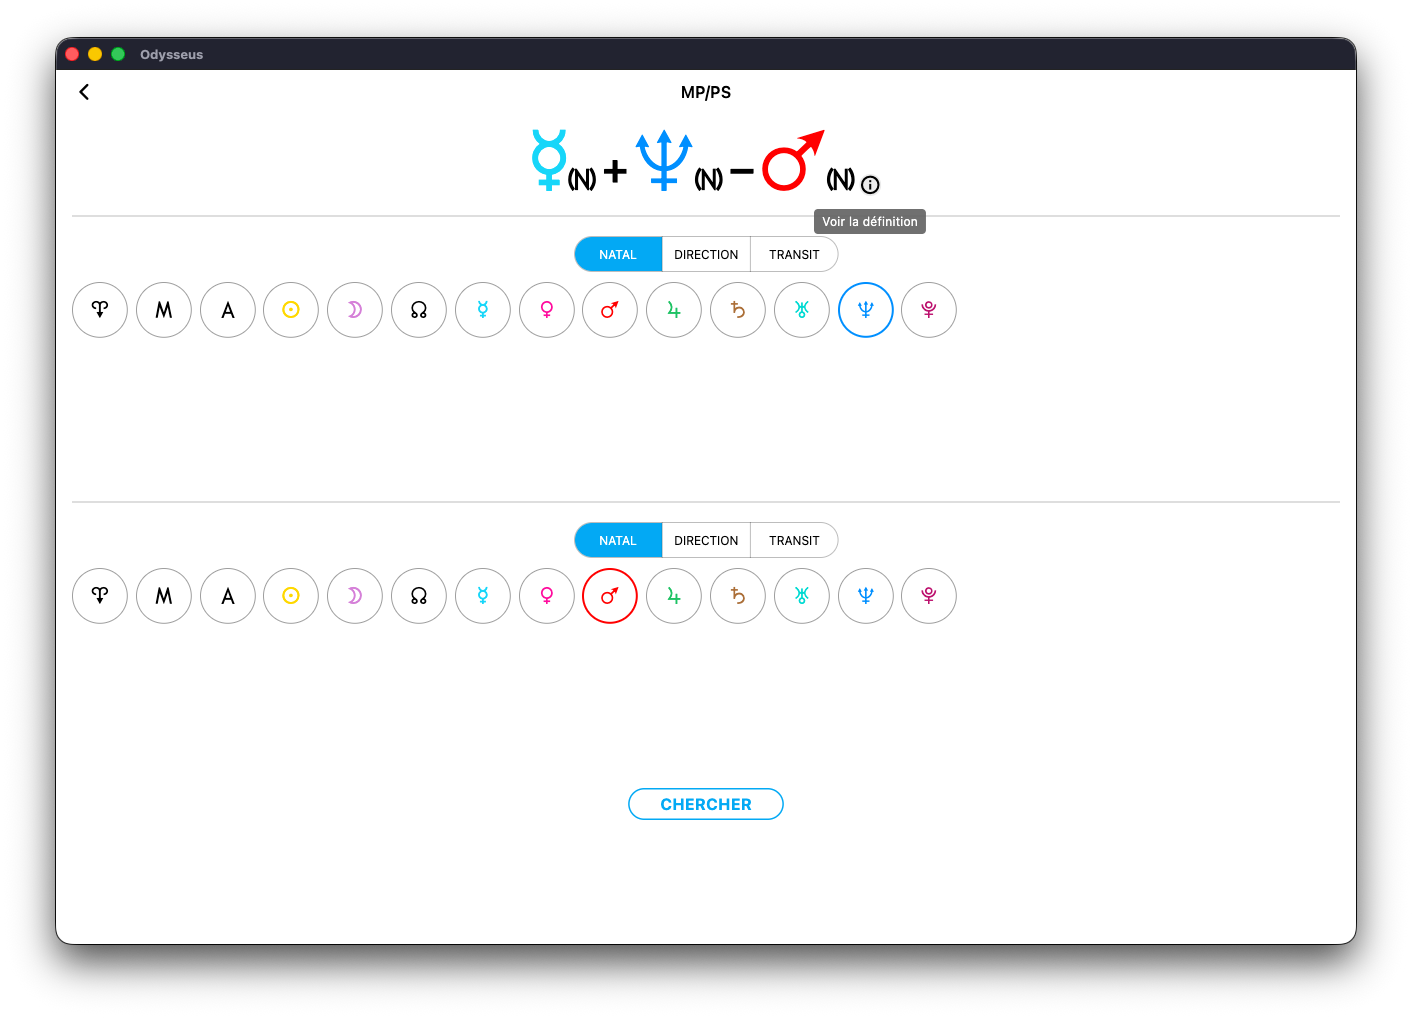
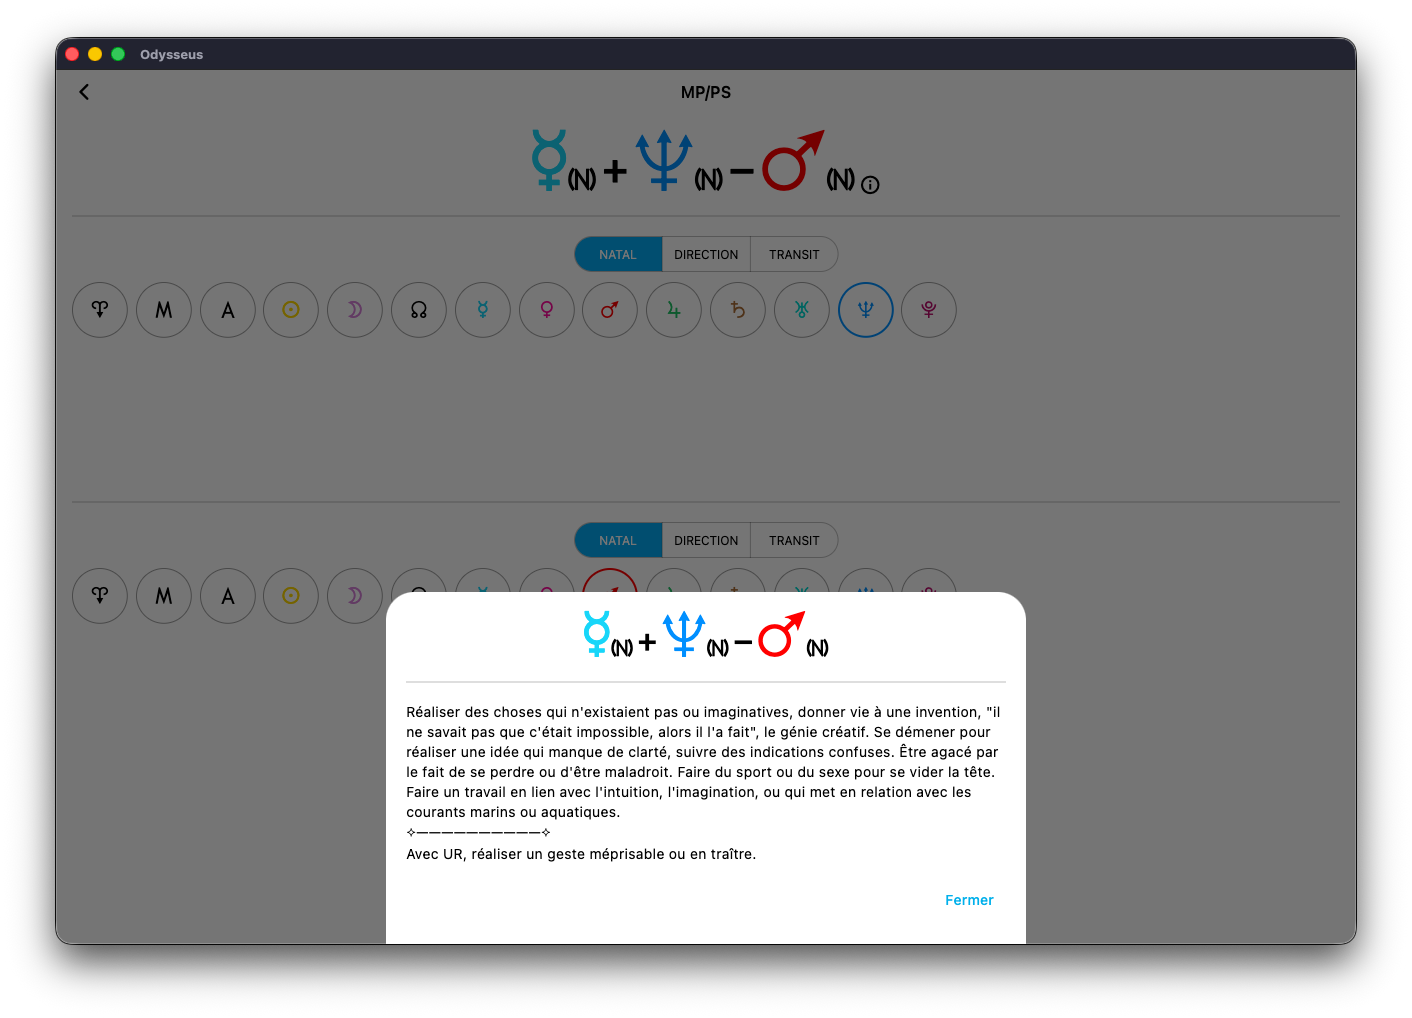
The whole set appears as a planetary picture A+B–C — here, the figure O+U–Q.
The small ⓘ icon next to the figure displays its definition:
And finally, a click on SEARCH closes the window…
And positions the wheel at the correct degree.
It’s also possible to mix different chart levels when searching, still using the MP/SP panel.
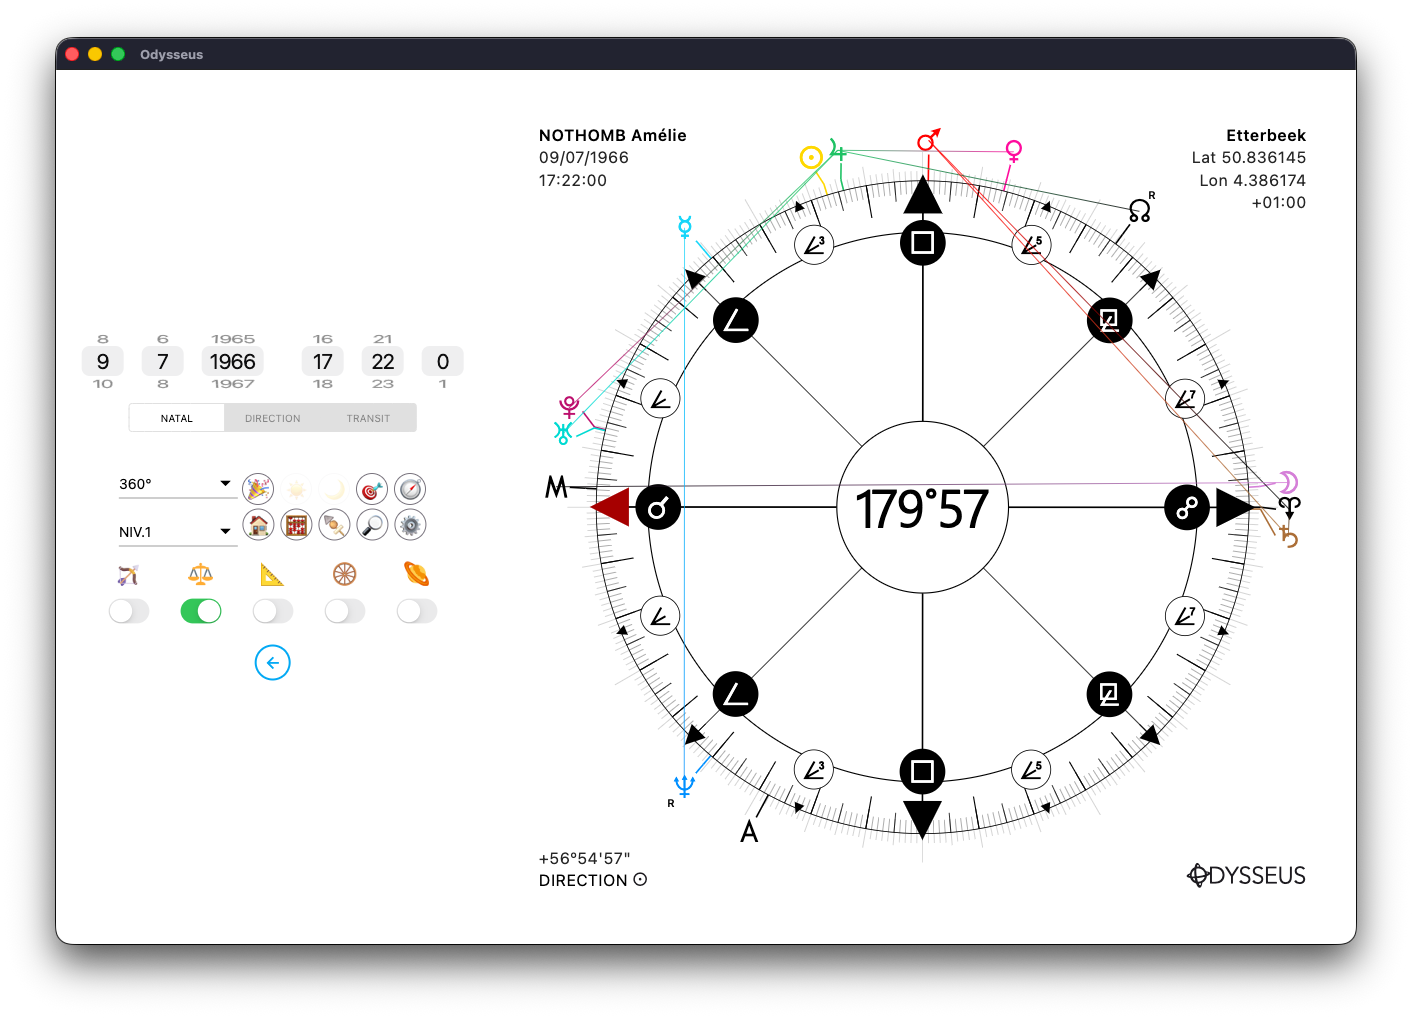
For example, with a long press on the natal Midheaven <:
You’ll notice the < followed by a small (N), meaning NATAL.
Then you can choose a second planet, for instance Mercury O:
And move the slider to DIRECTION. The symbol O will then appear with a small (D), for DIRECTION.
Finally, a third planet, here Venus P:
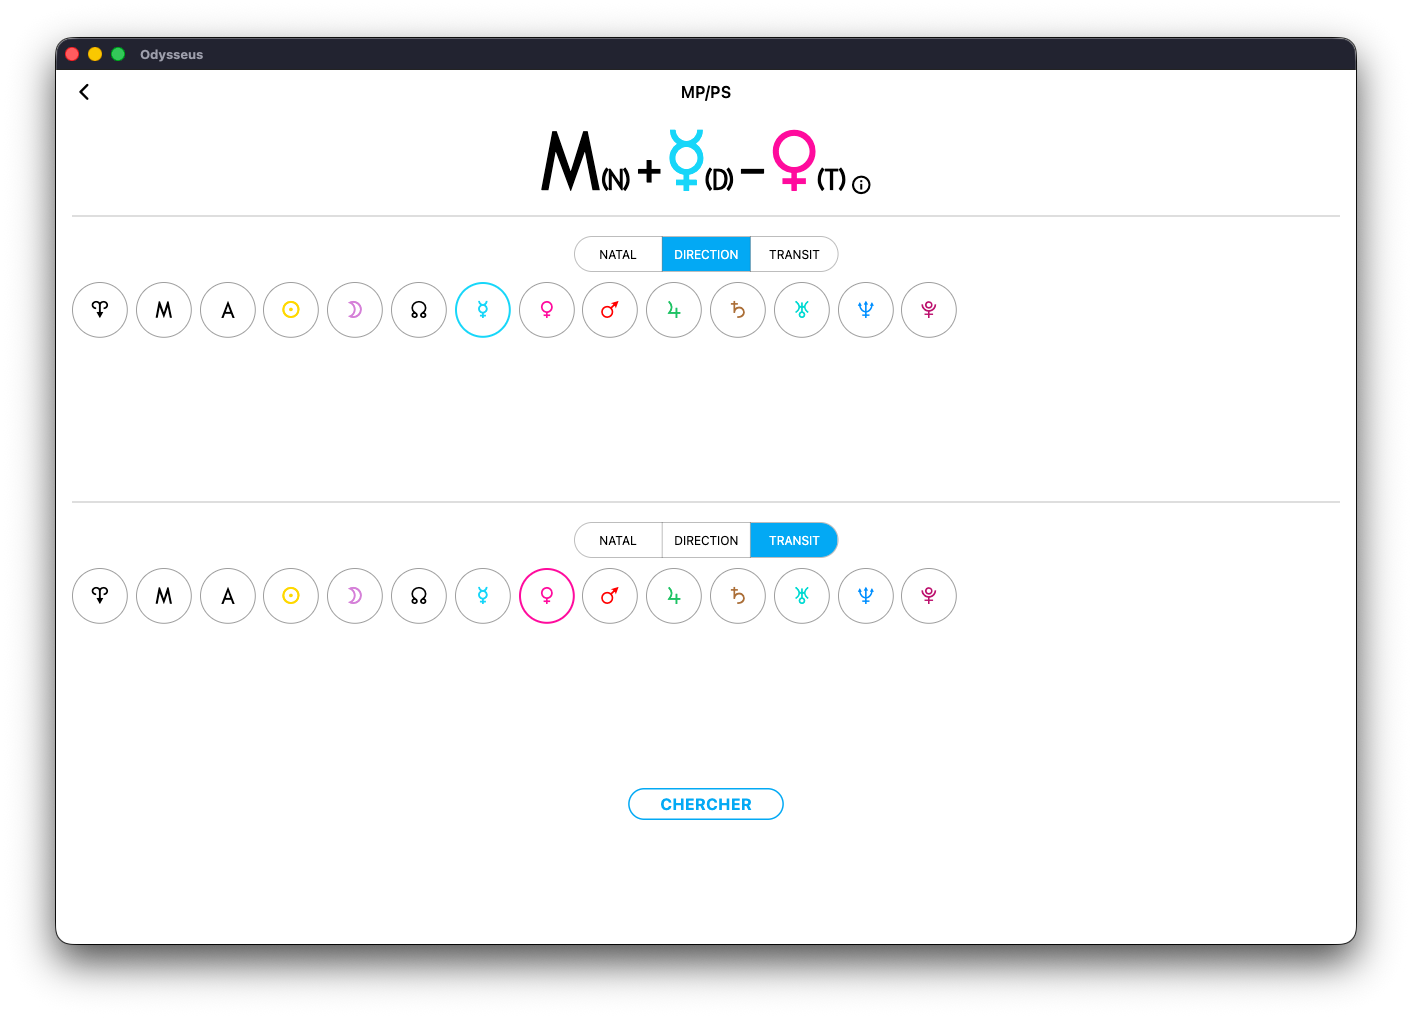
Then slide the cursor to TRANSIT, for example, to display a small (T) next to P, indicating the transit level.
Thus, you calculate one natal planet plus one directed planet minus one transiting planet.
Click SEARCH, the window closes…
And the wheel sets itself at the right degree.
Planetary-picture searches across multiple levels are especially useful for advanced practitioners.
Only use them if you know what you’re doing.
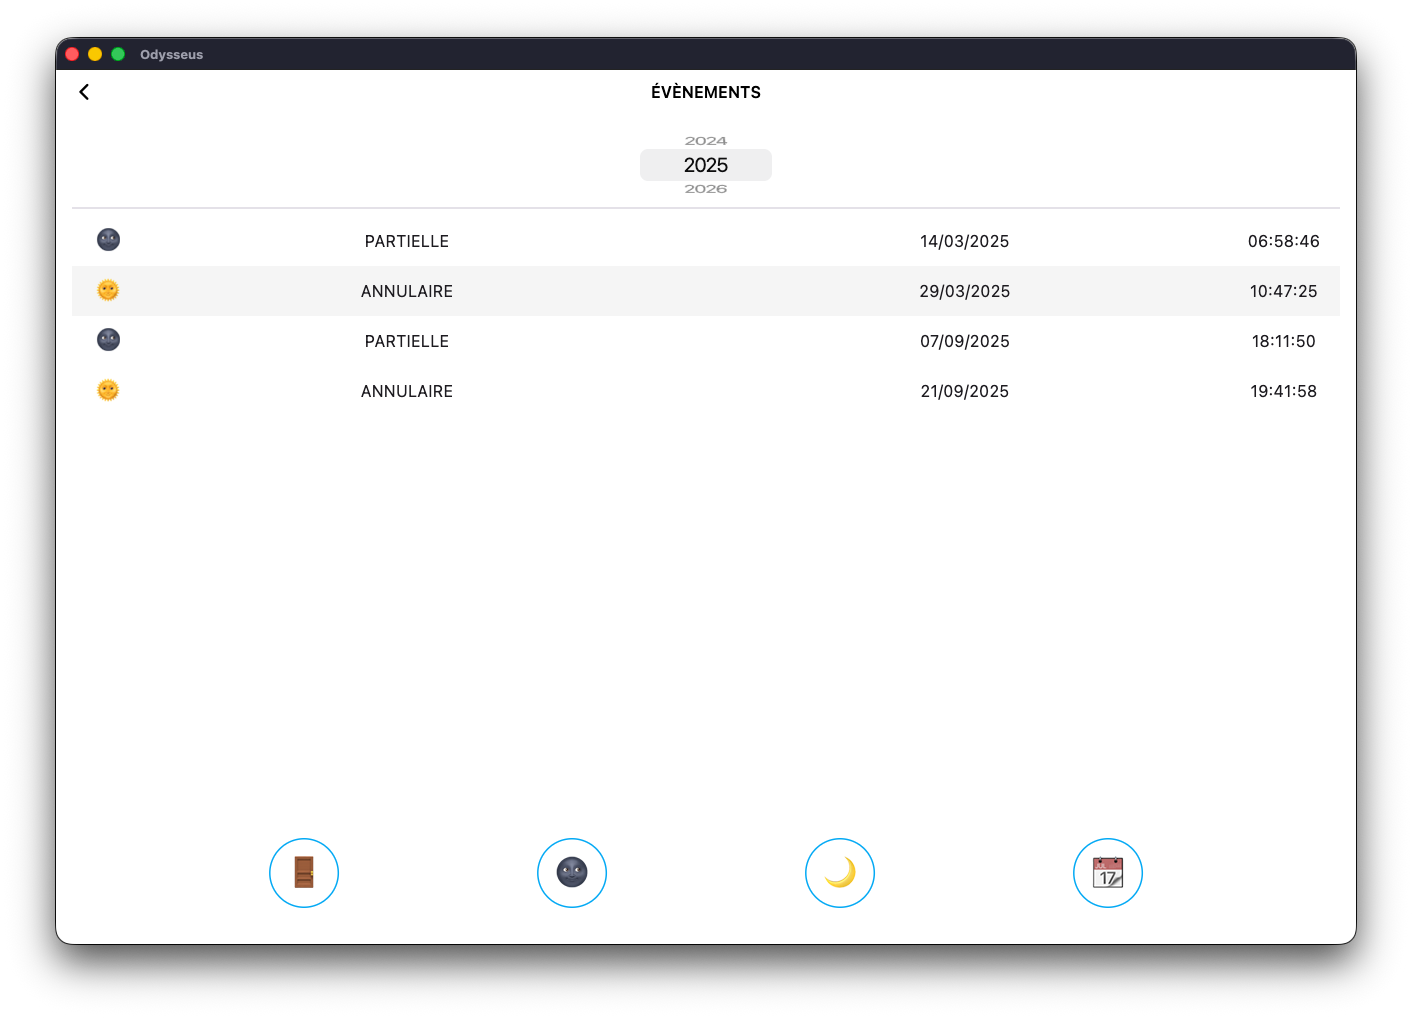
EVENTS 🎉
It’s common in astrology to need to load dates of specific celestial events. For that, use the festive button 🎉
Clicking it opens a new window:
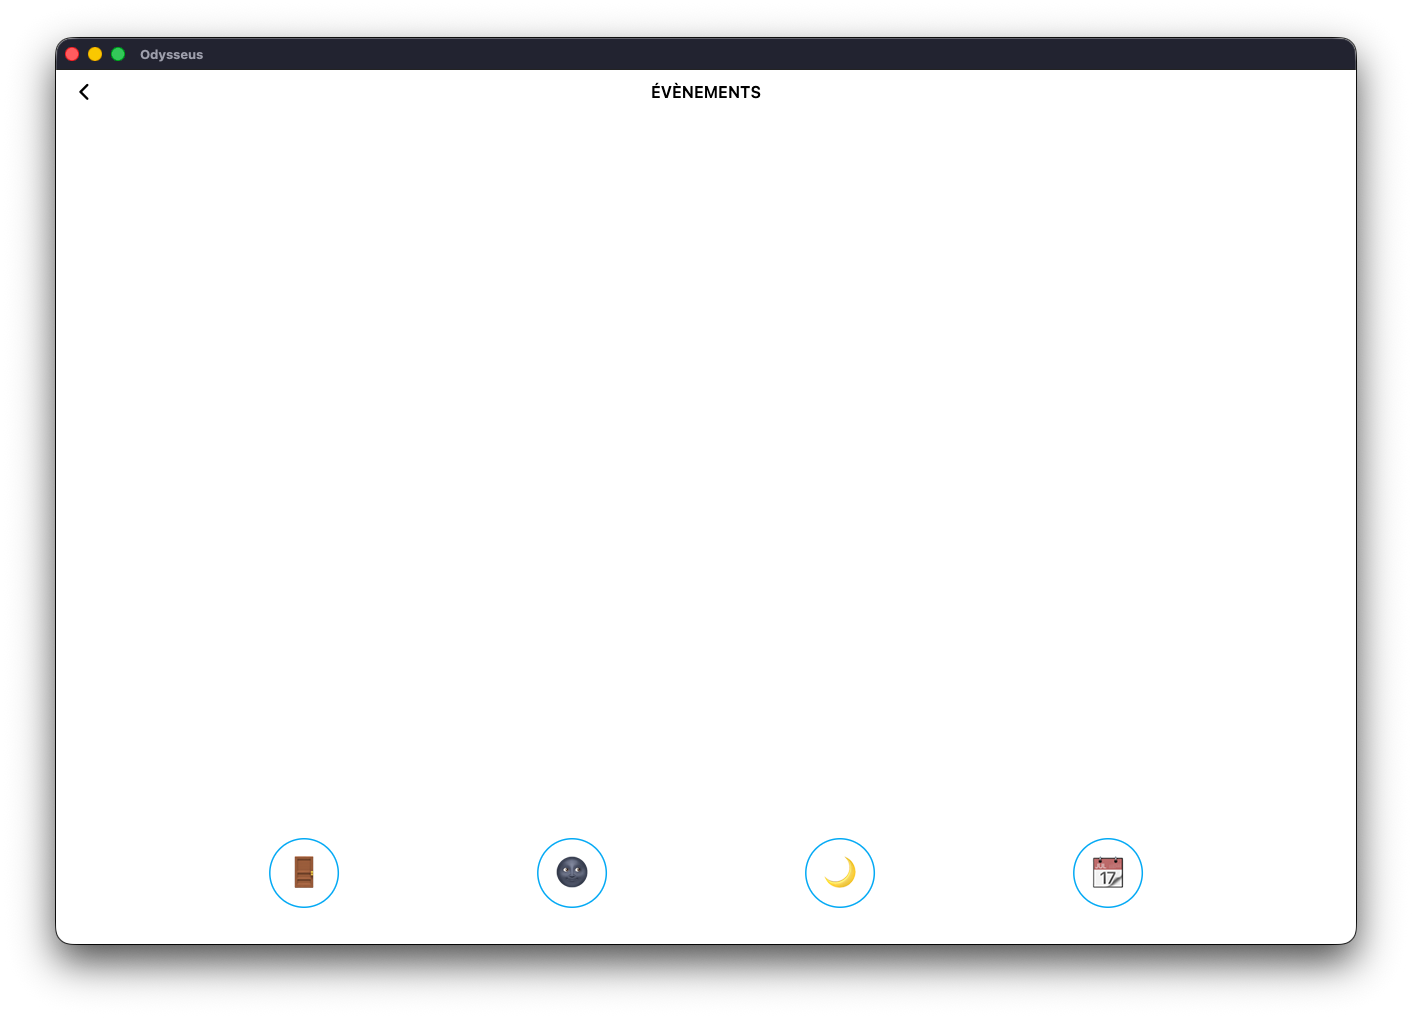
…containing four buttons. The first one, shaped like a door 🚪
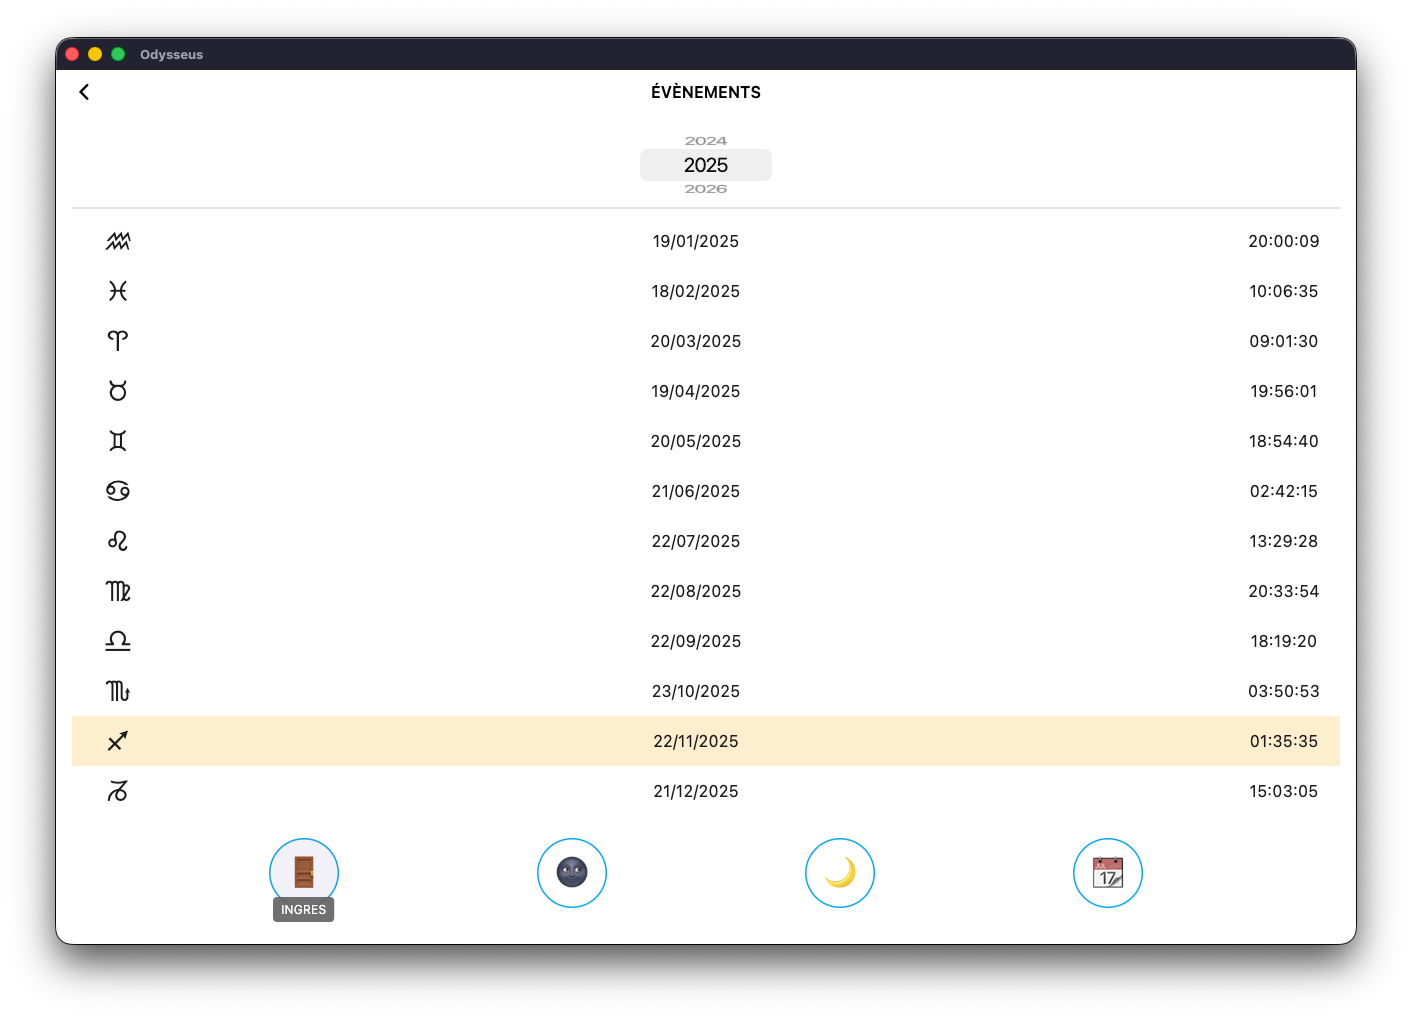
…displays the solar ingresses, from January to December — from the Aquarius ingress L to the Capricorn ingress K.
The scroll wheel at the top of the page lets you select the desired year.
The second button, shaped like a dark moon 🌚…
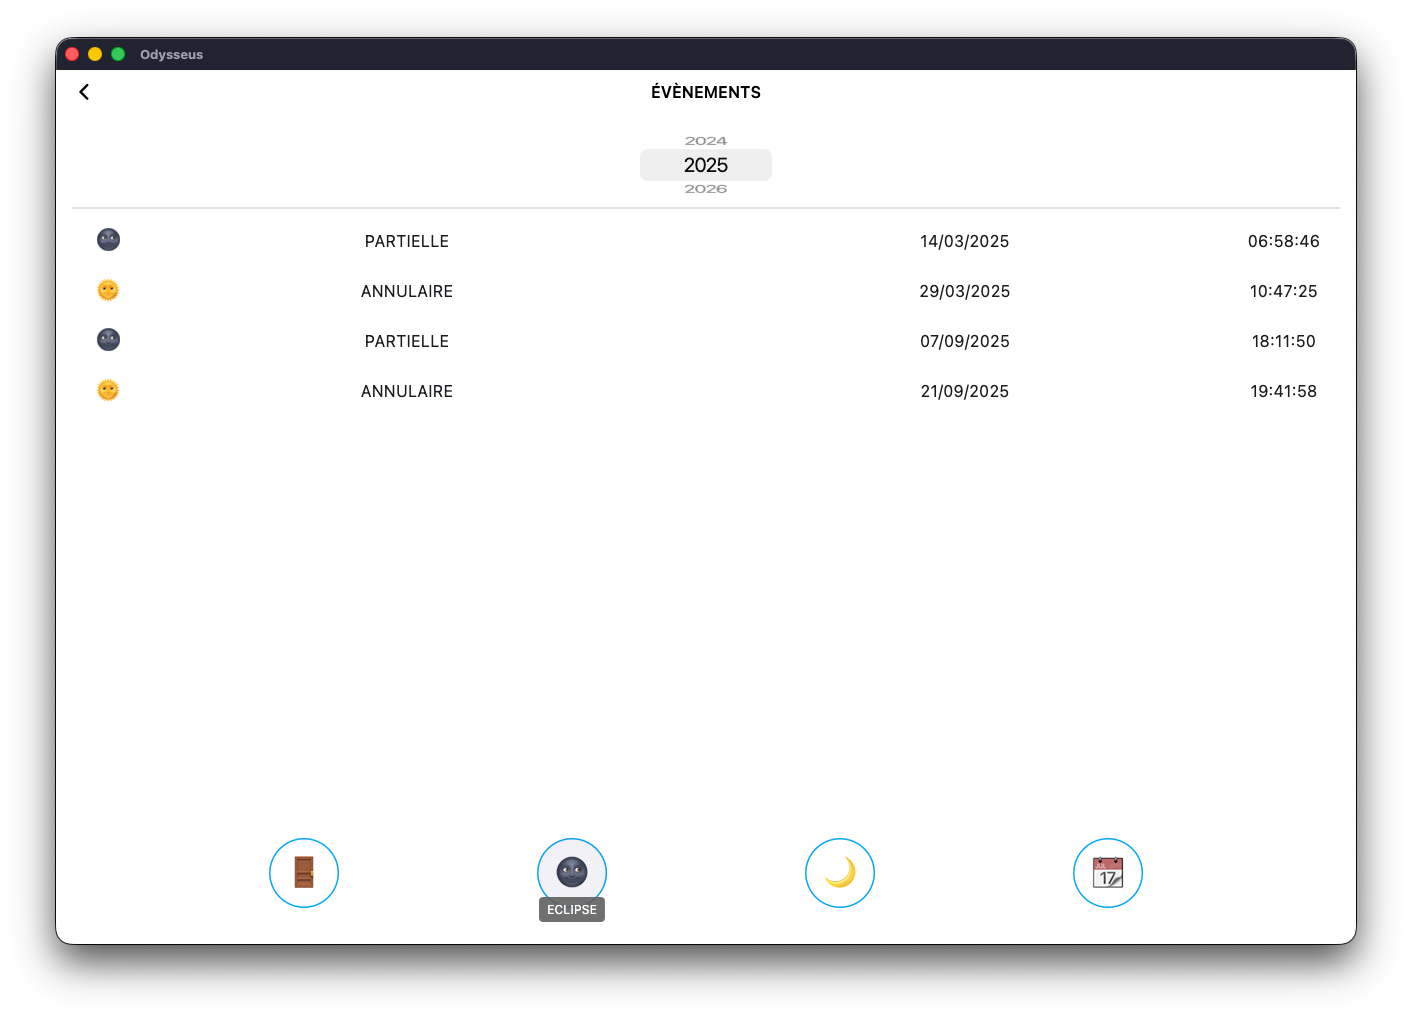
…loads the list of eclipses for the specified year.
The next button, a crescent moon 🌙:
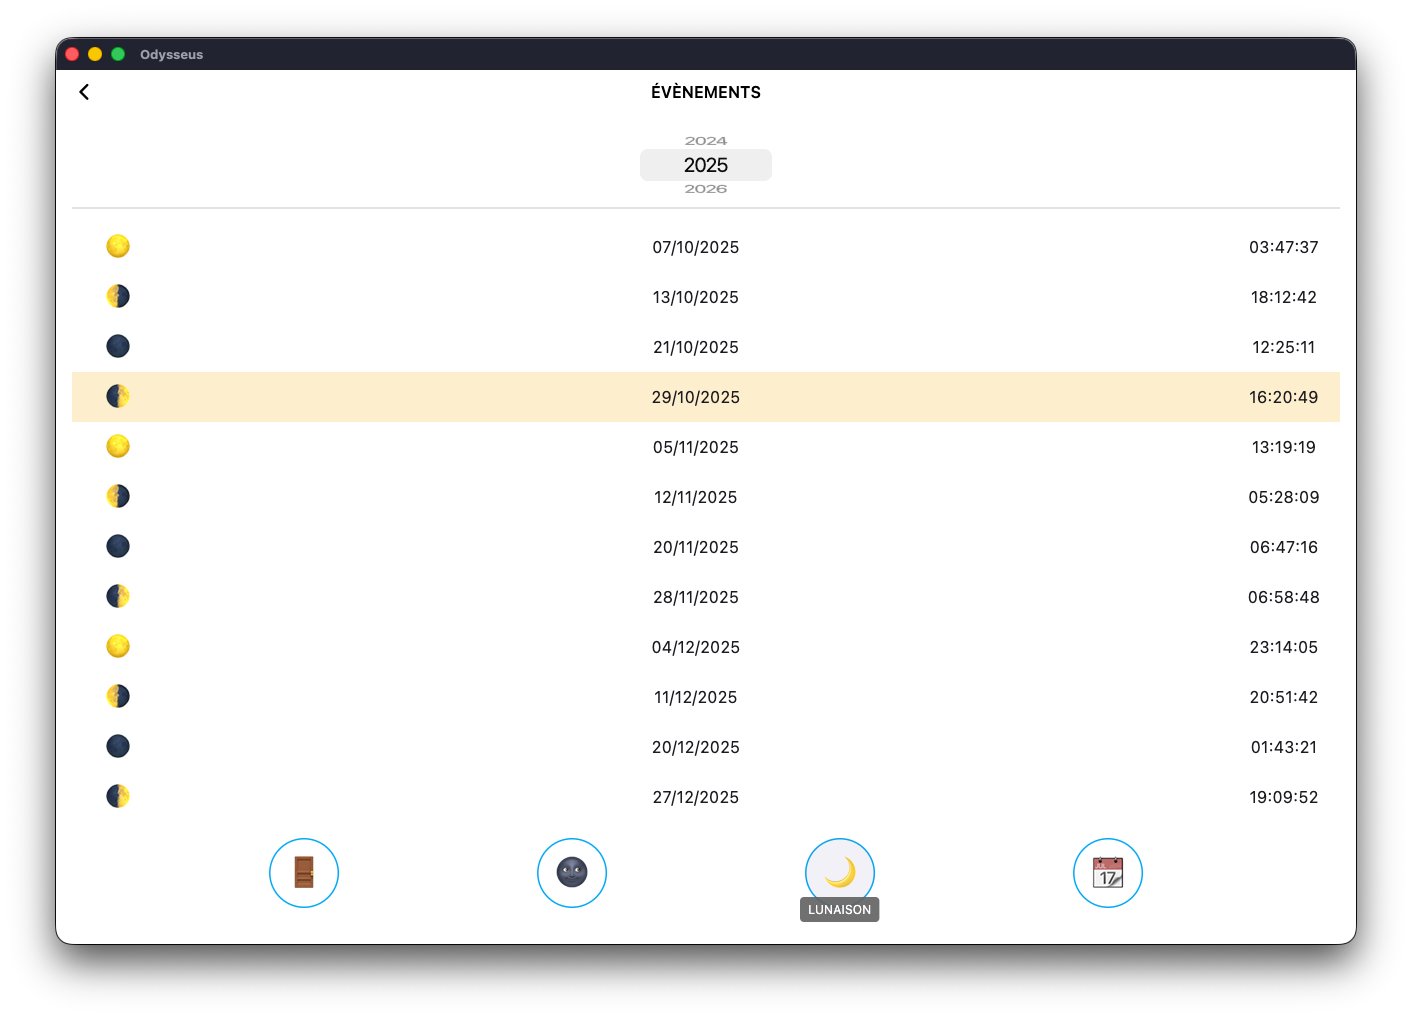
…loads the lunations for the current year. Be aware that this may take a moment, as there are many lunations throughout the year. You’ll notice that each time, the next upcoming event is always highlighted in yellow.
As always, you can change the year with the scroll wheel. However, since lunations can take time to load, scrolling the wheel may slow things down. In that case, simply double-click on the year: the wheel will disappear and be replaced with an input box where you can type the desired year directly.
Finally, the last button, shaped like a calendar or agenda page 📆
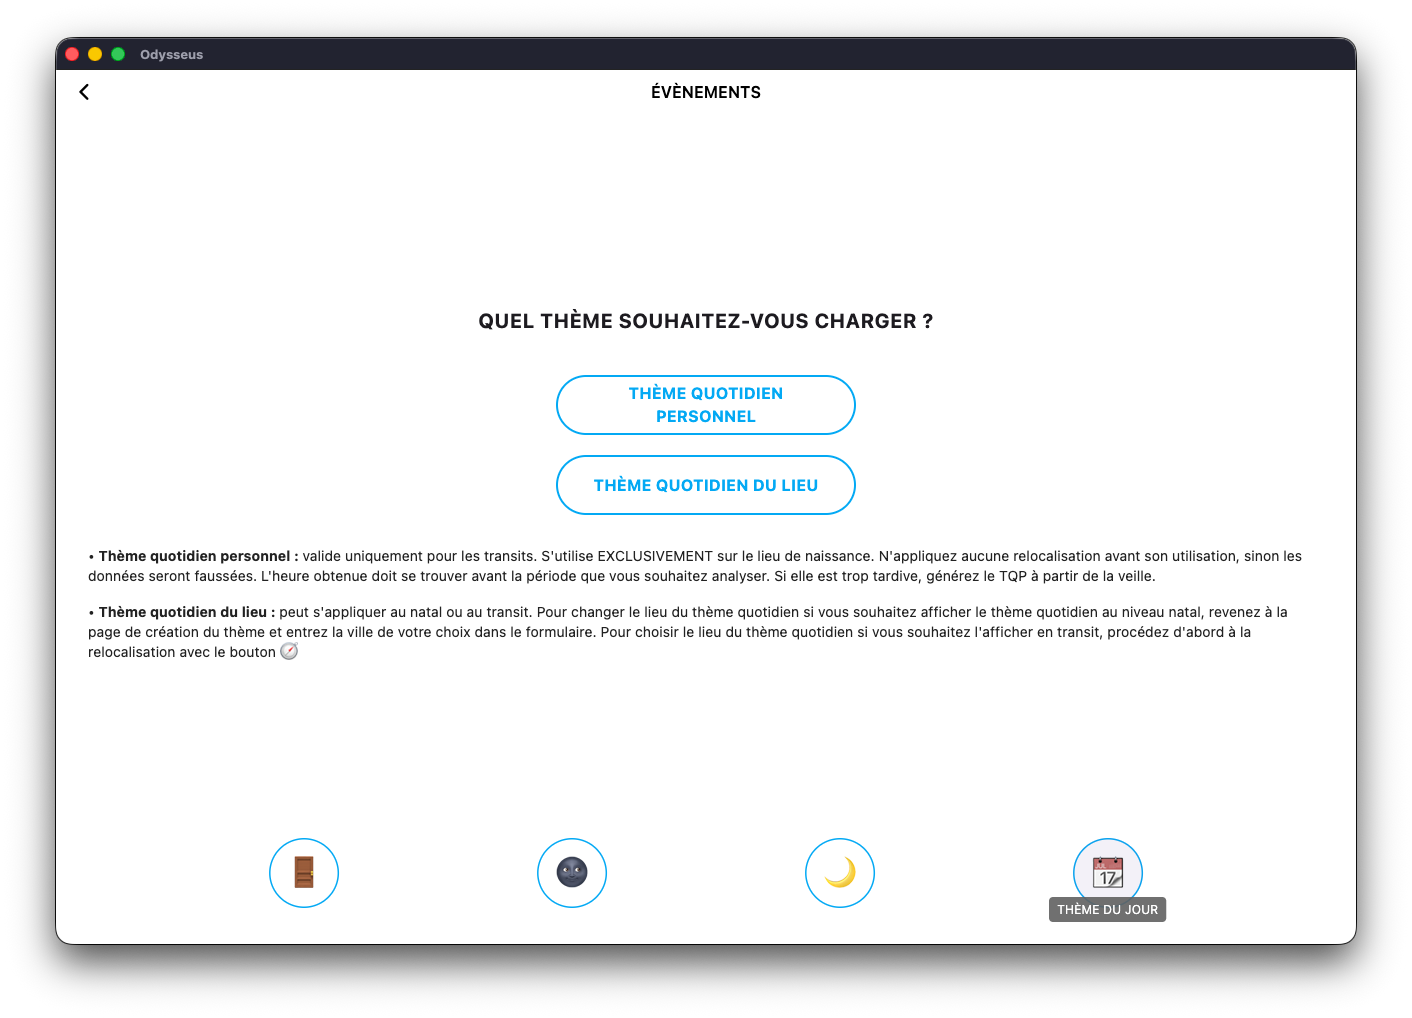
…lets you load the chart of the day.
This chart comes in two forms: the Personal Daily Chart (PDC) and the Location Daily Chart (LDC).
The PDC loads the daily chart for the date currently set in the transit dials beside the main chart.
It’s a chart that’s calculated uniquely for each natal chart.
The time will often be close to your birth time but never exactly the same throughout the year.
The *LDC is used in mundane astrology — that is, when you want to cast a chart for a location (city or country) for a specific date.
The time is calculated automatically.
However, make sure the desired city is correctly set in the chart creation page.
Finally, if your level slider is set to the natal level… 
…and you load an event…
The app will ask whether you really want to load this event on the natal level (which would replace your chart’s birth data) or on level 2/3 instead.
If you’re analyzing an individual chart, always choose to load the event in DIRECTION/TRANSIT.

SOLAR RETURN ☀️

Among the control buttons, you’ll find one shaped like a Sun ☀️
This button is used to display the next Solar Return for the birth chart you’ve opened. A simple click…
And the next S.R. is displayed.
If, on the other hand, you make a long press…
Then the previous S.R. appears. You can therefore go backward or forward in time with a sequence of long presses or simple clicks.
LUNAR RETURN 🌙

Among the control buttons, you’ll find one shaped like a Moon 🌙
This button is used to display the next Lunar Return for the birth chart you’ve opened. A simple click…
And the next L.R. is displayed.
If, on the other hand, you make a long press…
Then the previous L.R. appears. You can therefore go backward or forward in time with a sequence of long presses or simple clicks.
CUSPS 🏹
By clicking on the switch below the arc:
![]()
…It goes green and the wheel then goes into Cuspide mode. When you click on a planet outside of Cuspide mode, the wheel rotates in its direction and displays its longitude in the centre. In Cuspide mode, the wheel rotates to place the wheel on its right cusp and display its symbol in the centre. Here, by clicking on the Vernal Point A, the wheel rotates to place it at the cusp of House 7 / Aries B, and displays the signs and colours.
Here, with the Midheaven <, the wheel rotates to place it in the cusp of House 10, and displays the colours specific to its system. Ditto for the Ascendent > in cusp House 1:
The Sun N in cusp House 4:
The Moon Y cuspid House 10:
And finally the Lunar Node W, cusp House 1:
By clicking on a classic planet, the dial will be placed in such a way as to make it appear in the cusp of House 4, because this is how we consider the planets in Uranian astrology:
However, Cuspide mode immobilises the wheel in a system, not allowing us to see the Houses at the same time and to look for half-points or sensitive points for example. It is then possible not to activate the switch, but to display the cusps of the Houses as planets by double-clicking on the image of the arc:
![]()

We then see the system symbol appear in the centre of the wheel, under the degrees, and the cusps all around the wheel. Here, in the Earth Houses system, so with Vernal Point A in the centre of the dial, and the zodiac signs all around.
By making this time not a double-click but simply a long click/long press on the arc image, the taming system changes. Thus, by pressing for a long time on the image of the arc, we move this time to the Houses of the Midheaven <:
Then to the Houses of the Ascendent >:
Then at the Maisons du Soleil N:
Then to the Houses of the Moon Y:
And finally to the Houses of the Lunar Node W:
These cusps can be displayed on the 3 levels of the wheel:
And to make them invisible, just double-click on the bow again:
![]()
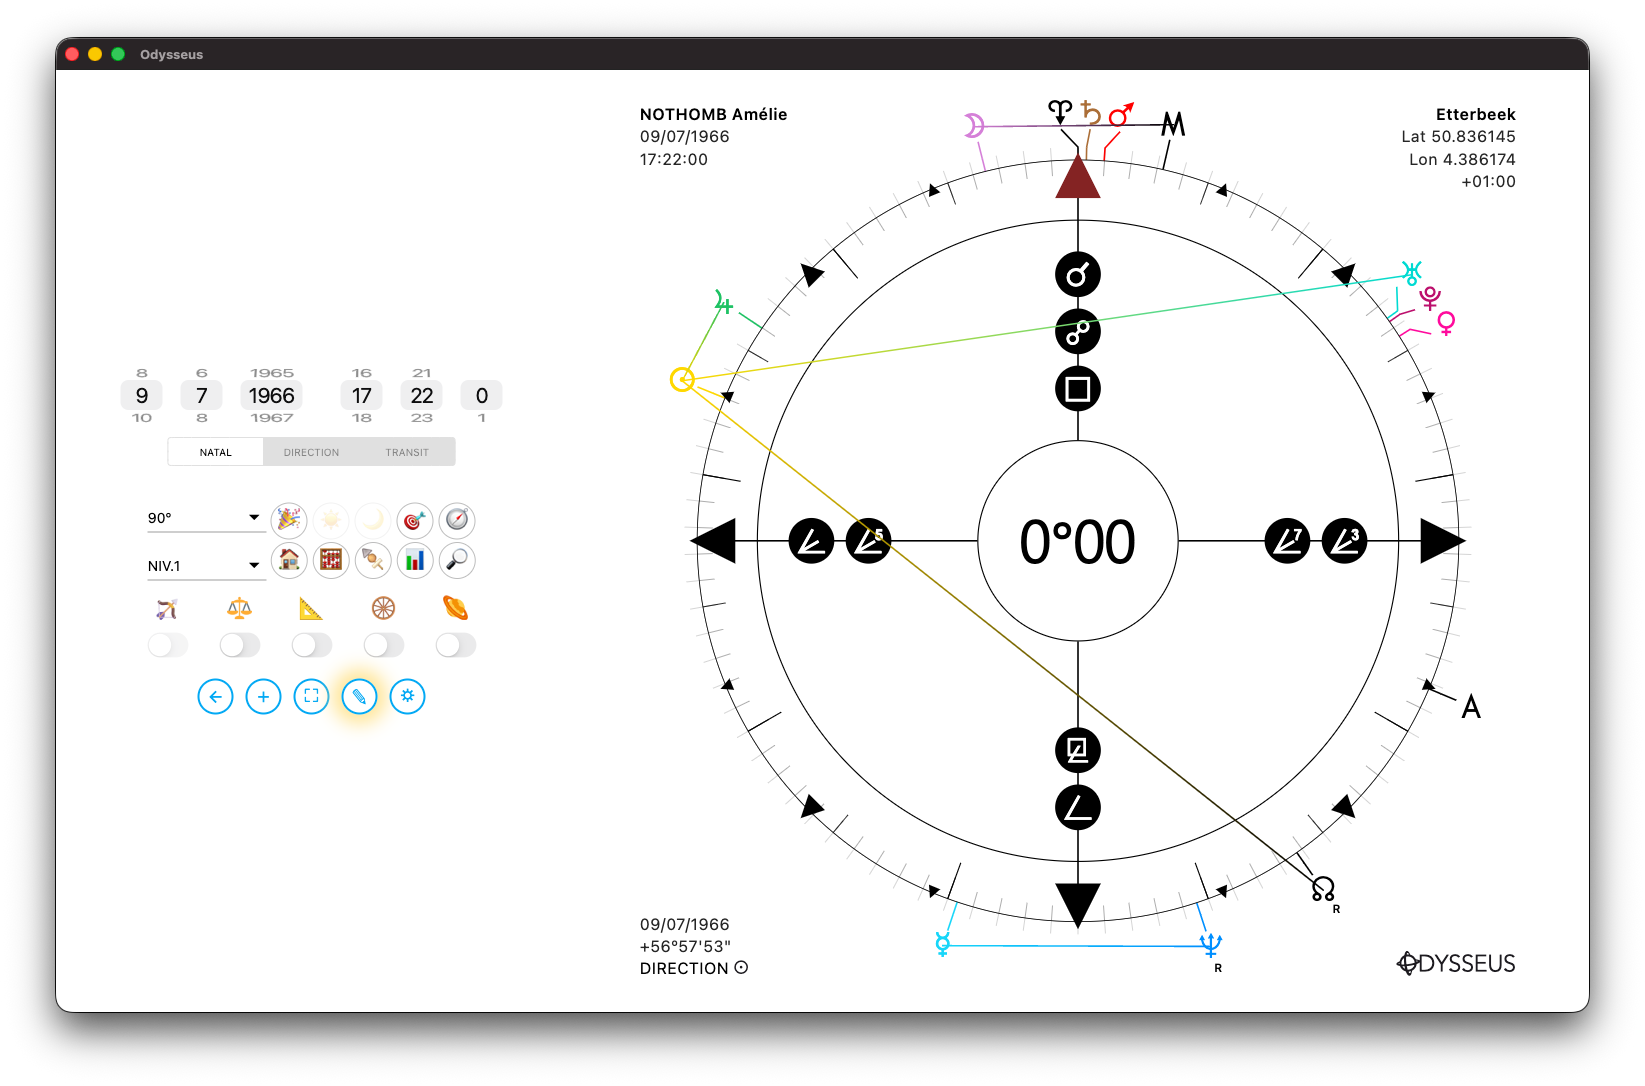
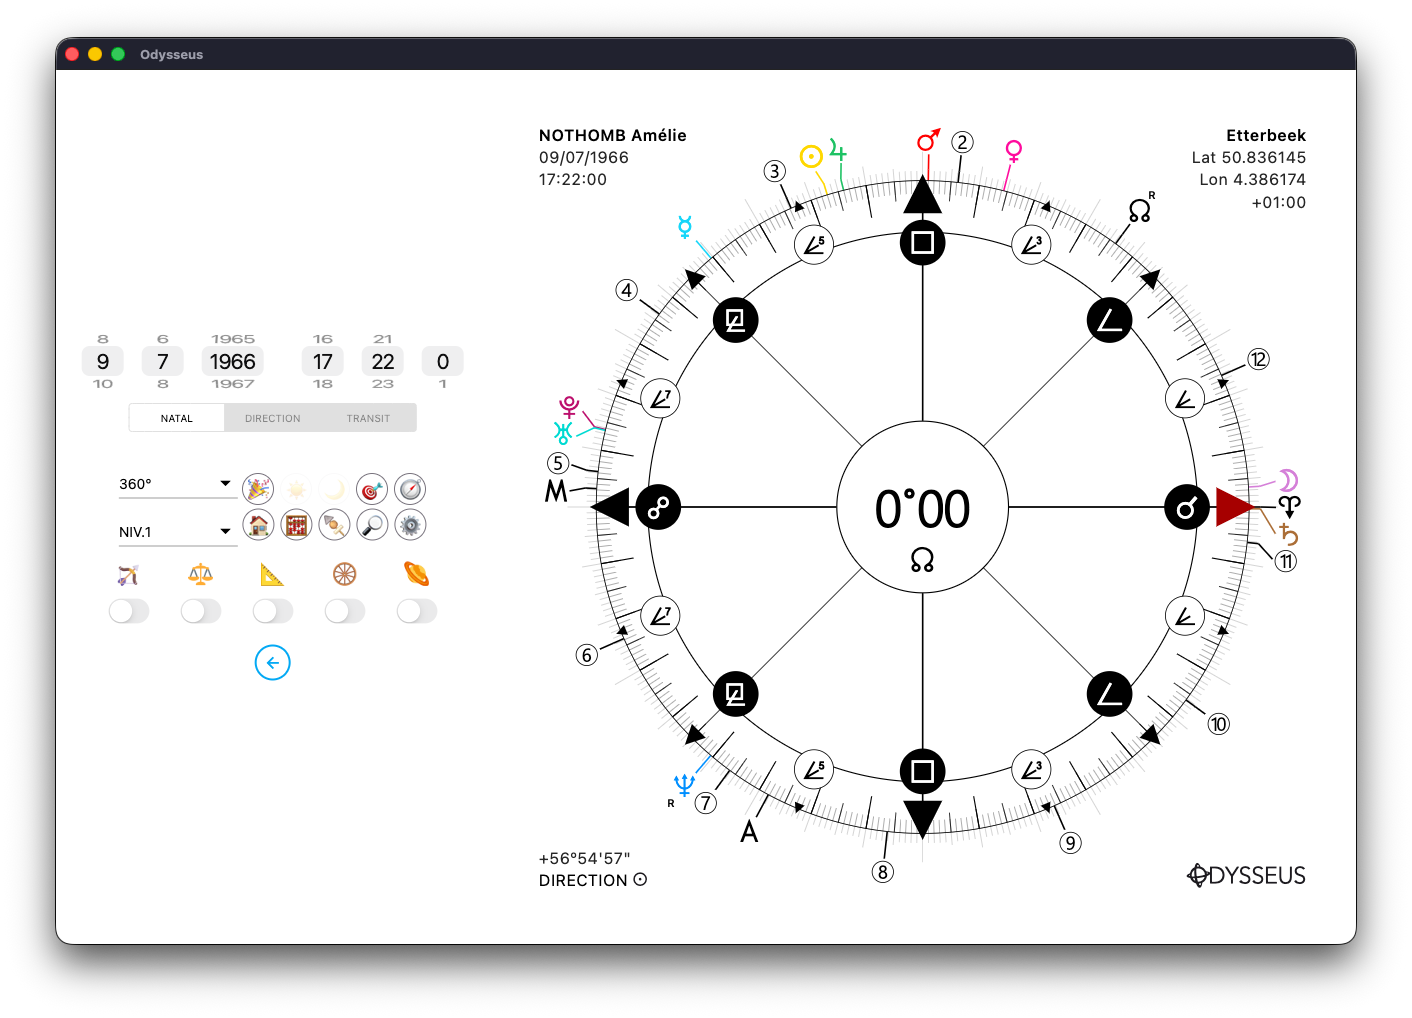
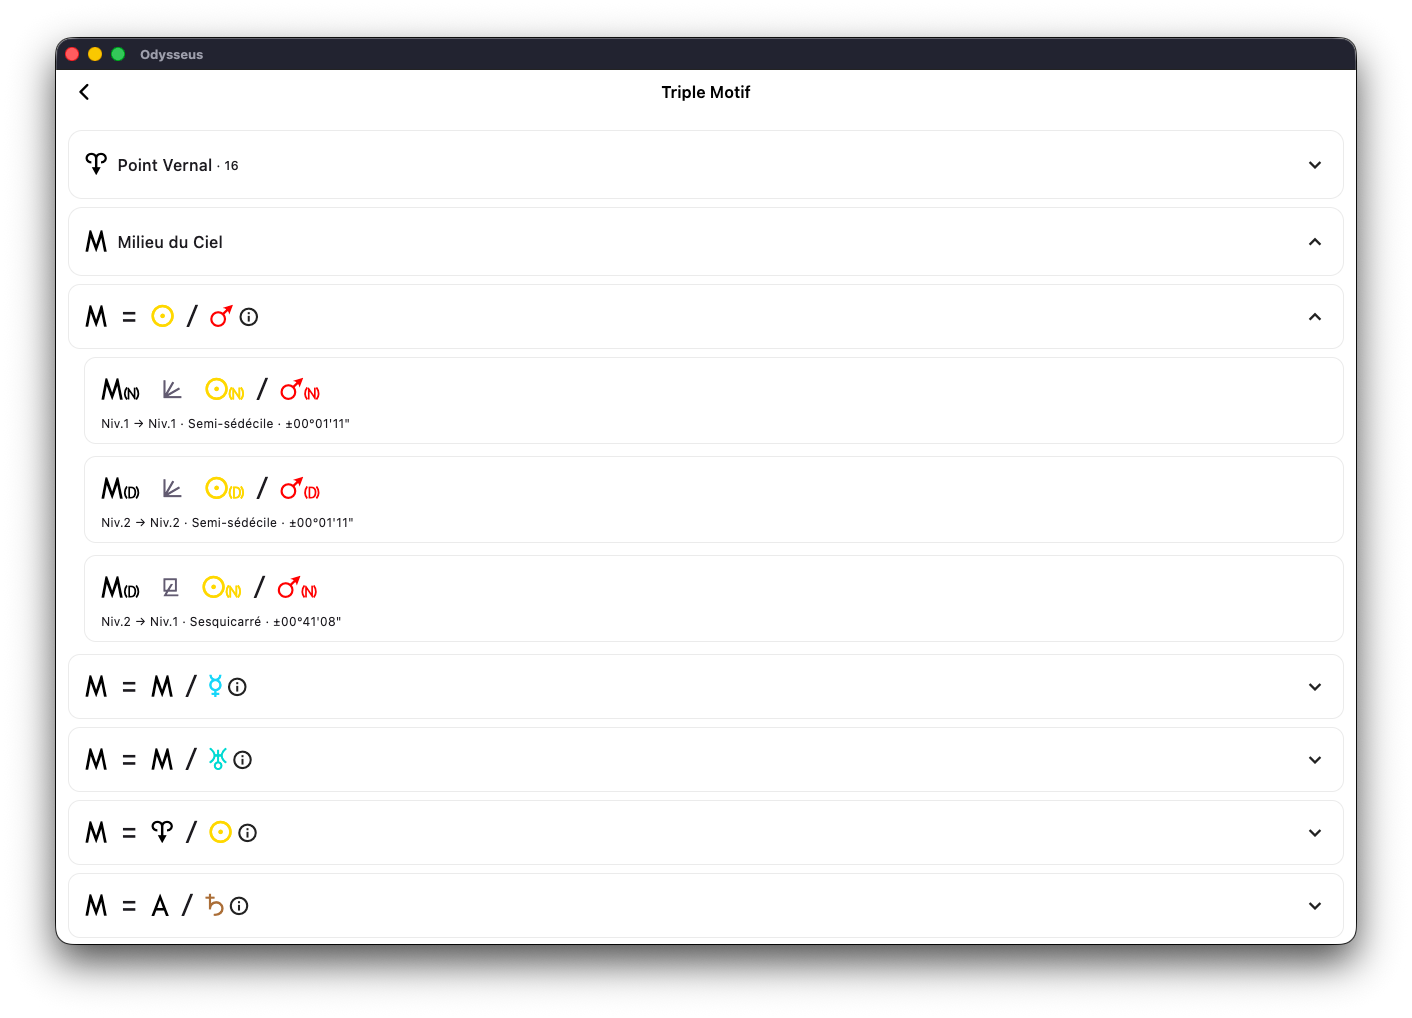
TRIPLES 🎯
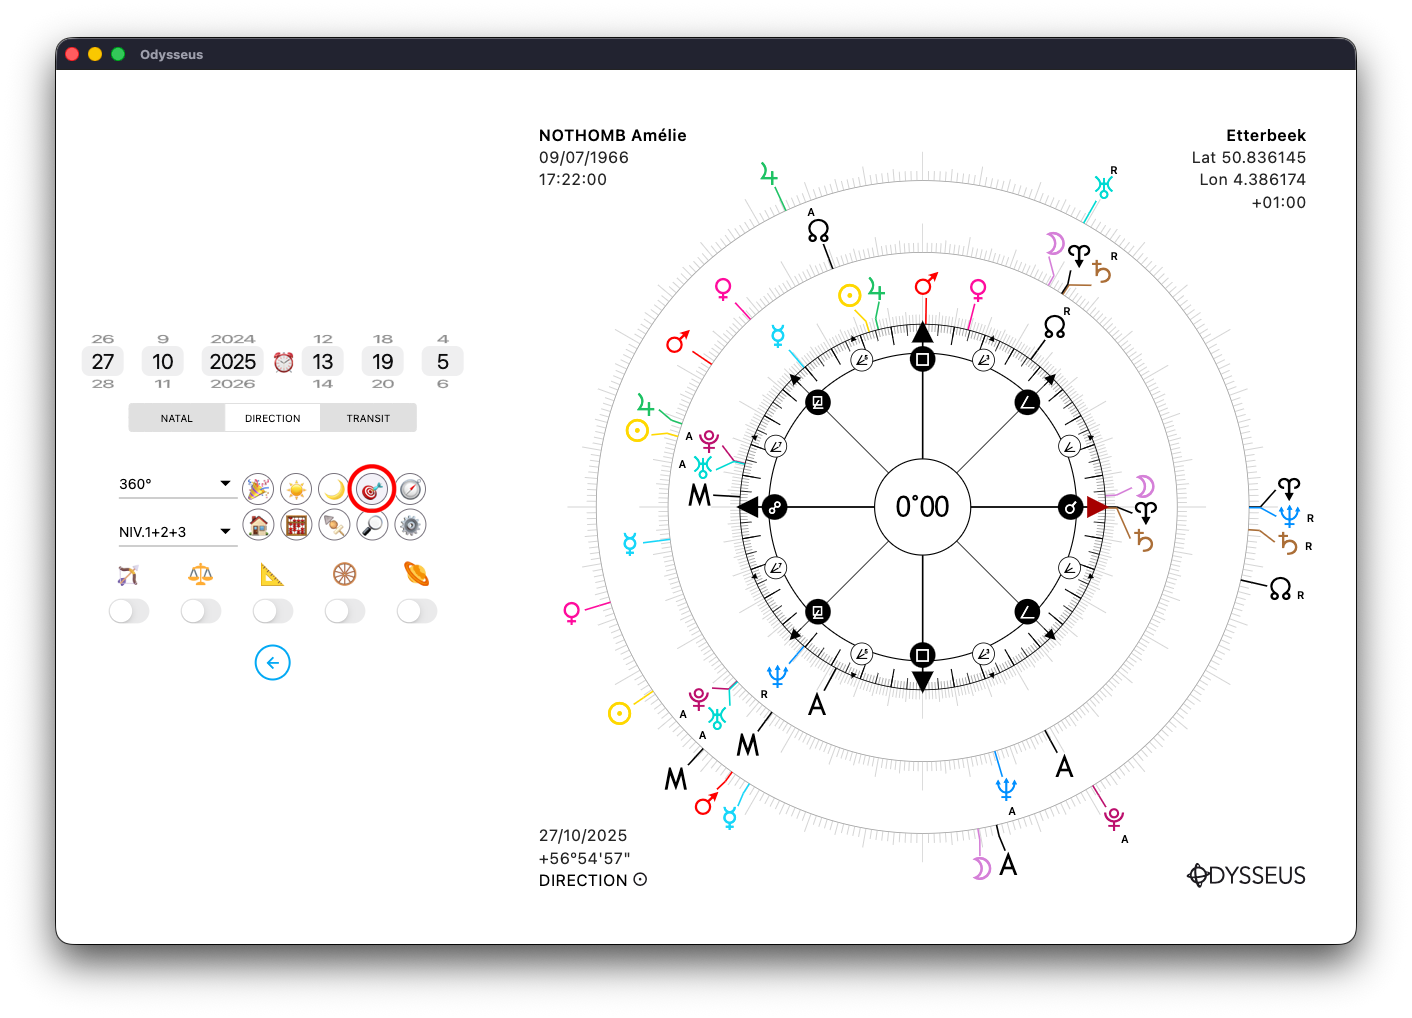
By clicking on the target button 🎯, you open the axis panel:

Inside, you’ll find the buttons of the planets currently displayed on the wheel.
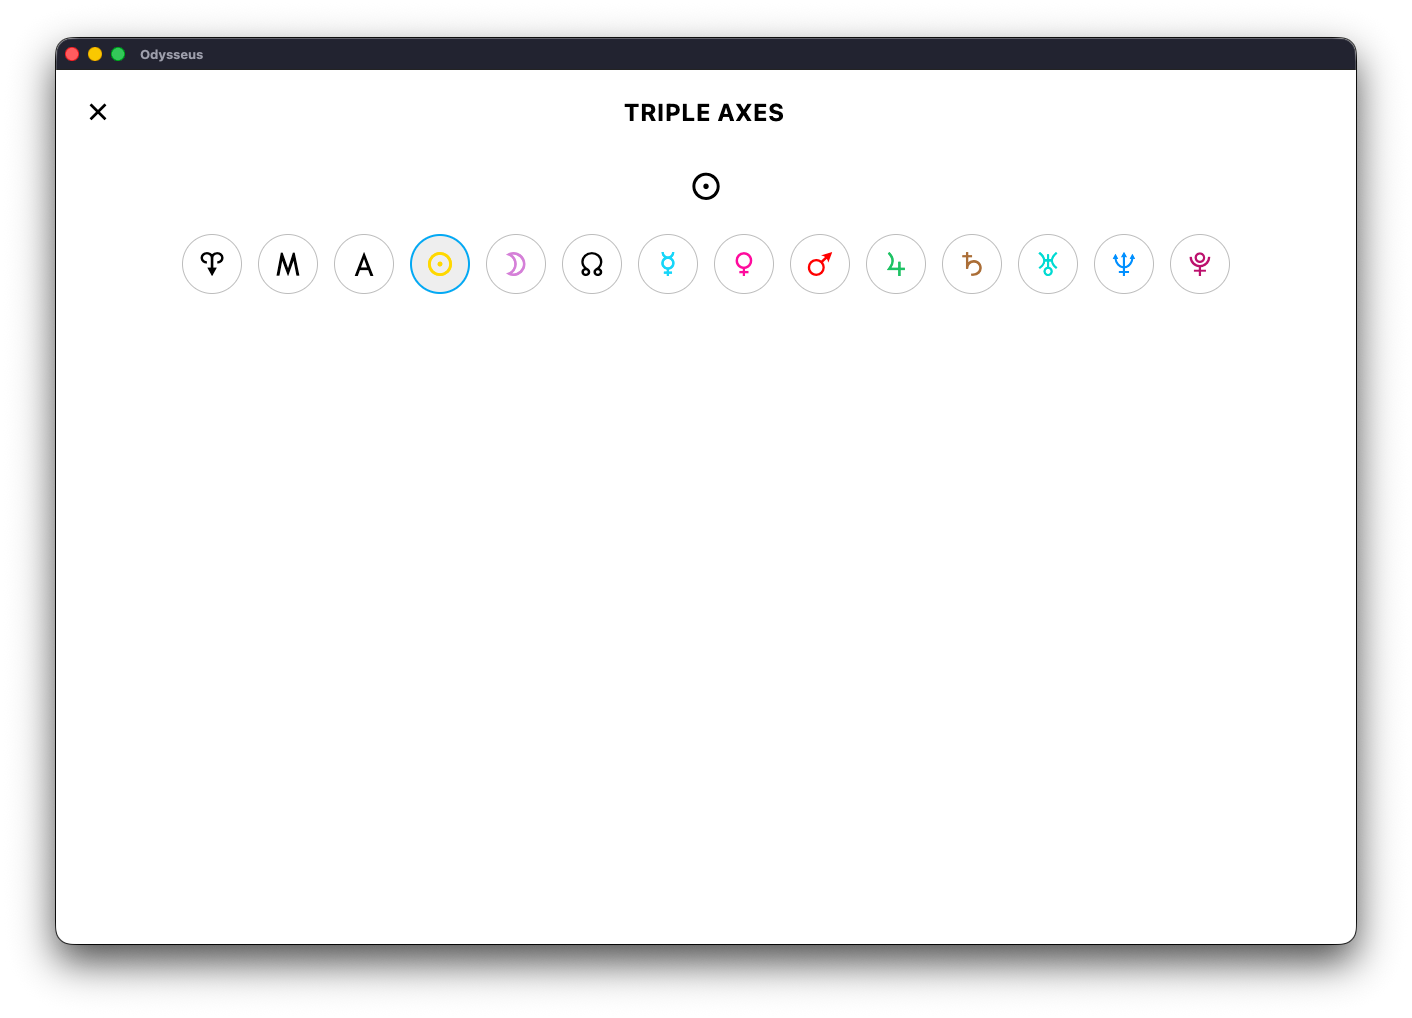
By clicking one of the buttons, it becomes active, and when you close the window:
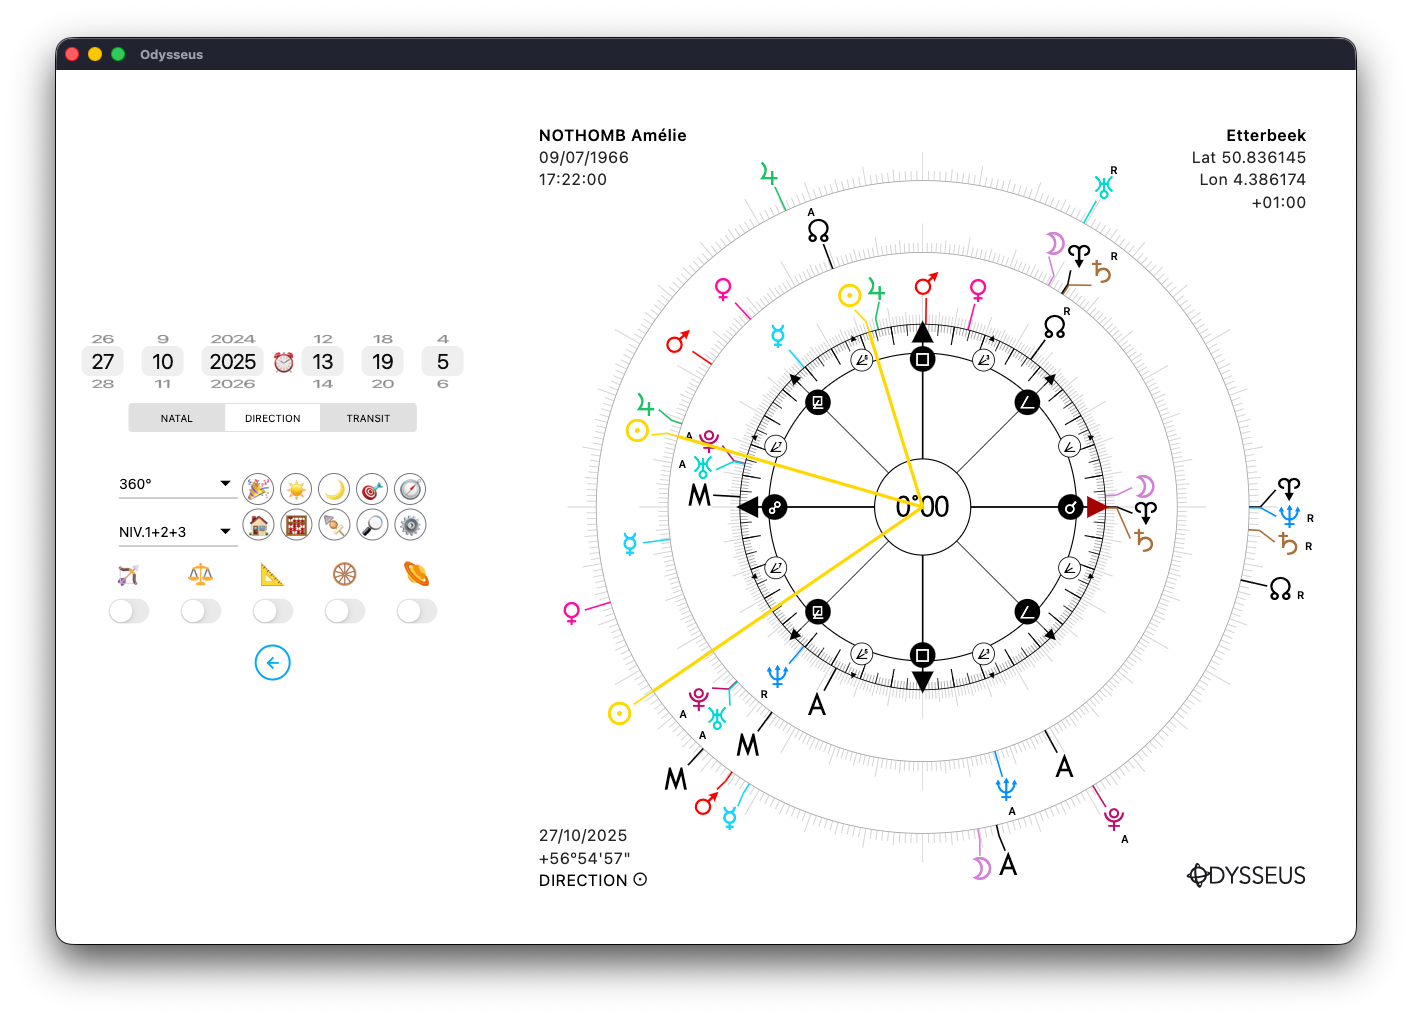
You’ll notice a line starting from the center of the wheel and extending toward the selected planet across all chart levels. Here, it’s the Sun N.
If you add a second planet, it displays as a midpoint. Here with the midpoint Sun N/Y Moon:
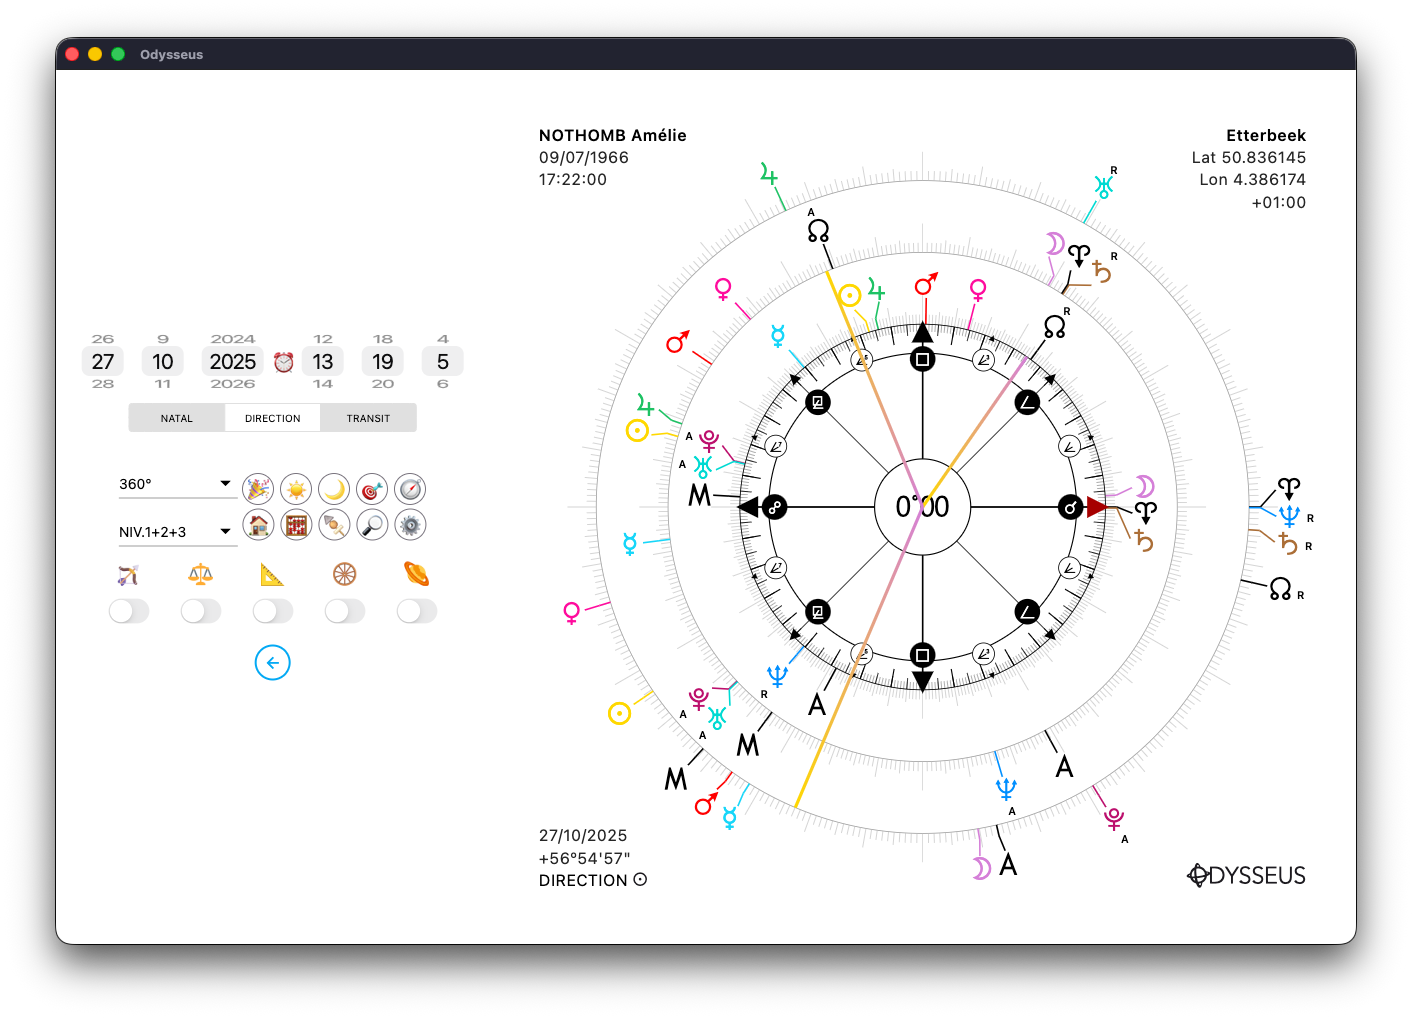
The line then takes the color of both planets and extends toward the midpoint position on all chart levels.

If you add a third planet, it becomes a planetary picture. Here with the Sensitive Point of the Sun N + Moon Y – Jupiter R:
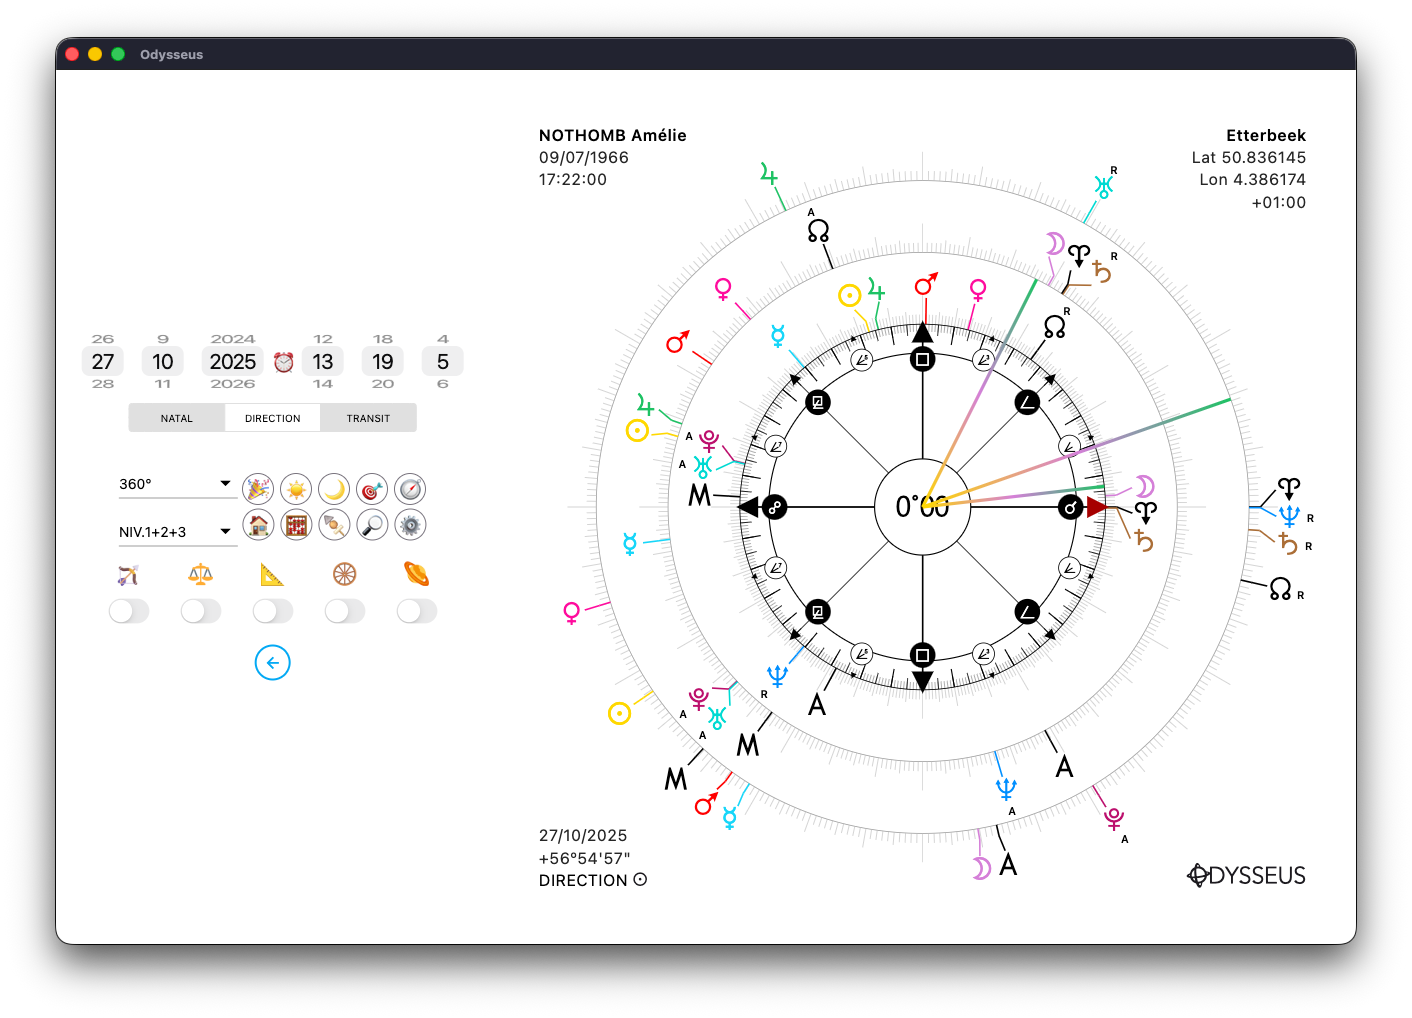
The line then takes the color of all three planets and points toward the Sensitive Point on each level.
This tool allows you to look for “axis symmetries.” In the future, an upcoming version will include an automatic feature to detect whether an axis symmetry exists between planets, midpoints, or sensitive points. For now, it must be searched manually.
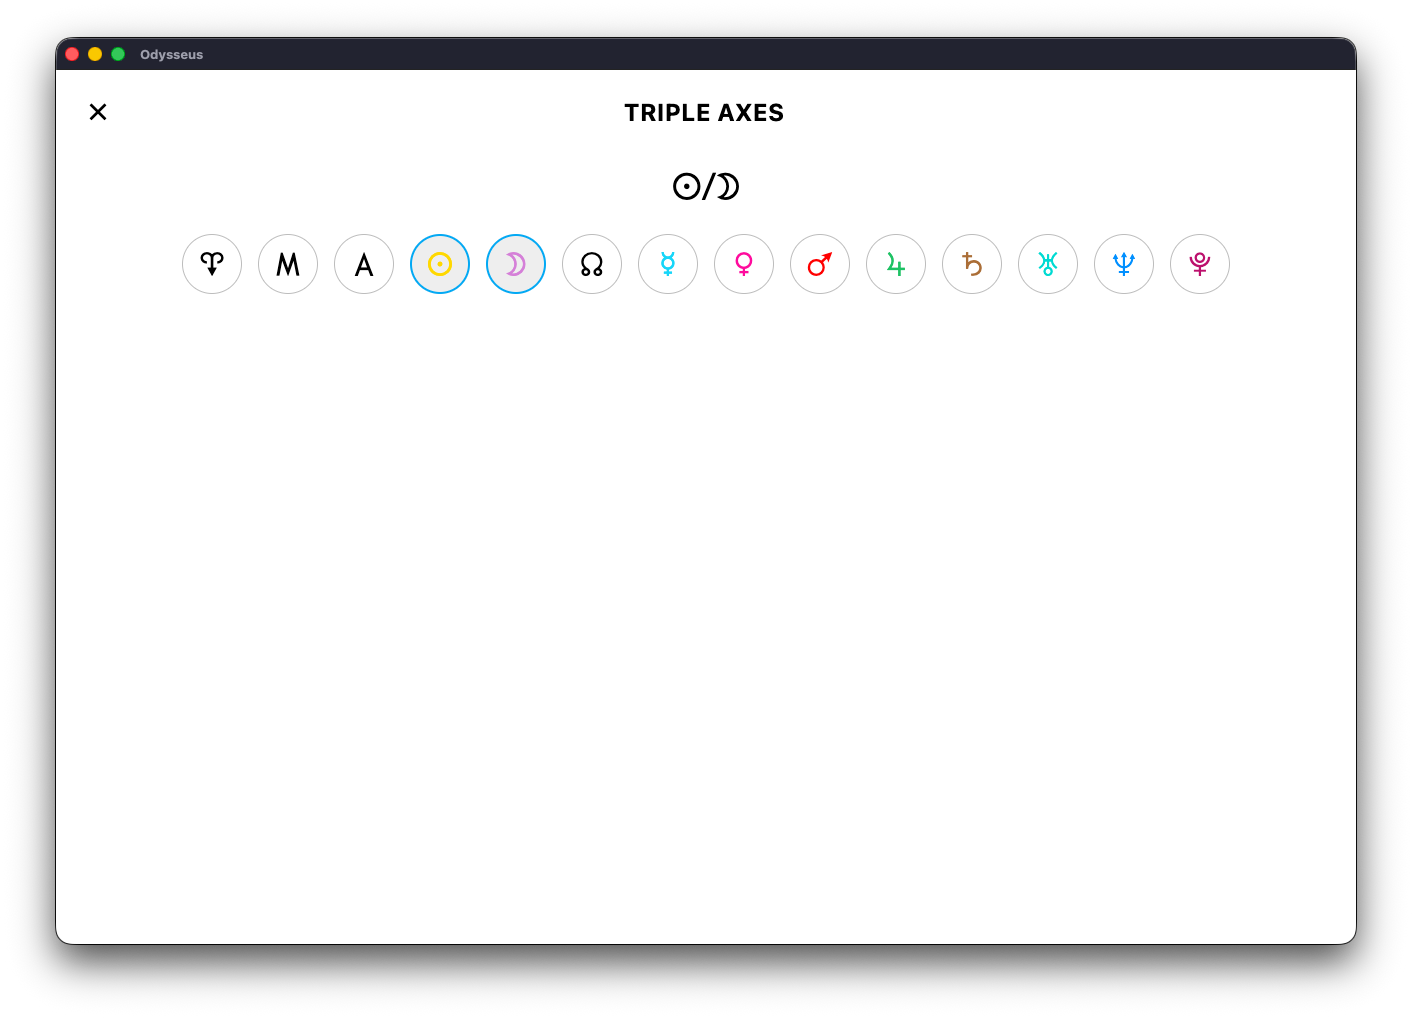
Also, by making a long press on the target 🎯…
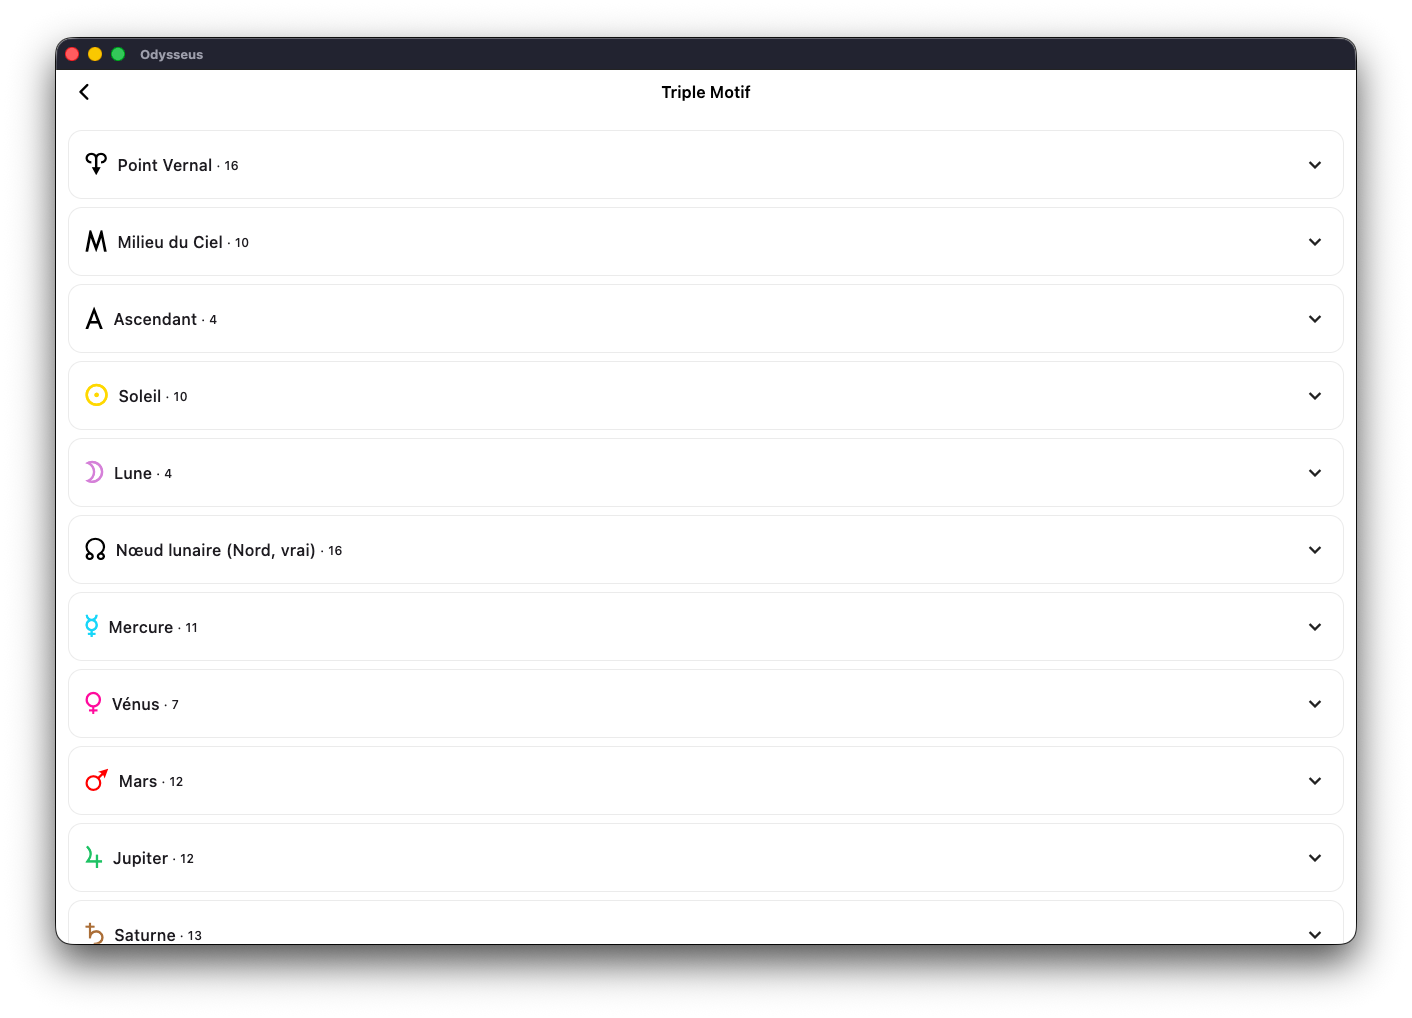
…the “triple pattern” panel opens. A triple pattern occurs when a certain planet is found on a midpoint at least three times, combining all possible chart levels. This greatly reinforces the manifestation of an event.
You may see on some American websites astrologers confusing axis symmetry with triple pattern, using the latter term to describe the former. This is incorrect.
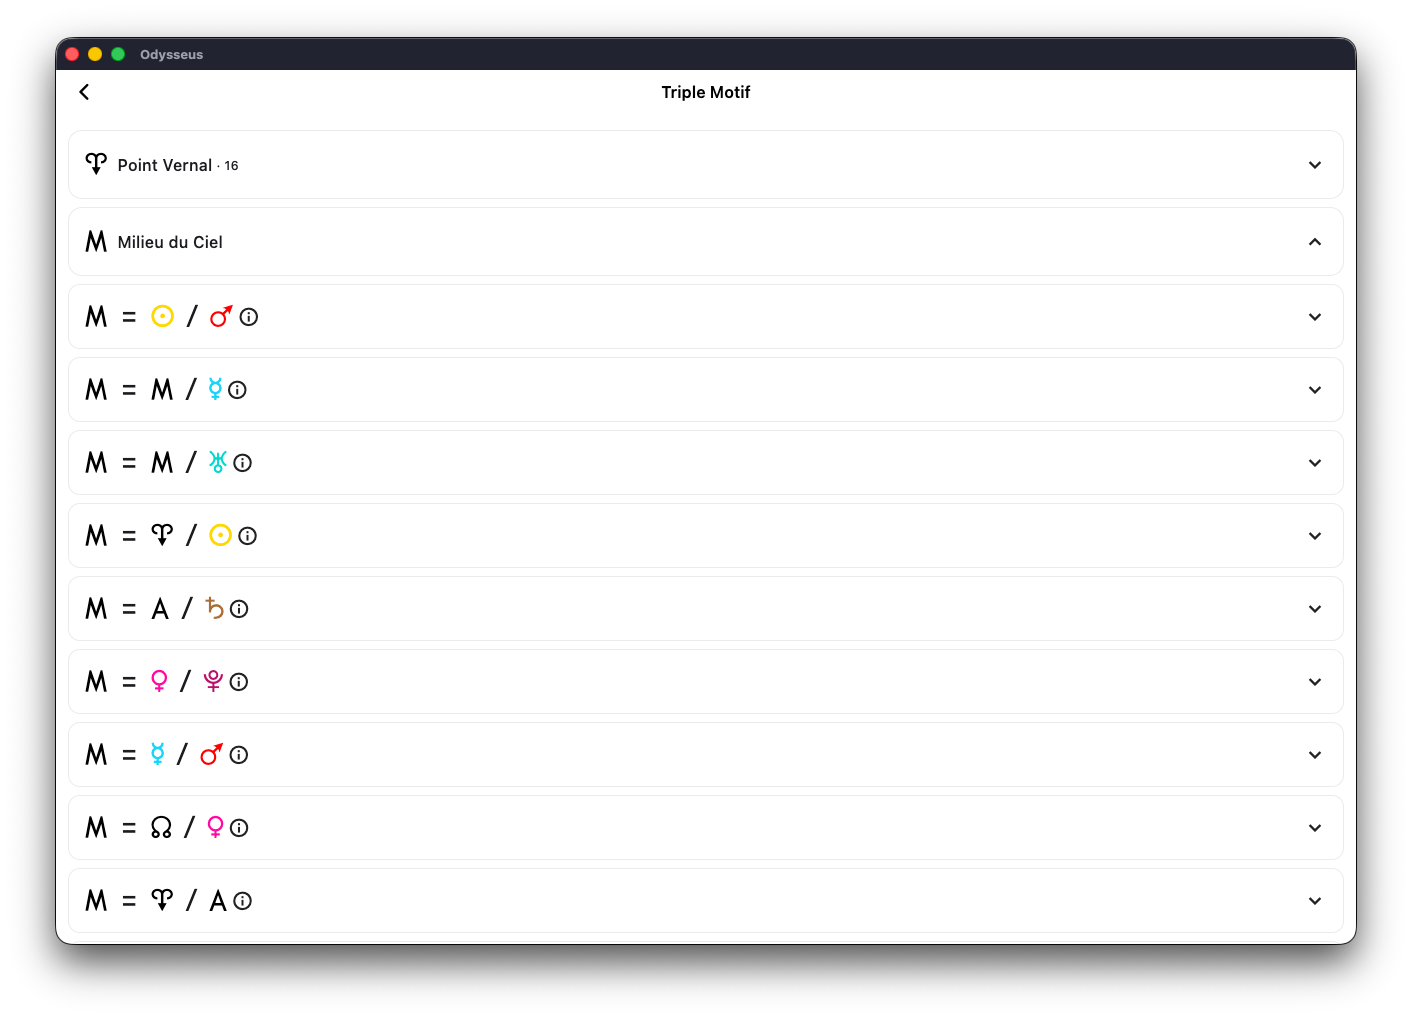
The Triple Pattern panel therefore allows you to see all occurrences of a planet appearing on a midpoint when this happens at least three times:
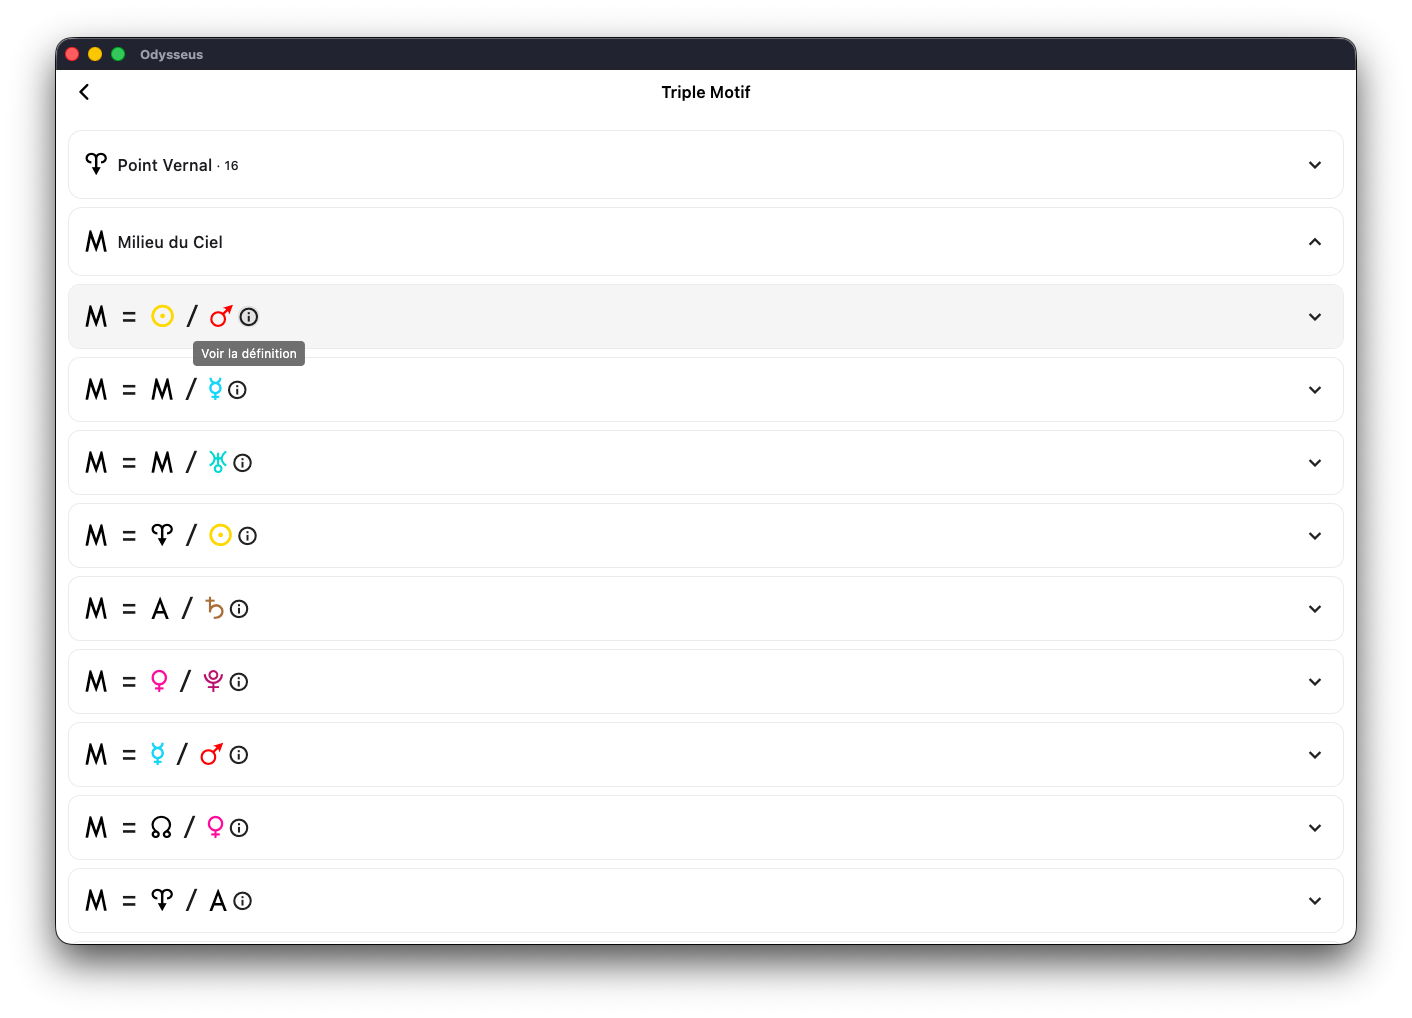
Next to each figure is the ⓘ icon, allowing you to view the definition of the figure:
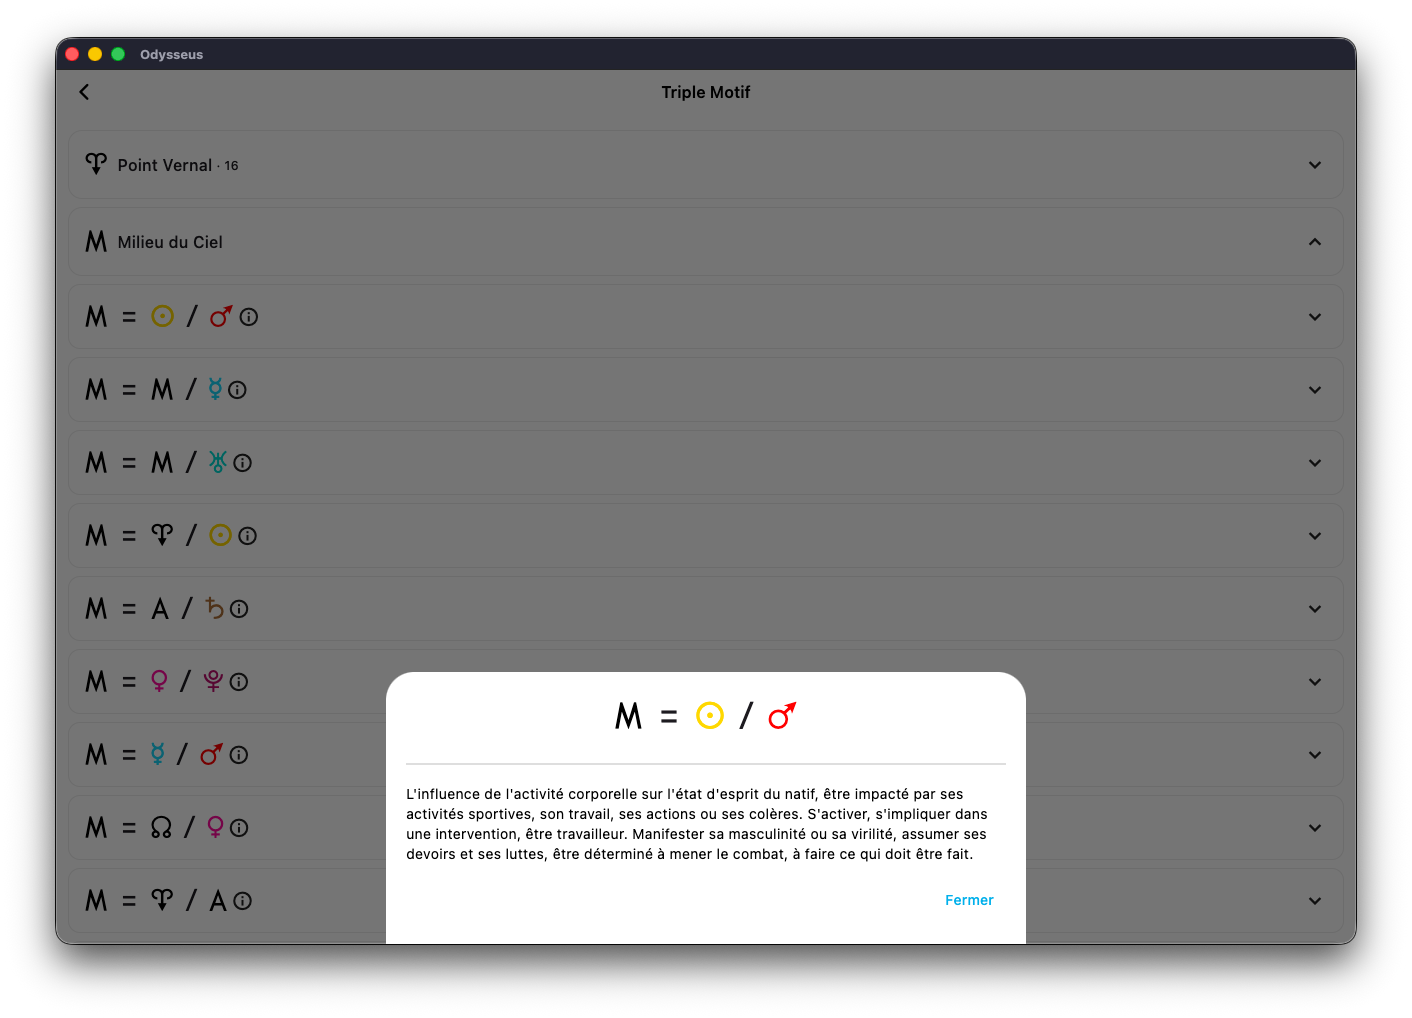
And when you click on a figure, its detailed structure appears.
In this example, it’s the Midheaven N at the midpoint of the Sun N and Mars Q.
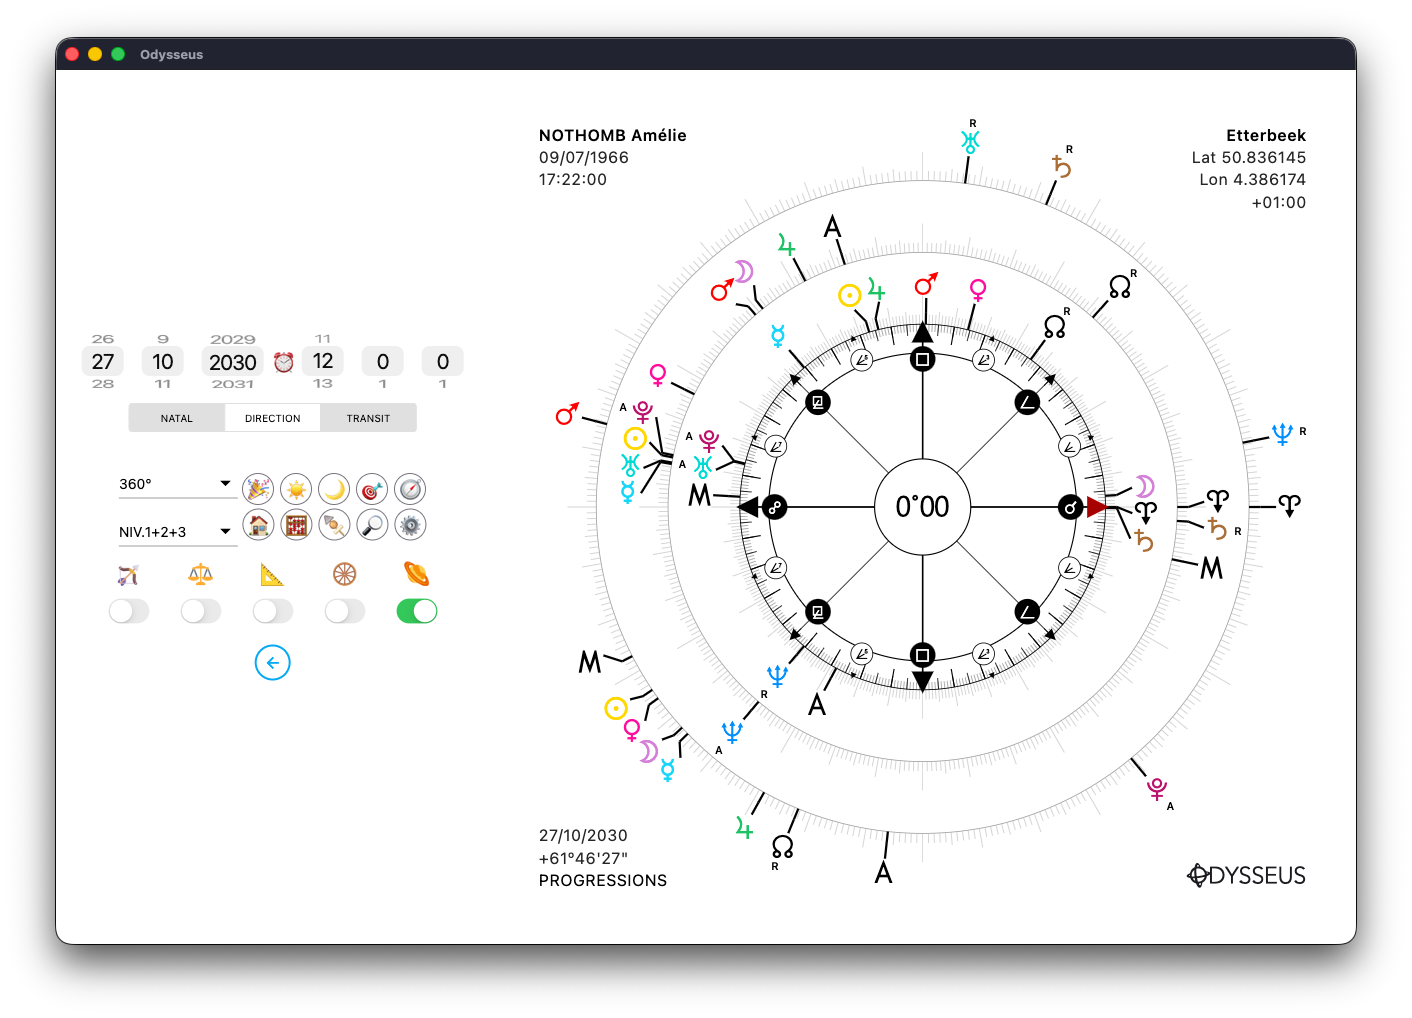
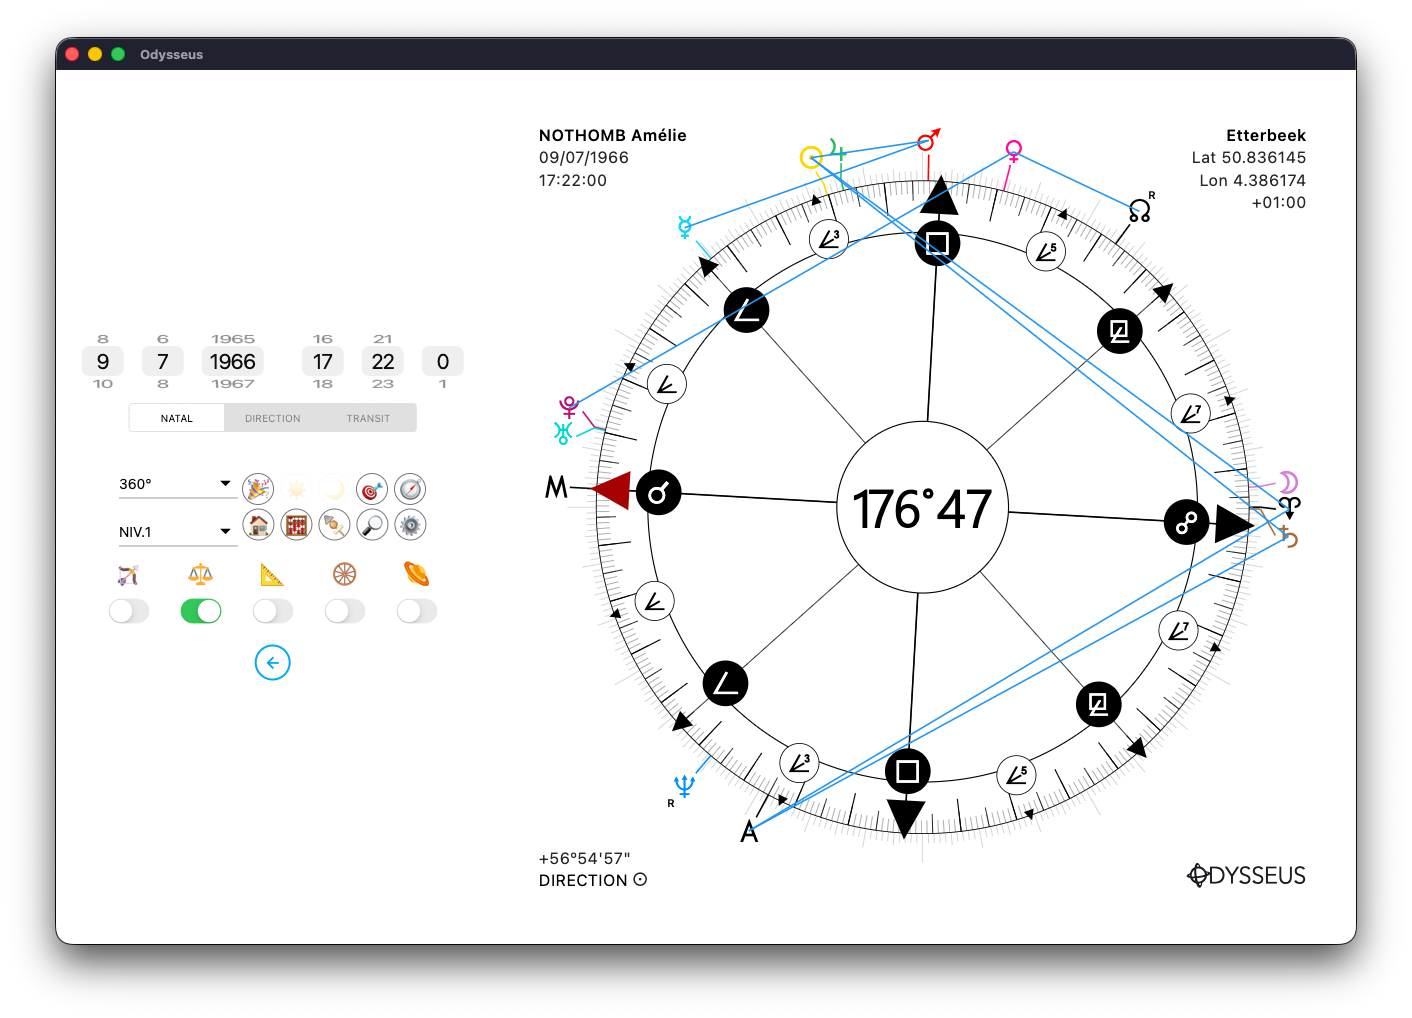
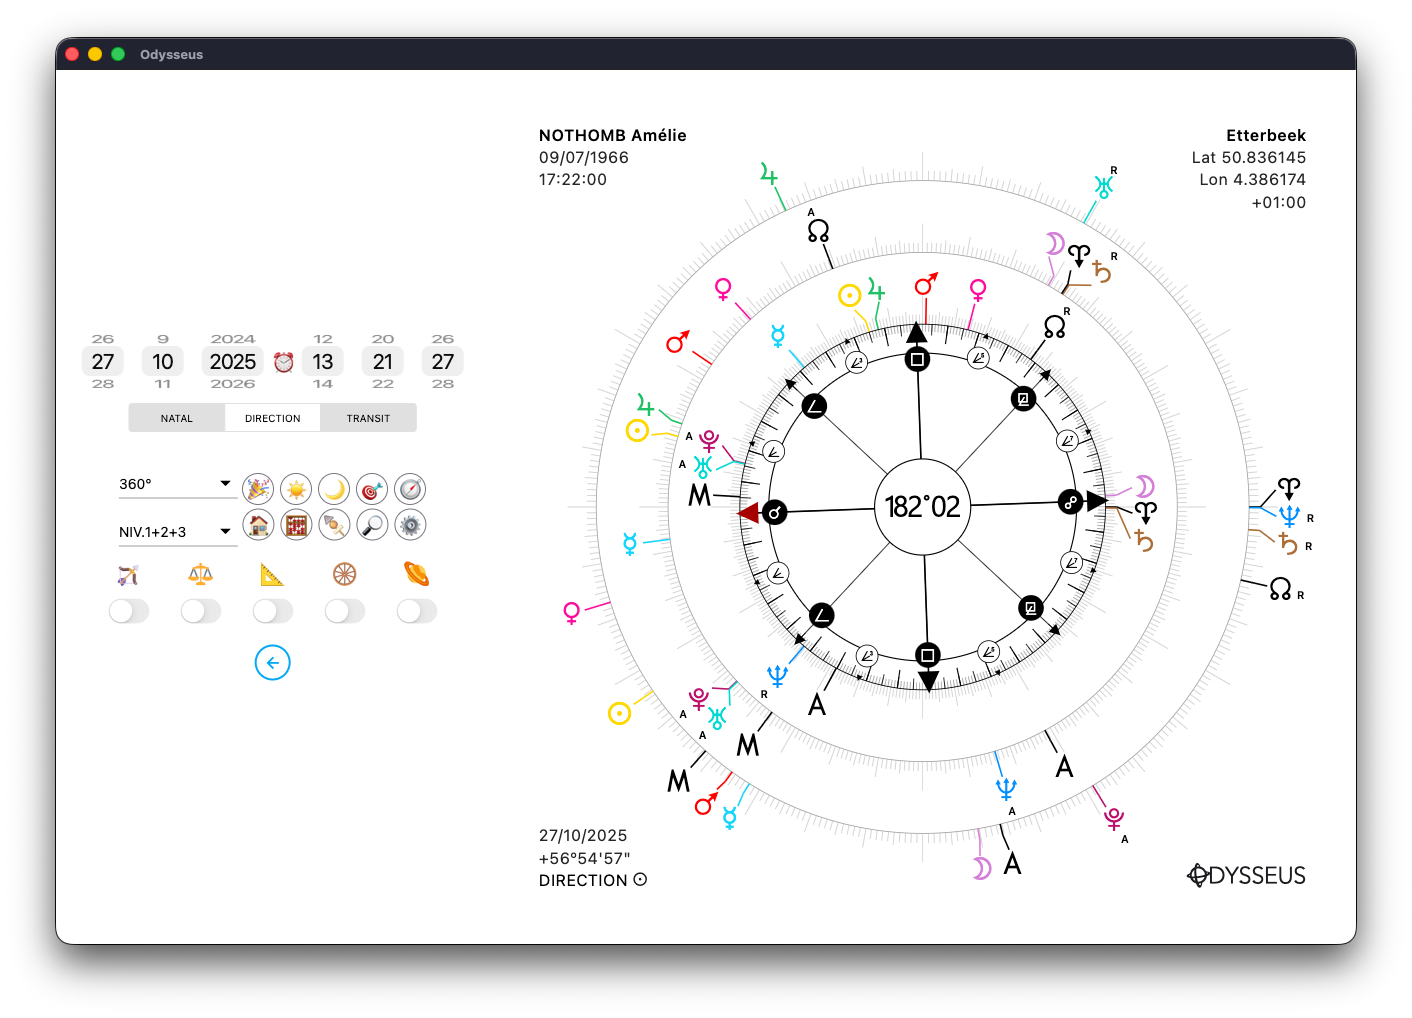
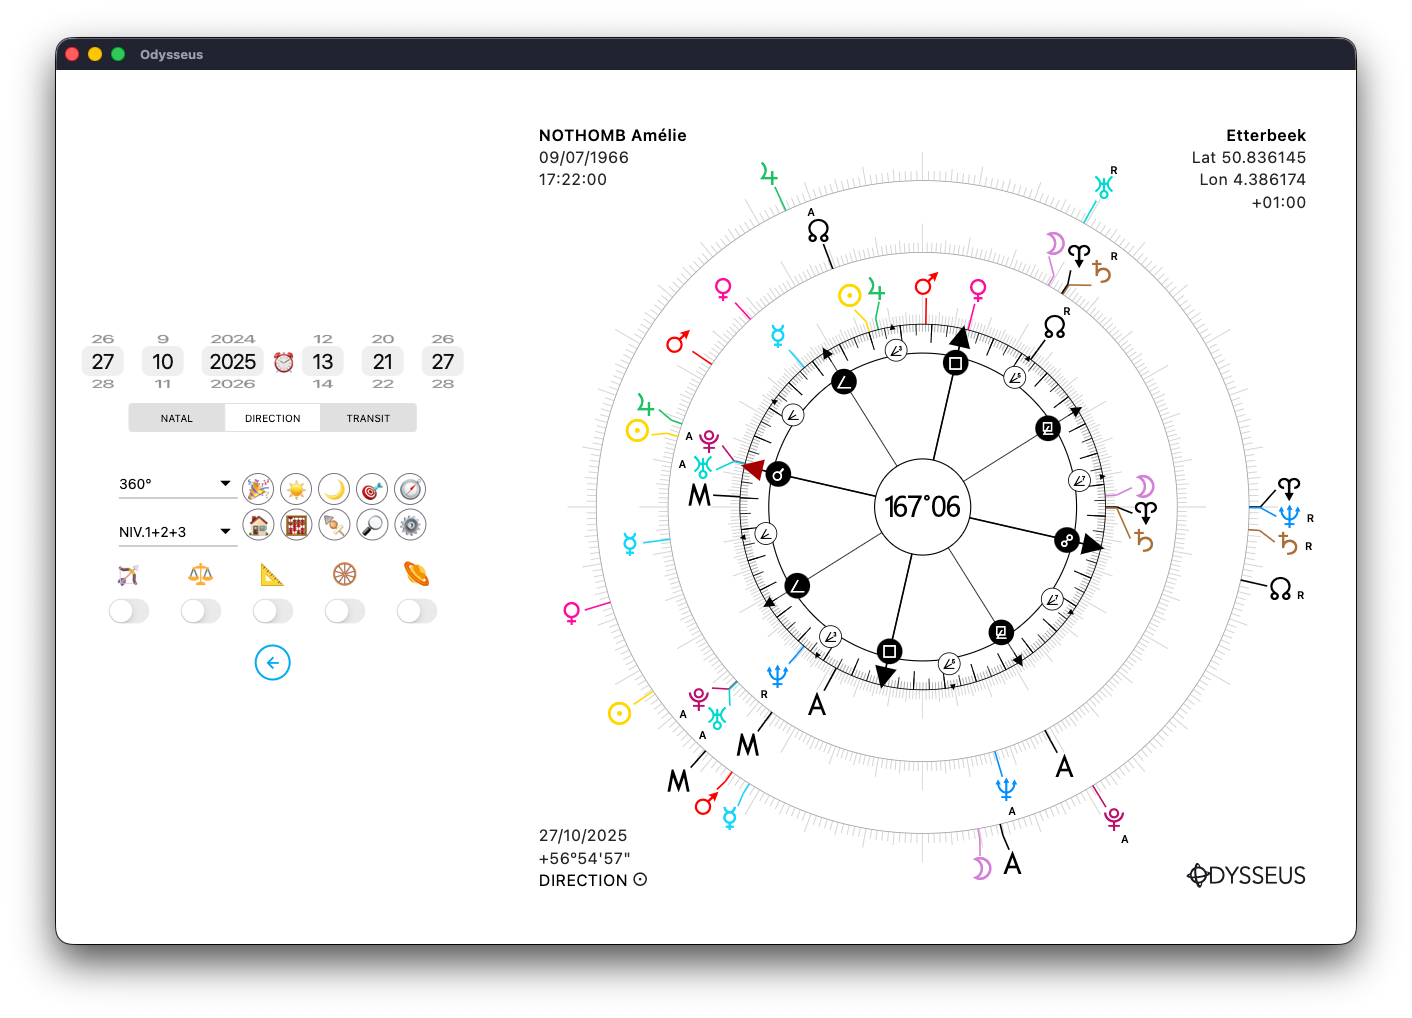
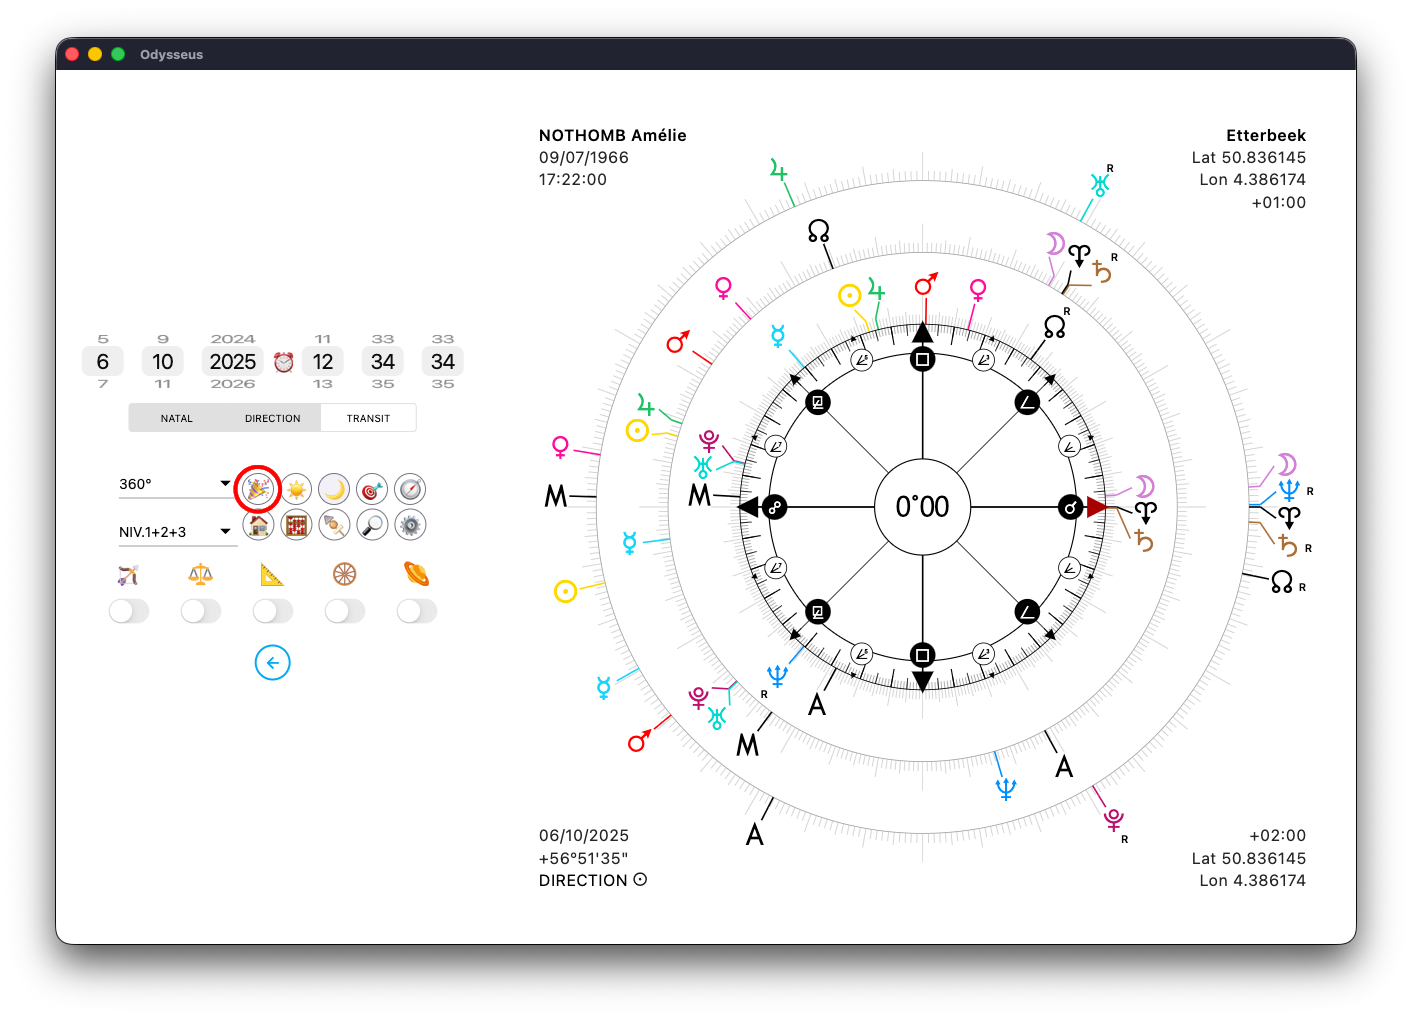
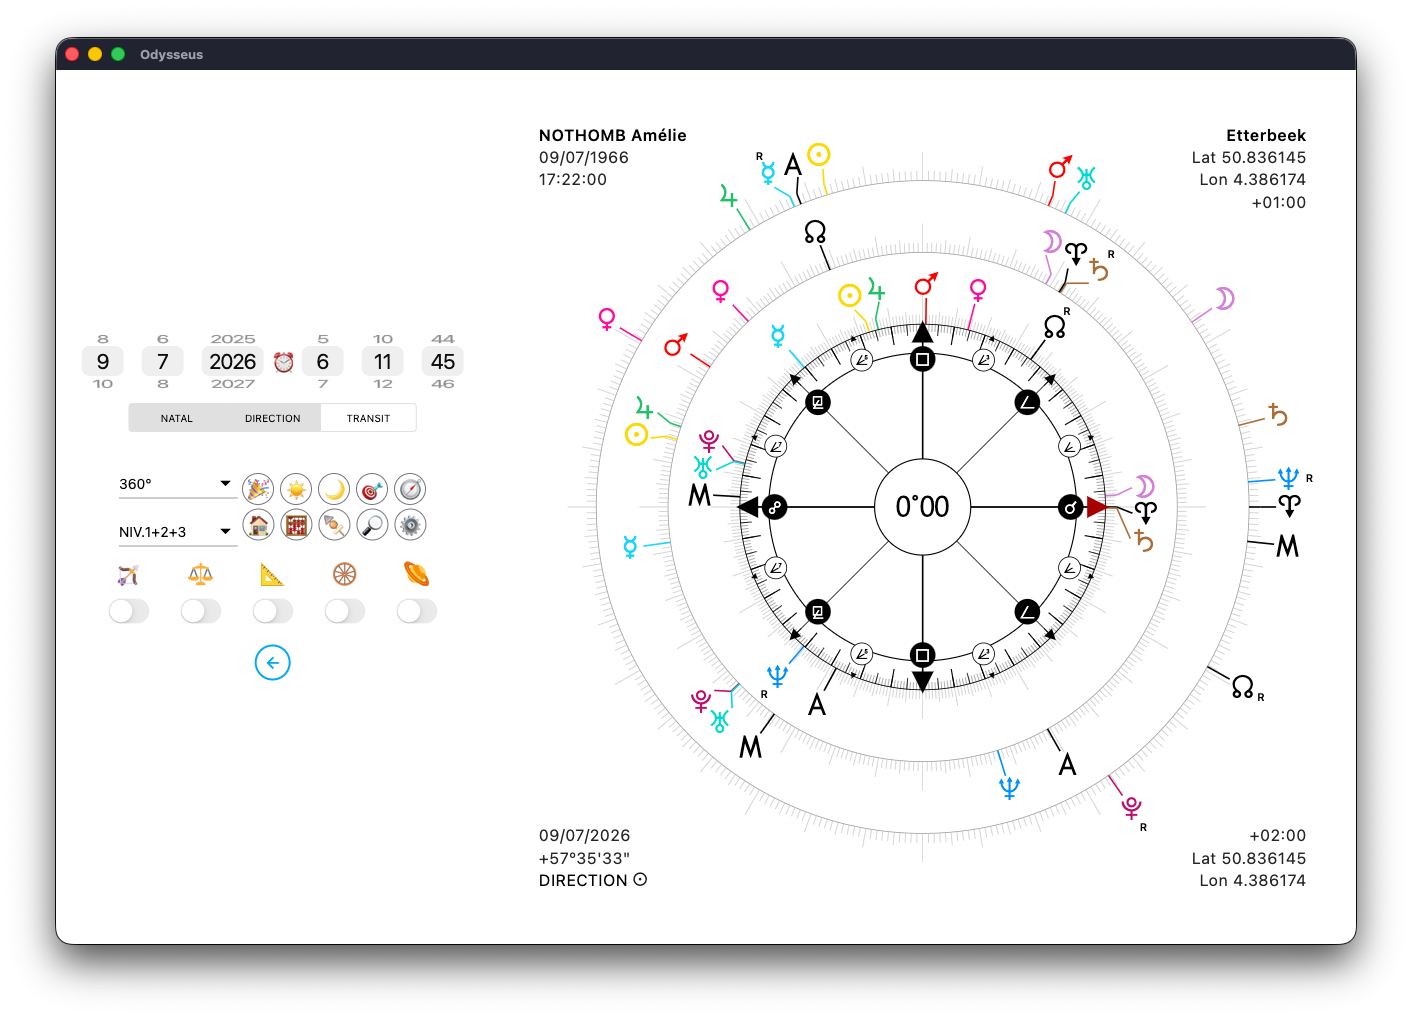
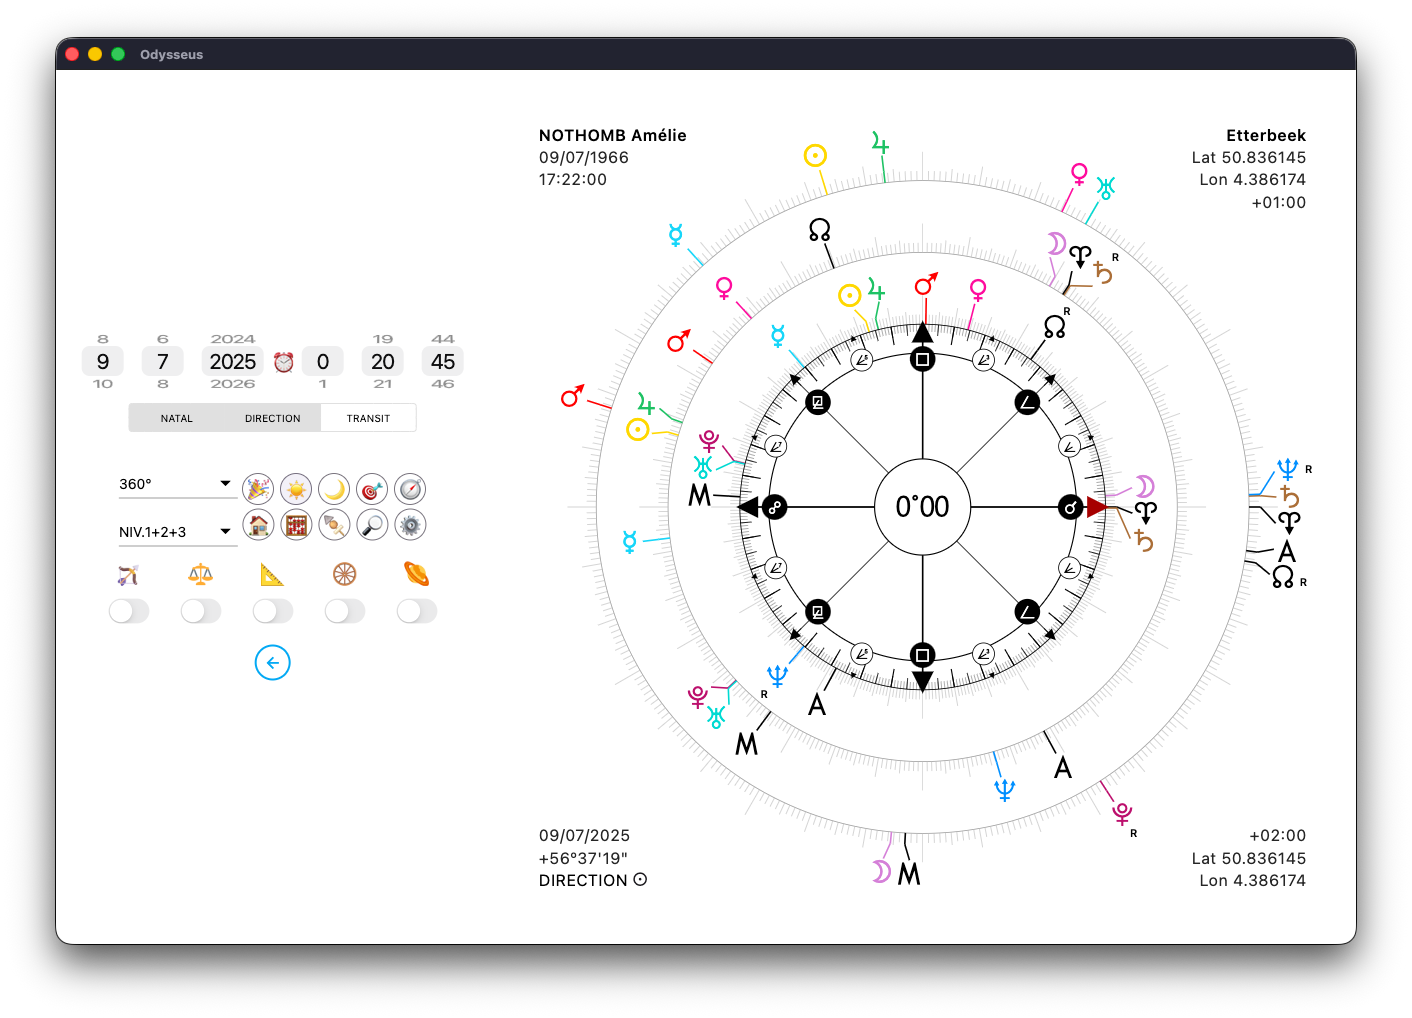
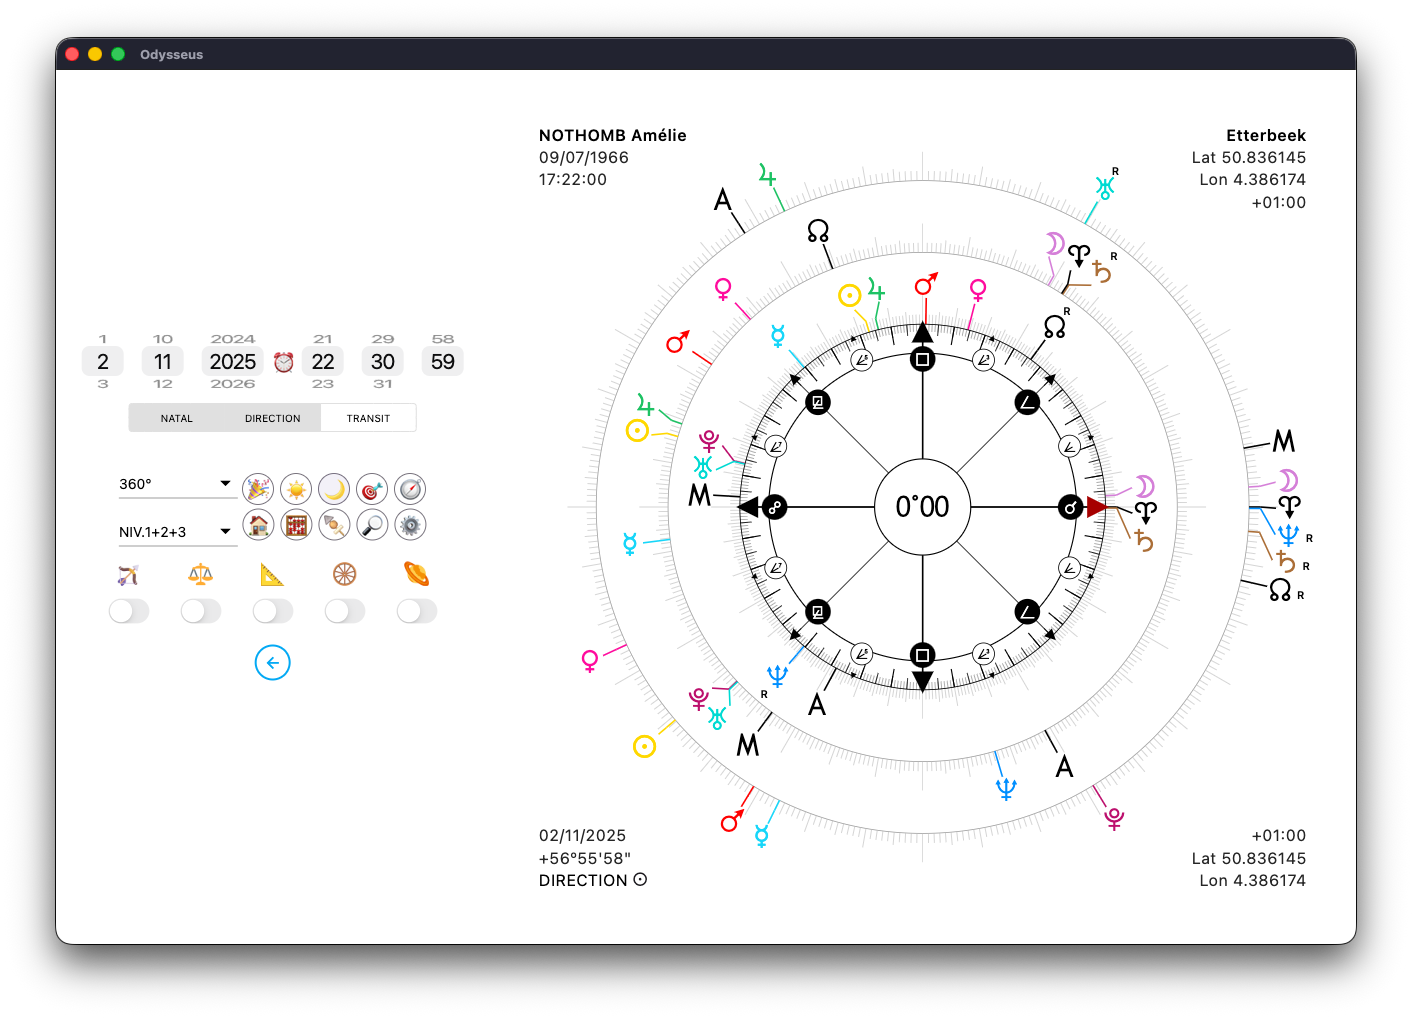
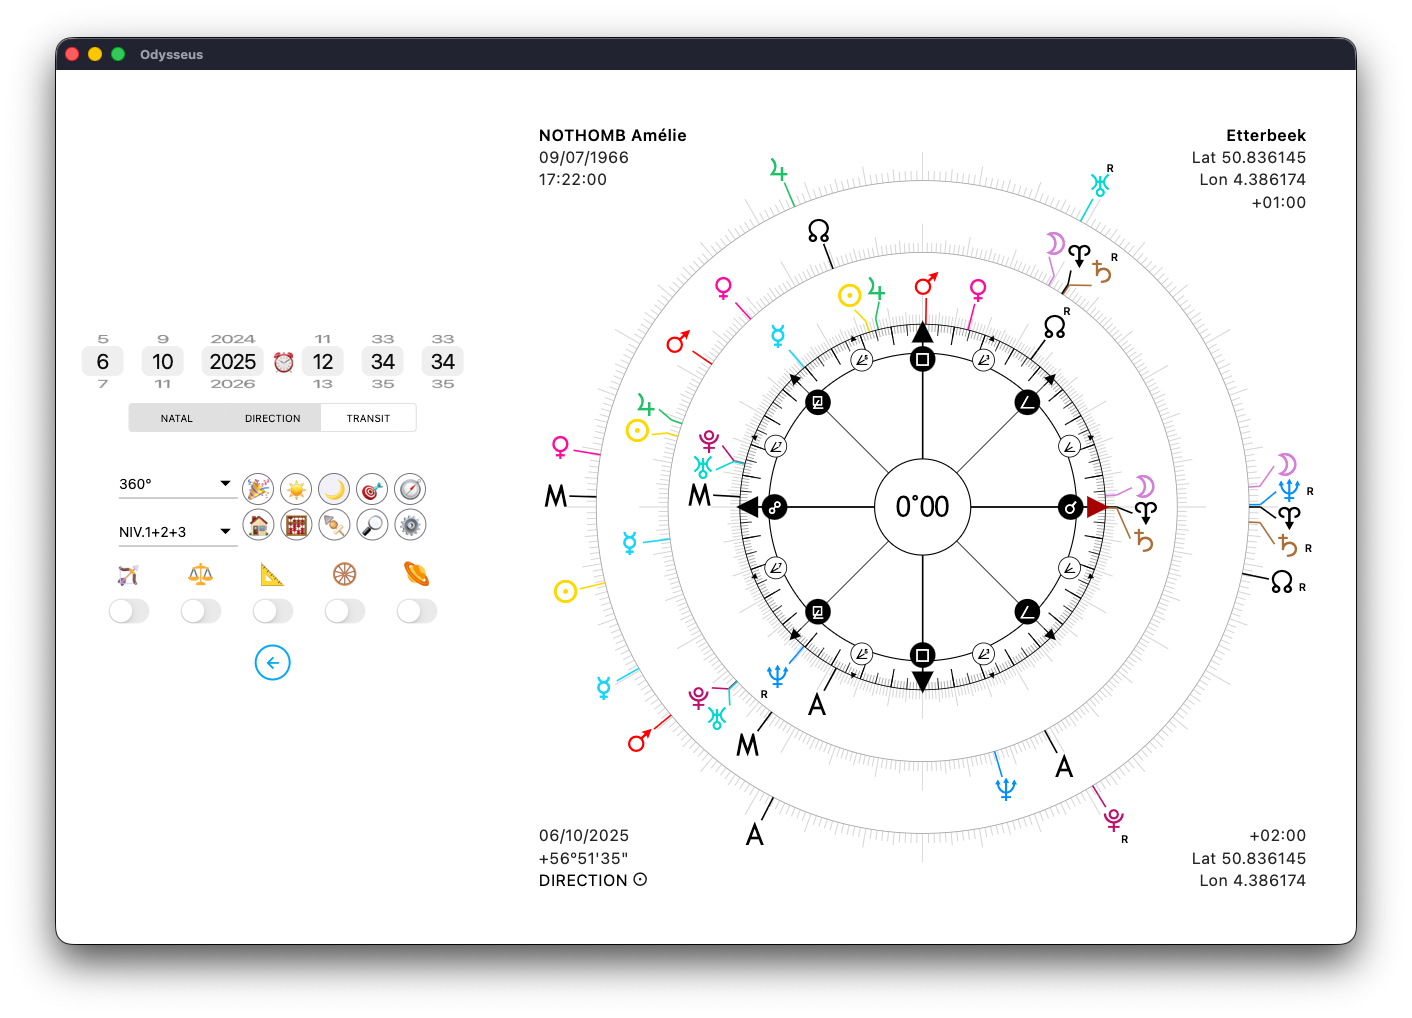
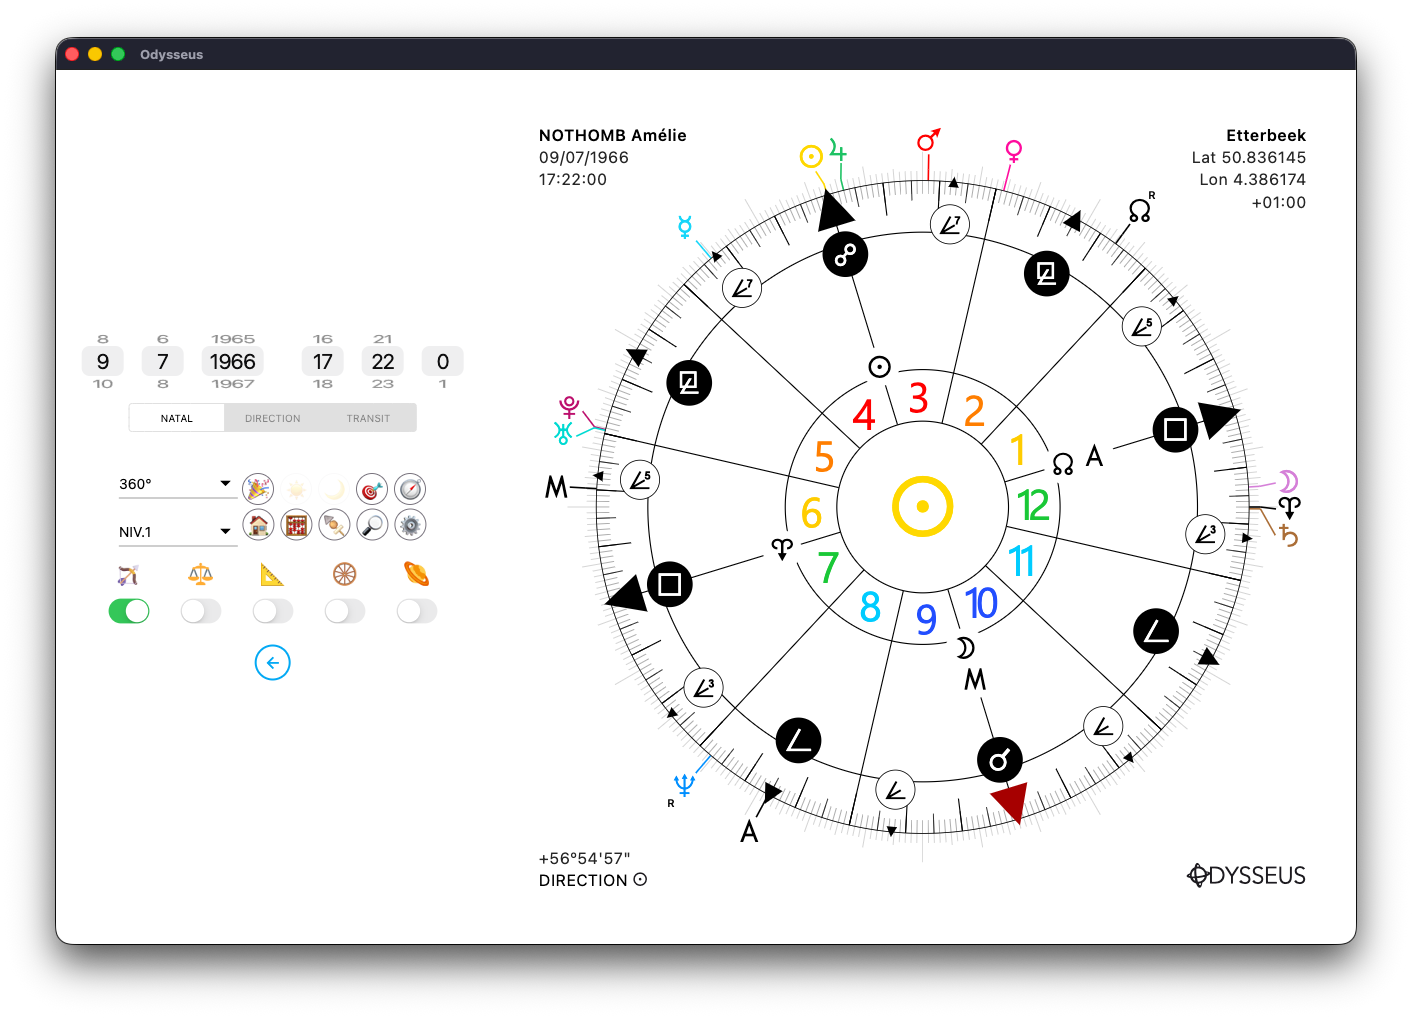
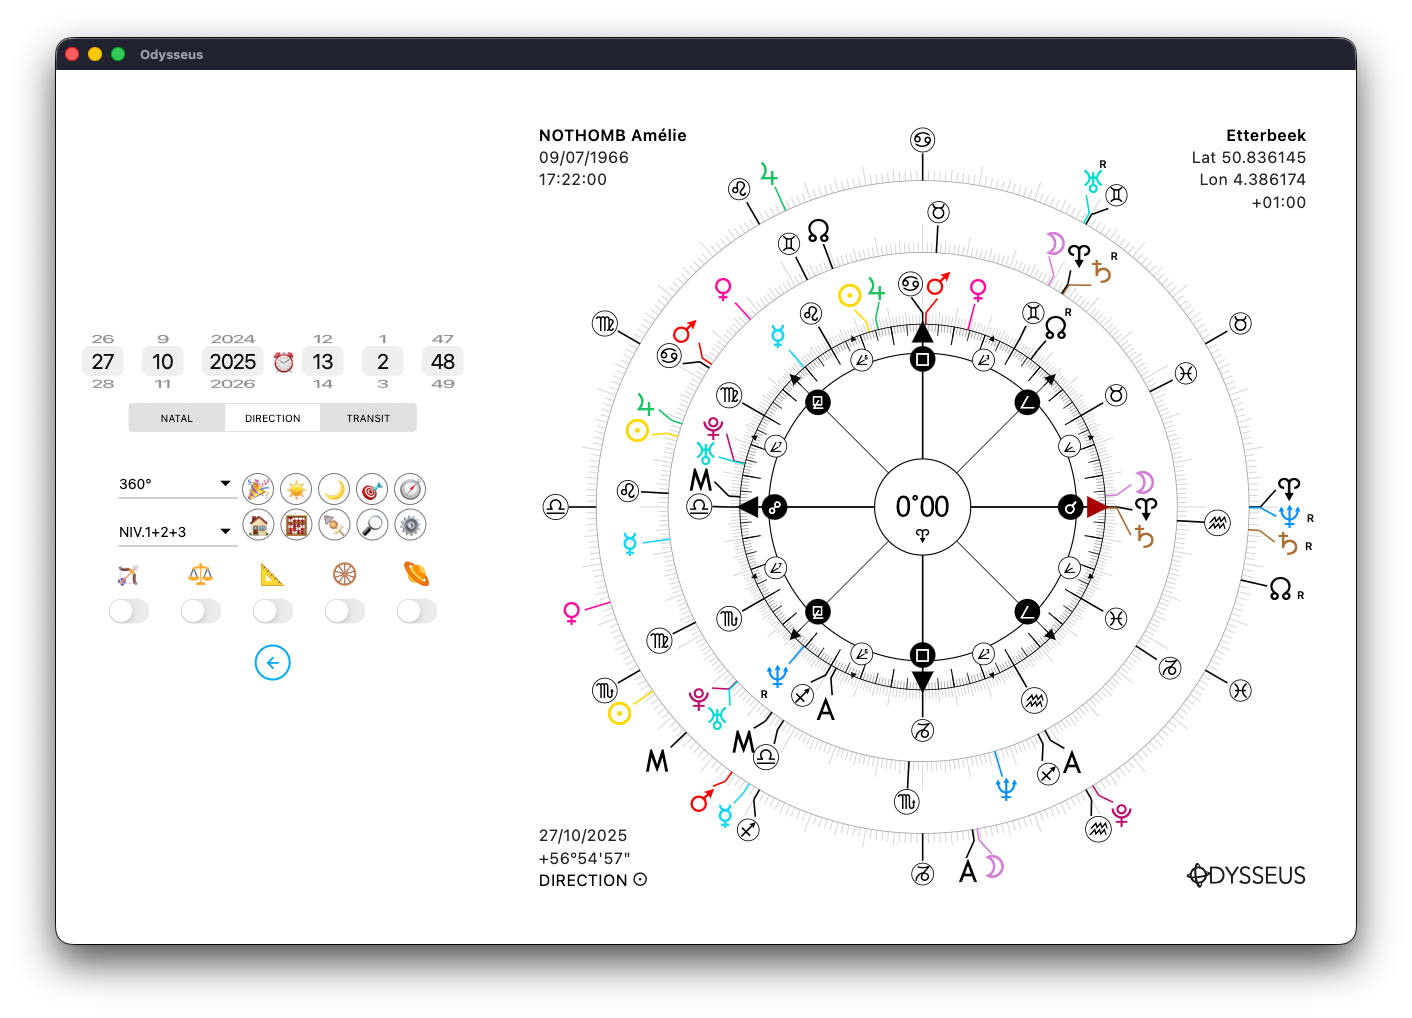
DIRECTION(S) 🪐
At the bottom left of the chart, you’ll find the date set for levels 2/3, then a plus sign followed by a value, and just below, the word DIRECTION followed by the symbol of the Sun N
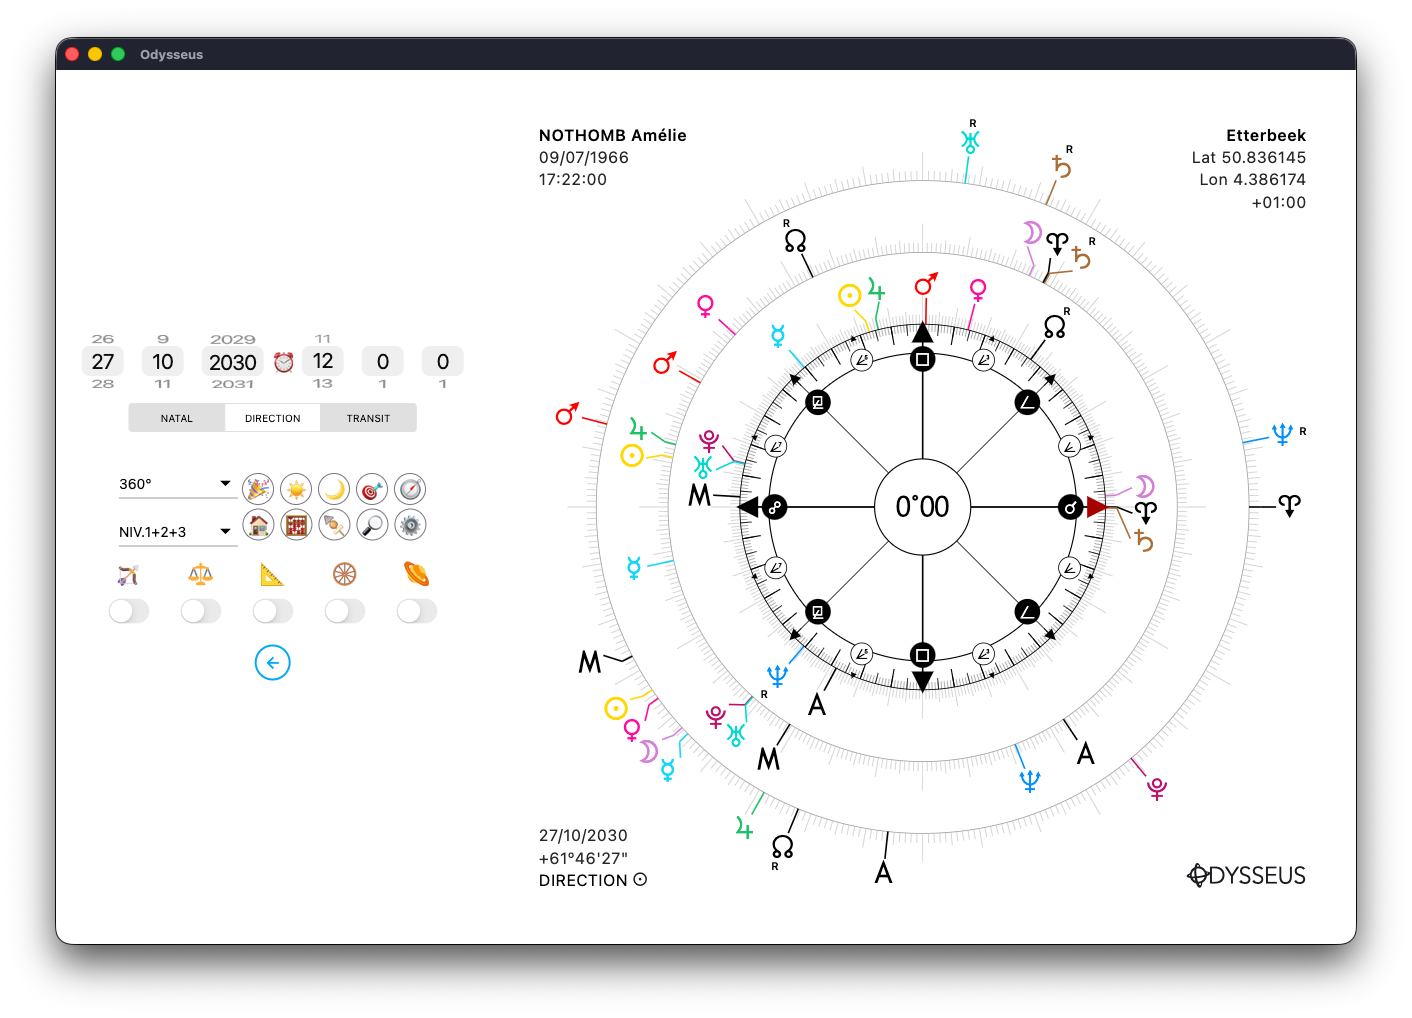
The value after the plus sign corresponds to the arc applied to level 2 (DIRECTION).
Here, with the term “DIRECTION N“, this refers to the solar arc.
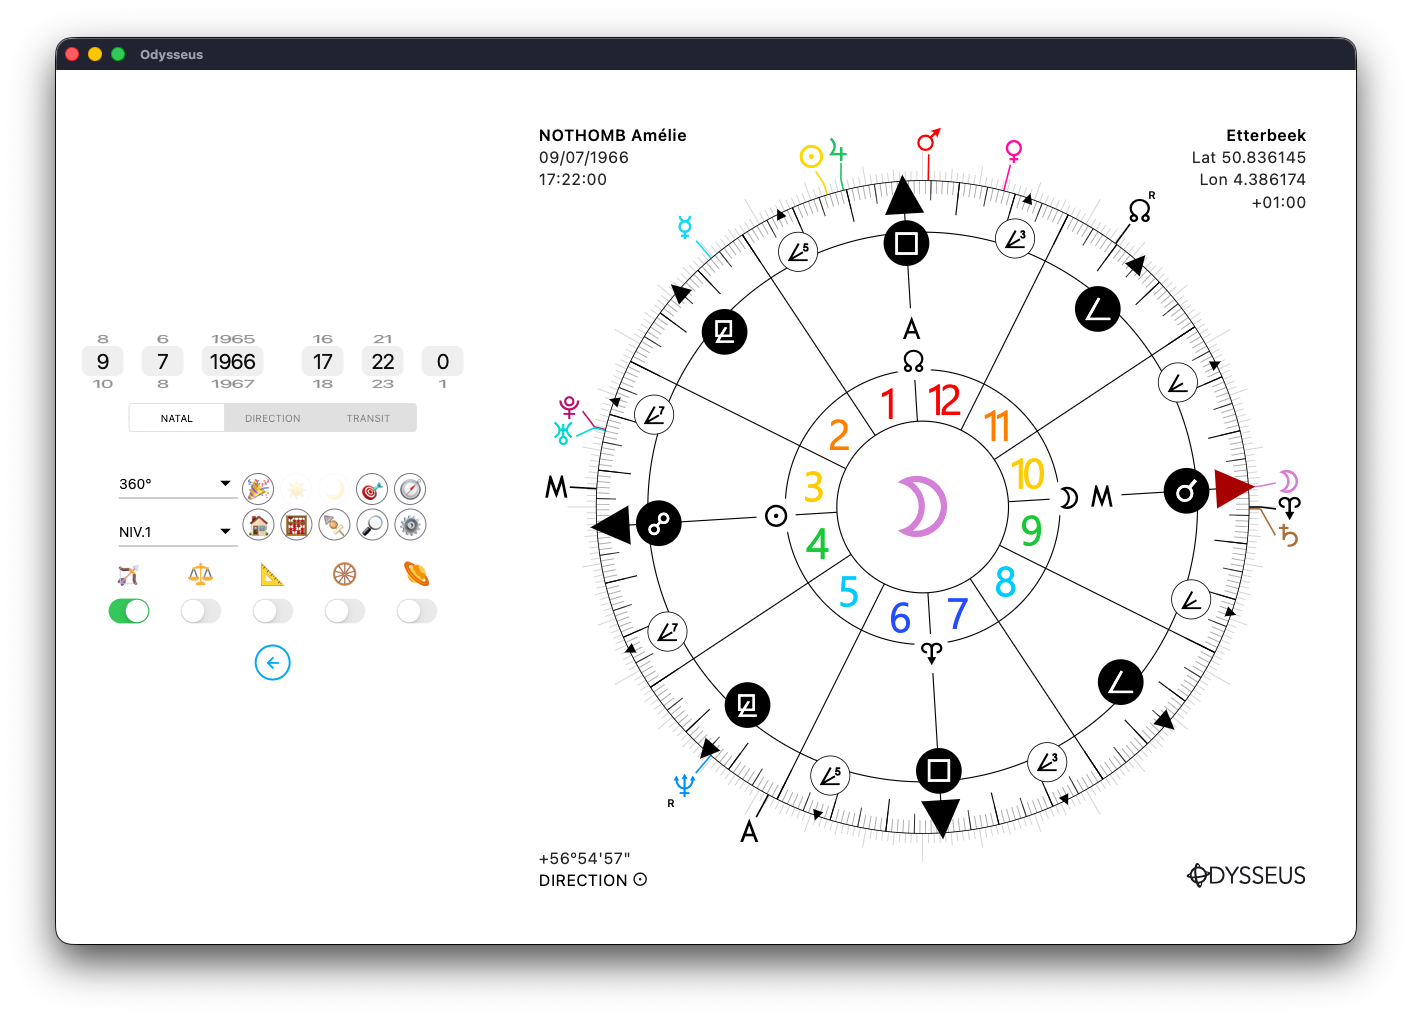
If, on the other hand, you activate the switch located below the small planet symbol:
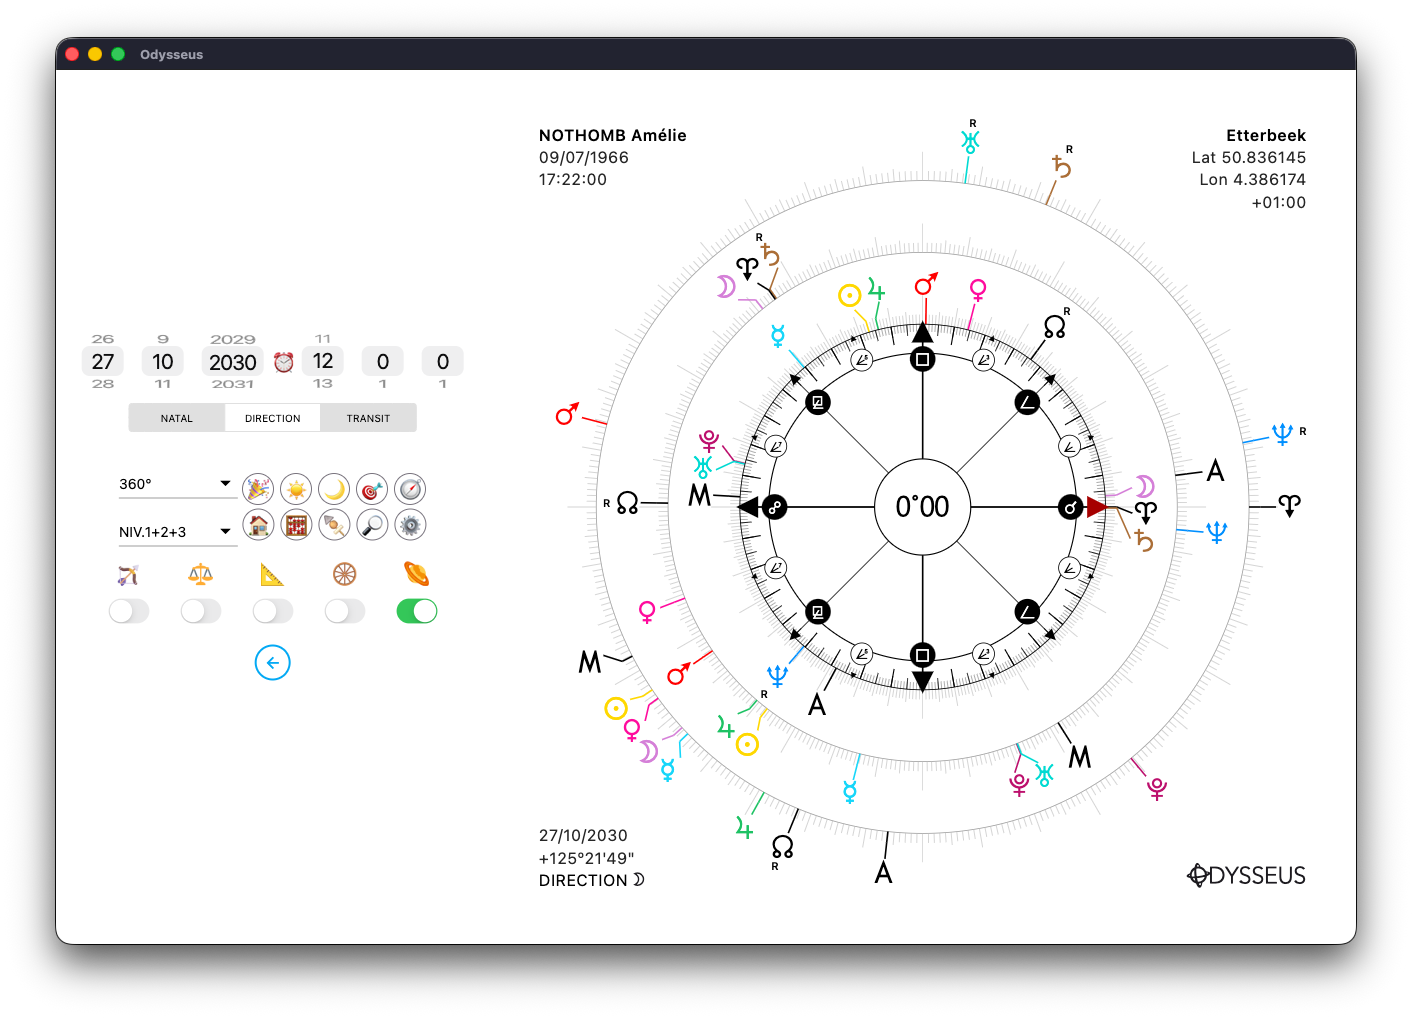
The direction will change to lunar arc direction Y.
If you now make a long press on the planet image:
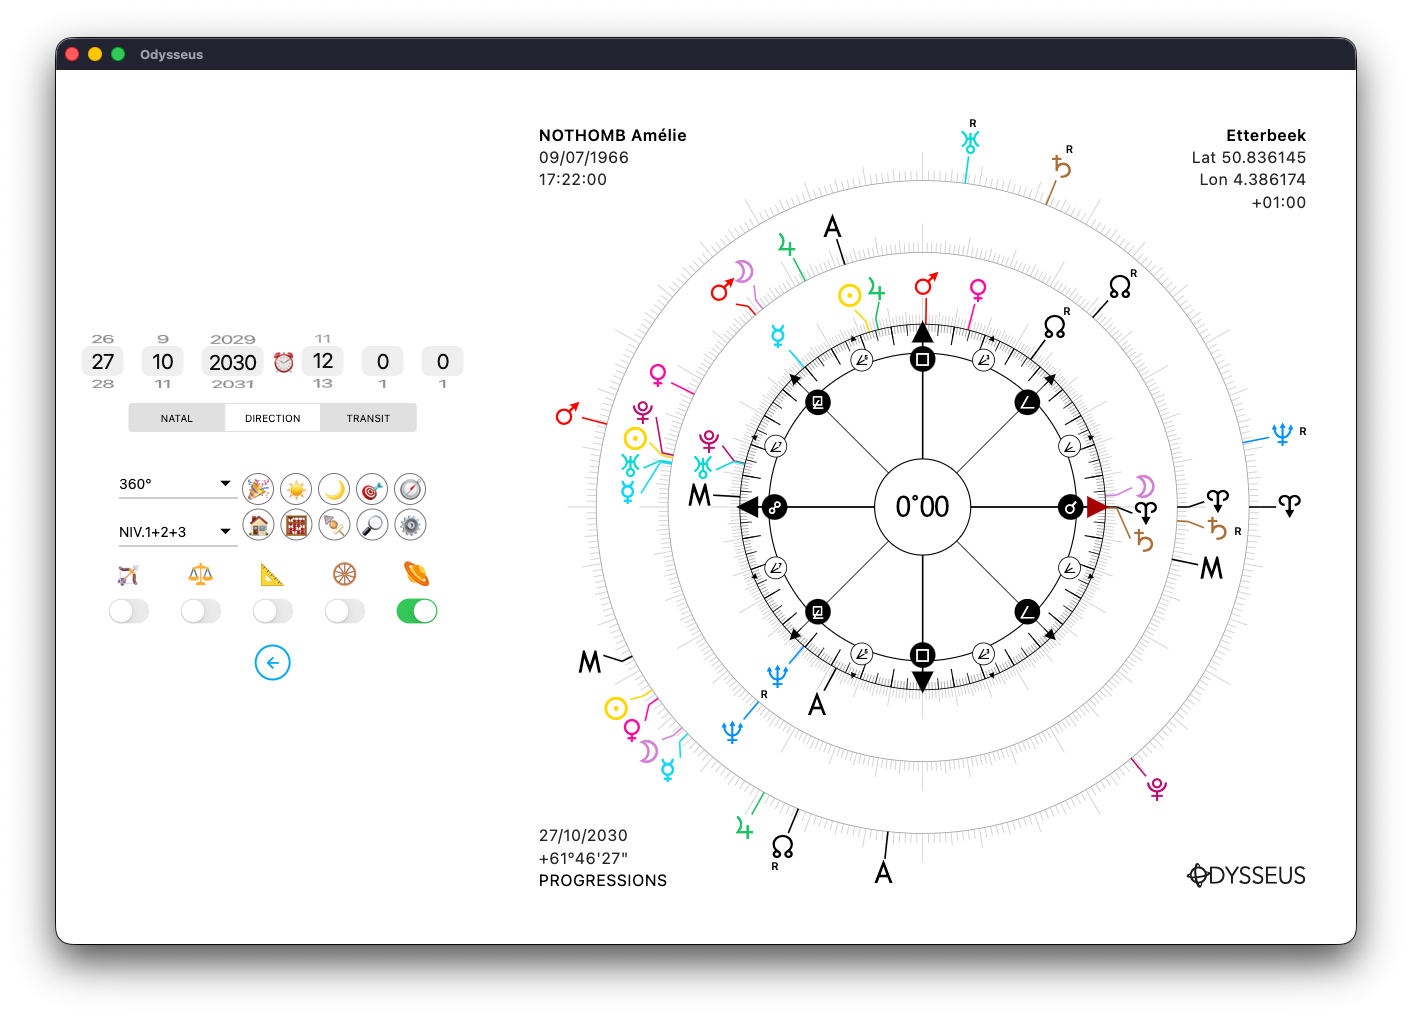
The direction will switch to progressions — the classical progressions of 1 day = 1 year, with each planet advancing at its own rate.
If you find it difficult to make a long press on the planet, you can always adjust this in the Settings panel.
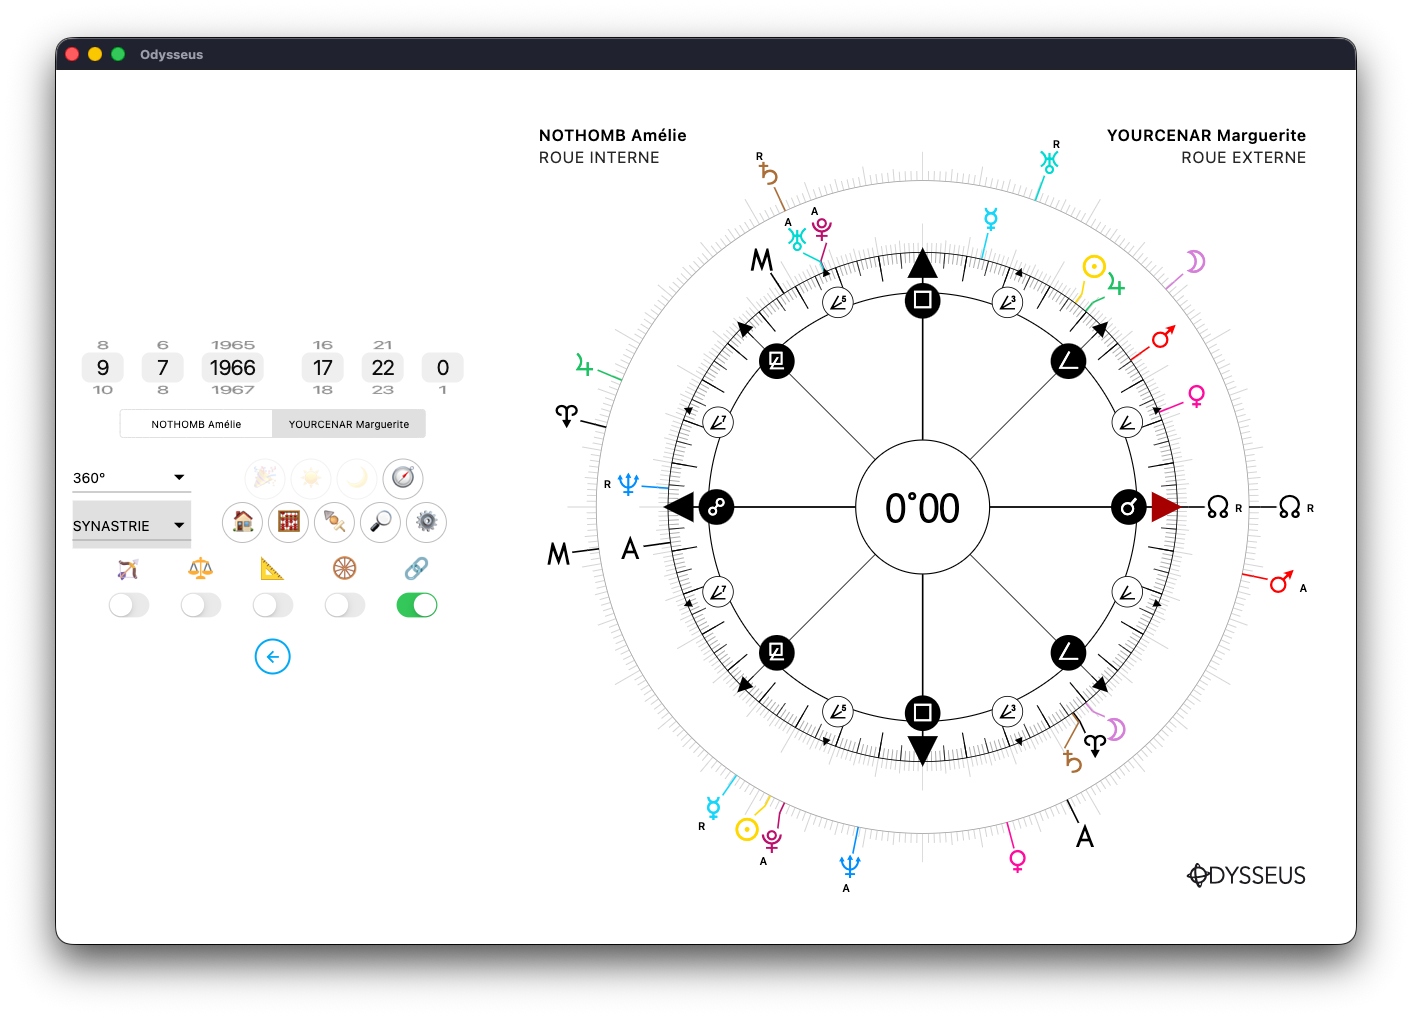
SYNASTRY 🤝
From the chart creation page, it is also possible to create a synastry. To do this, simply click on the two hands button 🤝
The app will then ask you to select a first chart. Click on it.

Then a second one. Click on it.
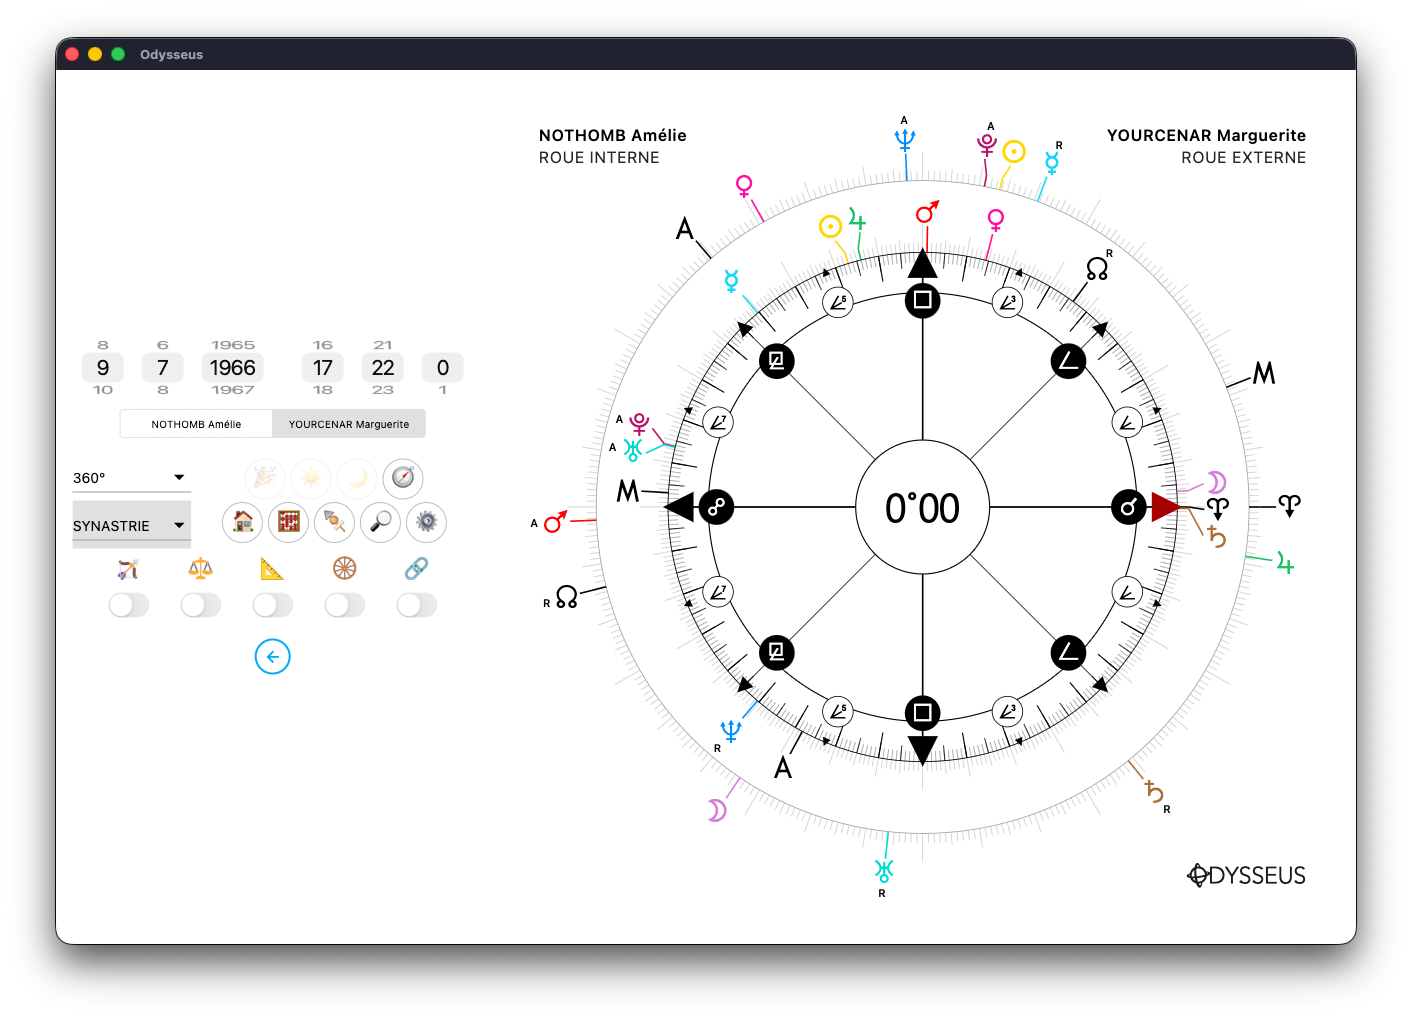
The synastry then opens, displaying both charts one over the other.

It is also possible to display the composite chart.
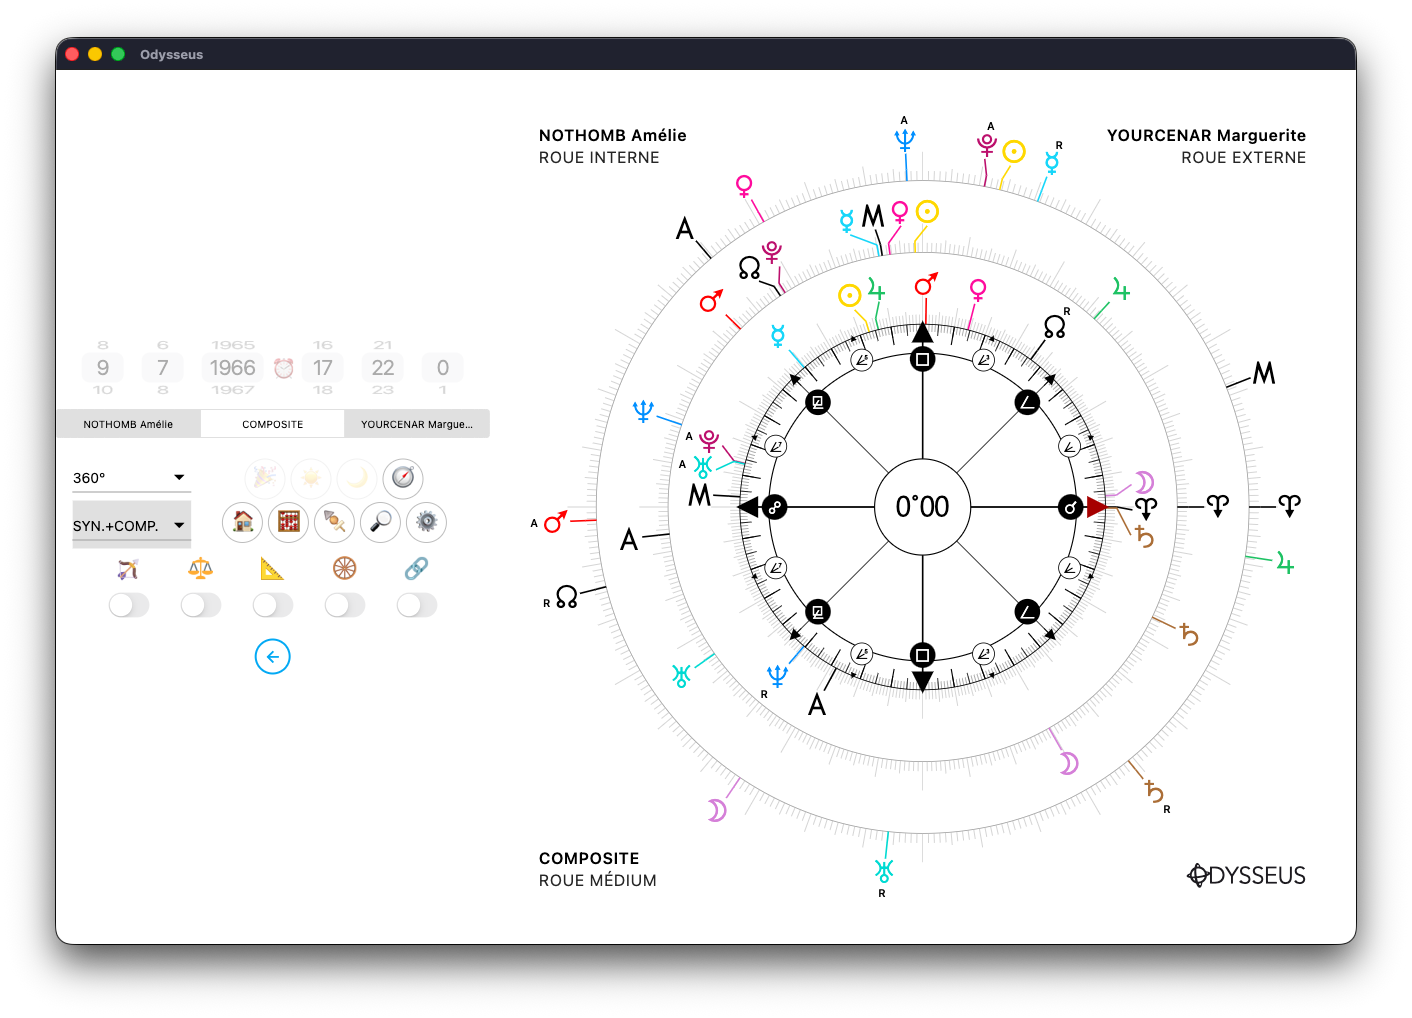
Or the synastry plus the composite.
Finally, if you click on the switch below the image of the chain:

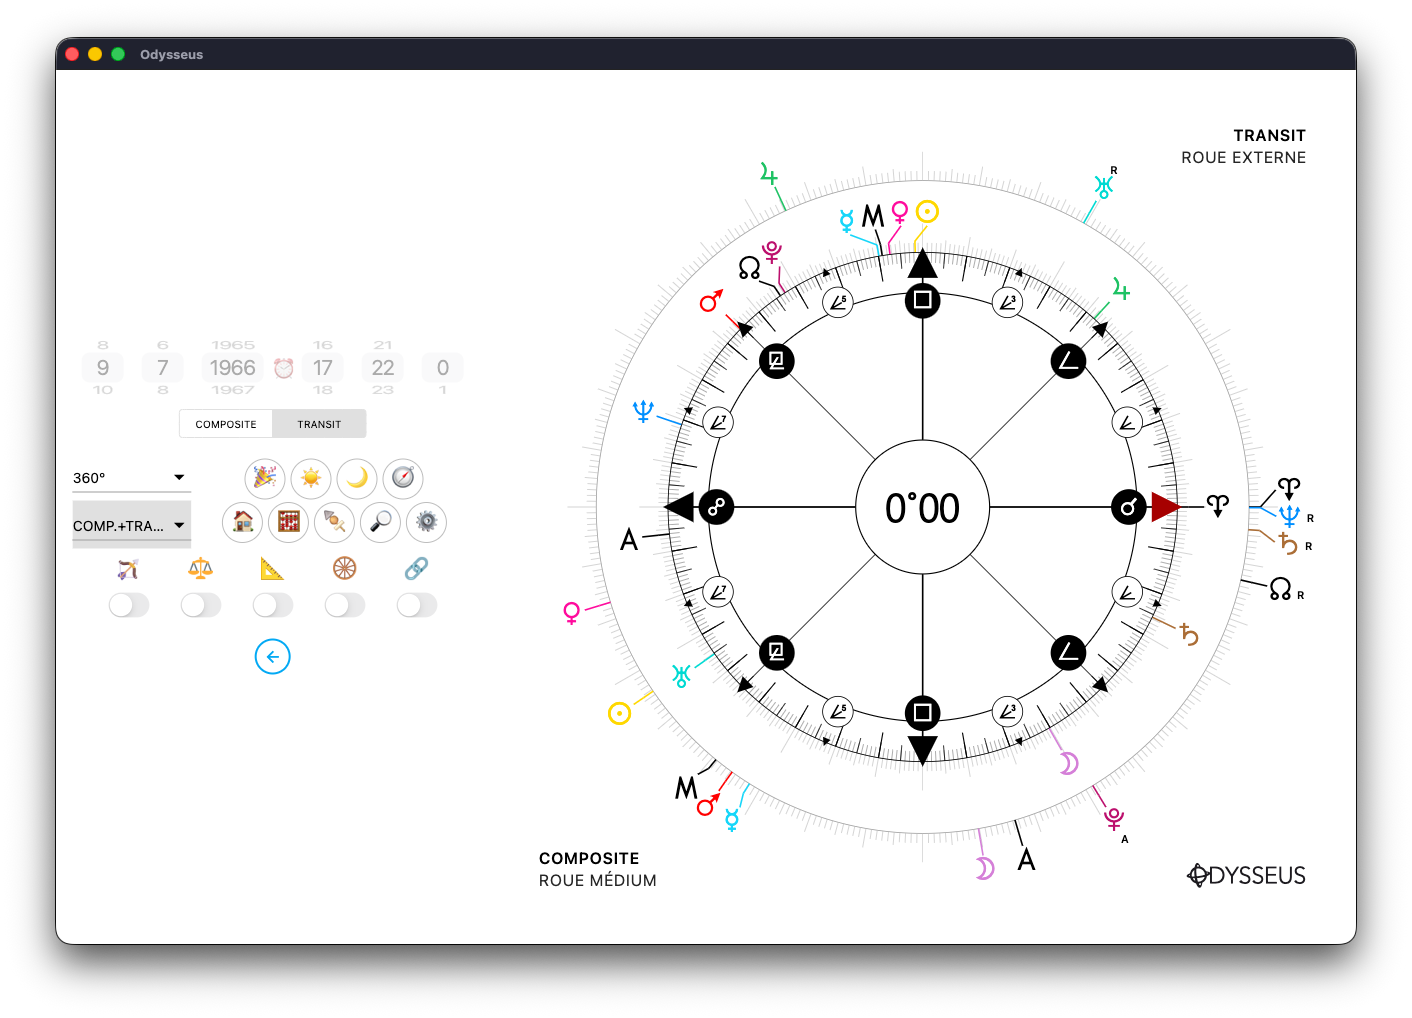
You can also display the composite plus transits.
You will then switch to the “nodal chart,” rotating both wheels so that the Lunar Node W of each chart is placed directly above the other.
Apart from that, the buttons and functions remain identical to their use in a standard chart.
With one exception: the Solar Return ☀️ and Lunar Return 🌙 functions, which here display the return of the respective luminary on top of the Composite chart. This allows you to observe the “anniversary” or “monthiversary” of the relationship chart.
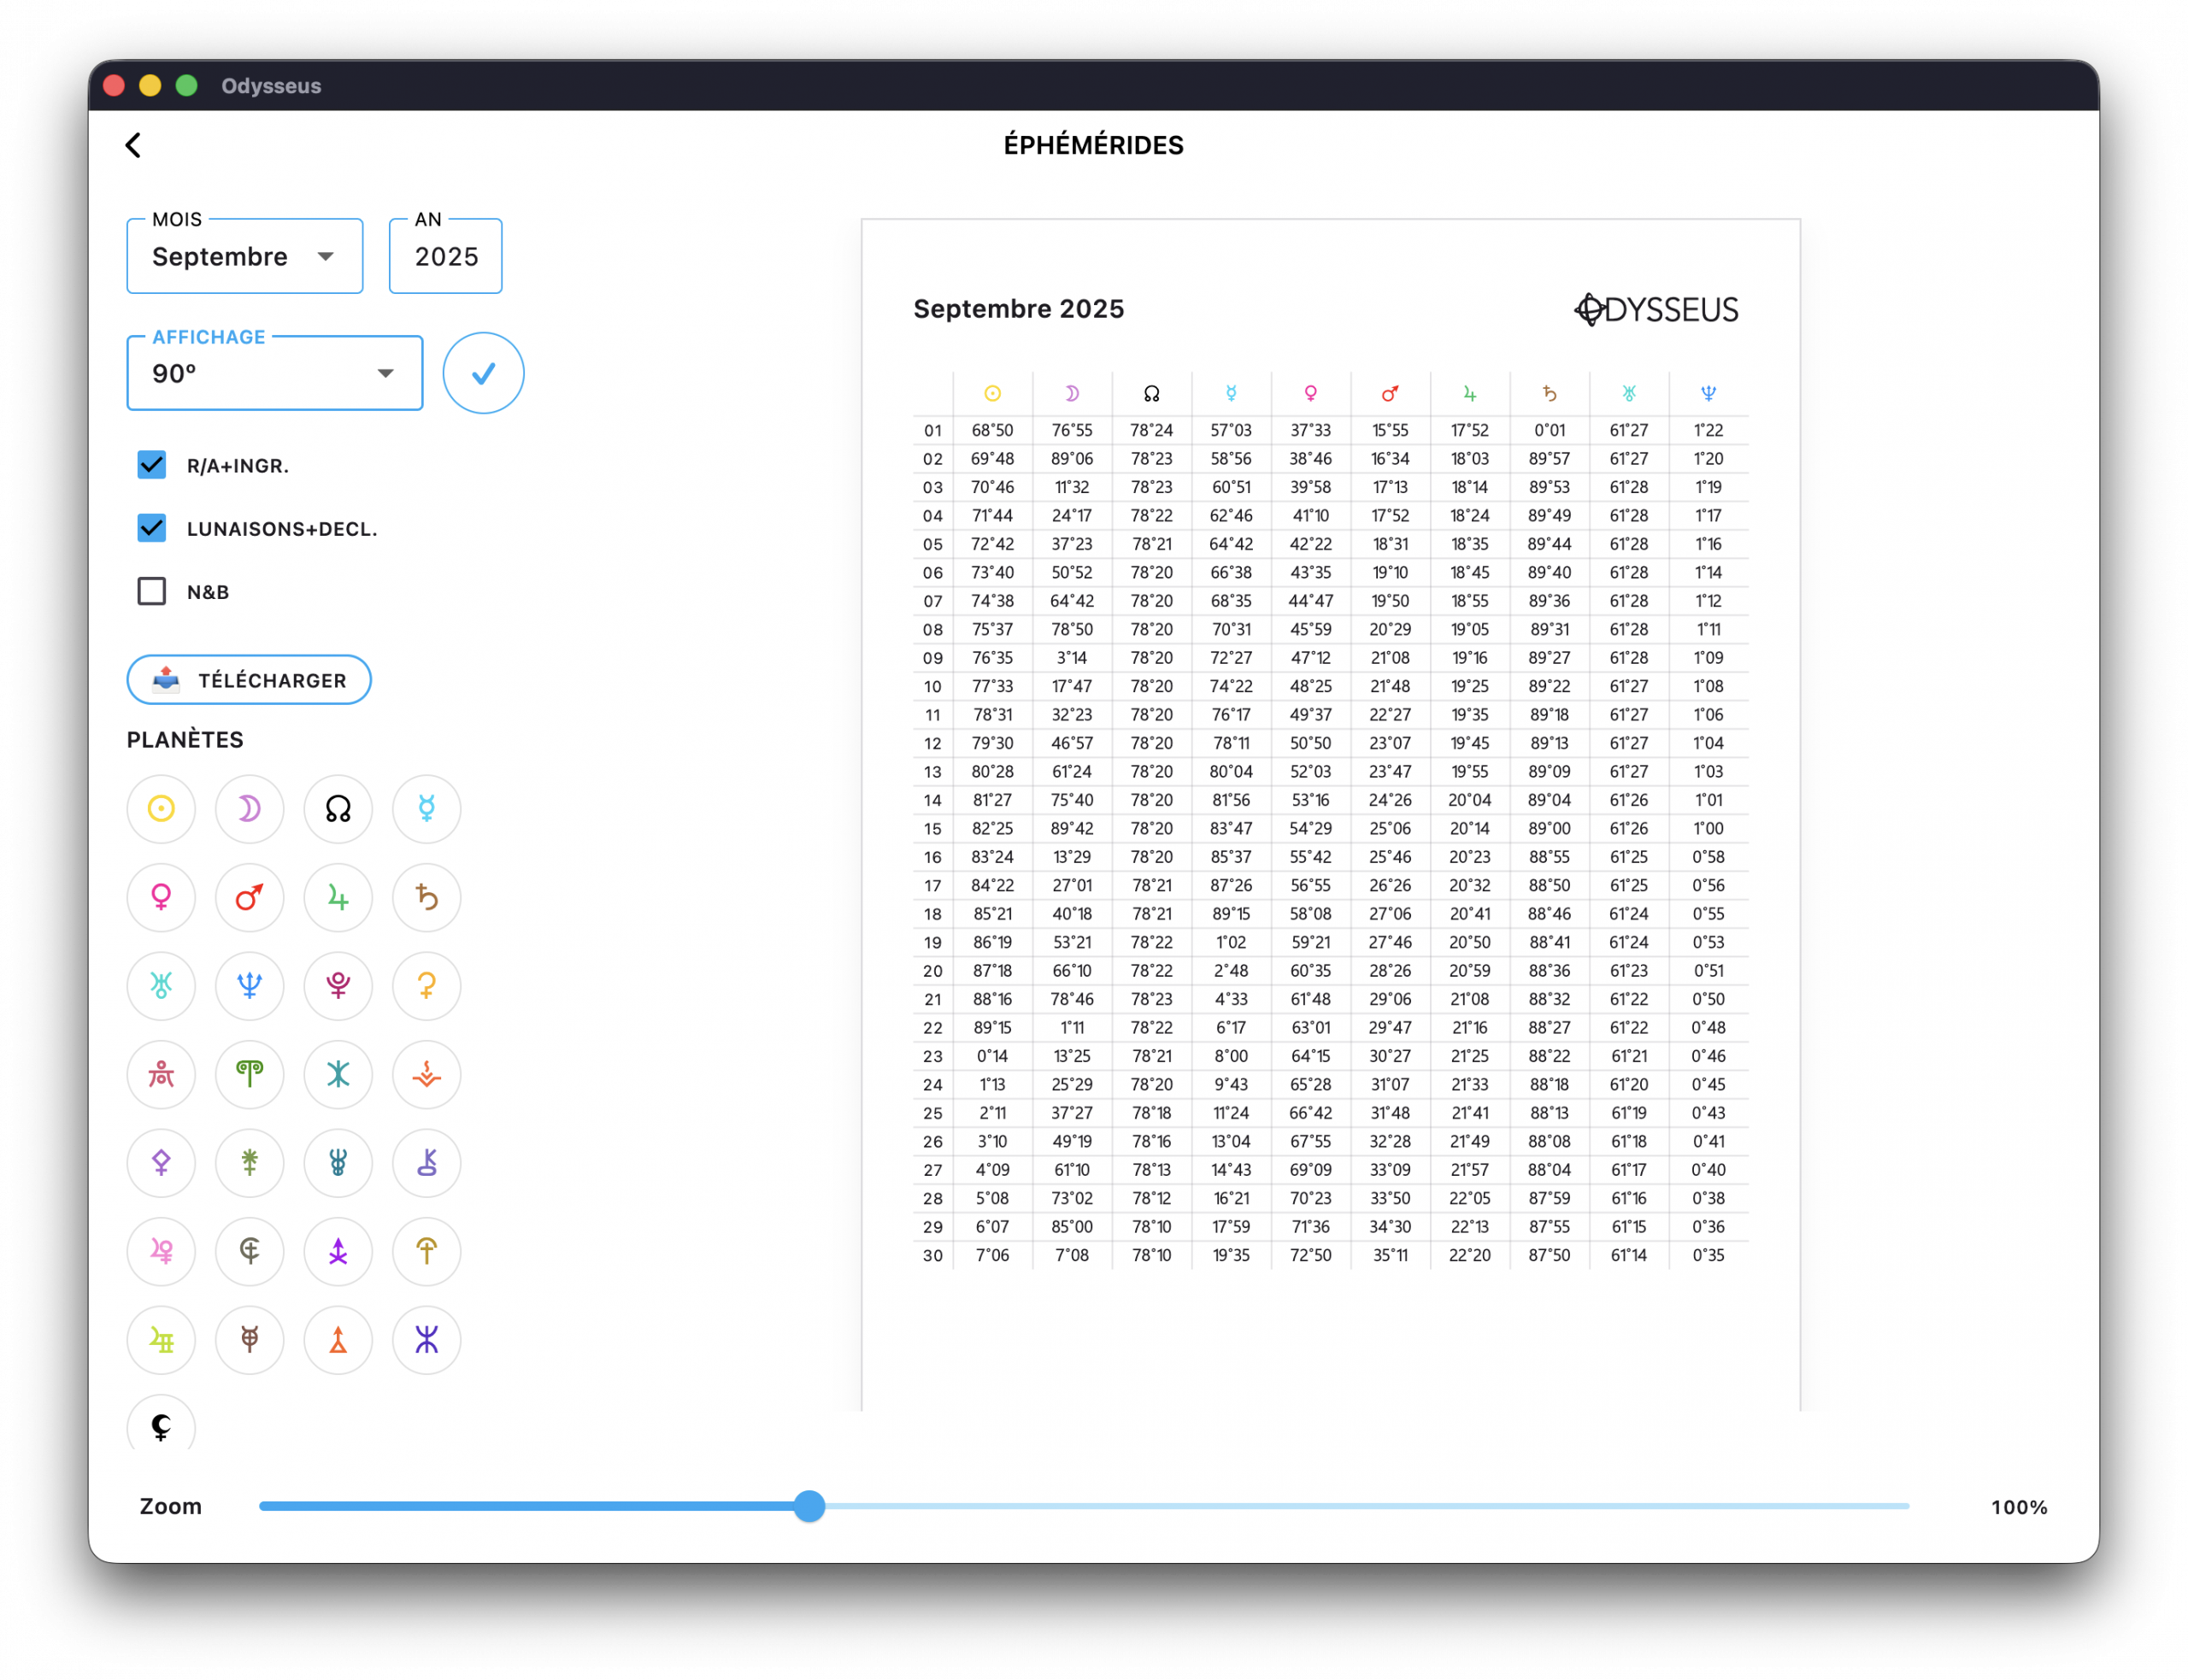
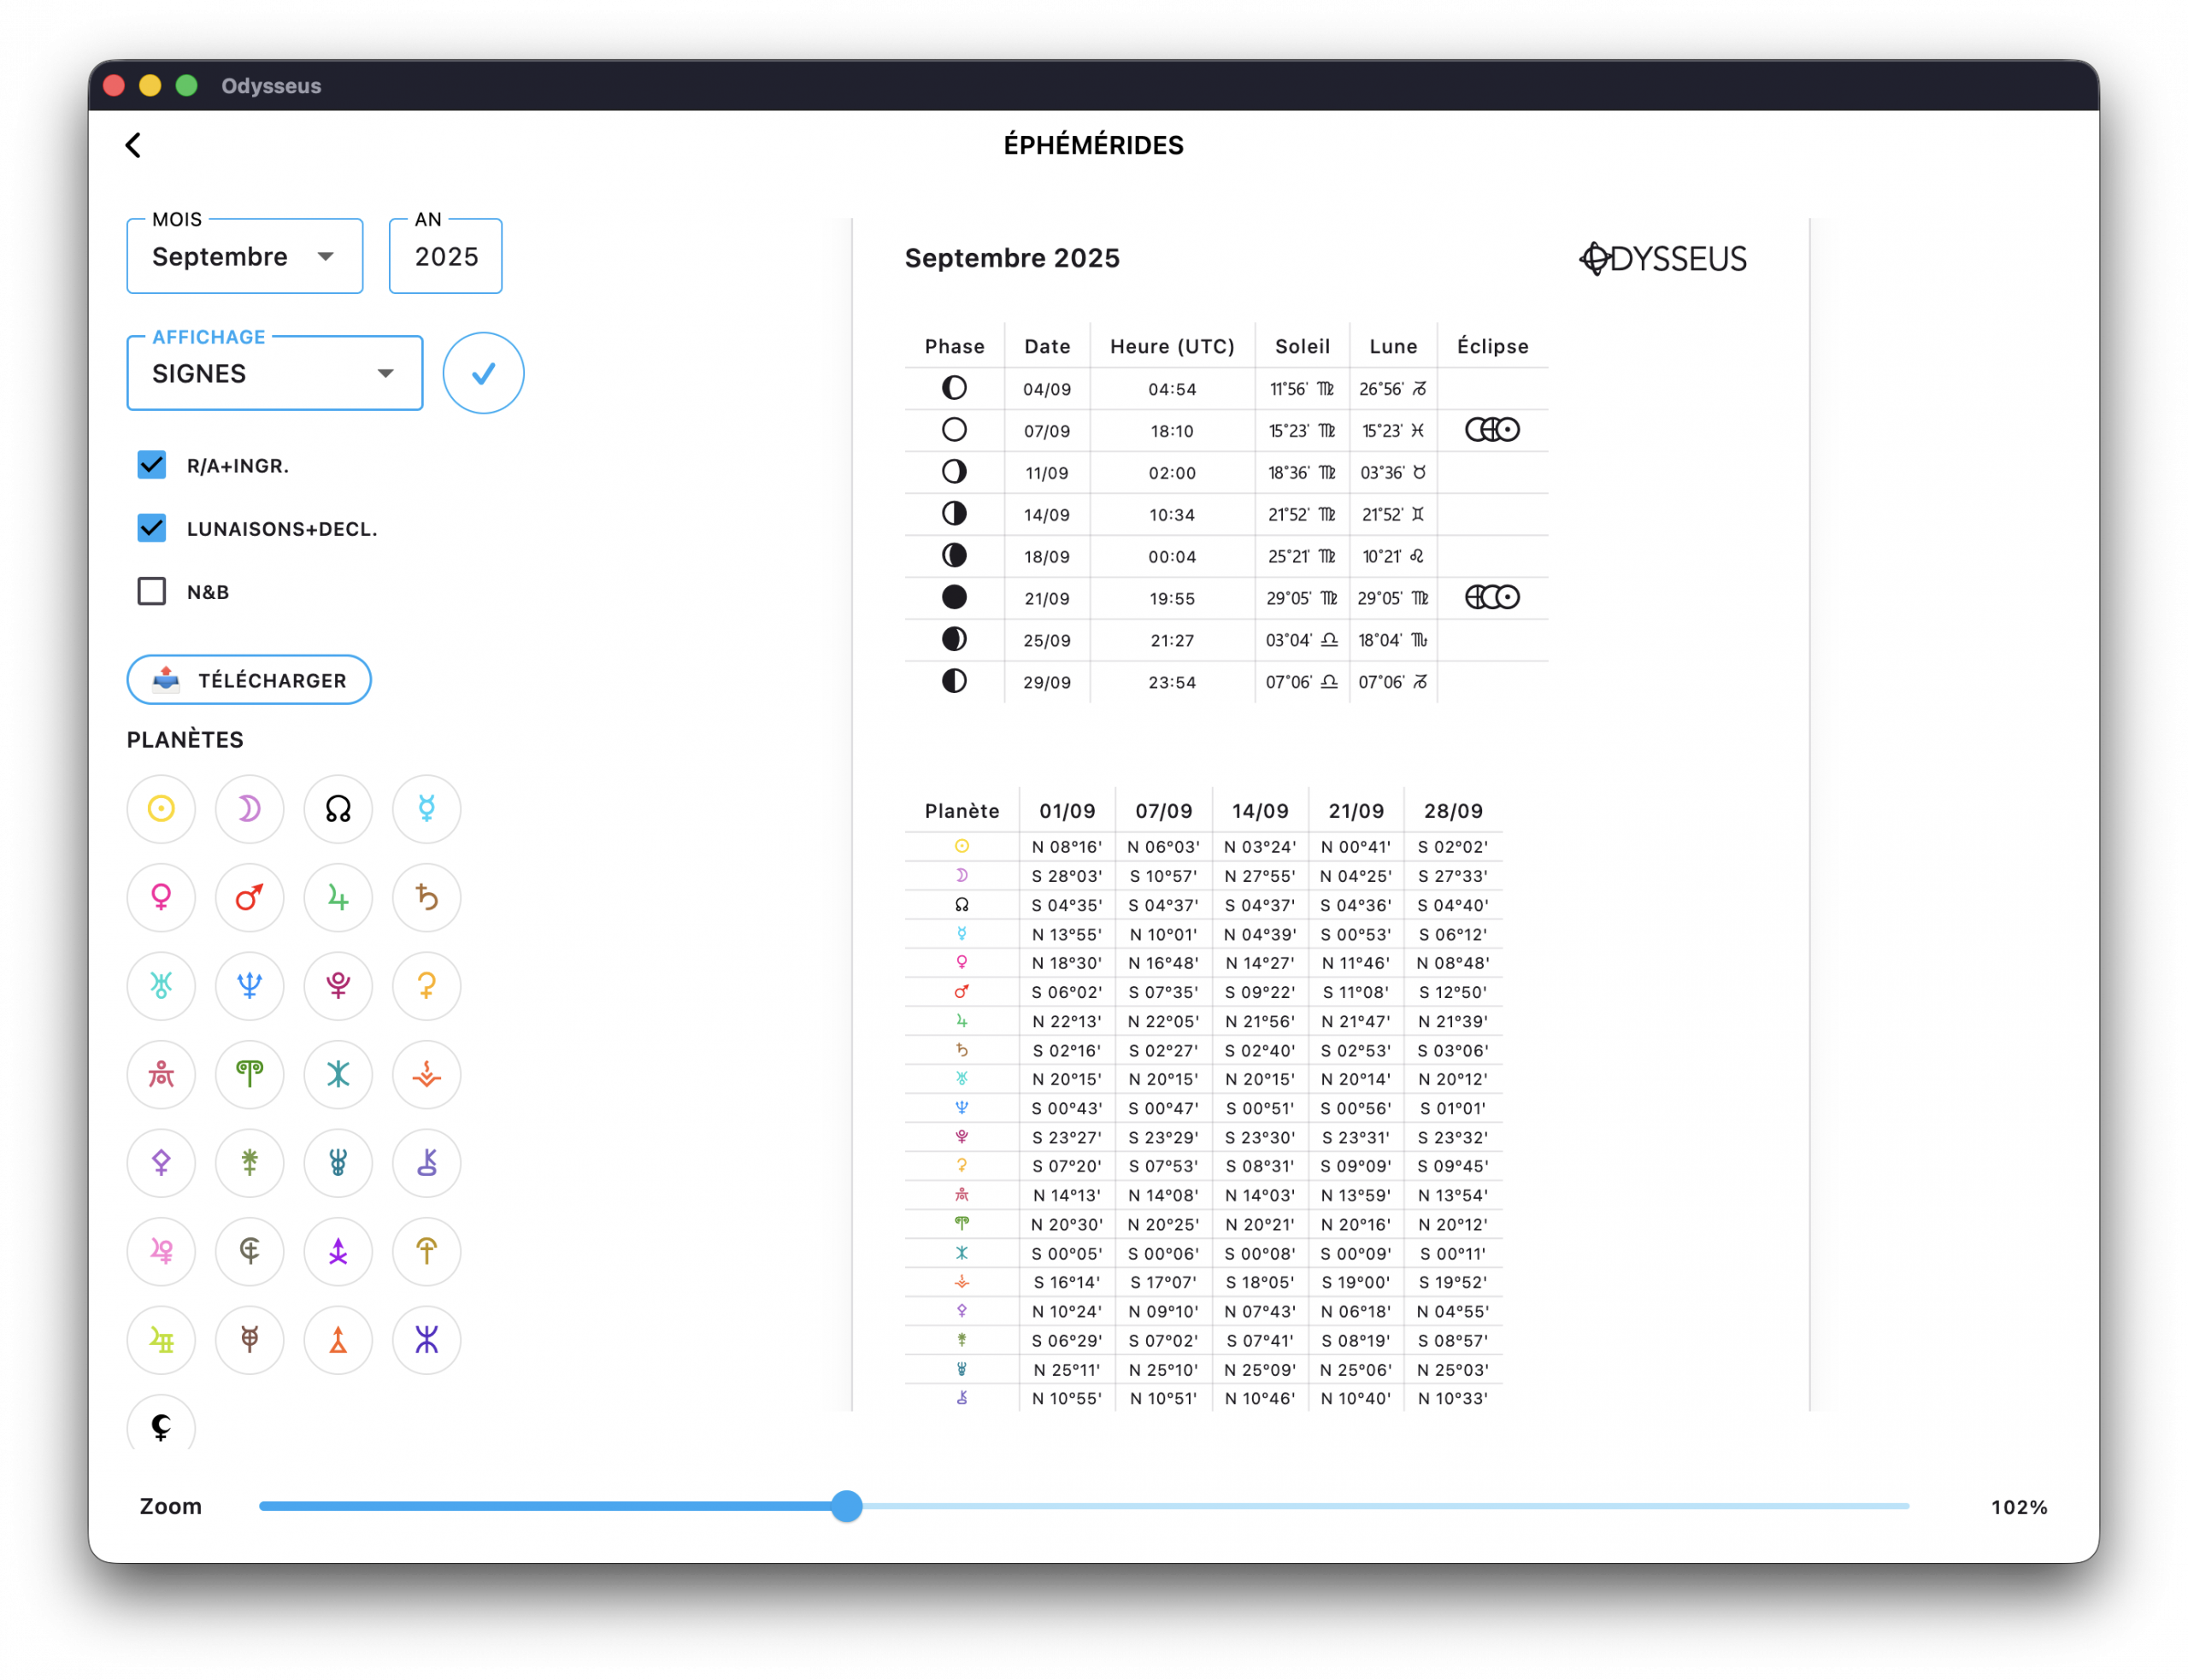
EPHEMERIS 📊
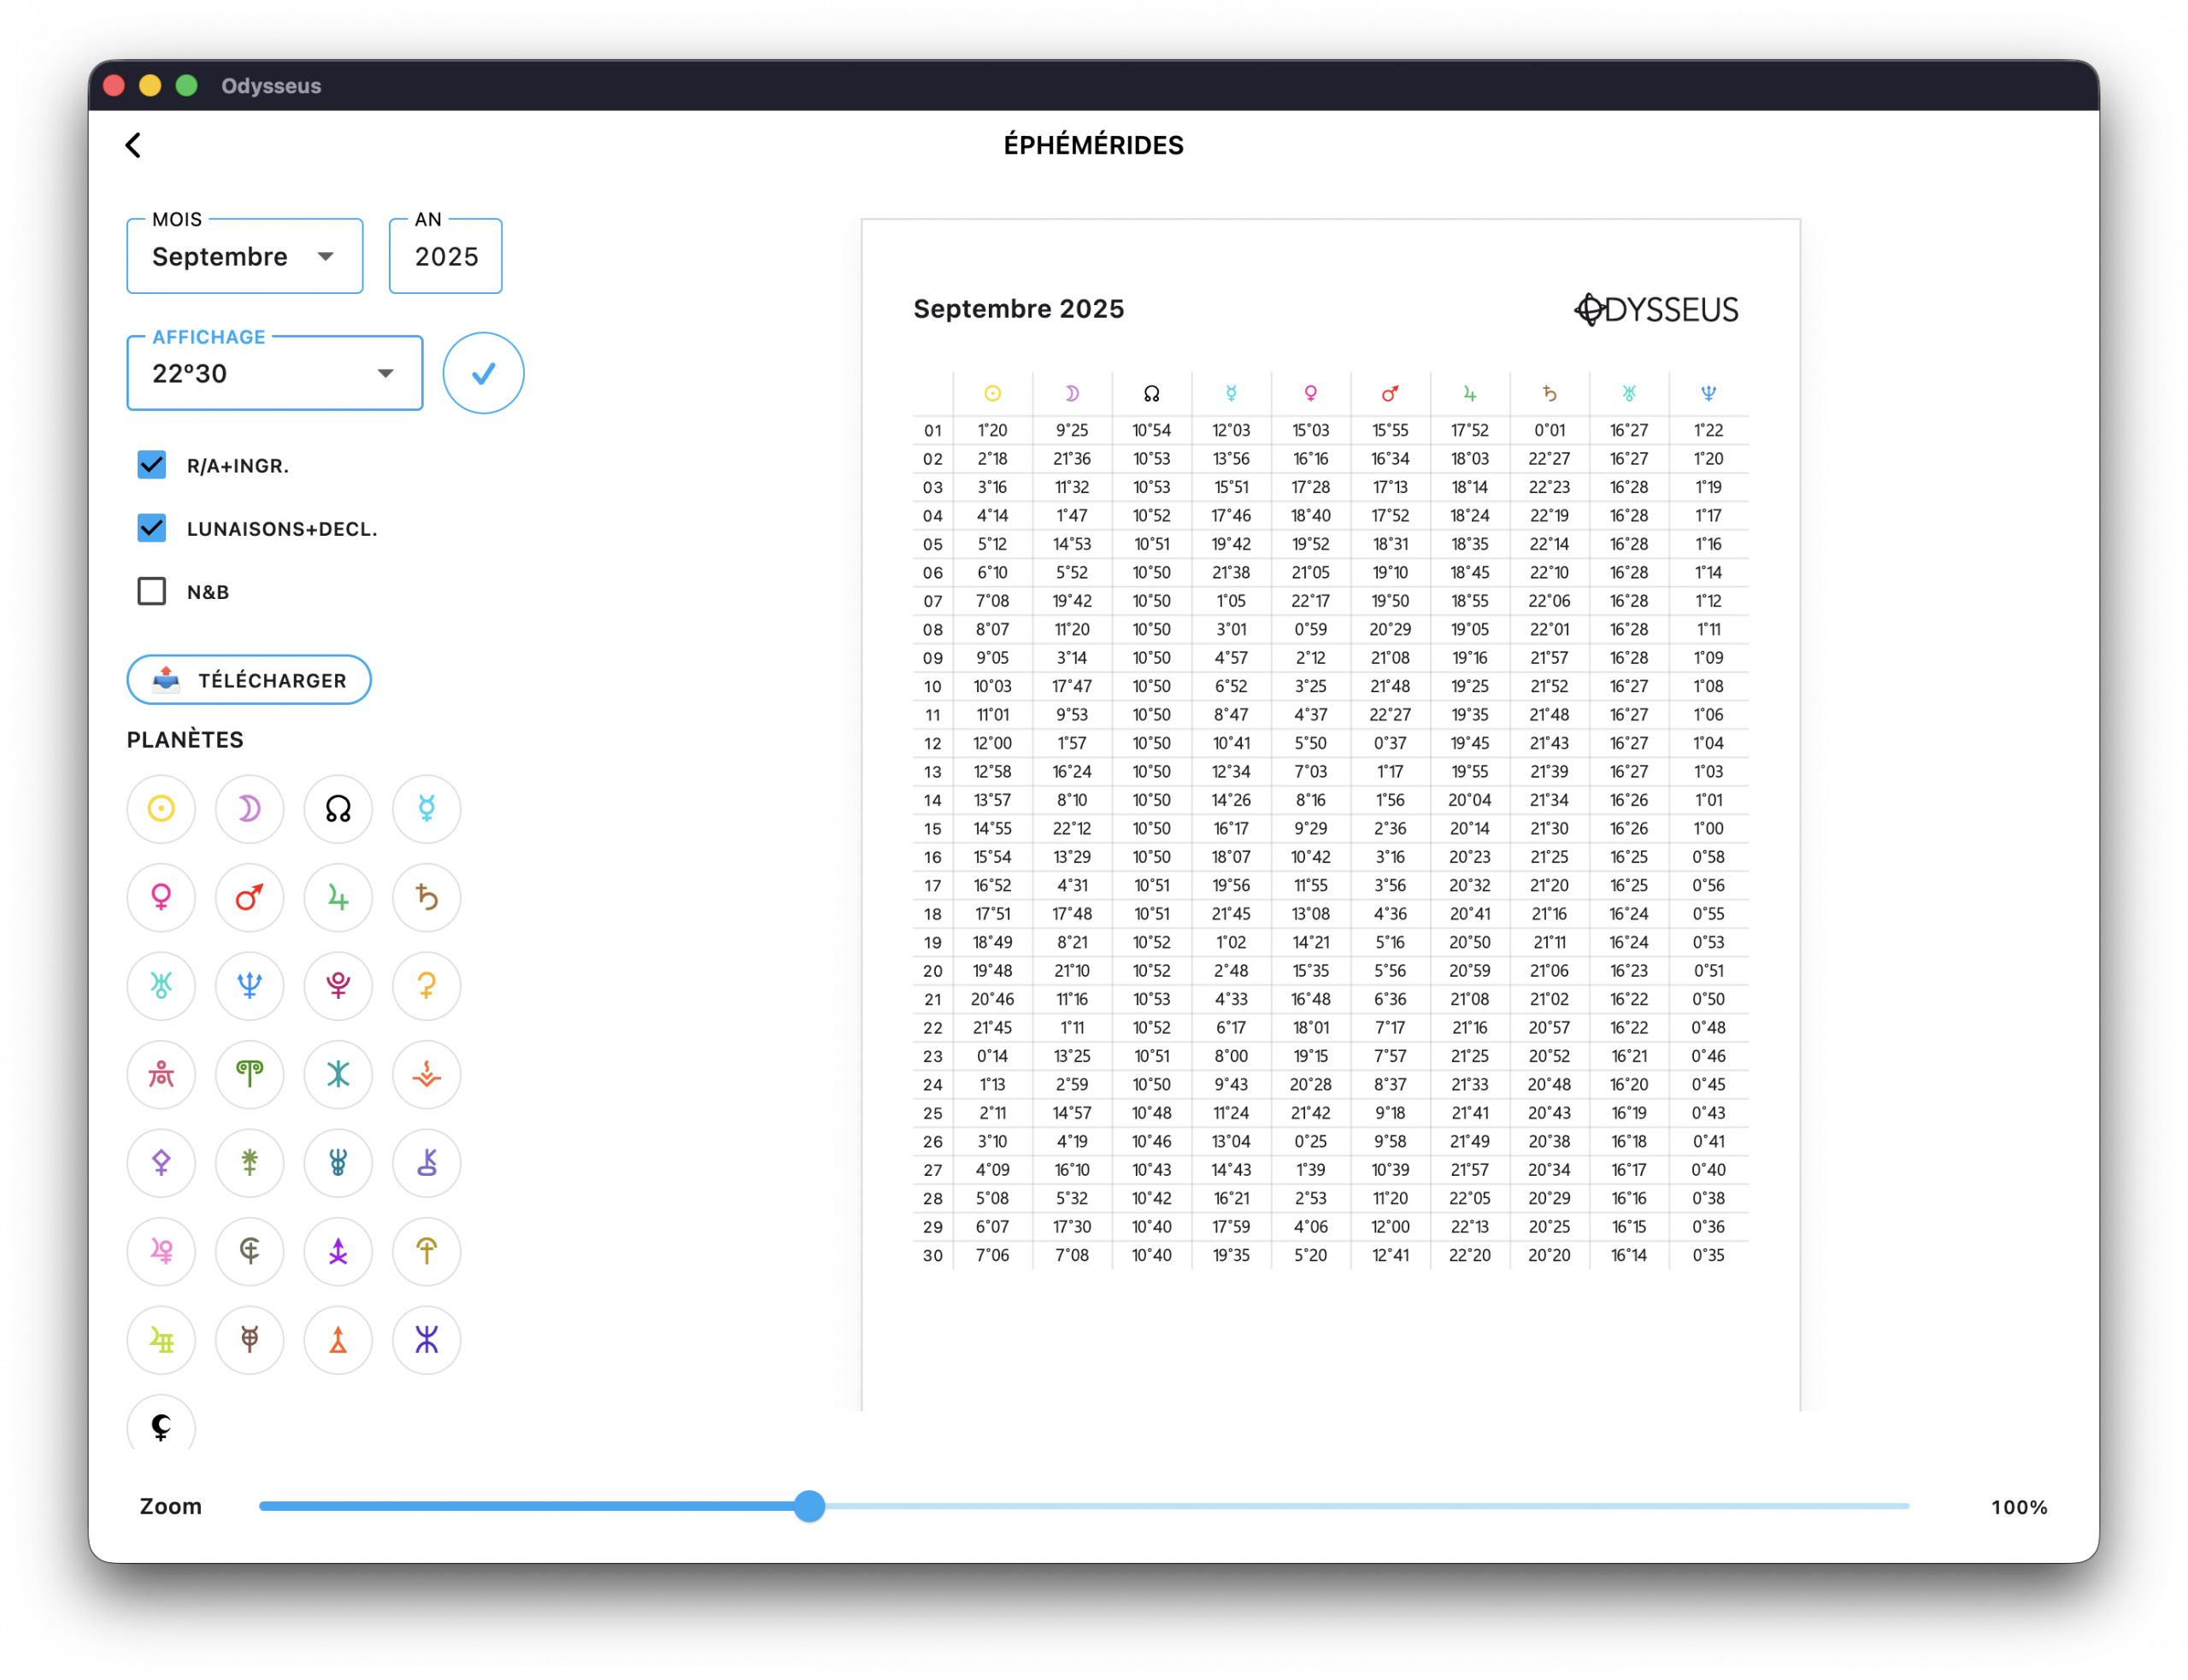
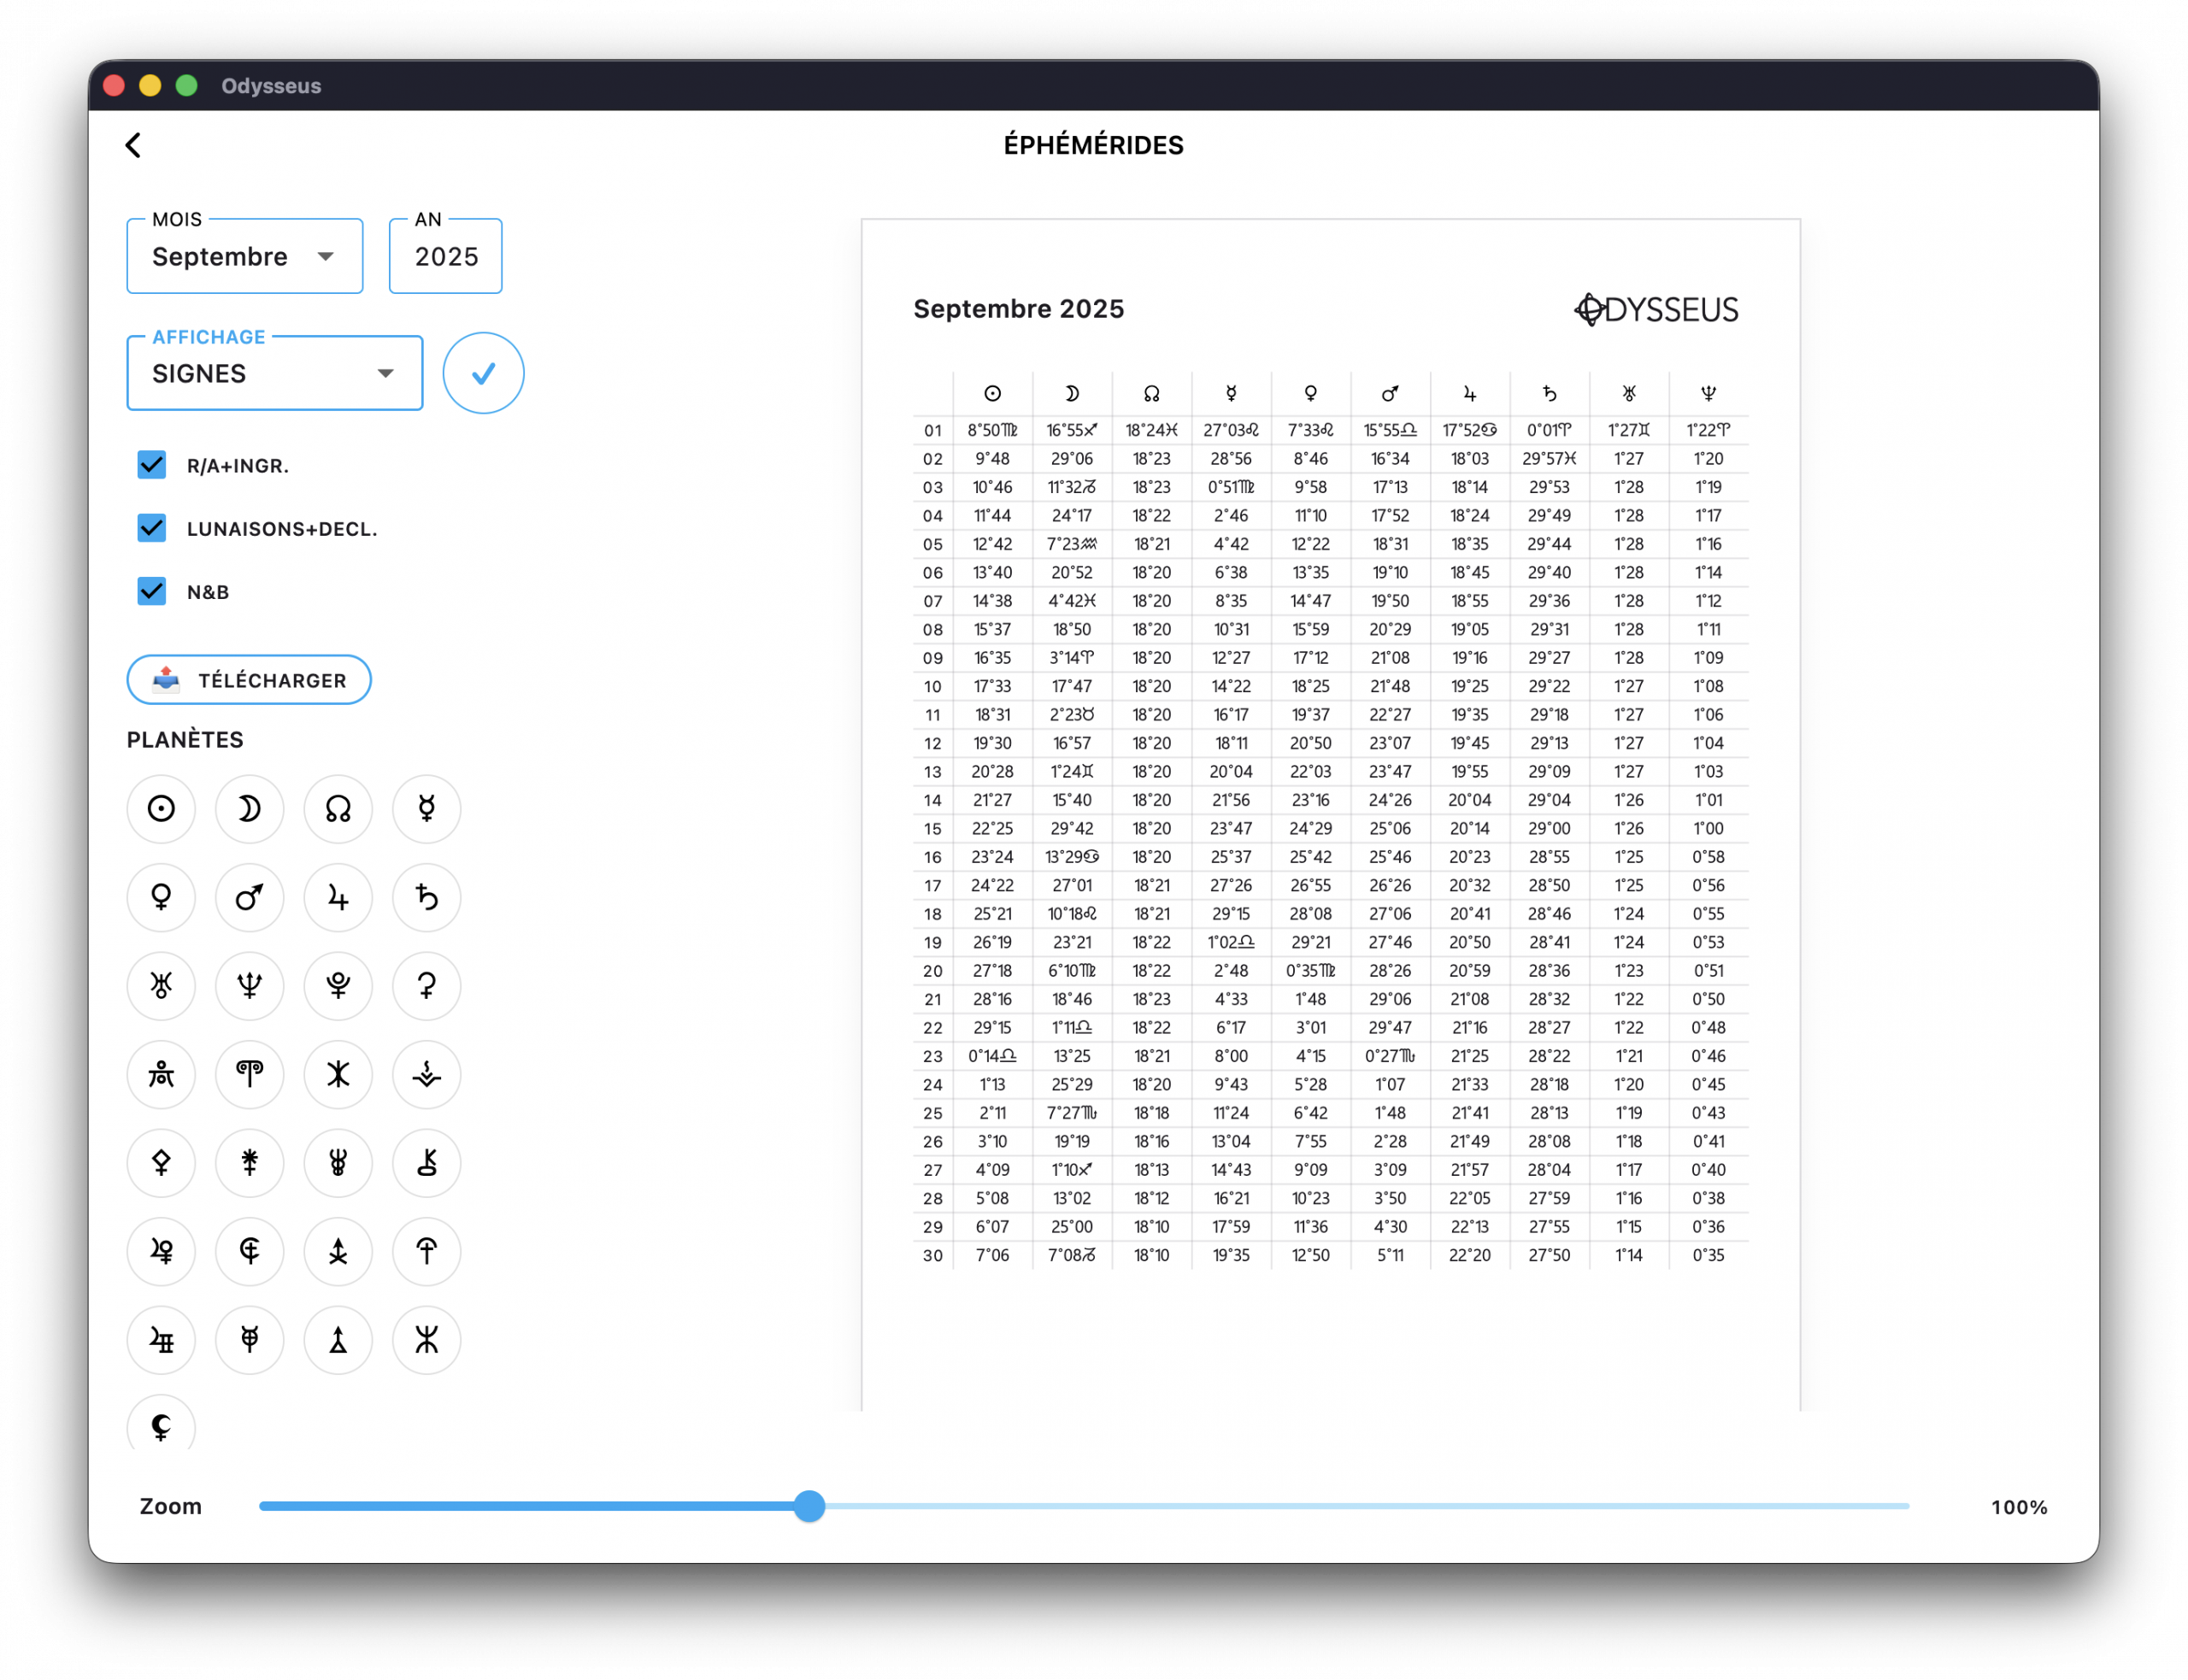
On the theme creation page, you have access to the 📊 button that leads to the ephemeris generator.
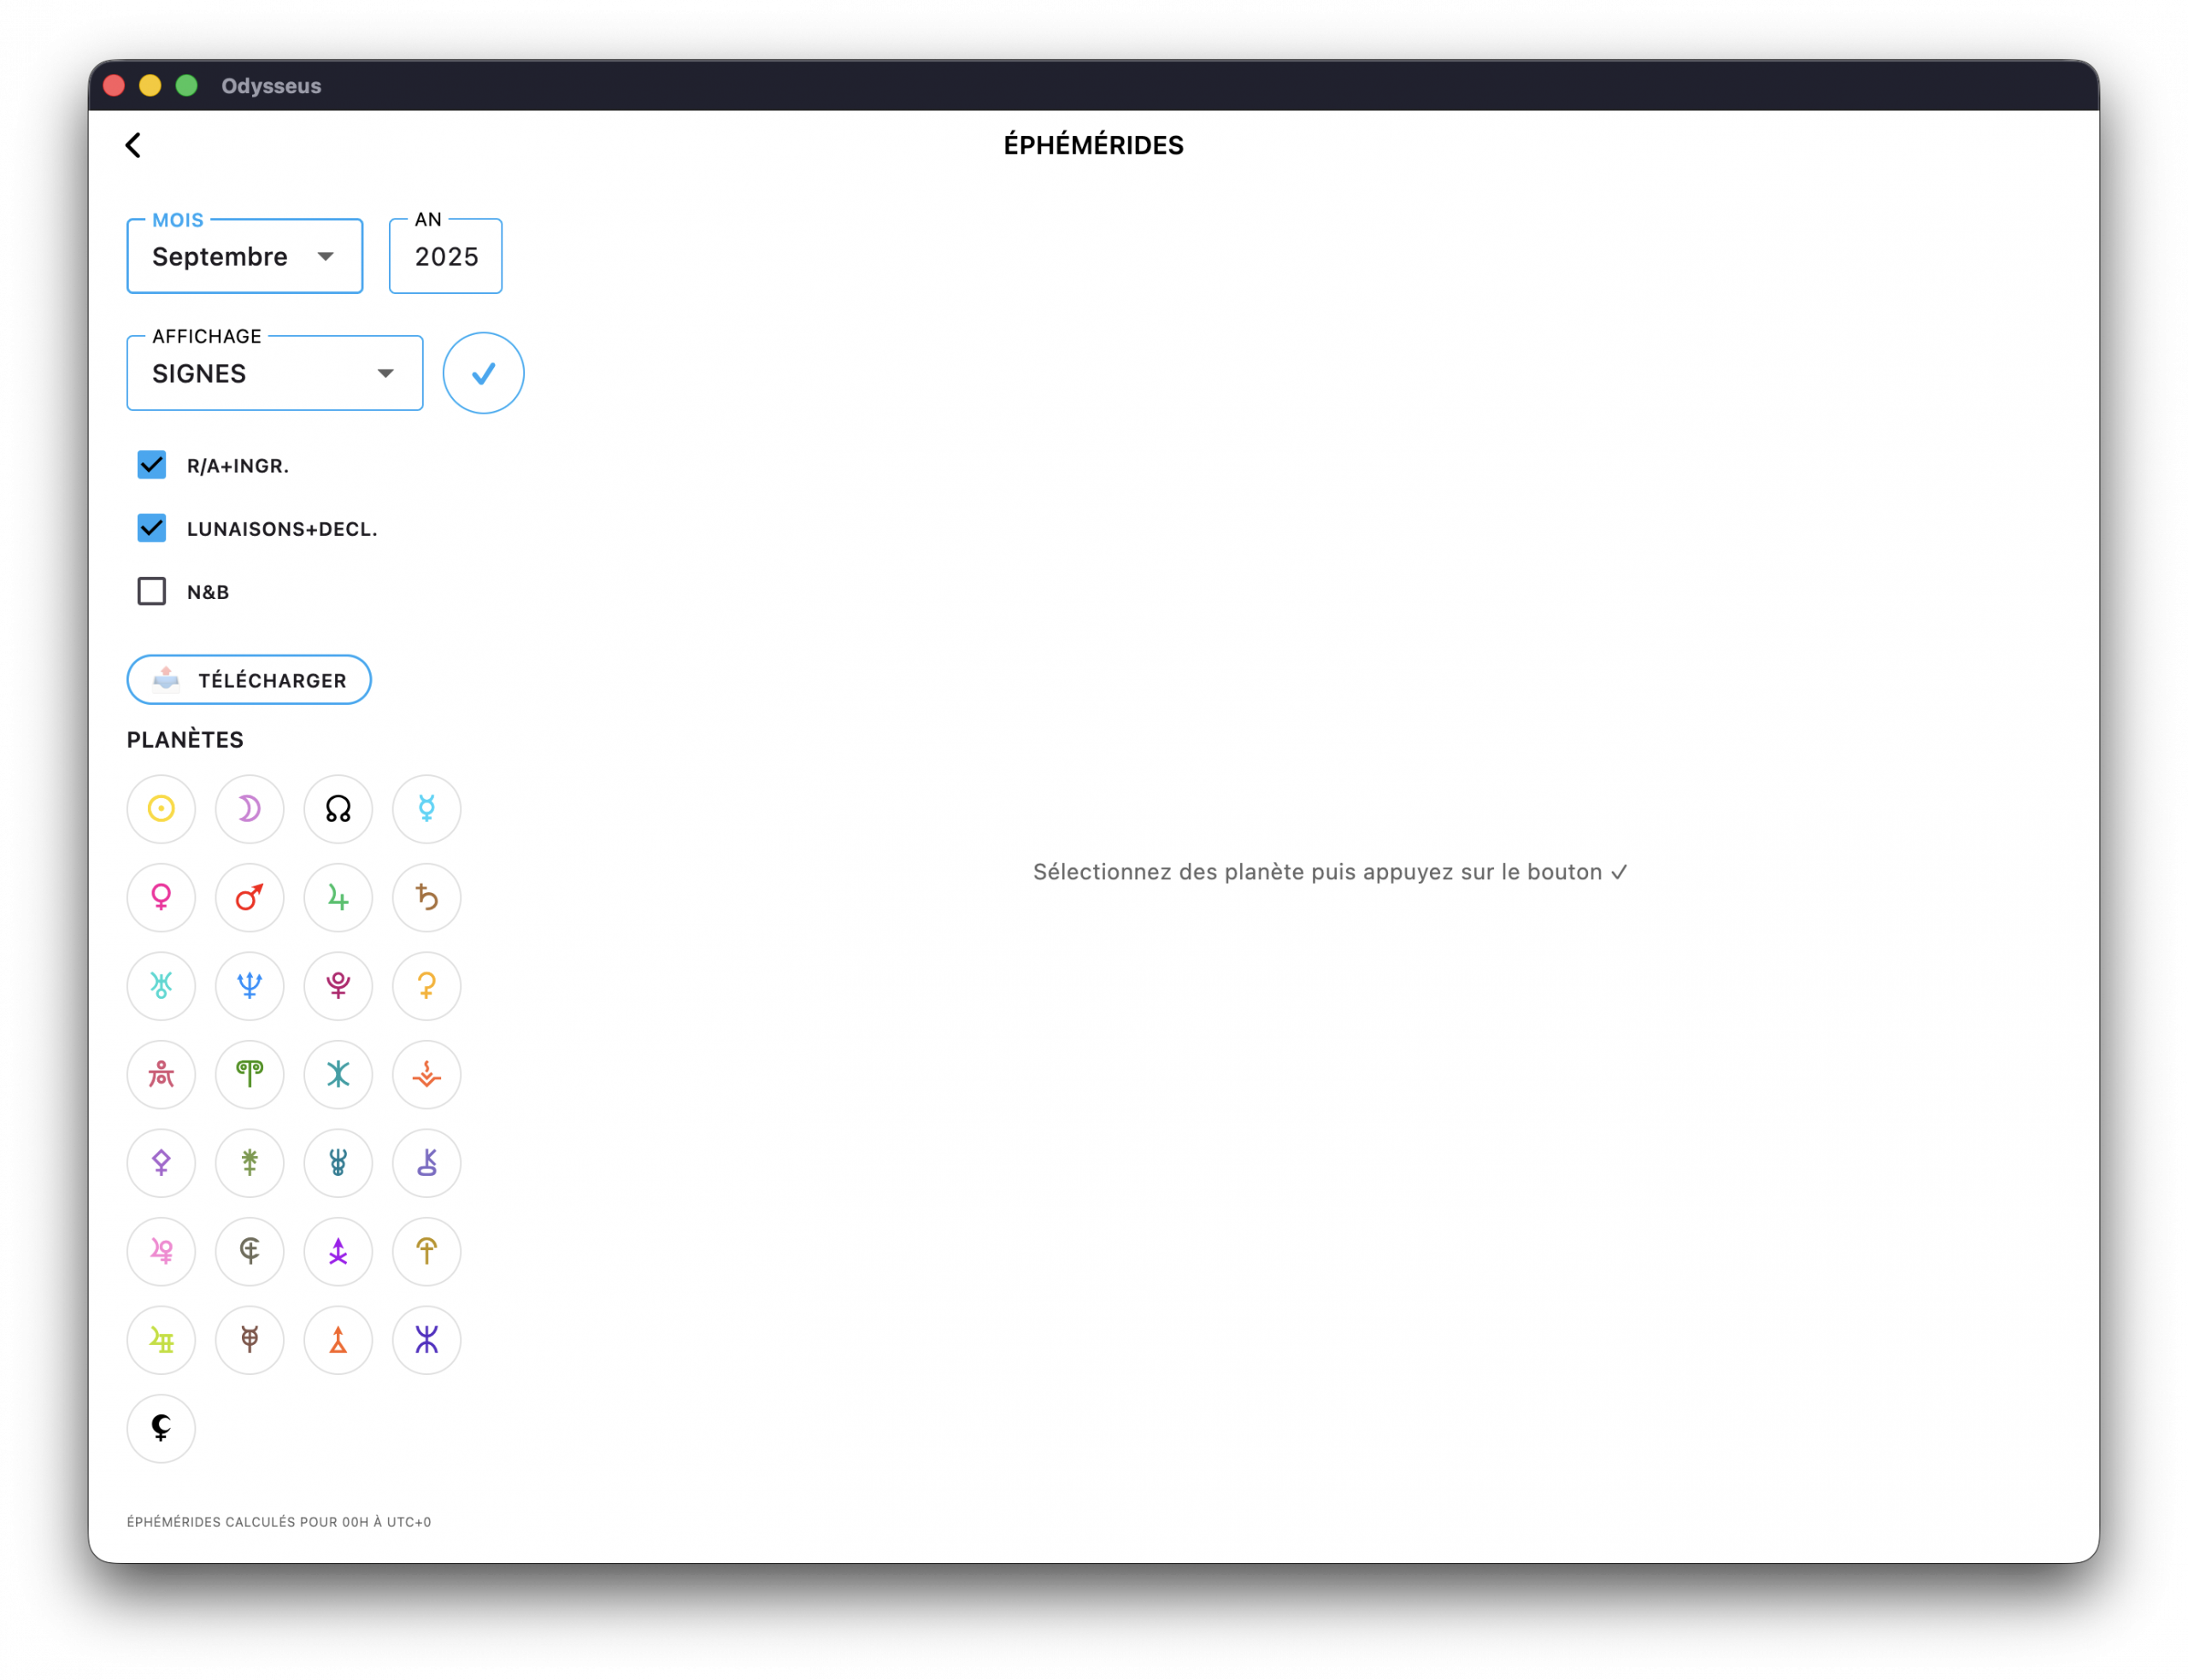
Here, you can select the planets that interest you, the month and the year, then click on the blue button with the ✓ to generate the ephemeris.
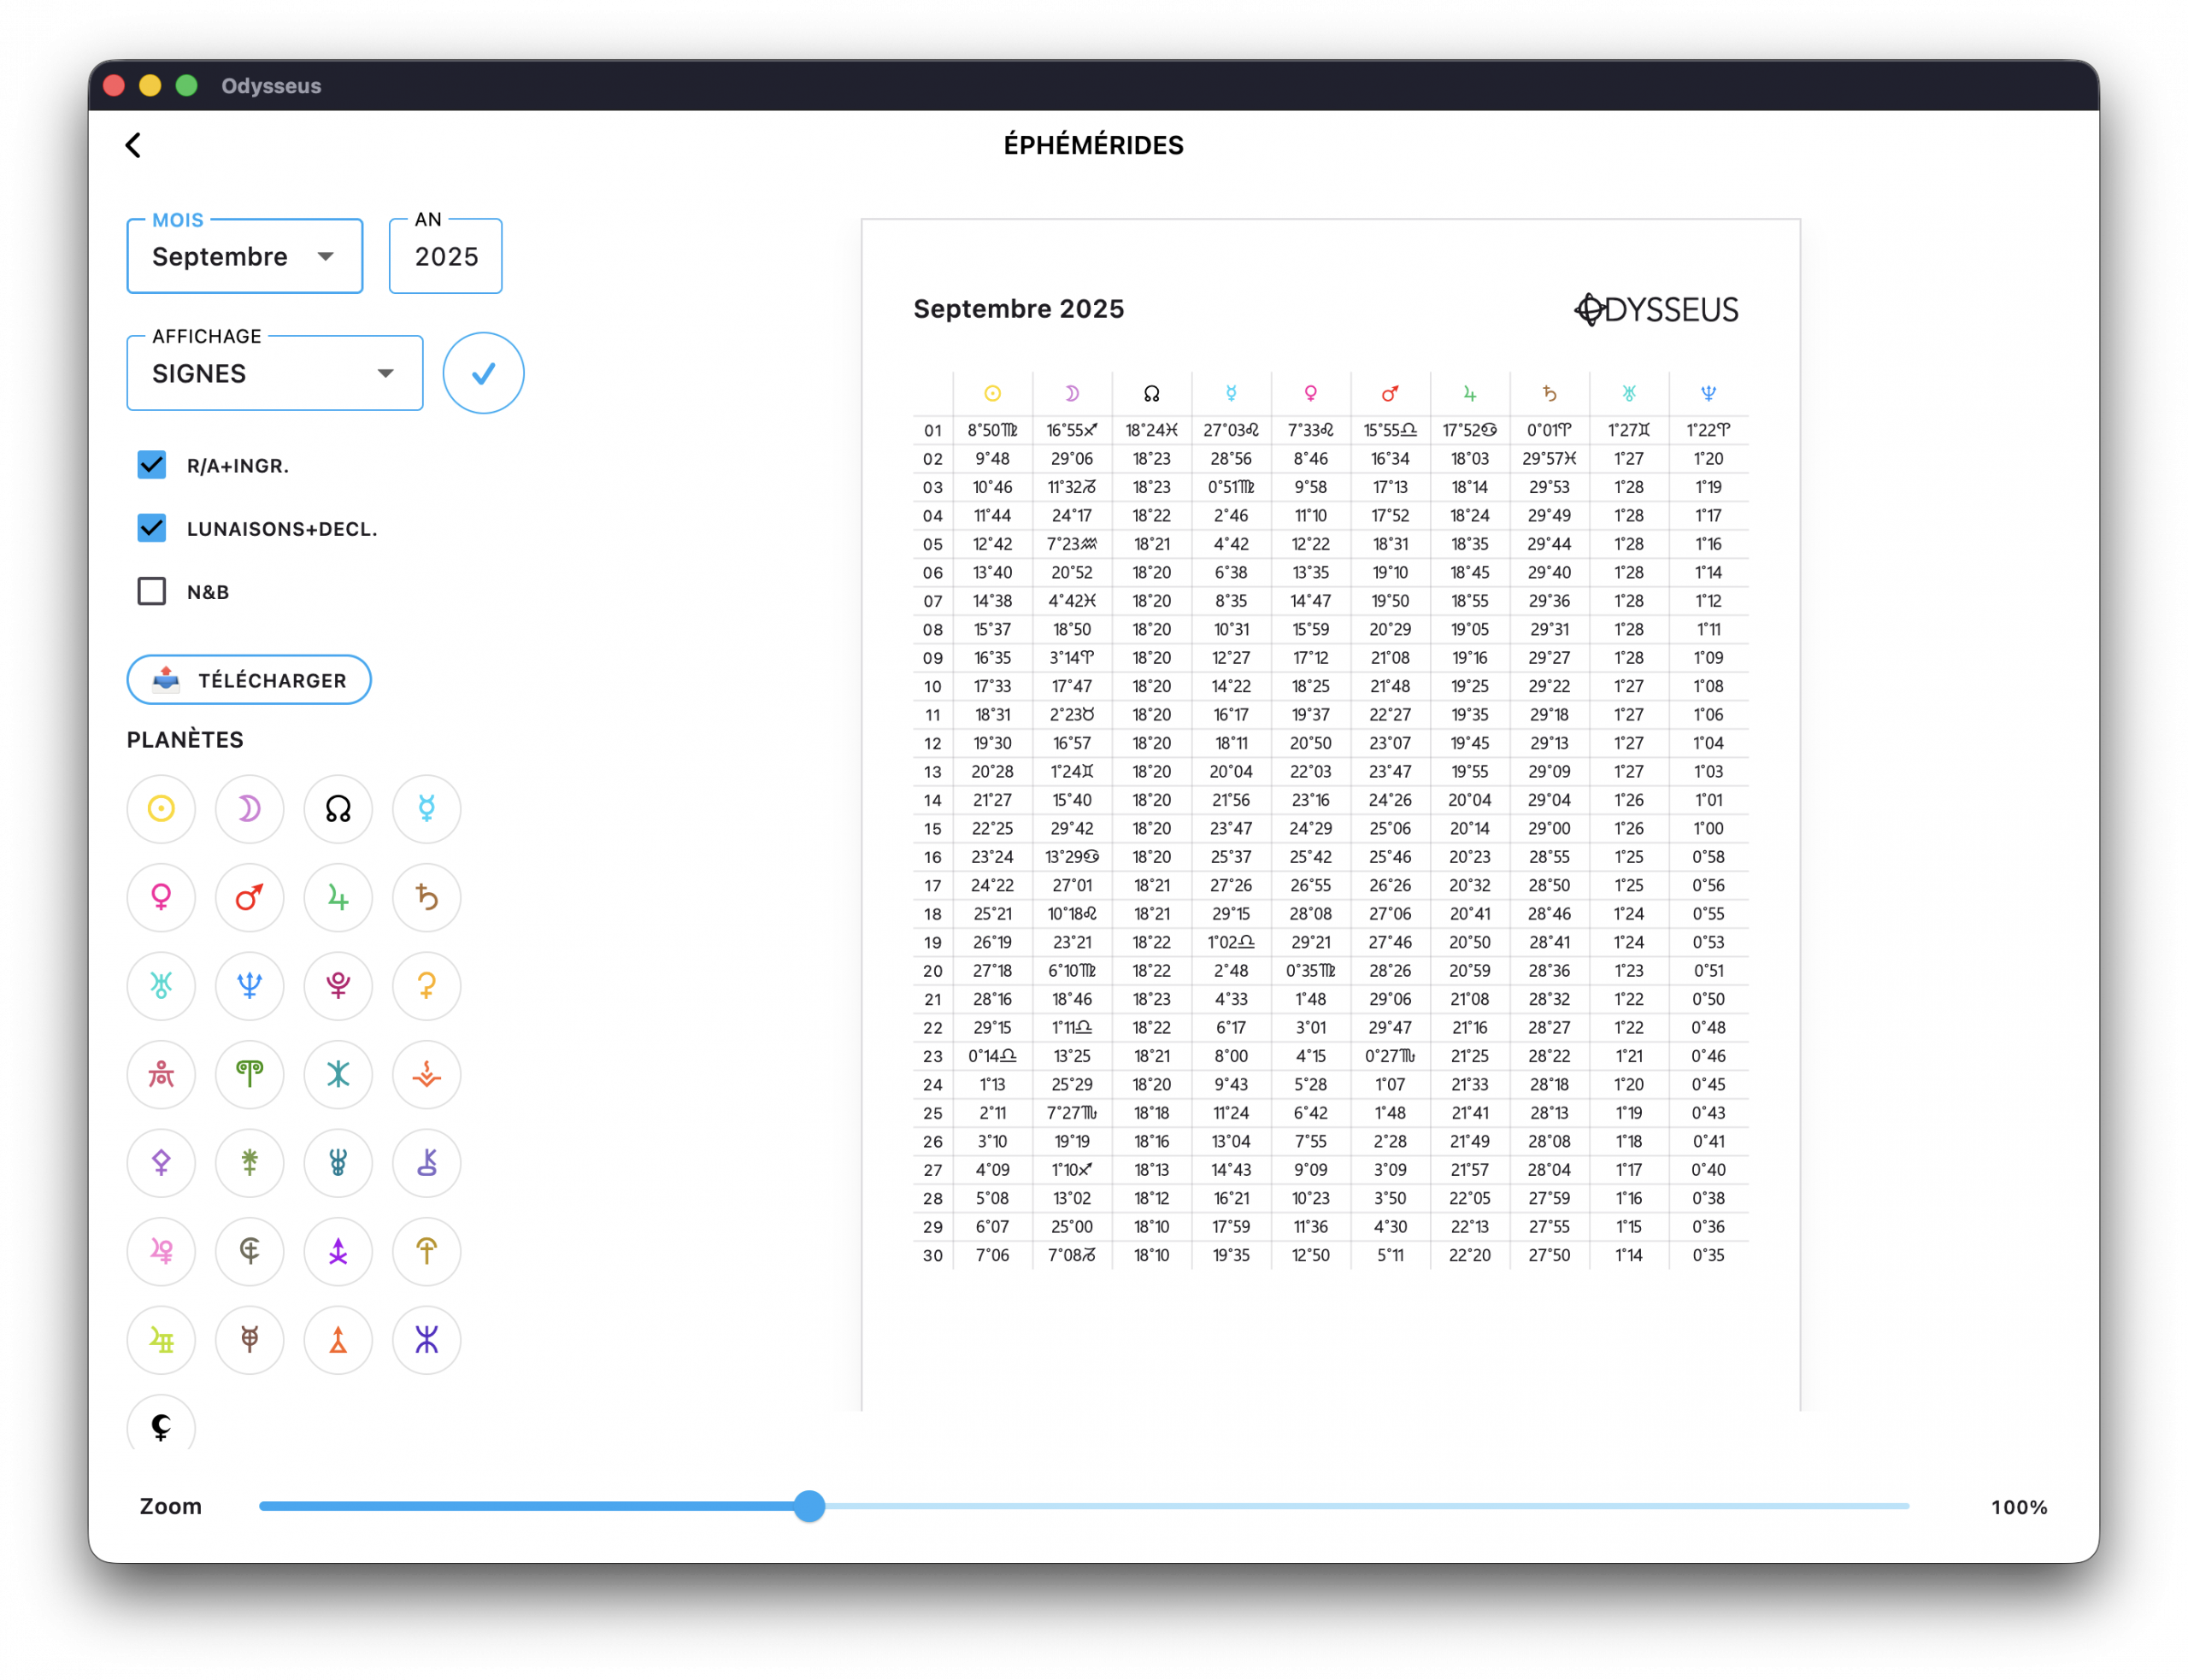
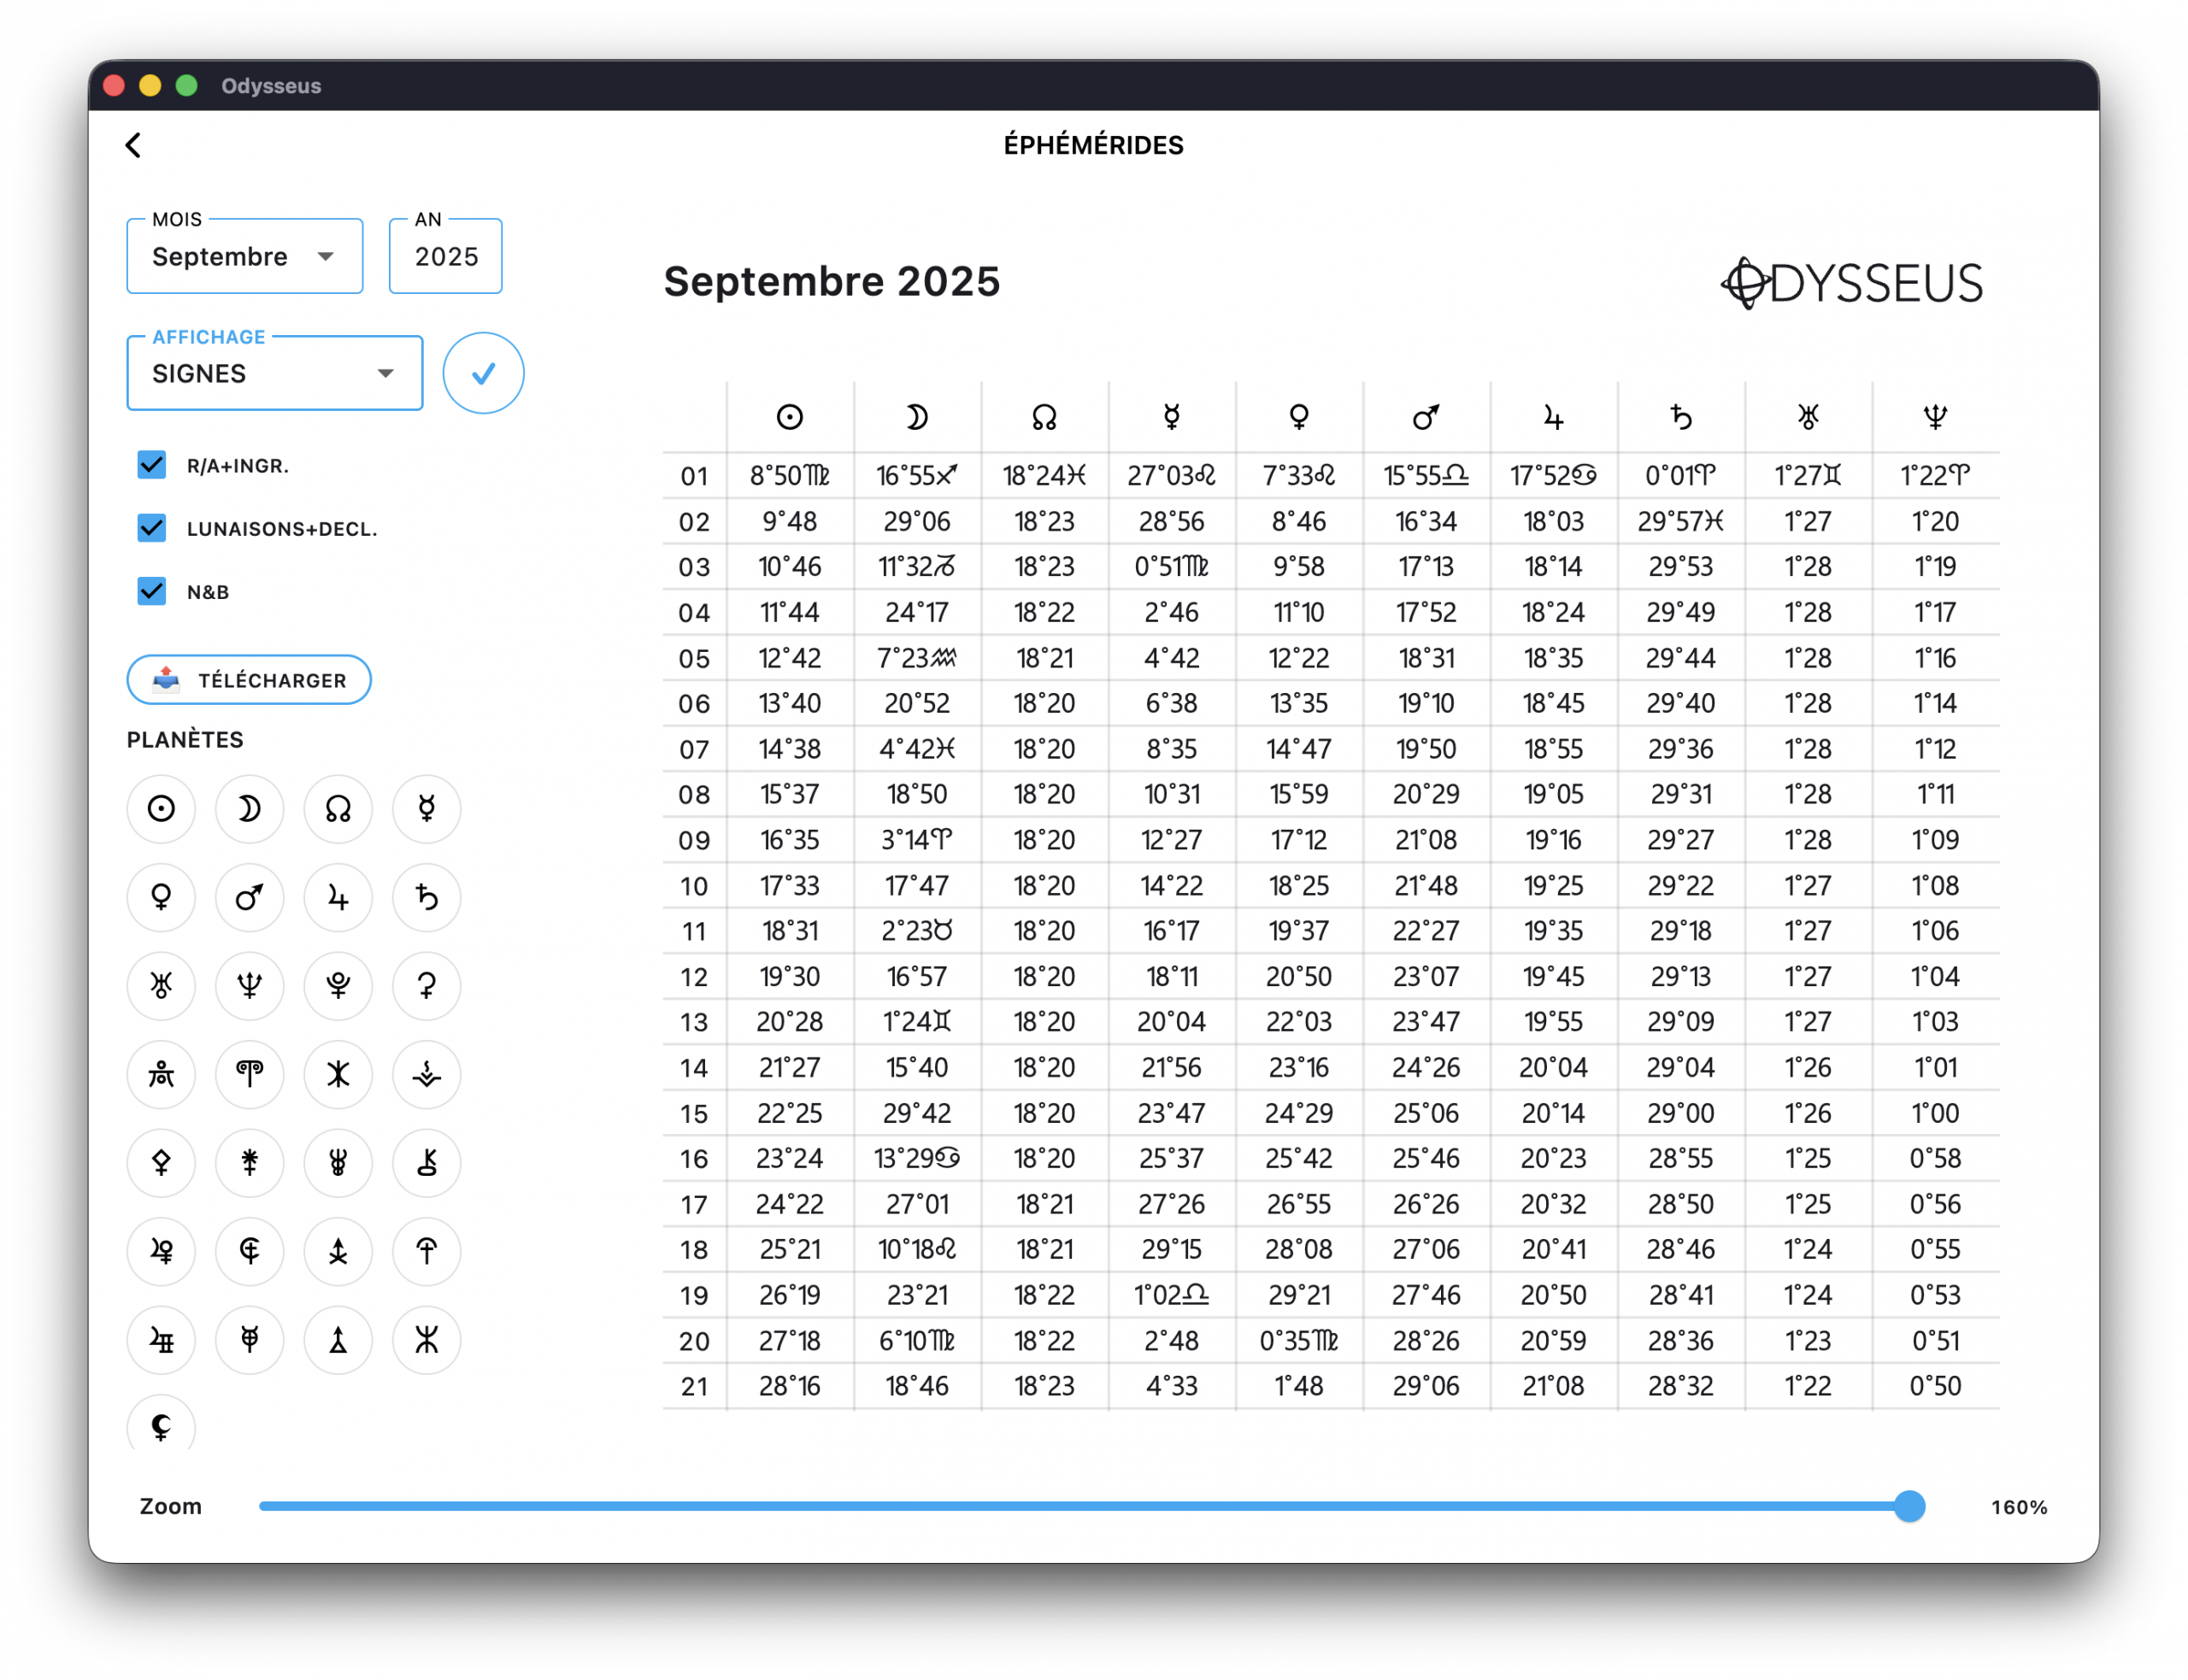
By default, the DISPLAY menu is set to SIGNS, which allows you to obtain the longitudes of the planets directly in the inhabited sign (ephemeris are all calculated for midnight at UTC+0).
But you can also select the display mode on 360º…

Or on 90º…
Or on 22º30:
You also have the possibility to pass the symbols of the planets in black with the B&W button…
And even zoom in using the slider at the bottom of the page (only on Mac/Windows):
Two additional pages are added by default. The first informs the dates of retrogradation and anterogradation (the dates may exceed the frame of the month defined in the ephemeris in order to give exhaustive date ranges), and on the right, the table of planetary ingress (therefore the date on which a planet enters a sign).
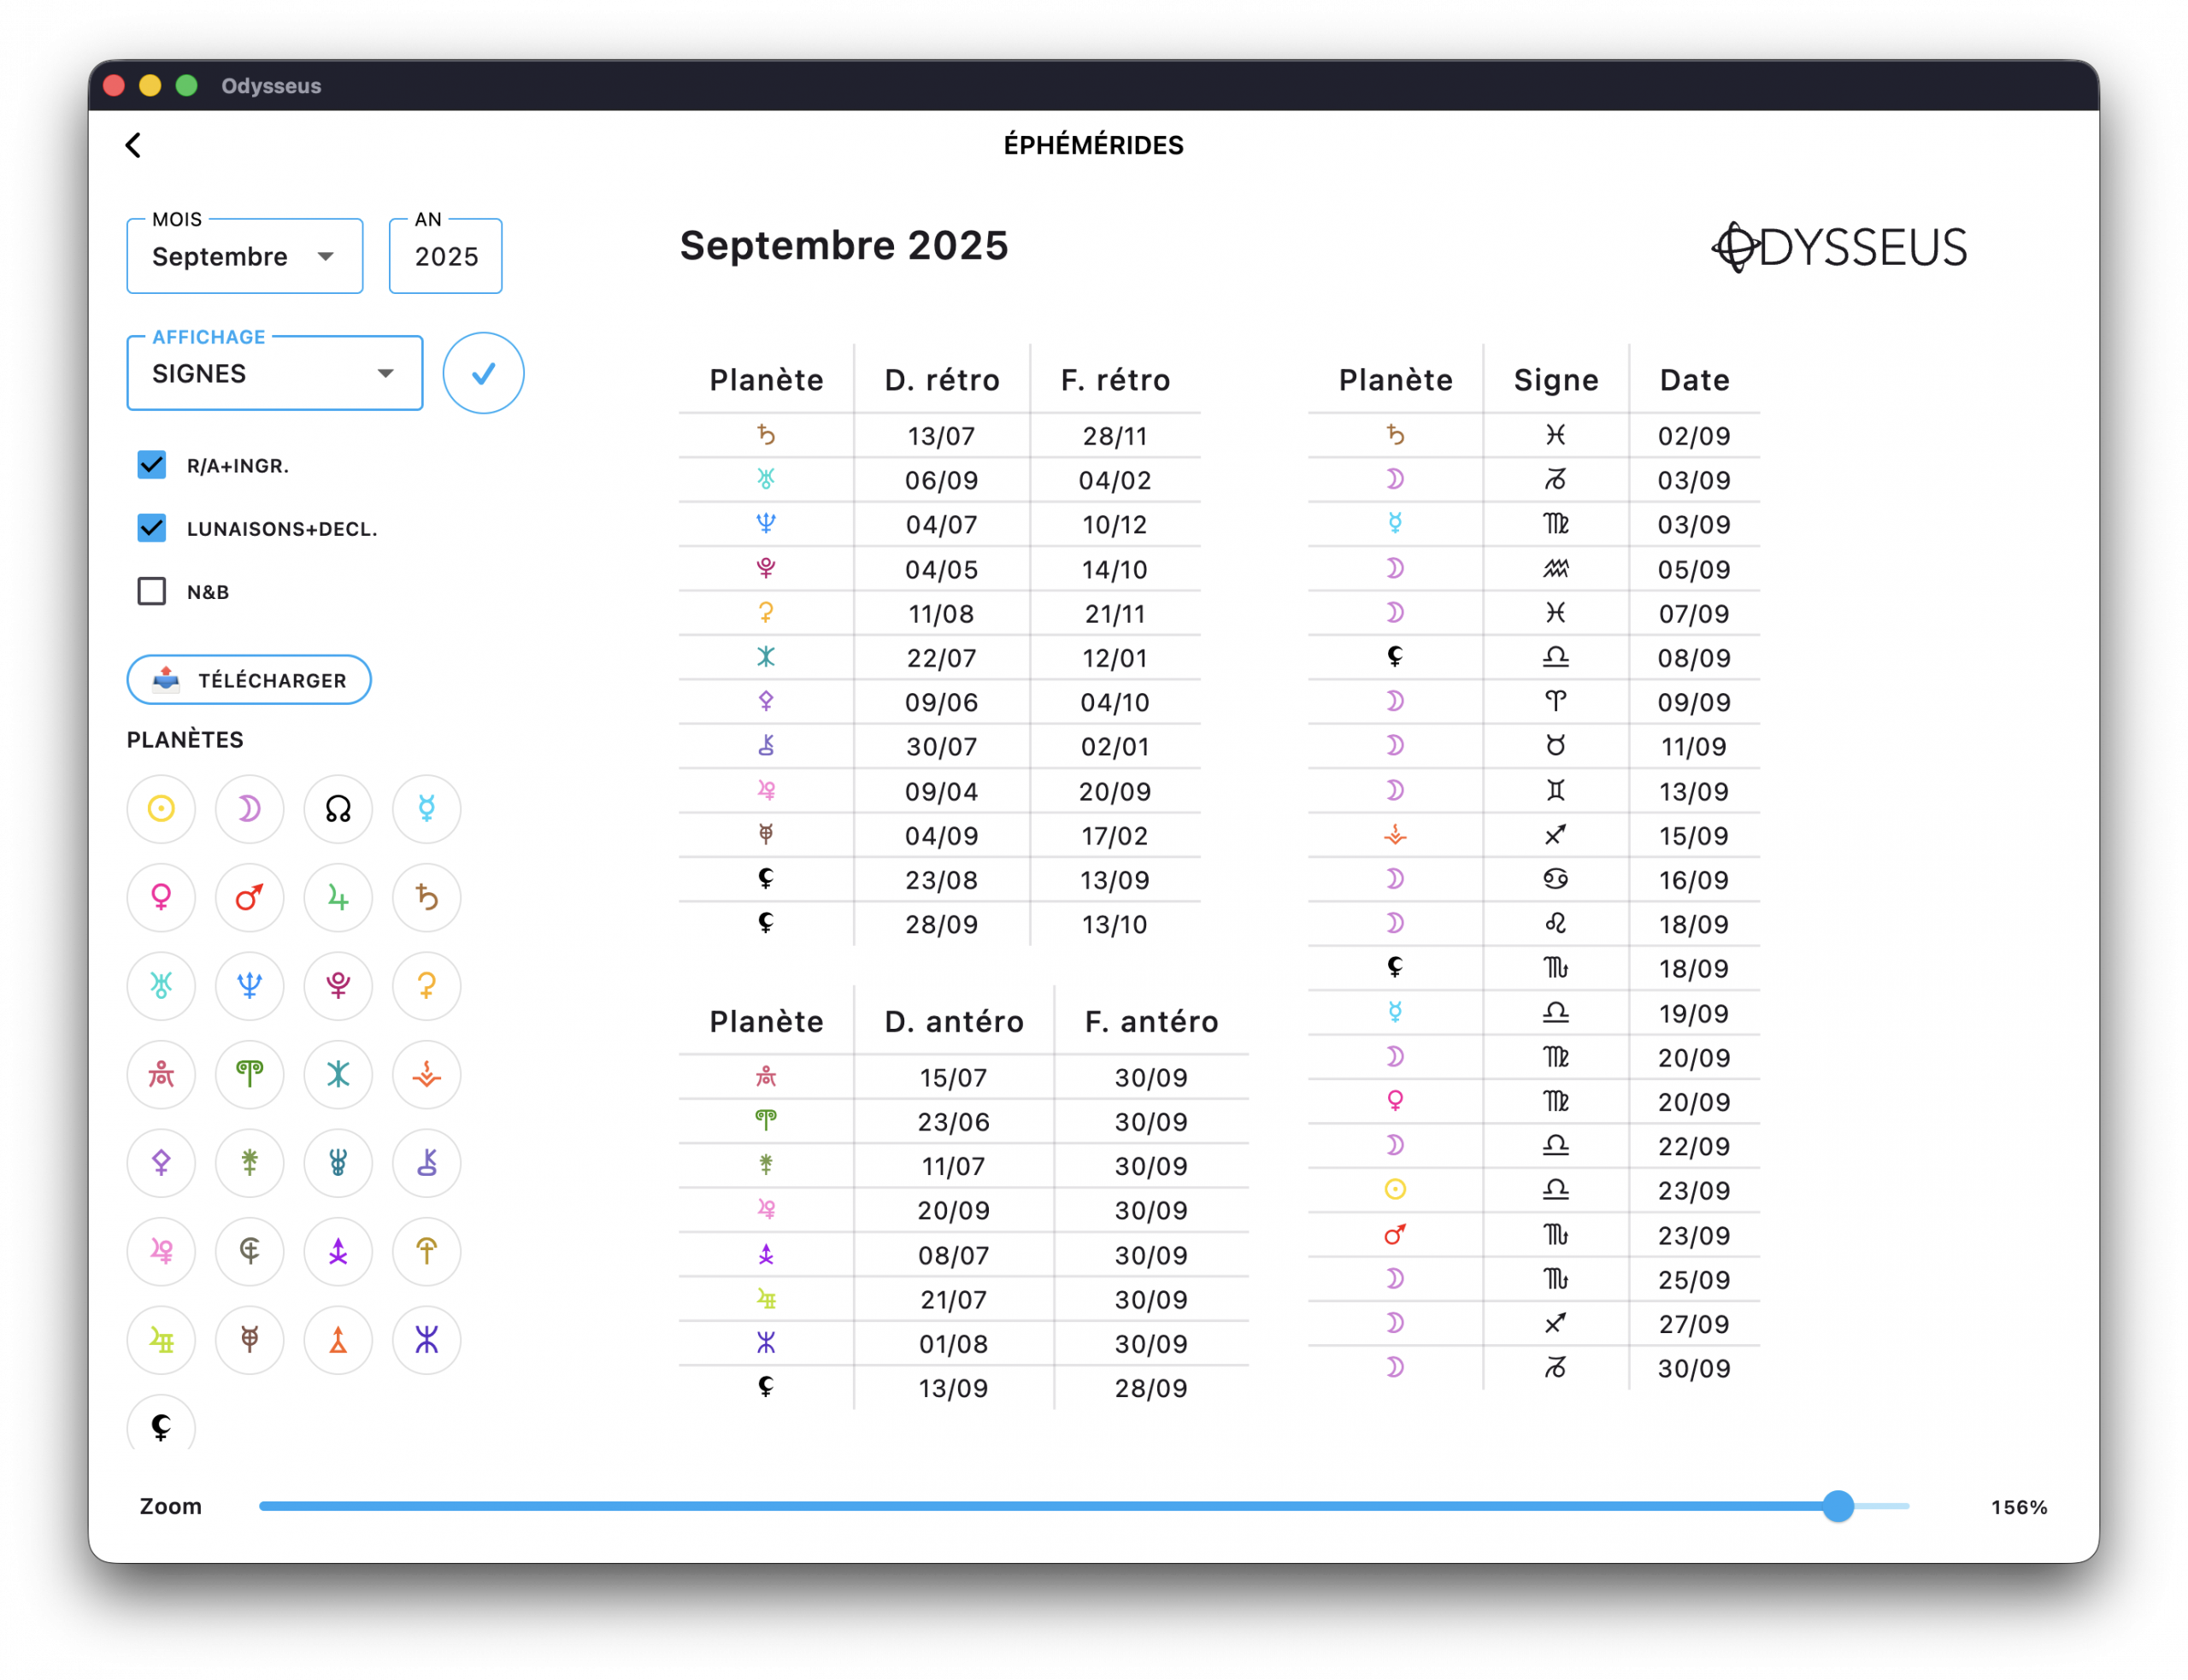
And on the last page, we find the table of the lunar phases (during the months when an eclipse will be held, a last column will be displayed revealing the nature of the eclipse, solar ‘ or lunar “). And also below, a table of the variations (for the planets of which we have this information… so not 8 hypotheses from the School of Hamburg, unfortunately).
You can check/uncheck the boxes to display or not these pages.
And a 📤 DOWNLOAD button will allow you to retrieve them in the format. PDF
GRAPHEMERIS 📊
By long-pressing the graph button 📊, you will access the “Graphemeris”, the graphical ephemeris generator for your chart:
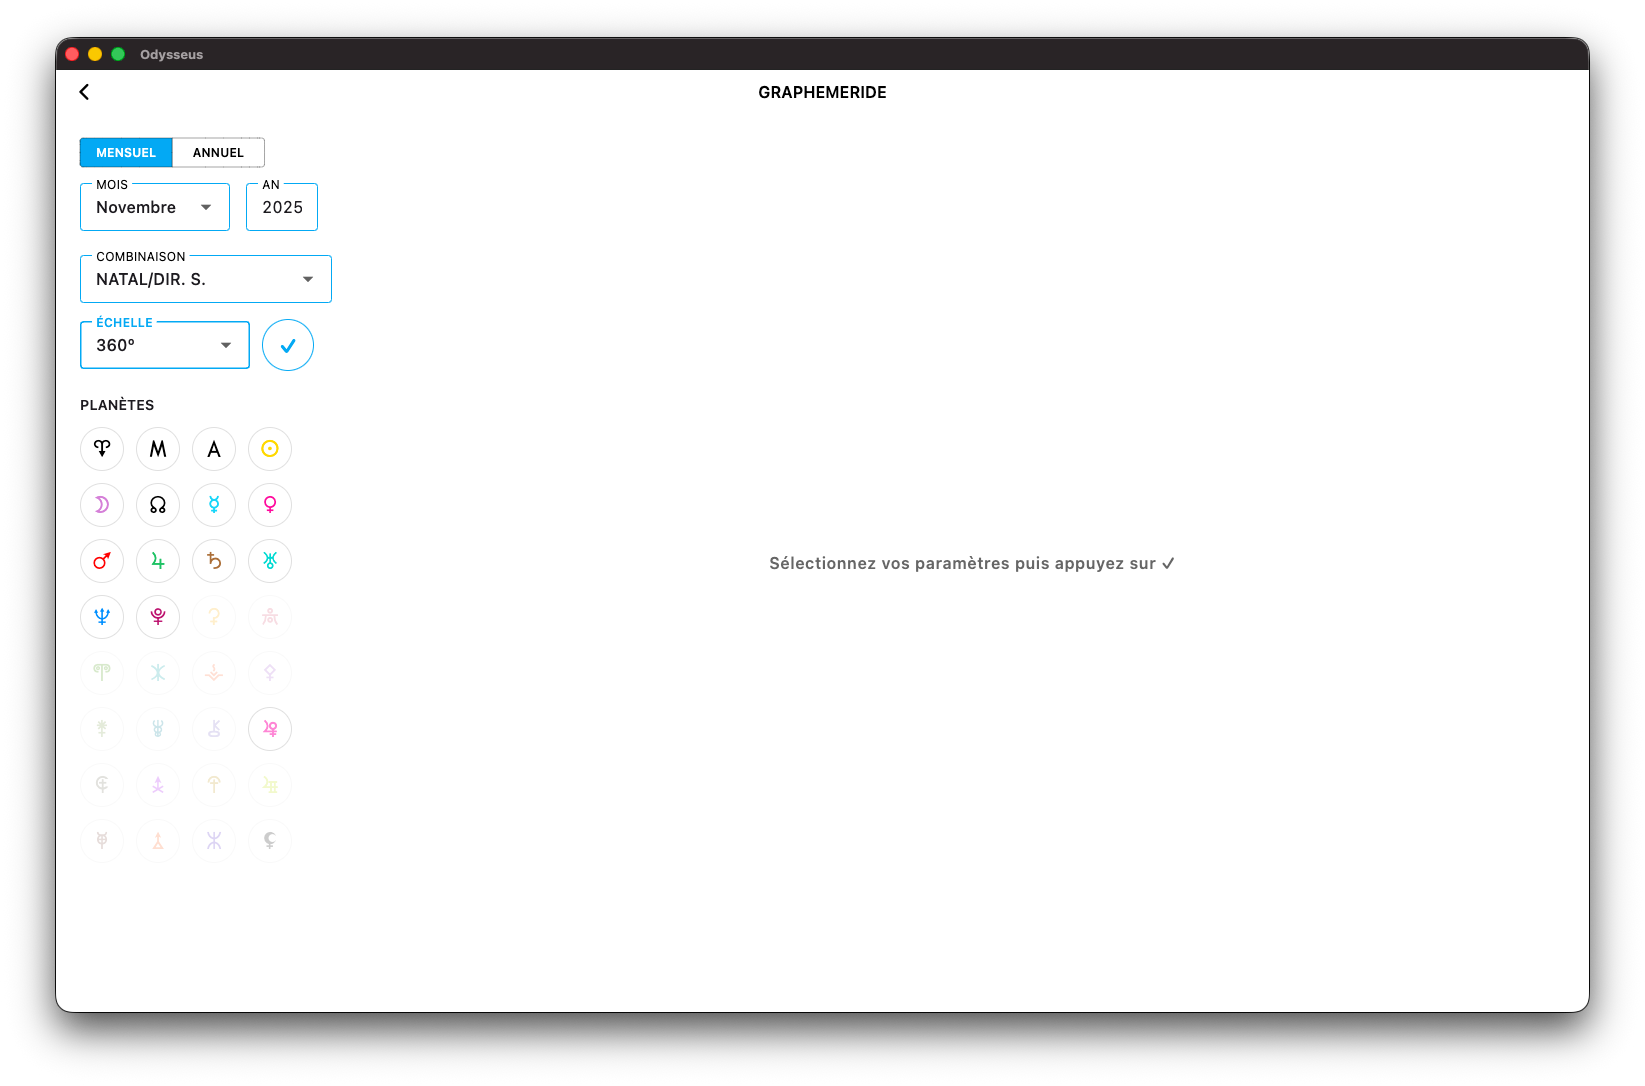
You can then choose its duration (monthly or yearly), the combinations with the 3 levels (including multiple directions), the scale (harmonic wheels), and the planets included.
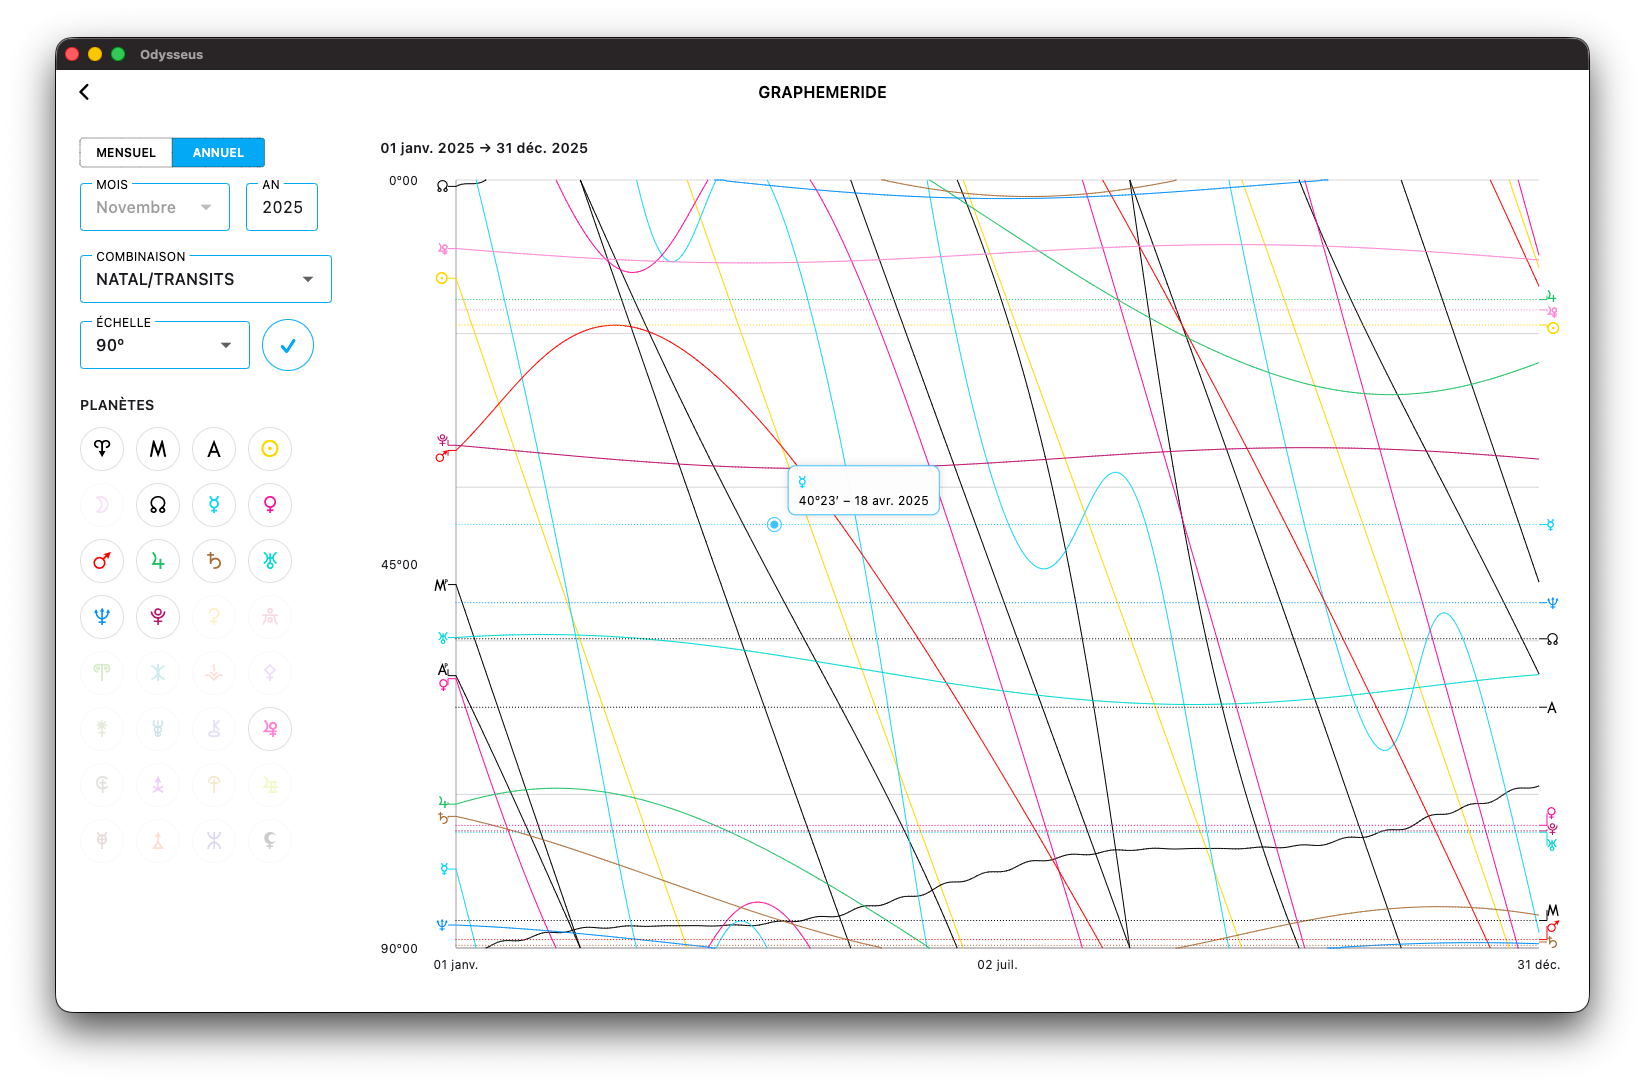
In the example above, this is a yearly graphical ephemeris for the year 2025, crossing natal lines with transit lines. On the right side you can see the symbols of the natal lines/planets, and on the left the symbols of the transit lines/planets.
When hovering the mouse over the curves, a tooltip will show you the date corresponding to your pointer location.
SETTINGS ⚙️
Open the Settings panel by clicking on the gear-shaped button ⚙️.
Inside, you can choose the planets to display, the level on which to display them (long press the button of each planet), their size, the colour and size of their connecters, but also the colour and size of the plots of the angles and midpoints, as well as some other parameters.
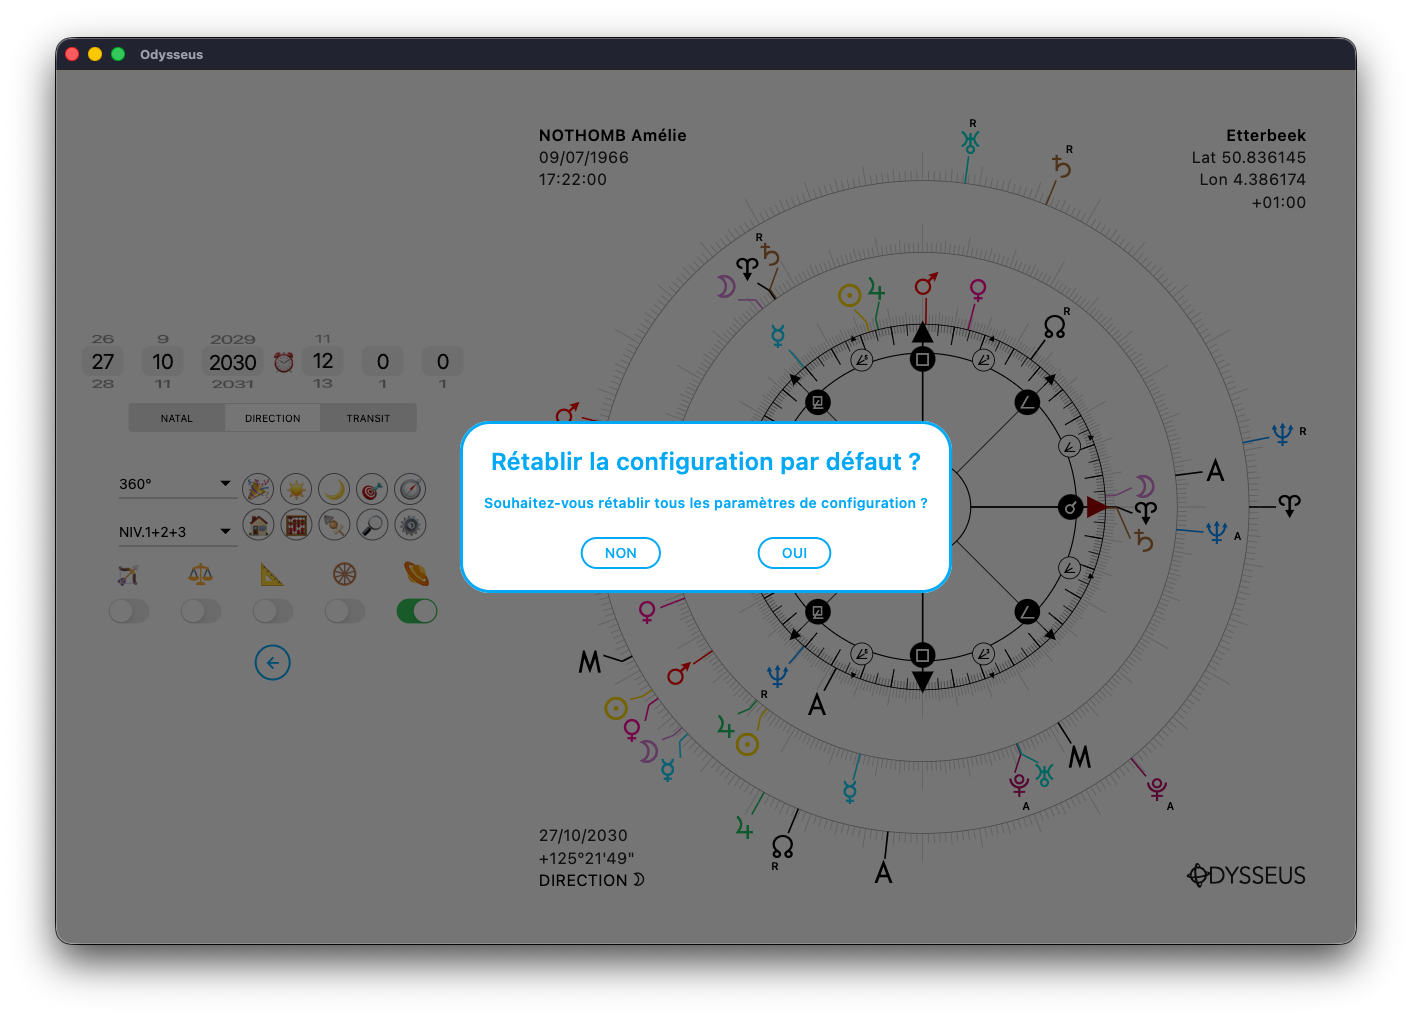
If you want to reset the default settings of the Settings panel, just long press the gear-shaped button ⚙️, and a window will offer you to reset everything. Be careful, if you have created personalised buttons (half-points, sensitive points, degrees), they will also be deleted.